Table of Contents
Advertisement
Quick Links
Advertisement
Table of Contents

Related Manuals for SUTO S217


Summary of Contents for SUTO S217
- Page 1 English Instruction and Operation Manual S217 Dew Point Transmitter...
- Page 2 The device is destined exclusively for the described application. SUTO offers no guarantee for the suitability for any other purpose. SUTO is also not liable for consequential damage resulting from the delivery, capability or use of this device.
-
Page 3: Table Of Contents
2 Registered Trademarks..............6 3 Application..................6 4 Features..................6 5 Technical Data................7 6 Dimensional Drawing..............8 7 Electrical Connection ..............9 8 Modbus Output (S217-8 and S217-9)...........10 8.1 Modbus Information.............10 8.2 Modbus Holding Register Table..........11 8.3 Interpretation of System Status..........12 9 Installation ................13 9.1 Installation Requirements............13 9.2 Installation Procedure ............14... -
Page 4: Safety Instructions
• Consider all regulations for electrical installations. • The system must be disconnected from any power supply during maintenance work. • Any electrical work on the system is only allowed by authorized qualified personal. S217... - Page 5 • Please make sure that the storage temperature of the transmitter is between -10 ... +50°C. • Avoid direct UV and solar radiation during storage. • For the storage the humidity must be <95% rH, no condensation. S217...
-
Page 6: Registered Trademarks
Registered trademark of the Modbus Organization, Hopkinton, USA 3 Application The SUTO Dew Point Transmitter S217-OEM provides reliable and long term stable dew point monitoring in industrial applications. The newly developed transmitter features improved signal and stability in demanding industrial applications. -
Page 7: Technical Data
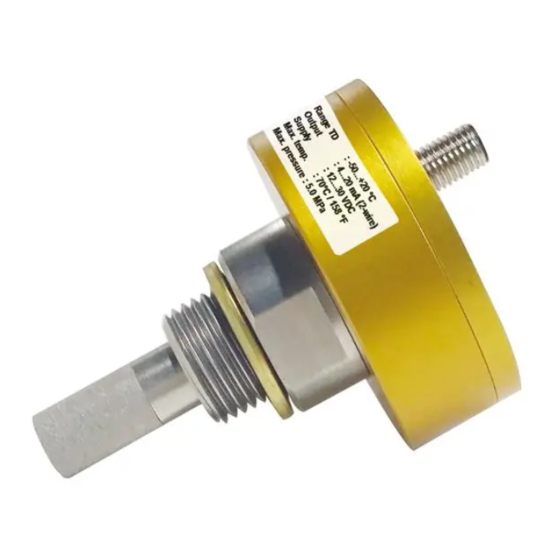
-40°C Td → -20°C Td: 20 seconds (@ 4 l/min) 0°C Td → -40°C Td: 120 seconds Output signal 4 ... 20 mA, 2-wire (S217-0 / S217-3 ) 4 ... 20 mA, 3-wire (S217-4 / S217-5) Modbus/RTU (S217-8 / S217-9) Cable M8 connector, 1.8 m, open wires, 4 poles... -
Page 8: Dimensional Drawing
6 Dimensional Drawing 6 Dimensional Drawing S217... -
Page 9: Electrical Connection
Pin 3 Pin 4 2-wire 3-wire Modbus/RTU Color Brown White Blue Black Legend for pin assignment Digital signal (Internal use only) Negative supply voltage Positive supply voltage 4 ... 20 mA (3-wire) Positive data Modbus Negative data Modbus Schemas S217... -
Page 10: Modbus Output (S217-8 And S217-9)
8 Modbus Output (S217-8 and S217-9) 8 Modbus Output (S217-8 and S217-9) 8.1 Modbus Information The default settings of the Modbus interface are as follows: Mode : RTU Baud rate : 19200 Device address : last two digits of serial number... -
Page 11: Modbus Holding Register Table
8 Modbus Output (S217-8 and S217-9) LSB refers to Least Significant Byte first, which follows the Little-Endian byte order. For example, if the main system follows the LSB first order: When the 4-byte floating number, in the order of Byte1-Byte0-Byte3-Byte2, is received from the slave (sensor), the master must change the byte order to Byte0-Byte1-Byte2-Byte3 for the correct display of the value. -
Page 12: Interpretation Of System Status
8 Modbus Output (S217-8 and S217-9) Modbus Data Channel Register Data type Unit Res.* Length description address atm,°Ftd atm INT16U 2 Byte Resolution of Humidity1 INT16U 2 Byte Status of Humidity1 FLOAT 4 Byte Humidity2 ASCII string 8 Byte Unit of (%,°Ctd,°Ftd... -
Page 13: Installation
Before installing the transmitter, please make sure that all components listed below are included in your package. Qty Description Item No. S217 Dew Point Transmitter Model specific (See section 9.4.) 2 m cable with M8 connector No P/N Instruction manual... -
Page 14: Installation Procedure
3. Connect the measuring chamber to the compressed air system using a quick connector. Make sure the Dew Point Transmitter is screwed on the chamber before connecting. The measuring chamber will create a purge flow. S217... -
Page 15: Install With By-Pass Measuring Chamber A699 3493
Note: The full flow must pass the measuring chamber. Ensure a certain flow rate to get fast response time. 2. Connect the outlet of the chamber to your system using the 6 mm hose quick connector. See figure below for details. S217... - Page 16 If there is no pressure difference between P1 and P2, there will be no flow through the chamber and therefore the response time will be very slow or the device will not even respond at all to the dew point changes. S217...
-
Page 17: Install Without Measuring Chamber
1/3 of the sensor tip is inside of the pipe. • The thread adapter (C190 0534) is used to adapt from G 1/2" sensor side to NPT 1/2" process connection. S217... -
Page 18: Remove The Dew Point Transmitter
9.4 Order Information Order no. Description S699 2170 S217-0, Dew Point Transmitter, 4 ... 20 mA (2-wire), -50 ... +20ºC Td, G 1/2” thread, 50 bar, M8 S699 2173 S217-3, Dew Point Transmitter, 4 ... 20 mA (2-wire), -20 ... -
Page 19: Calibration
The transmitter, the accessories and its packings must be disposed according to your local statutory requirements. The dispose can also be carried by the manufacturer of the product, for this please contact the manufacturer. S217... - Page 20 SUTO iTEC GmbH SUTO iTEC (ASIA) Co., Ltd. Grißheimer Weg 21 Room 10, 6/F, Block B, Cambridge Plaza D-79423 Heitersheim 188 San Wan Road, Sheung Shui, N.T. Germany Hong Kong Tel: +49 (0) 7634 50488 00 Tel: +852 2328 9782 Email: sales@suto-itec.com...
Need help?
Do you have a question about the S217 and is the answer not in the manual?
Questions and answers