
Related Manuals for PSSO CSA Series


Summary of Contents for PSSO CSA Series
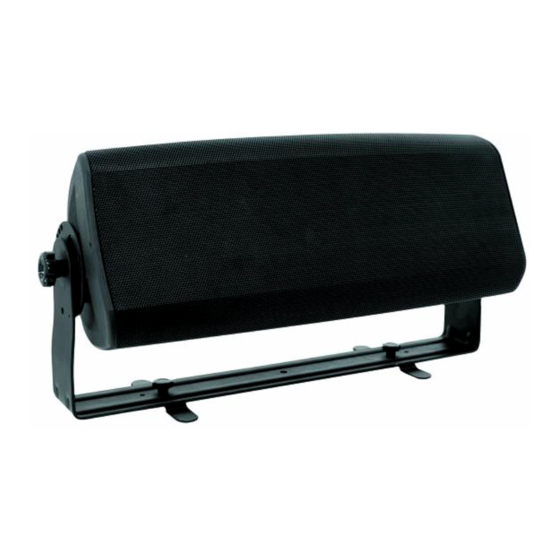
- Page 1 BEDIENUNGSANLEITUNG USER MANUAL CSA/CSK TOPS © Copyright Für weiteren Gebrauch aufbewahren! Nachdruck verboten! Keep this manual for future needs! Reproduction prohibited!
-
Page 2: Table Of Contents
This user manual is valid for the article number 11040804, 11040805, 11040806, 11040807 Das neueste Update dieser Bedienungsanleitung finden Sie im Internet unter: You can find the latest update of this user manual in the Internet under: www.psso.de 2/24 00042853.DOC, Version 1.0... -
Page 3: Einführung
- sich die letzte Version der Anleitung im Internet herunter laden EINFÜHRUNG Wir freuen uns, dass Sie sich für ein PSSO Topteil entschieden haben. Wenn Sie nachfolgende Hinweise beachten, sind wir sicher, dass Sie lange Zeit Freude an Ihrem Kauf haben werden. -
Page 4: Bestimmungsgemässe Verwendung
LEBENSGEFAHR! Eine herabstürzende Lautsprecherbox kann tödliche Unfälle verursachen. Alle Sicherheits- hinweise in dieser Bedienungsanleitung müssen unbedingt eingehalten werden. Bitte beachten Sie, dass Boxen durch Bassschläge und Vibrationen verrutschen können. Außerdem stellen unbeabsichtigte Stöße durch DJs, Musiker oder das Publikum ein erhöhtes Risiko dar. Deshalb muss die Box immer gegen Verrutschen gesichert oder der entsprechende Bereich abgesperrt werden. - Page 5 Vergewissern Sie sich vor der Montage, dass die Montagefläche mindestens die 5-fache Punktbelastung des Eigengewichtes der Installation aushalten kann (z. B. 20 kg Gewicht - 100 kg Punktbelastung). Die Montagehöhe der Lautsprecherbox darf ohne Absturzsicherung niemals 100 cm überschreiten. Bei Überkopfmontage (Montagehöhe >100 cm) muss die Lautsprecherbox immer mit einer Absturzsicherung (Sicherheitsfangseil) gesichert werden.
-
Page 6: Installation
INSTALLATION Aufstellung und Montage Die Lautsprecherbox kann frei im Raum aufgestellt werden. Der Untergrund muss fest, eben, rutschfest, erschütterungsfrei, schwingungsfrei und feuerfest sein. Die Montagefläche muss mindestens die 5-fache Punktbelastung des Eigengewichtes der Installation aushalten (z.B. 20 kg Gewicht - 100 kg Punktbelastung). Soll die Lautsprecherbox als Wandlautsprecher genutzt werden, kann Sie über ihren Montagebügel an der Wand festgeschraubt werden. -
Page 7: Einsatz Als Bodenmonitor
Vorgehensweise: Schritt 1: Entfernen Sie zur Besseren Handhabung zunächst den Montagebügel. Schrauben Sie dazu die Montageschrauben heraus. Schritt 2: Halten Sie den Montagebügel an die Stelle, wo die Lautsprecherbox installiert werden soll. Schritt 3: Am Montagebügel befinden sich Löcher zur Installation. Markieren Sie Ihre Bohrlöcher mit einem Bleistift oder einem geeigneten Werkzeug und bohren Sie die Löcher. -
Page 8: Satellitensysteme
Satellitensysteme Wird eine Lautsprecherbox mit Einbauflansch auf eine Bassbox montiert, spricht man von einem Satelliten- system. Dabei muss jedoch unbedingt sichergestellt werden, dass das Satellitensystem über eine ausreichende Standfestigkeit verfügt. Die Grundfläche der Bassbox muss in Bezug auf das montierte Topteil immer ausreichend dimensioniert sein, damit ein Umstürzen verhindert wird. -
Page 9: Montage Auf Einem Stativ Bzw. Boxenhochständer
Montage auf einem Stativ bzw. Boxenhochständer Die Lautsprecherbox darf nur auf ein Stativ bzw. einen Boxenhochständer montiert werden, wenn sie im Lieferzustand über eine entsprechende Aufnahmevorrichtung verfügt. Stative oder Satellitensysteme dürfen nur auf einer ebenen Fläche mit maximal 5° Neigung aufgestellt werden. -
Page 10: Fliegende Installation
Installation der Lautsprecherbox Achtung: Beim Aufbringen der Last ist eine gleichmäßige Lastverteilung erforderlich. Achtung: Die Traglast des Stativs bzw. Boxenhochständers darf niemals überschritten werden! Setzen Sie die Lautsprecherbox über den Anbauflansch auf den Boxenhochständer bzw. über den TV- Zapfen auf das Stativ auf. Achten Sie darauf, dass die maximale Auszugslänge des Rohres nicht überschritten wird. -
Page 11: Anschlüsse Herstellen
Anschlüsse herstellen CSK-228, CSA-218, CSA-228: Ihre Lautsprecherbox ist mit 4-poligen, verriegelbaren Speaker-Buchsen ausgestattet. Diese sind parallel verdrahtet. Sie können die Eingangsbuchse mit dem Ausgang Ihrer Endstufe verbinden und über die Ausgangsbuchse das Endstufensignal abgreifen, um es z.B. in eine weitere Lautsprecherbox einzuspeisen. Schalten Sie die PA-Analage vor dem Anschluss bzw. -
Page 12: Bedienung
BEDIENUNG Nachdem Sie Ihren Verstärker angeschlossen haben, drehen Sie die Lautstärkeregler gegen den Uhrzeigersinn bis zum Anschlag zurück. Schalten Sie erst alle Vorstufen und dann die Endstufe ein. Stellen Sie nun die gewünschte Lautstärke mit den Lautstärkereglern ein. Achtung! Achten Sie darauf, dass das Ausgangssignal nicht verzerrt, Ihre Lautsprecher können dadurch beschädigt werden. -
Page 13: Technische Daten
TECHNISCHE DATEN CSA-228 CSK-228 Belastbarkeit nominal: 300 W RMS 200 W RMS Belastbarkeit Programm: 600 W 400 W Komponenten: 2 x 8" Woofer, 1 x 1,33" Treiber 2 x 8" Woofer, 1 x 1" Tweeter Anschlüsse: 2 x Speaker-Buchse (4-pol) 2 x Speaker-Buchse (4-pol) Anschlüsse (1 W/m): 95 dB... -
Page 14: Introduction
- download the latest version of the user manual from the Internet INTRODUCTION Thank you for having chosen a PSSO top. If you follow the instructions given in this manual, we are sure that you will enjoy this device for a long period of time. -
Page 15: Operating Determinations
DANGER TO LIFE! A crashing speaker system can cause deadly accidents. All safety instructions given in this manual must be observed. Please note that speaker systems could move due to bass-beats and vibrations. Furthermore, unintended pushes from DJs, musicians or the audience present further risk. This is why the speaker system must always be secured against moving or the respective area has to be blocked. - Page 16 The speaker system must never be installed higher than 100 cm without secondary attachment. DANGER! This speaker system must never be installed on a wall-mounting because the secondary attachment cannot be fixed. Speaker systems may only be installed on top of other speaker systems if the systems are protected against slipping and flipping over (e.g.
-
Page 17: Installation
INSTALLATION Setting up and mounting The speaker system can be set up as desired. The location must be solid, plane, anti-slip, vibration-free, oscilation-free, and fire-resistant. The installation area must hold a minimum point load of 5 times the system's load (e.g. weight 20 kg - point load 100 kg). For using the speaker system as wall speaker it can be fastened to the wall via the mounting bracket. -
Page 18: Installation As Floor Monitor
Procedure: Step 1: For better handling, remove the mounting bracket first. For this purpose screw off the mounting screws. Step 2: Hold the mounting bracket onto the location where the speaker system is to be installed. Step 3: On the mounting bracket, are installation holes. Mark the boreholes with a pen or a suitable tool and drill the holes. -
Page 19: Satellite Systems
Satellite systems A satellite system is a system where a speaker system with flange is installed on top of a subwoofer. The satellite system must always provide enough stability. The subwoofer's base surface must always be sufficiently dimensioned in relation to the top speaker in order to prevent tilting over. The subwoofer and the top speaker must only be connected via an appropriate distance tube and flange. -
Page 20: Installation On A Stand Or Speaker Stand
Installation on a stand or speaker stand The speaker system may only be installed on a stand or speaker stand if the original speaker system is equipped with an appropriate flange. Stands or satellite systems must only be installed on a plane area with a maximum inclination angle of 5°. Caution: Speaker systems installed on stands or satellite systems may cause severe injuries when crashing! When using stands or satellite systems under the influence of horizontal forces, e.g. -
Page 21: Suspended Installation
Installation of the speaker system Caution: The loads have to be installed in a balanced way. Caution: The carrying capacity of the stand or speaker stand must never be exceeded! Install the speaker system via the flange on the speaker stand or via the TV-pin on the stand. Make sure that the maximum lifting height of the tube is never exceeded. -
Page 22: Making The Connections
Making the connections CSK-228, CSA-218, CSA-228: Your speaker system is equipped with 4-pole, lockable Speaker sockets that are wired in parallel. You can connect the input socket to the output on your power amplifier and tap into the signal from the amplifier on the output connector, e.g. -
Page 23: Operation
OPERATION After having connected your amplifier to the mains, turn all level controls counterclockwise to the minimum position. The last device to be switched on is the amplifier. Now adjust the volume with the level controls. Caution! Always make sure that the output signal is not distorted and that your speakers will not get damaged. -
Page 24: Technical Specifications
TECHNICAL SPECIFICATIONS CSA-228 CSK-228 Rated power: 300 W RMS 200 W RMS Program power: 600 W 400 W Components: 2 x 8" woofer, 1 x 1.33" driver 2 x 8" woofer, 1 x 1" tweeter Connections: 2 Speaker sockets (4-pin) 2 Speaker sockets (4-pin) Sensitivity (1 W/m): 95 dB...
Need help?
Do you have a question about the CSA Series and is the answer not in the manual?
Questions and answers