Table of Contents
Advertisement
Available languages
Available languages
Quick Links
H-3532, H-3534
BOSTITCH
®
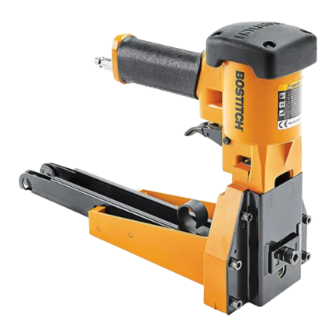
PNEUMATIC STAPLER
Employer and/or user must ensure that
proper eye protection is worn. Eye protection
equipment must conform to requirements
of the American National Standards Institute
ANSI Z87.1 and provide both frontal and side
protection.
Eye protection which conforms to ANSI
specifications and provides protection against
flying particles from both the FRONT and the
SIDES should always be worn by the operator
and others in the work area when connecting
to air supply, loading, operating or servicing
this stapler. Eye protection is required to guard
against flying fasteners debris which could
cause severe eye injury.
WARNING! Non-side shielded spectacles
and face shields do not provide adequate
protection.
• Use the Bostitch
pneumatic stapler only for the
®
purpose for which it was designed.
• Never use this stapler in a manner that could cause
a fastener to be directed toward the user or others
in the work area.
• Do not use the stapler as a hammer.
• Always carry the stapler by the handle. Never carry
the stapler by the air hose.
• Do not alter or modify this stapler from the original
design or function without approval from Bostitch
Inc.
• Always be aware that misuse and improper
handling of this stapler can cause injury to yourself
and others.
• Never leave unattended with the air hose attached.
• Do not operate this stapler if it does not have a
legible WARNING LABEL.
PAGE 1 OF 19
1-800-295-5510
uline.com
SAFETY
• Do not continue to use a stapler that leaks air
or does not function properly. Notify Uline if
your stapler continues to experience functional
problems.
• Always handle the stapler with care
• Never engage in horseplay.
• Never pull the trigger unless nose is directed
toward the work.
• Keep others at a safe distance from the stapler
while in operation as accidental actuation may
occur, possibly causing injury.
• Keep hands and body away from the discharge
area of the stapler.
• Do not drive fasteners on top of other fasteners or
with the stapler at an overly steep angle as this
may cause deflection of fasteners which could
cause injury.
• This stapler produces SPARKS during operation.
NEVER use the stapler near flammable substances,
gases or vapors including lacquer, paint, benzene,
thinner, gasoline, adhesives, mastics, glues or
any other material that is – or vapors which are –
flammable, combustible or explosive. Using the
stapler in any such environment could cause an
EXPLOSION resulting in personal injury or death to
user and bystanders.
• Remove all fasteners from the stapler before
performing stapler operation check.
• Do not use oxygen, combustible gases or bottled
gases as a power source for this stapler, as the
stapler may explode, possibly causing injury.
• Do not use supply sources which can potentially
exceed 200 psig as stapler may burst, possibly
causing injury.
Para Español, vea páginas 7-13.
Pour le français, consulter les pages 14-19.
0923 IH-3532
Advertisement
Table of Contents

Related Manuals for U-Line BOSTITCH H-3532


Summary of Contents for U-Line BOSTITCH H-3532
- Page 1 Para Español, vea páginas 7-13. Pour le français, consulter les pages 14-19. H-3532, H-3534 1-800-295-5510 uline.com BOSTITCH ® PNEUMATIC STAPLER SAFETY Employer and/or user must ensure that • Do not continue to use a stapler that leaks air proper eye protection is worn. Eye protection or does not function properly.
-
Page 2: Loading The Magazine
SAFETY CONTINUED • The connector on the stapler must not hold STOP: Always disconnect air supply: pressure when air supply is disconnected. If a • Before making adjustments; wrong fitting is used, the stapler can remain • When servicing the stapler; charged with air after disconnecting and thus will •... -
Page 3: Operation
INSTRUCTIONS CONTINUED OPERATION 6. Clinch Adjustment – Turn special nut clockwise to tighten clinch and counterclockwise to loosen clinch. TRIGGER-OPERATED STAPLER Use a tool to fit 1/8" (3 mm) hole. (See Figure 5) NOTE: Remove adjusting tool after adjustment. a. With finger off the trigger, hold the stapler with a firm grip on the handle. -
Page 4: Maintenance
INSTRUCTIONS CONTINUED REMOVING STUCK STAPLES Remove magazine. (See Figure 9) WARNING! Always disconnect air supply before removing stuck stapels Remove the remaining stick from the magazine. Pry jam release forward with a screwdriver. (See Figure 8) Figure 9 2. Clear the jam and reinsert the magazine. Pry jam release shut. -
Page 5: Specifications
SPECIFICATIONS STAPLER SPECIFICATIONS STAPLE ULINE PART NO. MFG. PART NO. LENGTH HEIGHT WIDTH WEIGHT CAPACITY H-3532 DS-3219 12.6" (320 mm) 8.86" (225 mm) 4.5" (115 mm) 5.45 lbs. (2.45 kg) H-3534 DS-3522 12.6" (320 mm) 8.86" (225 mm) 4.5" (115 mm) 5.45 lbs. -
Page 6: Troubleshooting
TROUBLESHOOTING OPERATING ISSUE CAUSES RECOMMENDATIONS Trigger valve housing leaks air O-Ring cut or cracked Replace O-Ring Trigger valve stem leaks air O-Ring/seals cut or cracked Replace trigger valve assembly Frame/piston rod leaks air O-Ring Replace O-Ring Frame/cap leaks air Damaged O-Ring Replace O-Ring Loose cap screws Tighten and recheck... - Page 7 H-3532, H-3534 800-295-5510 uline.mx BOSTITCH ® ENGRAPADORA NEUMÁTICA SEGURIDAD ¡ADVERTENCIA! El operador y las demás • Esta engrapadora produce CHISPAS durante la personas en el área de trabajo siempre operación. NUNCA utilice la engrapadora cerca de deben utilizar protección ocular que se ajuste sustancias, gases o vapores inflamables, incluyendo a las especificaciones ANSI y proporcione laca, pintura, bencina, diluyente, gasolina,...
- Page 8 CONTINUACION DE SEGURIDAD • Nunca use esta engrapadora de tal modo que • No opere esta engrapadora si no cuenta con pueda causar la salida de una grapa hacia el una ETIQUETA DE ADVERTENCIA legible. usuario u otras personas presentes en el área de •...
- Page 9 CONTINUACIÓN DE FUNCIONAMIENTO b. Para cambiar los remachadores superficiales 6. Ajuste del remache: Gire la tuerca especial en el sentido de las agujas del reloj para apretar el (consulte el gráfico de partes para ver los remache y gírela en el sentido contrario de las números de las mismas) retire los pernos agujas del reloj para aflojarlo.
- Page 10 CONTINUACIÓN DE FUNCIONAMIENTO OPERACIÓN RETIRE GRAPAS ATASCADAS ENGRAPADORAS CON GATILLO ¡ADVERTENCIA! Siempre desconecte el suministro de aire: a. Con el dedo fuera del gatillo, sostenga la 1. Al hacer mantenimiento a la engrapadora; engrapadora firmemente por el mango. 2. Al eliminar el atasco; 3.
-
Page 11: Mantenimiento
MANTENIMIENTO SUMINISTRO DE AIRE - PRESIÓN ¡ADVERTENCIA! Recuerde las advertencias en este manual al trabajar con herramientas Y VOLUMEN neumáticas y tenga mayor cuidado al evaluar herramientas problemáticas. • El volumen de aire es tan importante como la presión. El volumen de aire suministrado a la PARTES DE REPUESTO engrapadora puede ser inadecuado debido a conectores y mangueras de tamaño inferior... -
Page 12: Solución De Problemas
CONTINUACIÓN DE ESPECIFICACIONES GRÁFICO DE PARTES/GRAPAS MODELO H-3532/H-3534 H-3534 ESTÁNDAR/PLANO DE PROFUNDIDAD REMACHADORES A01900601(M.I.) A01900501(M.D.) A01200601(M.D.) A01200601(M.I.) SEPARADORES A02300801 A02300801 — — LARGO " " " " 16 mm (5/8 19 mm (3/4 19 mm (3/4 22 mm (7/8 DE GRAPAS POSICIÓN DEL SELECTOR CONECTOR DE AIRE DE LA ENGRAPADORA... - Page 13 CONTINUACIÓN DE SOLUCIÓN DE PROBLEMAS PROBLEMA DE OPERACIÓN CAUSAS RECOMENDACIONES Falta de potencia; ciclo lento Herramienta seca, le falta lubricación Use lubricante Bostitch para herramientas neumáticas Anillos-o/sellos rotos o agrietados Remplace los anillos-o/sellos Escape bloqueado Revise el tope, el resorte de la válvula cabezal Ensamble del gatillo desgastado/con Remplace el ensamble de disparo...
- Page 14 H-3532, H-3534 1-800-295-5510 uline.ca BOSTICH - AGRAFEUSE PNEUMATIQUE SÉCURITÉ AVERTISSEMENT! Une protection oculaire qui • Le raccord installé sur l'agrafeuse ne doit retenir satisfait à la spécification ANSI et qui protège les aucune pression après la déconnexion de yeux contre les particules projetées à la fois de l'alimentation d'air.
- Page 15 SÉCURITÉ SUITE • Si l'agrafeuse n'est pas munie d'une ÉTIQUETTE DE • Retirez toutes les agrafes de l'agrafeuse avant SÉCURITÉ lisible, ne l'utilisez pas. d'exécuter le contrôle de fonctionnement de l'outil. • Cessez immédiatement d'utiliser une agrafeuse • N'alimentez pas cette agrafeuse avec de qui présente une fuite d'air ou qui ne fonctionne l'oxygène, du gaz combustible ou du gaz pas correctement.
- Page 16 INSTRUCTIONS SUITE 4. Chargez la bande d'agrafes depuis l'arrière de Réglage de profondeur : Desserrez la vis avant l'agrafeuse. et réglez à la longueur voulue. Quand le rebord supérieur de la plaque de réglage est à son 5. Glissez le pousseur de la position 1 à l'arrière de la réglage supérieur (n°...
- Page 17 INSTRUCTIONS RETRAIT D'AGRAFES COINCÉES Agrafage : Saisissez la poignée à une main. Positionnez l'agrafeuse à l'emplacement AVERTISSEMENT! Déconnectez toujours voulu sur la boîte en ligne. Il y'a une petite ARRÊT l'alimentation d'air. saillie de chaque côté du cadre pour aider à localiser la position de l'agrafe).
-
Page 18: Entretien
ENTRETIEN PRESSION ET VOLUME D'ALIMENTATION AVERTISSEMENT! Lorsque vous travaillez sur des ARRÊT outils pneumatiques, prenez connaissance des D'AIR avertissements contenus dans ce manuel et prenez grand soin lors de l'évaluation d'outils • Le volume d'air est aussi important que la pression en panne. -
Page 19: Spécifications
SPÉCIFICATIONS SPÉCIFICATIONS DE L'AGRAFEUSE CAPACITÉ RÉF. ULINE RÉF. DE FABRICATION LONGUEUR HAUTEUR LARGEUR POIDS AGRAFES H-3532 DS-3219 320 mm (12,6 po) 225 mm (8,86 po) 115 mm (4,5 po) 2,45 kg (5,45 lbs.) H-3534 DS-3522 320 mm (12,6 po) 225 mm (8,86 po) 115 mm (4,5 po) 2,45 kg (5,45 lbs.) SPÉCIFICATIONS DES AGRAFES LONG. DES LARG. -
Page 20: Dépannage
DÉPANNAGE PROBLÈME DE FONCTIONNEMENT CAUSES RECOMMANDATIONS Fuite d'air dans le boîtier de la soupape dedétente Joint torique coupé ou fissuré Remplacez le joint torique Joints toriques/bagues d'étanchéité Remplacez la soupape de la détente Fuite d'air de la tige de soupape de la détente coupés ou fissurés Fuite d'air du cadre/tige de piston Joint torique...
Need help?
Do you have a question about the BOSTITCH H-3532 and is the answer not in the manual?
Questions and answers