Table of Contents
Advertisement
Quick Links
Advertisement
Table of Contents

Subscribe to Our Youtube Channel
Related Manuals for DELTA DORE TYMOOV 2 Silence+ 10


Summary of Contents for DELTA DORE TYMOOV 2 Silence+ 10
- Page 1 Pack TYMOOV 2 Silence+ 10 / 20 Roller shutter motor packs...
- Page 2 Recommendations WARNING: Important security instructions - The operating device of an unlockable switch must be in direct view Incorrect installation may cause severe injury of the driven part, but kept away from the moving parts. It must be Follow all the instructions and keep this installation guide in a safe installed at a height of at least 1.5 m.
- Page 3 - If an attempt is made to raise the shutter (for example: intruder test), DELTA DORE hereby declares that the motorised systems covered by these instructions comply with the essential requirements set out by the Machinery the motor will lower the apron.
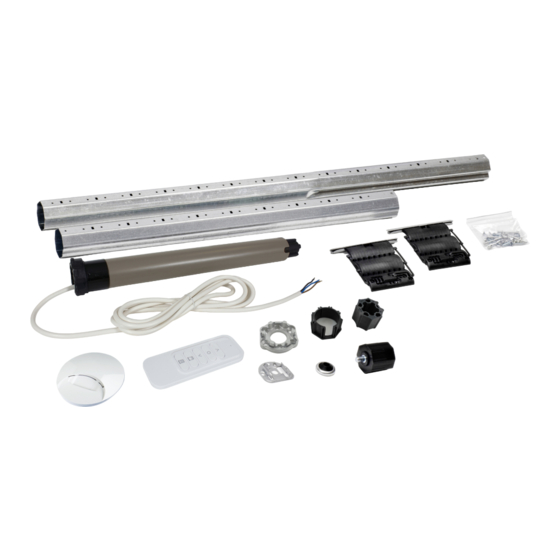
- Page 4 Technical Characteristics Pack contents Remote control TYXIA 1701 • Power supplied by 3V lithium battery, CR2430 Contents of the PACK TYMOOV 2 Silence+ 10: • Class III insulation 1 TYMOOV bidirectional wireless motor 10Nm 2 telescopic tubes • X3D Transmission frequency: 1 TYXIA 1701 remote control 868.7 MHz to 869.2 MHz...
-
Page 5: Table Of Contents
Contents 1/ Use 1/ Use ............................. 9 • Press to raise, and to lower. 2/ Installation ..........................10 • Press to stop the shutters. 2.1 Installing the tube ..........................10 2.2. Motor.fitting ............................. 12 2.3 Installing the fasteners ........................14 3/ Connection ...........................16 •... -
Page 6: 2/ Installation
2/ Installation 2.1 Installing the tube ❻ Determine the length of the new tube. - Measure the distance between the 2 mounts. - Calculate the length of the tube. ❶ Lower the roller shutter completely. Motor mount Bearing mount Coffre tunnel Coffre menuisé... -
Page 7: Motor.fitting
2/ Installation 2.2 Motor fitting 2.2.3 Motor head position The motor head must be positioned on the support as such that the cable outlet is in • Never strike the motor head or output shaft to fit the motor into the tube. the lower part relative to the horizontal. -
Page 8: Installing The Fasteners
2/ Installation 2.2.5 Telescopic assembly Attach the fasteners to the tubes. Drill Ø 4 mm holes Attach the fasteners using the screws provided. Use the holes marked 1 and 2. Tube 2 Tube 1 Use the screws provided. The screws must not be in contact with the motor. -
Page 9: 3/ Connection
3/ Connection 4/ Starting up for the first time The electrical wiring must comply with EN, IEC and national institute standards for The first time it is switched on, the motor will make a short movement in both installation (e.g.: NF C15-100 for France). directions to indicate that it has not been associated with a transmitter. -
Page 10: Setting Stops
4/ Starting up for the first time 4.2 Setting stops 4.2.1 Setting 2 automatic stops You can use Auto mode if there are both upper and lower physical stops. The motor will automatically detect its end of travel distances. ❶ Automatic upper stop If there are no upper physical stops and/or automatic locks, you must set the end of travel manually. - Page 11 4/ Starting up for the first time 4.2.2 Setting 1 manual stop + 1 automatic stop 4.2.3 Setting 2 manual stops ❶ Position the shutter Scroll step by step ❶ Position the shutter Scroll step by step To scroll step by step, briefly press then Press the button until the shutter is in the To scroll step by step, briefly press then...
-
Page 12: 5/ Modifying Stops
5/ Modifying stops 7/ Associating a smoke detector You want to control the opening of roller shutters if smoke is detected. If smoke is detected, the shutter will be raised very quickly. The stops must first be removed then set again for them to be modified. Remove them by proceeding as follows: On the transmitter that is already associated, press the button for more than 3 seconds until the motor is... -
Page 13: 9/ Obstacle Detection
9/ Obstacle detection 10/ Remove one or several associations 10.1 Remove the remote control association The motors of the TYMOOV range include the obstacle detection feature. It fully protects the roller shutter mechanism. with the motor After locking on an obstacle, the motor reverses direction by about 15 cm. - Remove the front panel of the remote control. -
Page 14: 12/ Association With An Alarm Control Unit
12/ Association with an alarm control unit 12.2 Defining the motor’s operating mode Association of the motor with an alarm control unit enables: - the anti-intruder function (attempt to lift up the shutter). - the surveillance stop/start report, compatible with all motors. Alarm Alarm stop For intruder detection to work, the lower stop must be recorded... -
Page 15: 13/ Location/Mounting
13/ Location/Mounting 16/ Setting stops from the push button (local control) Mounted on the wall or placed on a flat surface 16.1 Recording 2 automatic stops > 2s Press and hold the push button (> 2 seconds) When the motor detects the 1st stop (upper or so that the motor operates in the up or down lower), then the motor operates once. -
Page 16: Recording.firstly.an.automatic.stop.then.a.manual.stop
16/ Setting stops from the push button (local control) 16.2 Recording firstly an automatic stop then a manual stop 16.3 Recording firstly a manual stop then an automatic stop > 2s STOP > 2s > 2s > 2s Press the push button (> 2 seconds) so that the When the motor detects the 1st stop (upper or Press the push button (>... -
Page 17: Recording.2.Manual.stops
16/ Setting stops from the push button (local control) 16.4 Recording 2 manual stops 16.5 Removing stops > 2s < 5s > 2s STOP > 3s > 2s Press the push button once to move the shutter Wait for at least 2 seconds, then switch on the down or up.Switch off the mains within 5 seconds motor again, while pressing down nd holding the >... -
Page 18: 17/ Your Remote Control Is Lost Or Not Functioning
17/ Your remote control is lost or not 19/ Troubleshooting functioning • If the motor is not working: These procedures are used to set the motor to association wait mode for a new - Check that the wiring corresponds to the diagrams in the “Connection” chapter. control unit (Tyxia 1701, 2331, TYDOM, etc.) when the remote control of the - Check the power supply in the network. - Page 19 www.deltadore.com...
Need help?
Do you have a question about the TYMOOV 2 Silence+ 10 and is the answer not in the manual?
Questions and answers