Advertisement
www.efg.se
1.
x4
260mm
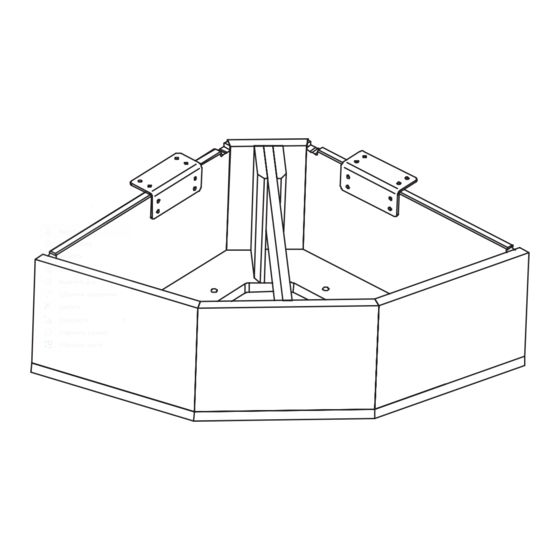
Always start with the plinth to the inner cor-
ner if this module is included. Screw the 90°-brack-
ets on the sides, aprox. 260mm from the back corner
on each side.
x4
plinth-clamp
2.
If adjustment feets are specified its time to mount them on all plinths.
Turn all the plinths upside down and place the plinth-clamp in positions
so you secure that the adjustmentfeet doesn't collide with it later on
when you assemble the modules together. Adjustment feet comes in
package by 4 or 6 pcs with screws. 2 screws/foot. Use a hammer to hit
the foot on to the side. The sharp flaps goes into the wood.
x4
Ori
Assembly Instruction 039223
x6
1
Advertisement
Table of Contents

Related Manuals for EFG Ori


Summary of Contents for EFG Ori
- Page 1 Assembly Instruction 039223 www.efg.se If adjustment feets are specified its time to mount them on all plinths. Turn all the plinths upside down and place the plinth-clamp in positions so you secure that the adjustmentfeet doesn’t collide with it later on when you assemble the modules together.
- Page 2 See all pos. for adjustment feet below. frontside 1-seater frontside Inner corner frontside 2-seater frontside frontside Outer corner 3-seater...
- Page 3 Holes for steering-dowels Next step is to assemble all the plinths with its seats. Each seat is attached with 4 screws and washers. Turn the seats upside down. If the seat will be placed on a 2- or 3-seater plinth, you can use steering-dowels.
- Page 4 If the module is specified with power or table, its time to also equipe the plinths with this. The power-units is placed in the large front holes. Lock- ed by the connecting ring from behind unit ring There is a small ”hole” on the backside on all plinths with power, to lead out the contact.
- Page 5 The table is attached in the small holes on the frontside. Each table leg is attached with 2 screws and washers from inside the plinth. Then turn up the sofa on its plinth and screw on the table top by using 6 screws.
- Page 6 Now all the modules are prepared to be assembeld. To assemble a chosen set-up we use the plinth-clamp. It’s open on one side to have some flexibility. It’s not im- portant where this side is located. The clamp is symme- tric otherwise.
- Page 7 Keep this still Push on the back so the mo- dule tilts backward and out of the clamp The product contains one or more of following materials: Metal, plastic, wood, fabric, foam. 039223 Produced by: EFG Product development...
Need help?
Do you have a question about the Ori and is the answer not in the manual?
Questions and answers