Table of Contents
Advertisement
Quick Links
INSTRUCTIONS AND ADVICE FOR THE
USE, INSTALLATION AND MAINTENANCE
OF MIXED AND GAS FUELLED
Dear Customer,
Thank you for having purchased one of our products.
We are certain that this new, modern, functional and practical appliance, built with the very highest
quality materials, will meet your requirements in the best possible way. This appliance is easy to
use. It is, however, important to thoroughly read the instructions in this handbook in order to obtain
the best results.
These instructions are only valid for the countries of destination, the identification symbols of
which are indicated on the cover of the instruction manual and on the appliance itself.
The manufacturer shall not be held responsible for any damages to persons or property caused
by incorrect installation or use of the appliance.
Toll: (800) 459-0844 P: 813-288-8890 F: 813-288-8604
MODELS: GMS 6540.0 E-UL - GMS 9551.0 E-UL
The Manufacturer shall not be held responsible for any inaccuracies in this handbook due to printing or
transcription errors; the designs in the figures are purely indicative. The Manufacturer also reserves the right
to make any modifications to the products as may be considered necessary or useful, also in the interests
of the user, without jeopardizing the main functional and safety features of the products themselves.
All manuals and user guides at all-guides.com
BUILT-IN HOT PLATES
Kuppersbusch USA
1883 Massaro Blvd. Tampa, FL 33619
COD. 04037ULKUP - 25.06.2009
Advertisement
Table of Contents

Subscribe to Our Youtube Channel
Related Manuals for Kuppersbusch GMS 6540.0 E-UL


Summary of Contents for Kuppersbusch GMS 6540.0 E-UL
- Page 1 1883 Massaro Blvd. Tampa, FL 33619 Toll: (800) 459-0844 P: 813-288-8890 F: 813-288-8604 MODELS: GMS 6540.0 E-UL - GMS 9551.0 E-UL The Manufacturer shall not be held responsible for any inaccuracies in this handbook due to printing or transcription errors; the designs in the figures are purely indicative. The Manufacturer also reserves the right to make any modifications to the products as may be considered necessary or useful, also in the interests of the user, without jeopardizing the main functional and safety features of the products themselves.
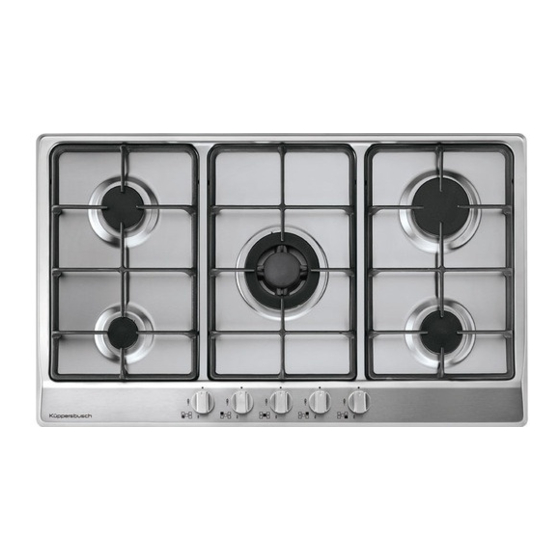
- Page 2 All manuals and user guides at all-guides.com DESCRIPTION OF HOBS TYPES: GMS 6540.0 E - UL TYPES: GMS 9551.0 E - UL 1 Ultra rapid gas burner 11000 Btu/h 2 Rapid gas burner 10000 Btu/h 3 Semirapid gas burner 6100 Btu/h 4 Semirapid gas burner 6100 Btu/h 5 Auxiliary gas burner...
-
Page 3: Safe Guard Instructions
All manuals and user guides at all-guides.com SAFE GUARD INSTRUCTIONS 1) SAFE GUARD INSTRUCTIONS For all appliances: - the product shall be installed according with the a statement that the installation must conform with local codes or, in absence of local codes, with the National Fuel Gas Code, ANSI Z223.1/NFPA 54. - The product must be electrically grounded in accordance with local codes or, in the absence of local codes, with the National Electrical Code, ANSI/NFPA 70. - Page 4 All manuals and user guides at all-guides.com 2) BURNERS Burners Power ratings Pan Ø in cm A diagram is screen-printed above each knob on the front panel. This diagram indicates to which Ultra rapid 11000 Btu/h 24 ÷ 26 burner the knob in question corresponds. After Rapid 10000 Btu/h 20 ÷...
- Page 5 All manuals and user guides at all-guides.com Notes: use of a gas cooking appliance produces heat and moisture in the room in which it is installed. The room must therefore be well ventilated. Intensive and lengthy use of the appliance may require additional ventilation. This can be achieved by opening a window or by increasing the power of the mechanical exhausting system if installed.
- Page 6 All manuals and user guides at all-guides.com CLEANING IMPORTANT: WARNINGS: always disconnect the appliance from the gas comply with the following instructions, before and electricity mains before carrying out any remounting the parts: cleaning operation. - check that burner head slots “T” (fig. 3) have not become clogged by foreign bodies.
-
Page 7: Installation
All manuals and user guides at all-guides.com INSTALLATION TECHNICAL INFORMATION 5) FIXING THE HOT PLATE FOR THE INSTALLER The hot plate has a special seal which prevents liquid from getting into the cabinet. Strictly comply Installation, adjustments of controls and with the following instructions in order to correctly maintenance must only be carried out by a apply this seal:... -
Page 8: Room Ventilation
All manuals and user guides at all-guides.com INSTALLATION 6) ROOM VENTILATION The transition piece on the supply side of the regulator must be provided by the installer. To ensure correct operation of the appliance, it is important to ensure that the room where the hot Unions compatible with the hose fittings must be plate is installed has sufficient ventilation. -
Page 9: Electrical Connection
All manuals and user guides at all-guides.com INSTALLATION 8) ELECTRICAL CONNECTION When the appliance is connected straight to the electricity main: The electrical connections of the appliance - install an omnipolar circuit-breaker between the must be carried out in compliance with the appliance and the electricity main. - Page 10 All manuals and user guides at all-guides.com INSTALLATION 9) FIXING THE WORKTOP - Fix the hob with the proper brackets “S” and fit the prominent part into the porthole “H” on the bottom; The hot plate has a special seal which prevents turn the screw “F”...
- Page 11 All manuals and user guides at all-guides.com ADJUSTMENTS Always disconnect the appliance from the - Insert a small screwdriver “D” into hole “C” (fig. 9) electricity main before making any adjustments. and turn the throttle screw to the right or left until All seals must be replaced by the technician at the burner flame has been adequately regulated to the end of any adjustments or regulations.
-
Page 12: Replacing The Injectors
All manuals and user guides at all-guides.com CONVERSIONS 11) REPLACING THE INJECTORS paragraphs 10. The technician must reset any seals on the regulating or pre-regulating devices. The burners can be adapted to different types of The envelope with the injectors and the labels can gas by mounting injectors suited to the type of gas be included in the kit, or at disposal to the in question. -
Page 13: Replacing Components
All manuals and user guides at all-guides.com SERVICING Always disconnect the appliance from the Greasing the taps (see fig. 15 - 16) electricity and gas mains before proceeding If a tap becomes stiff to operate, it must be with any servicing operation. immediately greased in compliance with the following instructions: 12) REPLACING COMPONENTS... - Page 14 All manuals and user guides at all-guides.com TECHNICAL DATA ON THE DATA LABEL 4 BURNERS (60) 5 BURNERS (90) PROPANE HD - 5 = 11 inches water column PROPANE HD - 5 = 11 inches water column NATURAL GAS = 7 inches water column NATURAL GAS = 7 inches water column Σ...
-
Page 15: Technical Assistance And Spare Parts
All manuals and user guides at all-guides.com TECHNICAL DATA FOR THE APPLIANCE GAS REGULATION TECHNICAL ASSISTANCE AND SPARE PARTS Before leaving the factory, this appliance will have been tested and regulated by expert and specialized personnel in order to guarantee the best performances. Any repairs or adjustments which may be subsequently required may only be carried out by qualified personnel with the utmost care and attention. - Page 16 All manuals and user guides at all-guides.com Kuppersbusch USA 1883 Massaro Blvd. Tampa, FL 33619 Toll: (800) 459-0844 P: 813-288-8890 F: 813-288-8604...
Need help?
Do you have a question about the GMS 6540.0 E-UL and is the answer not in the manual?
Questions and answers