Advertisement
- 1 lntroduction
- 2 Package Contents
- 3 Product Features
- 4 Where to Install
- 5 Locations to Avoid
- 6 Installation Method
- 7 Alarm Testing
- 8 Peak CO Concentration Memory and Reset
- 9 Silence Mode
- 10 LCD Display
- 11 Technical Specifications
- 12 What to Do When the Alarm Sounds
- 13 Maintenance
- 14 Deactivating the Alarm (XC01)
- 15 Battery Replacement (XC01-R)
- 16 Limitations of CO Alarms
- 17 Environmental Protection
- 18 Manufacturer and Service Information
- 19 Documents / Resources
lntroduction
This user manual contains important information regarding the installation and operation of your carbon monoxide alarm. Please take а few minutes to thoroughly read this manual which should be saved for future reference. lf you are installing the carbon monoxide alarm for use by others, you must leave this manual-or а сору of it-with the end user.
This device is а battery-powered standalone СО (carbon monoxide) alarm with an advanced electrochemical sensor for domestic use. Please note that this device does not detect smoke, heat, Aames or any hazardous gas other than carbon monoxide even though carbon monoxide can be generated by fire. For this reason you must install smoke alarms to provide early warning of fire and to protect you and your family from fire and its related hazards.

- THE INSTALLATION OF THE APPARATUS SHOULD NOT BE USED AS A SUBSTITUTE FOR PROPER INSTALLATION, USE AND MAINTENANCE OF FUEL-BURNING APPLIANCES INCLUDING APPROPRIATE VENTILATION AND EXHAUST SYSTEMS.
- THIS APPARATUS IS TO BE INSTALLED BY A COMPETENT PERSON.
- IT IS NOT TESTED FOR USE IN A CARAVAN OR BOAT.
Package Contents
1 х СО Alarm
1 х User Manual
2 х Screws
2 х Anchor Plugs
2 х Carbon Monoxide Safety Stickers
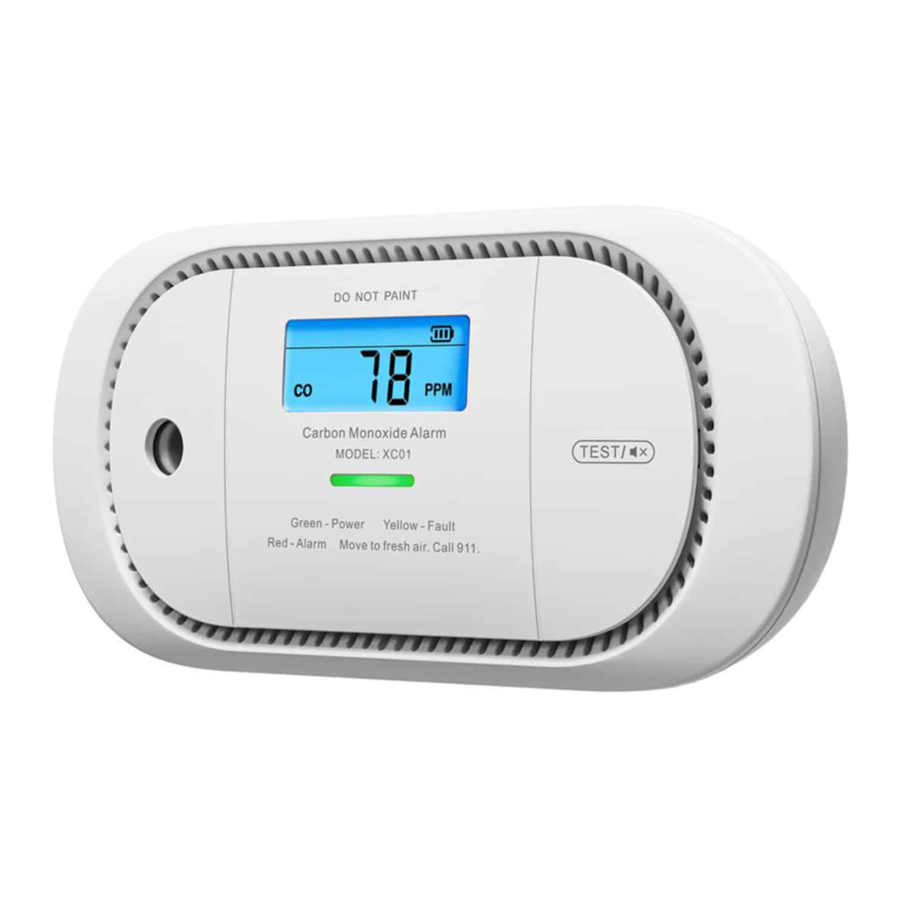
Product Features


Test/Silence Button
The Test/Silence button is used to test the unit's electronics and to silence the unit during an alarm. When testing the alarm weekly, press and hold the test button and you will hear a short beep, indicating that the alarm has entered the test mode.
XCO01: You should first wake up your alarm by pressing the test button; once the alarm has woken up, the LCD display will activate, then press the test button again until you hear a short beep, indicating that the alarm has entered the test mode. Please refer to the "Alarm Testing" section for further information. The alarm goes back to the standby mode after testing. To save power, the alarm is designed to automatically turn off the LCD display if there has been no operation for 5 minutes.
XCO1-R: Short press the test button and you will hear a short beep, indicating that the alarm has entered the test mode.
NOTE: After a test has begun, the alarm will sound and the LED indicator will flash red. This does not indicate that CO is present. If you press the test button during an alarm state, the unit will enter the silence mode.
CO Alarm Levels
This X-Sense carbon monoxide alarm is programmed to sound an alarm at the following CO concentrations within the time periods listed:
70 ppm for 60-240 minutes,
150 ppm for 10-50 minutes,
and 400 ppm for 4-15 minutes.
When CO is detected and the alarm sounds, the CO concentration will be displayed on the LCD and a blue backlight will be lit. The LED indicator will flash red and the alarm will issue 4 short beeps, repeating the cycle every 5.8 seconds.
CO Concentration and Symptoms
The table below shows the effects of different levels of CO poisoning on the body:
| Parts per Million (PPM) | Effects on Adults |
| 100 | Slight headache, nausea, fatigue (flu-like symptoms). |
| 200 | Dizziness and headache within 2-3 hours. |
| 400 | Nausea, frontal headache, drowsiness, confusion and rapid heart rate. Risk to life after over 3 hours of exposure. |
| 800 | Severe headaches, convulsions, vital organ failures. Death possible within 2-3 hours. |
THIS DEVICE IS DESIGNED TO PROTECT INDIVIDUALS FROM ACUTE EFFECTS OF CARBON MONOXIDE EXPOSURE. IT MAY NOT FULLY SAFEGUARD INDIVIDUALS WITH SPECIFIC MEDICAL CONDITIONS. IF IN DOUBT, CONSULT A MEDICAL PRACTITIONER.
Low-Battery Warning
If the battery voltage is low, the unit will chirp once and the LED indicator will flash yellow every 60 seconds to indicate the need for battery replacement. If you press the test button when there is low battery, the low battery signal will temporarily cease for 10 hours; if you press the test button again, the unit will enter the test mode and then the standby mode.
End-of-Life Indication and Hush Control
Once the maximum lifetime (10 years) is reached, the alarm will deliver 3 beeps and the LED indicator will flash yellow 3 times every 60 seconds. This end-of-life signal can be temporarily silenced for 22 hours by pressing the test button. The end-of-life silence feature can only be used for a total of 30 days. After 30 days, the end-of-life signal cannot be silenced. During this end-of-life hush period, your alarm continues monitoring CO and provides protection as usual. To help identify the date to replace the alarm, write down the date of first operation on the dedicated label on the side of the alarm.
Where to Install
Ideally, a carbon monoxide alarm should be installed in every room containing a fuel-burning appliance, and one in every bedroom. However, if the number of carbon monoxide alarm available is limited, the following guidelines should be considered when choosing the best places to install an alarm(s):
- if there is an appliance in a bedroom, a CO monitor should be installed.
- Install an alarm in rooms containing a flueless or open-flued appliance.
- Install an alarm where residents spend most of their time.
- Install studio apartment, a CO alarm should be placed as far away from the cooking appliances as possible, but close to where the person sleeps.
- If the appliance is in a room not normally used (such as a boiler room), the CO alarm should be placed just outside of this room so that the alarm can be heard more easily.
- Installing a CO alarm in a room with a fuel-burning appliance (see Figure 1):

Figure 1: Installation in a room with a fuel-burning appliance
- If it is mounted on a wall, it should be installed at a height greater than the height of any door or window, but should still be at least 5.9 inches (150 mm) below the ceiling.
- The CO alarm should have a horizontal distance between 3.3 feet (1 m) and 10 feet (3 m) from any potential CO source.
- If there is a partition in the room, the CO alarm should be installed on the same side of the partition as the potential CO source.

- Installing the CO alarm in a bedroom or room without a fuel-burning appliance (see Figure 2):

Figure 2: Installation in a bedroom or room without a fuel-burning appliance (installed at head level)
- Mount the CO alarm relatively close to the breathing zone of the occupant.
- Install the alarm such that the LED indicator is viewable when the occupant is near the alarm.

NOTE: Due to the product's unique design and unfixed installation, it is not recommended to install it on a ceiling, as it is prone to falling off and causing injuries to people.
Locations to Avoid
Important Note
Improper location can affect the sensitive electronic components in this alarm. To avoid causing damage to the unit, to provide optimum performance and to prevent unnecessary nuisance alarms, do not locate CO alarms in the following areas:
- In garages or in any extremely dusty, dirty or greasy areas.
- Where there is the possibility of smoke or fumes under normal operating circumstances.
- In poorly ventilated kitchens, garages and furnace rooms. Keep the CO alarms at least 5 feet (1.5 m) from potential smoke or fume sources (e.g. stoves, furnaces, water heaters, space heaters) if possible.
- In areas where a 5-foot (1.5 m) distance from a potential smoke or fume source is not possible. In modular, mobile or smaller houses, it is recommended the CO alarm be placed as far from any potential smoke or fume sources.
- Within 5 feet (1.5 m) of any cooking appliance.
- In extremely humid areas. This alarm should be at least 10 feet (3 m) from a bath or shower, sauna, humidifier, vaporizer, dishwasher, laundry room, utility room or other source of high humidity.
- In areas where the temperature is colder than 40°F (4.4°C) or hotter than 100°F (37.8°C). For example, non-air-conditioned crawl spaces, unfinished attics, uninsulated or poorly insulated ceilings, porches and garages.
- Where the air is turbulent, such as near ceiling fans, heat vents, air conditioner vents, fresh air return vents, or open windows. Excessive air flow may prevent any CO from reaching the sensors.
- In direct sunlight.
Installation Method
To Activate the Device
This device is equipped with a battery insulating film to ensure it will not be powered on during transportation before it has shipped from the factory. When installing this product, you will need to pull out the film before powering on and activating the device.

Before use, pull out the battery insulating film from the battery compartment to power on the device. After the device is turned on, the buzzer will beep once, the LCD backlight will light up, and the LED indicator will flash through 8 cycles (yellow/green/red). The device will then enter standby mode.
CONSTANT EXPOSURE TO HIGH OR LOW TEMPERATURES AND HIGH HUMIDITY MAY REDUCE BATTERY LIFE.
Wall Mounting
- Choose a suitable installation location by referring to the "Where to Install" section.
- Remove the indication sticker from the packaging and refer to the hole locations on the sticker. Draw two screw holes according to the size and layout of the mounting holes on the back of the product. Drill the screw holes 1.18 inches (30 mm) deep using a
![]() 1/4-inch (6.0 mm) drill bit. Note that the distance between the center of the two holes is 2.9 inches (74 mm).
1/4-inch (6.0 mm) drill bit. Note that the distance between the center of the two holes is 2.9 inches (74 mm).

- Insert the anchor plug into the screw hole and hammer it in until the head of the anchor plug is flush with the wall.
- Use the two provided screws or 0.13 x 0.98 in (3.5 x 25 mm) countersunk screws to screw into the two anchor plugs. Be sure to leave a 1/5-inch (5 mm) gap between the head of the anchor plugs and the screws, which will allow for easy device mounting.
 1/4-inch (6.0 mm) drill bit. Note that the distance between the center of the two holes is 2.9 inches (74 mm).
- Mount and lock the device onto the wall by aligning the two mounting slots on the back of the device with the screws on the wall.
- Test the device by pushing the test button to make sure that the device is functioning properly.
Installation on a Table
The base of the detector has two feet built into the design that allow it to stand freely on a flat surface.

NOTE: When placing on a shelf, please adhere to the recommended placement as described in "Where to Install."
Alarm Testing
Be sure to test your CO alarms when you turn them on for the first time. In addition to the weekly test you should perform, it is also recommended to test the alarm after returning from a long trip or vacation.
| Type | XC01 | XCO1-R |
| Action | Push the test button once to wake up the alarm, and press the test button again when the LCD is on. | Push the test button. |
| Device Response | The device beeps 4 times twice, and the LED will flash red. The LCD will display "---," PAS," the peak CO concentration recorded since the previous reset, and finally "0." This indicates that the device is functioning properly. | |
NOTE: The test function accurately tests the alarm's CO sensing circuit without the need of testing CO.
Peak CO Concentration Memory and Reset
The peak CO concentration feature is helpful in identifying if there have been any dangerous CO readings since a peak CO concentration reset.
Each time you push the test button, the LCD displays the peak CO concentration recorded since the previous reset. The peak CO concentration will be displayed for 5 seconds, and then the device will enter standby mode. In the example, 300 ppm was the maximum CO concentration recorded since the unit was last reset.

Peak CO Concentration Reset: During the 5 seconds when the LCD displays the peak CO concentration, press and hold the test button for 3 seconds, the device will beep, the LED will flash green, and the peak CO concentration will be reset with LCD displaying "0."
NOTE: If the carbon monoxide concentration is lower than 30 ppm, it will not be recorded in the peak CO concentration.
Silence Mode
Press the test button during an alarm to have the unit enter silence mode. If the CO density still exceed the alarm threshold after 6 minutes, the unit will enter another alarm state. Otherwise, the unit will exit the silence mode after 9 minutes and resume normal operation. If the CO concentration is above 300 ppm, the silence function cannot be enabled.
LCD Display
While detecting CO, the LCD will display different indicators to inform you of the alarm status, as shown below:
| Mode | LCD Display | LED Indicator | Audible Alarm | Remarks |
| Powering On |  | Runs through 8 cycles (yellow/green/red) in sequence. | 1 quick beep. | Make sure battery insulating film is removed and the device is turned on. |
| Standby Mode (XC01) | None. | Flashes green once every 60 seconds. | None. | None. |
| Standby Mode (XCO1-R) |  | Flashes green once every 60 seconds. | None. | None. |
| Alarm Mode |  | ACO concentration ranging from 30 to 999 ppm has been present for a certain time period. The blue backlight is lit, and the LED indicator flashes red 4 times every 5.8 seconds. | 4 beeps repeating every 5.8 seconds. | Dangerous CO concentration is detected, and has reached the alarm status. Please refer to "What to Do When the Alarm Sounds". |
 | A CO concentration level ranging fromm 30 to 999 ppm has been detected, but for less than the allotted detection period. The LED indicator flashes green once every 60 seconds. | None. | Dangerous CO concentration is detected, but has not reached the alarm status. Potential dangerous CO conditions exist. Please search for the CO source first. Open nearby windows and doors, and immediately move to fresh air. | |
| Flashes green once every second for 5 seconds. | None. | Alarm cancellation: when the CO concentration level drops below the alarm threshold, the alarm signal will stop. | ||
| Test Mode |  | 2 sets of 4 red flashes. | 2 sets of 4 quick beeps. | Peak CO level recorded since beeps. the previous reset. |
| Silence Mode |  | Flashes red 4 times every 5.8 seconds. | None. | CO silence mode: After 9 minutes, the unit will exit silence mode. |
 | Flashes yellow once every 60 seconds. | None. | Silence mode during low battery: after 10 hours, the unit will exit silence mode. | |
 | Flashes yellow 3 times every 60 seconds. | None. | Silence mode during the end of cycle: after 22 hours, the unit will exit silence mode. | |
| Flashes green 3 times. | None. | Exiting silence mode. | ||
| Low Battery |  | Display alternates between Lb" and current o level. The LED indicator flashes yellow once every 60 seconds. | 1 quick beep every 60 seconds. | XCO1: The unit must be replaced immediately. XCO1-R: The battery must be replaced immediately. |
| Fault |  | Flashes yellow 2 times every 60 seconds. | 2 beeps every 60 seconds. | Please clean your alarm and see if it is working normally. If "Err" continues to display, the unit has malfunctioned and must be replaced immediately. |
| End of Life |  | Flashes yellow 3 times every 60 seconds. | 3 quick beeps every 60 seconds. | Replace the unit immediately |
Technical Specifications
| Power Supply | XCO01: 10-year sealed lithium battery |
| XCO01-R: CR123A (replaceable battery) | |
| Product Lifespan | 10 years |
| Sensor Type | Electrochemical |
| Safety Standart | UL 2034 |
| Operating Temperature | 40-100°F (4.4-37.8°C) |
| Operating Relative Humidity | 10%-85% RH (non-condensing) |
| Alarm Loudness | > 85 cB at 10 ft (3 m) @ 3.2 + 0.3 kHz pulsing alarm |
| Storage and Transport Conditions | -4-140°F (-20-60°C), 5%-95% RH (non-condensing) |
| Silence Duration | About 9 minutes |
What to Do When the Alarm Sounds
- Call emergency services as soon as possible.
- Immediately move outside and make sure that everyone inside the house has evacuated the area or has access to fresh air. Do not re-enter the house until it has been aired out and your alarm remains under normal condition. If it is not possible to move outside, stay close to an open door/window until emergency service responders arrive.
- After following steps 1-2 above, if your alarm reactivates within a 24 hour period, repeat steps 1-2 and call a qualified appliance technician to investigate sources of CO from fuel-burning equipment and appliances, and inspect for proper operation of this equipment.
- If problems are identified during this inspection, have the equipment serviced immediately. Note any combustion equipment that has not been inspected by the technician and consult the manufacturer's instructions, or contact the manufacturers directly for more information about CO safety and this equipment. Make sure that motor vehicles are not, and have not been, operating in an attached garage or adjacent to the residence.
Maintenance
To keep your alarm in good working order, you should adhere to the following steps.
- Test the alarm once a week by pressing the test/silence button.
- Vacuum the alarm cover once a month to remove any accumulated dust.
- Never use detergents or solvents to clean the alarm. Chemicals can permanently damage or temporarily contaminate the sensor.
- Avoid spraying air fresheners, hair spray, paint or other aerosols near the alarm.
- Do not paint the unit. Paint may clog the openings to the sensing chamber and prevent the unit from operating properly.
DO NOT TAMPER WITH THE APPARATUS, AS THERE IS A RISK OF ELECTRIC SHOCK OR MALFUNCTION.
Deactivating the Alarm (XC01)
When the product reaches its end of life (10 years), it is recommended to discharge the battery to ensure the built-in lithium battery is fully depleted.
DO NOT DEACTIVATE THE ALARM UNIT UNTIL THE END-OF-LIFE SIGNAL HAS BEEN HEARD. ONCE THE ALARM IS DEACTIVATED, IT WILL NO LONGER FUNCTION. IT CANNOT BE REACTIVATED, AND MUST BE REPLACED.
- Peel off the label marked by the arrow on the back of the device.
 - Step 1")
- Take out the plastic pin used to discharge the battery.
 - Step 2")
 - Step 1")
 - Step 2")
- Insert the plastic pin into the mounting hole slot on the left to discharge the battery.
 - Step 3")
- Replace the alarm.
 - Step 3")
Battery Replacement (XC01-R)
Remove the old batteries and replace with a CR123A battery (a Huiderui CR123A battery is recommended) when the LCD displays the "Lb" message and the LED indicator flashes yellow once every 60 seconds with the buzzer chirping. After changing the battery, the buzzer will beep once, the LCD backlight will light up, and the LED indicator will flash through 8 cycles (yellow/green/red). Reinstall your alarm and test it by pressing the test/silence button.
NOTE: Rechargeable batteries are not recommended for use with this device.
Limitations of CO Alarms
- CO alarms may not wake up all individuals. If children or others do not readily awaken to the sound of the CO alarm, or if there are infants or family members with mobility limitations, make sure that someone assists them in the event of an emergency.
- This CO alarm will not sense carbon monoxide that does not reach the sensor. This CO alarm will only detect CO that reaches the sensor. CO may be present in other areas. Doors or other obstructions may affect the rate at which CO reaches the CO alarm. For this reason, if bedroom doors are usually closed at night, it is recommended that you install a CO alarm in each bedroom and in the hallway between them.
- CO alarms may not sense CO on another level of the house. For example, a CO alarm on the second level, near the bedrooms, may not sense CO in the basement. For this reason, one CO alarm may not give an adequate warning. Complete coverage is recommended by placing CO alarms on each level of the house.
- CO alarms may not be heard. The alarm buzzer noise level is over 85 dB at a distance of 10 feet (3 m). However, if the CO alarm is installed outside the bedroom, it may not awaken a sound sleeper or one who has recently used drugs or has been drinking alcohol. This is especially true if the door is closed or only partially open. Even persons who are awake may not hear the alarm horn if the sound is blocked by distance or closed doors. Noise from traffic, stereos, radios, televisions, air conditioners, or other appliances may even prevent alert persons from hearing the alarm horn. This CO alarm is not intended for people who are hearing impaired.
- CO alarms are not a substitute for a smoke alarm. Although fire is a source of carbon monoxide, this CO alarm does not sense smoke or fire. This CO alarm senses CO that may be escaping unnoticed from malfunctioning furnaces, appliances, or other possible sources of incomplete combustion. The installation of a smoke alarm is required for an early warning of fire.
- CO alarms are not a substitute for life insurance. Though these CO alarms warn against increasing CO levels, we do not warrant or imply in any way that they will protect lives from CO poisoning. Homeowners and renters must still insure their lives.
- CO alarms have a limited life. Although the CO alarm and all of its parts have passed many stringent tests and are designed to be as reliable as possible, any of these parts could fail at any time. Therefore, you are strongly recommended to test your CO alarm weekly.
- CO alarms are not foolproof. Like all other electronic devices, CO alarms have limitations. They can only detect CO that reaches their sensors. They may not give early warning of rising CO levels if the CO is coming from a remote part of the house, or is at some distance from the CO alarm.
Environmental Protection
Waste electrical products should not be disposed of with household waste. Please recycle where facilities exist. Check with Local Authority or retailer for recycling advice.

Manufacturer and Service Information
X-Sense Innovations Co., Ltd.
Address: B4-503, Kexing Science Park, 15 Keyuan Road, Shenzhen, 518057, CHINA
Email: support@x-sense.com

Documents / ResourcesDownload manual
Here you can download full pdf version of manual, it may contain additional safety instructions, warranty information, FCC rules, etc.
Advertisement


Need help?
Do you have a question about the XCO1 and is the answer not in the manual?
Questions and answers