
Related Manuals for Ricoh FAX1900L


Summary of Contents for Ricoh FAX1900L
- Page 1 FAX1900L Operating Instructions Read this manual carefully before you use this product and keep it handy for future reference. For safety, please follow the instructions in this manual.
- Page 2 15-5, 1 chome, Minami-Aoyama, Minato-ku, Tokyo Telephone: Tokyo 3479-3111 Ricoh shall not be responsible for any damage or expense that may result from the use of parts other than recommended parts. For good copy quality, Ricoh recommends that you use genuine Ricoh toner.
- Page 3 Optional Equipment HANDSET TYPE 100(Telephone Handset) This permits voice communication (over the PSTN). FAX EXPANSION CARD TYPE 20 A 2-Mbyte memory card can be added.
- Page 4 6. In the event of operation problems (document jam, copy jam, communication error indication), refer to the solving problems section in this manual. 7. If you cannot correct the problem, please contact the RICOH CORP. CUSTOMER SUPPORT DEPT. at 1-800-FASTFIX for repair and warranty information. If it is causing harm to the tele- phone network, the telephone company may request you to disconnect the equipment from the network until the problem is resolved.
- Page 5 FCC Requirements 1. This equipment complies with Part 68 of the FCC rules. On the cover of this equipment is a label that contains, among other information, the FCC registration number and ringer equivalence number (REN) for this equipment. If requested, this information must be provided to the tele- phone company.
- Page 6 Notice R CAUTION: Use of controls, adjustments or performance of procedures other than those specified herein may result in hazardous radiation exposure. Shielded interconnect cables must be employed with this equipment to ensure compliance with the pertinent RF emission limits governing this device. Although this equipment can use either loop disconnect or DTMF signalling, only the performance of the DTMF signalling is subject to regulatory require- ments for correct operation.
- Page 7 ENERGY STAR Program As an ENERGY STAR Partner, we have deter- mined that this machine model meets the ENER- GY STAR Guidelines for energy efficiency. The ENERGY STAR Guidelines intend to establish an international energy-saving sys- tem for developing and introducing energy-efficient office equipment to deal with en- vironmental issues, such as global warming.
- Page 8 Energy Saving Modes Energy Saving mode enables you to avoid using unnecessary power and econo- mize on electricity. Although we recommend you use this mode from the view- point of environmental consciousness, you can also turn it off. When you install this machines for the first time, Energy Saving mode is turned on by default.
- Page 9 To exit Energy Saving mode: • In Energy Saving Standby mode, press the Energy Saver key. • In FAX Standby mode, press any key. • Set a document. • Pick up the optional handset or the external telephone handset. Note When you load paper in Energy Saving mode, no error will be displayed even if the cassette is not pushed right in.
- Page 10 Note to users in the United States of America -Notice: This equipment has been tested and found to comply with the limits for a Class B digital device, pursuant to Part 15 of the FCC Rules. These limits are designed to provide reasonable protection against harmful interference in a residential in- stallation.
-
Page 11: Table Of Contents
TABLE OF CONTENTS 1. Safety Important Safety Instructions..............1 When to Call Your Service Representative ..........3 Power And Grounding ................4 Power Supply ....................4 Grounding ..................... 4 Other Important Informations..............5 General ......................5 Cold Weather Power-up................5 Thunderstorms .................... - Page 12 Storing & Editing Fax Numbers (Functions 31 & 32) ......27 Storing, Editing & Erasing Quick Dial Numbers (Function31) ..... 27 Storing, Editing & Erasing Speed Dial Numbers (Function 32) ....28 Storing & Editing A Group Of Fax Numbers (Function 33) ....30 Erasing Groups ...................
- Page 13 Entering A List Of Senders To Treat Differently (Function 81) ... 56 Programming the list of senders (Special Senders)........56 Editing the RTI/CSI for the special terminals ..........57 Erasing the special terminal ................ 58 Forwarding ....................59 Programming the forwarding feature............59 Editing the forwarding feature ..............
- Page 14 Changing The Paper Size In The Paper Cassette......... 88 Changing The Paper Size Setting ............93 6. Troubleshooting If An Indicator Lights Up On The Operation Panel....... 95 Other Possible Problems................ 96 You Want To Remove The Document In The Feeder......... 96 Clearing a Document Jam ..............
- Page 15 Specifications ..................131 Base Machine ................... 131 8. Installation Before Installation ................. 133 Machine Environment ................134 Location..................... 134 Installing The Optional Memory Card..........135 Installing The Optional Handset............136 Connecting The Machine ..............137 Connecting Up To The Telephone Line..........138 Connecting The Power And Switching On..........
-
Page 16: Safety
1. Safety Important Safety Instructions All Safety messages in the main text Do not place this product on an un- of this manual are labeled WARN- stable cart, stand, or table. The ING or CAUTION. These mean the product may fall, causing serious following: damage to the product or injuring the user. - Page 17 Safety Do not allow anything to rest on • If the product has been exposed the power cord. Do not locate this to rain or water. product where persons will walk • If the product does not operate on the cord. normally when the operating If an extension cord is used with instructions are followed.
-
Page 18: When To Call Your Service Representative
When to Call Your Service Representative When to Call Your Service Representative WARNING: Do not attempt any After you move the machine, fix it maintenance or troubleshooting other with the caster fixture. Otherwise than that mentioned in this manual. the machine might move or come This machine contains a laser beam down to cause a personal injury. -
Page 19: Power And Grounding
Safety Power And Grounding Power Supply Grounding Power requirements: 115 V, 60 Hz In order to prevent potentially haz- ardous electrical shock, provide Insert the power plug securely into means of connecting to the protective the wall socket. grounding conductor in the building, Make sure that the wall outlet is wiring those grounding conductors near the machine and readily ac-... -
Page 20: Other Important Informations
Other Important Informations Other Important Informations General Cold Weather Power-up Since some parts of the machine Avoid raising the room temperature are supplied with high voltage, abruptly when it is below 57°F, or make sure that you do not attempt condensation may form inside the any repairs or attempt to access machine. -
Page 21: Copy Paper
Safety Procedures: Copy Paper Procedures are described step by step. Perform them in order. When • 16 to 24lb. copy paper is recom- you see a display, it always shows mended. what comes after performing the step it accompanies. Other illustra- •... -
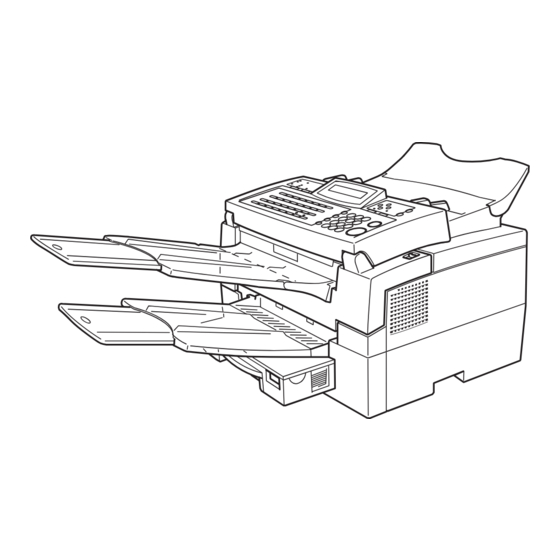
Page 22: Machine Layout
2. Machine Layout Part Names Paper cassette The paper cassette holds copy paper. Print delivery tray Copies and incoming faxes are delivered here. Document delivery tray Scanned documents are stacked on the Document delivery Tray. Main switch The main switch turns your machine on and off. - Page 23 Machine Layout Operation panel Key panel for operating the machine. Document guide Match the document guide to the size of your original documents. Document table Document table holds up to 30 sheets which are fed one at a time. Place your original documents here.
-
Page 24: Operation Panel
Operation Panel Operation Panel Add Paper indicator Control panel Display Lights when a cassette is empty. The Liquid Crystal Display guides you through tasks and informs you of the Add Toner indicator state of the machine. Messages appear Blinks when toner is about to run out and here. - Page 25 Machine Layout {Energy Saver} key {Quick Dial} keys / {User Function} keys. Hold a few seconds this to start or end the energy saver mode. There are 30 Quick Dial keys. Use them to store individual fax numbers (see P.27 {Copy} key “Storing &...
-
Page 26: Faxing
3. Faxing Recommended Types Of Document Before you send your document, make sure that it meets the following require- ments. Important Documents that do not meet these requirements can cause your machine to jam or may cause some components of the machine to become damaged or dirty. -
Page 27: Page Condition
Faxing Page Condition Do not place damaged pages in the automatic document feeder. • If your pages are curled or dog eared, flatten them. • If your pages are stuck together, shuffle the stack. • If your pages are folded, torn, or patched together, make copies. •... -
Page 28: Memory Transmission And Immediate Transmission
Memory Transmission And Immediate Transmission Memory Transmission And Immediate Transmission There are two ways to send a fax mes- Fan your document stack (at most sage. 30 pages: 20 lb) to make sure all • Immediate Transmission pages are loose, then square it. •... - Page 29 Faxing In this example Quick Dial key 30 Please set your document is programmed as the Group key, straight in the feeder. If you set and Group dial number 1 is pro- more than 15 sheets, make sure grammed. the ends of your document are Note not skewed.
-
Page 30: Immediate Transmission
Memory Transmission And Immediate Transmission If your line goes through a local Press the {Yes} key to enter an- switchboard (a PBX) remember other number. to dial the exit code. Press the {Pause} key immediately after TRANSMIT DIAL/START the code. If the number includes DIAL NEXT FAX NUMBER a c o u n t r y c o d e , p r e s s t h e {Pause} key after the country... -
Page 31: Dialing With The Telephone Directory
Faxing Press the {Start} key. Make sure that the machine is in standby mode. 5551234 The display should look like this: DIALING READY 100% 10:00AM The machine dials and connect to SET DOC. OR DIAL NO. the other party. The number that you dialed and the other party's Note RTI or CSI is displayed. - Page 32 Memory Transmission And Immediate Transmission If the label you want does not ap- pear, scroll through the labels us- ing with W and V until you find it. TEL DIR. Y/hi b12 XYZ CO.NEW YORK Press {Yes} to dial the number you want.
-
Page 33: Receiving Telephone Calls & Fax Messages (Faxes/Phone Calls)
Faxing Receiving Telephone Calls & Fax Messages (Faxes/Phone Calls) The machine can treat incoming fax Switching Between Auto, Fax messages and telephone calls in three ways. and Telephone Mode Auto mode The Manual Receive indicator is lit Use this mode if your line is shared when the machine is in Telephone by a fax machine and telephone. -
Page 34: Setting The Auto Ring Time
Receiving Telephone Calls & Fax Messages (Faxes/Phone Calls) Note Listen to the other end. If you wish to keep these set- tings, go to step E . If you hear a voice Press the {No} key, then press the A Continue your conversation as new number using the ten key you would normally. -
Page 35: Printing Received Messages That Have Been Stored (Substitute Reception)
Faxing Printing Received Messages That Have Been Stored (Substitute Reception) If the Receive File indicator is lit, a To turn substitute reception off or message was stored in memory using back on, set bit 0 of user parameter substitute reception. This could be be- switch 05. -
Page 36: Faxing A Page With Very Fine Detail
Faxing A Page With Very Fine Detail Faxing A Page With Very Fine Detail So that text, diagrams and images Note stand out clearly in your document, Faxing at a higher resolution re- the machine automatically detects the quires more time. Frequent use of image density (contrast) and makes a high resolution could cause an in- compensation. -
Page 37: Optional Features For Transmission
Faxing Optional Features For Transmission If you enter the wrong time, Sending At A Specific Time press the {No} key and enter again. (Send Later) Press {*} or {#} to change the AM/ This feature is called Send Later. Using this feature, you can delay transmission of your fax message un- SET OPTION */#/Y... -
Page 38: Printing The Page Number
Optional Features For Transmission Press V until the following dis- Printing The Page Number play appears. (Page Count) SET OPTION This feature is called Page Count. SET PAGES? When your fax message is printed at the other end, page numbers will be Press the {Yes} key. -
Page 39: Personal Codes
Faxing Press the {Yes} key. Press V and make sure that the display is as shown. SET OPTION Y/hi SET OPTION SET PERSONAL CODE? Press W or V until the displayed Press the {Yes} key. setting is correct. SET OPTION Y/hi SET OPTION KPAD... -
Page 40: Redialing
Redialing Redialing If a message was not transmitted suc- Using the AI Redial key cessfully, that does not mean that you have to enter the telephone number The machine remembers the last 10 again. In many cases, the machine telephone numbers that you input. If will redial the destination automati- you have to redial one of these num- cally. - Page 41 Faxing If you dial another party A Select another number. (Broad- casting) If you dial no more party A Press the {Start} key to start the transmission.
-
Page 42: Storing & Editing Fax Numbers (Functions 31 & 32)
Storing & Editing Fax Numbers (Functions 31 & 32) Storing & Editing Fax Numbers (Functions 31 & 32) • Press the V key until the Quick You can store numbers that you often use in the machine's memory. A Dial you want appears on the dis- stored number will remain in memo- play. -
Page 43: Storing, Editing & Erasing Speed Dial Numbers (Function 32)
Faxing Enter or edit the label using the Select a Speed Dial in any one of Quick Dial keys and the ten key the following ways: pad. See P.128 “Entering Charac- •Enter the Speed Dial code one the ters” ten key pad. (e.g. 01) ABC Y/N b01 PROGRAM? Y/hi... - Page 44 Storing & Editing Fax Numbers (Functions 31 & 32) Enter or edit the label using the Quick Dial keys. ABC Y/N NEW YORK OFFICEkkkkk Press {Yes} key. Y/hi LABEL SET ON iOFF Press a W or V to select whether the label for this Speed Dial will be printed on top of messages that you send to this destination.
-
Page 45: Storing & Editing A Group Of Fax Numbers (Function 33)
Faxing Storing & Editing A Group Of Fax Numbers (Function 33) Groups To program or edit a Quick Dial If you regularly broadcast messag- key for this group, press the {Yes} es to the same set of destinations, key. you can combine these numbers into a group. -
Page 46: Erasing Groups
Storing & Editing A Group Of Fax Numbers (Function 33) Enter or edit the name then press Erasing Groups the {Yes} key. How to enter characters, see P.128 These steps describe how to erase sin- “Entering Characters” gle numbers from a group. Press the {Function} {3} {3} and GROUP 1 KPAD/N... -
Page 47: Programming The Group Key
Faxing Programming The Group Key You can program the 5 groups. How- ever, if there is no room in Quick Dial keys, this group key is helpful. You have to program the 30 of the Quick Dial key as the group key. How to transmit using the group key, see P.13 “Memory Transmission (Memory Indi- cator Lit)”... -
Page 48: Dial Options
Dial Options Dial Options The Dial Options provide access to Using the Dial Options various F-code features which are de- signed to allow confidential transmis- To use the Dial Options, do the fol- sion and polling reception between lowing after you have dialed the des- different makers' fax machines. - Page 49 Faxing Press the {Start} key. Enter the SEP code on the ten key pad then press the {Yes} key. SID? (I) Do one of the following: • If you wish to set the SID code, press the {Yes} key. TRANSMIT Y/START 2345S9999P1234IkkkkW •...
-
Page 50: Chain Dialing
Chain Dialing Chain Dialing This feature allows you to compose a telephone number from various parts, some of which may be stored as Quick Dial Keys or Speed Dial Codes, and some of which may be input at the ten key pad. You can program commonly used area or country codes into Speed Dial Codes or Quick Dial Keys. -
Page 51: Erasing A Stored Message Before It Is Sent (Functions 21 & 22)
Faxing Erasing A Stored Message Before It Is Sent (Functions 21 & 22) Every time you store a fax message in Note your machine's memory, a new file is Press W to obtain a list of all the created. A file is also created for stor- files and their number. -
Page 52: Printing A Stored Message (Function 51)
Printing A Stored Message (Function 51) Printing A Stored Message (Function 51) If you need to see the contents of any files, use this feature. Press the {Function} {5} {1} and the {Yes} key. FILE NO.kkk KPAD/hi PRINT LISTh/SEARCHi Press V to scroll through the mes- sages. -
Page 53: Confidential Reception
Faxing Confidential Reception Editing the Confidential ID Storing & Editing the Confidential ID Press {Function} {6} then enter the access code {2} {2} {2} {2}. Then press {6} {1} and the {Yes} key. Programming the Confidential ID Y/NEXTi This can be any four-digit code except '0000'. -
Page 54: Printing Messages Received Into Memory (Function 52)
Confidential Reception To check for messages sent with Printing messages Received other Confidential ID codes, go to into Memory (Function 52) step B . Alternatively, press the {No} key then the {Function} key If someone sends you a message us- to quit this function. -
Page 55: Sending A Fax Using The Handset
Faxing Sending A Fax Using The Handset You can send a fax message using the handset. (Optional handset or exter- nal telephone is required.) Set the document then pick up the handset. Dial the other party. If you hear a voice A Speak to the other party. -
Page 56: Answering The Telephone
Answering The Telephone Answering The Telephone This feature is available when you connect the optional handset or exter- nal telephone. Note If the telephone rings just once, a fax is coming in. Do not pick up the handset. If the telephone rings continuously Pick up the handset and speak to the other party. -
Page 57: Phoning And Faxing On The Same Call
Faxing Phoning And Faxing On The Same Call To talk before sending a fax Pick up the handset. Dial. Note Do not press the {Start} key. If you hear a voice speak as a nor- mal telephone conversation. If you hear a high-pitched tone instead of a voice A Place your fax message in the feeder, then press the {Start}... -
Page 58: Other Features
4. Other Features Verifying Communications, Errors, Counters, Etc. You can obtain reports from your ma- Note chine either by having your machine Phone numbers stored in Quick/ print them out automatically, or by Speed/Groups are not lost. printing them out yourself. Communication Result Report (Mem- ory Transmission) (Switch 03, bit 0) Automatically printed reports... -
Page 59: Report Formats
Other Features Error Report (Turned on/off by a Serv- Polling Result Report ice Technician) This report is printed after your machine polls a message from an- This report is printed after each other machine. unsuccessful communication. The communication failure report is Printing Part of the Image on the Re- printed after a job has been com- port (Switch 04, bit 7) -
Page 60: Counters (Function 94)
Verifying Communications, Errors, Counters, Etc. Counters (function 94) These counters will help you if you wish to keep a regular check on how many pages your machine has sent, received, and copied. The machine has the following counters: TX Counter: The number of pages that your ma- chine has sent (transmitted) RX Counter:... -
Page 61: Programming Keystrokes
Other Features Programming Keystrokes If you regularly transmit to a particu- Note lar destination or set of destinations Skip step B if you are making a using the same features, you can save Polling Reception program. a lot of repetitive the ten key pad op- eration by storing the features and Select all required features and destinations in a Keystroke Program. -
Page 62: Labeling A Program
Programming Keystrokes Press the {Yes} key. Labeling a program QUICK/hi If you store a label for your keystroke PRINT LISTh/SEARCHi programs, the label will appear on the display when you use the program. To label another program Press the {Function} {3} {4} and the {Yes} key. -
Page 63: Erasing A Program / Changing The Program Label
Other Features Reference Either ; Picking Up Messages Stored Elsewhere (Polling Reception ) : QUICK/hi see P.73 “Calling To Request A PRINT LISTh/SEARCHi Message (Polling)” . To edit or erase another program Erasing a program / Changing A Go to step B. the program Label To return to standby When you wish to delete a keystroke... -
Page 64: Programming The Personal Codes
Programming the personal codes Programming the personal codes The main advantage of Personal Journal: see P.66 “Journal (Function Codes is that they allow you to track 41)” . machine usage You can still use Per- Confidential File Report: see P.39 sonal Codes to personalize your fax “Printing messages Received into messages, by using the Label Inser-... -
Page 65: Storing A Personal Code
Other Features Storing a personal code Press the {Function} {6} then enter To store the label for this the access code {2} {2} {2} {2}. personal code Then press {7} {2} and the {Yes} A Press the {Yes} key and go to key. - Page 66 Storing a personal code If you want to program the Confidential ID for this user A Press the {Yes} key. B Input a Confidential ID for the personal code used by this us- C Press the {Yes} key. To enter another code A Go to step C.
-
Page 67: Editing Or Erasing A Personal Code
Other Features Editing or erasing a personal code Press the {Function} {6} then enter To edit the label the access code {2} {2} {2} {2}. Then press {7} {2} and the {Yes} A Press the {Yes} key and go to step E . -
Page 68: Tonal Signals
Tonal Signals Tonal Signals On this model the {*} key on the ten Input the digits that you need to key pad is used as the Tone key. use the remote facility. After you Some organizations offer you a spe- have finished your business with cial service by telephone, which you the remote facility, hang up. -
Page 69: Rejecting Messages From Senders Who Don't Identify Themselves
Other Features Rejecting messages from senders who don't identify themselves Your fax machine can reject incoming messages lacking an identifier signal. Follow the user parameter procedure on to enter these settings. Switch 05, bit 1 • 0: Accept such messages •... -
Page 70: Rejecting Or Accepting Messages From Specified Senders (Authorized Reception)
Rejecting or accepting messages from specified senders (Authorized Reception) Rejecting or accepting messages from specified senders (Authorized Reception) This feature is called Authorized Re- Entering A List Of Senders To ception. It helps you reject junk fax mail. Treat Differently (Function 81) It lets you specify which terminals How to enter a list of senders to treat you wish to receive fax messages... -
Page 71: Entering A List Of Senders To Treat Differently (Function 81)
Other Features Entering A List Of Senders To Treat Differently (Function 81) You can enter a list of up to 30 identi- Enter RTI or CSI using the Quick fications (RTI, CSI and Wild Cards) Dial key and the ten key pad. for senders you wish to treat differ- ently. -
Page 72: Editing The Rti/Csi For The Special Terminals
Entering A List Of Senders To Treat Differently (Function 81) Press V to scroll through the list. Either: W h e n R T I / C S I y o u w a n t t o change appears, press the {Yes} To program another special key. -
Page 73: Erasing The Special Terminal
Other Features Either: To edit another special terminal A Go to step B. To finish A The {Function} key. Erasing the special terminal Press the {Function} {6} then enter the access code {2} {2} {2} {2}. Then press {8} {1} and the {Yes} key. -
Page 74: Forwarding
Forwarding Forwarding Using this feature, you can send fax • Select whether or not your ma- messages coming in from certain lo- chine transmits a forwarding mark cations on to another fax machine. to be printed at the other end on The terminals that receive your for- the top of each page of the printout warded messages are called “for-... - Page 75 Other Features Store a forwarding station number. Type in an RTI or CSI. FORWARD KPAD/Y/N RTI/CSI ABC Y/N 2125551234kkkkkkkkkk XYZ COMPANY Note Reference Example: {2} {1} {2} {5} {5} {5} How to enter characters, see {1} {2} {3} {4} P.128 “Entering Characters” . If your machine is behind a Press the {Yes} key.
-
Page 76: Editing The Forwarding Feature
Forwarding If this forwarding station's Editing the forwarding feature telephone number is correct Press the {Function} {6} then enter A Press the {Yes} key. the access code {2} {2} {2} {2}. Then press {8} {2} and the {Yes} FORWARD key. SET RTI/CSI? SETTING? Y/hi... -
Page 77: Switching Forwarding On / Off (Function 62)
Other Features If you edit the RTI/CSI To work on another forwarding station: A Edit the RTI/CSI. A Press the {No} key. Go to step RTI/CSI STORE AS WILD CARD? Important B Press the {Yes} key. Then go to If you switch the forwarding step F . -
Page 78: Selecting Which Messages To Forward
Forwarding • Bit 1=1 : Forwarding mark on Selecting which messages to (See P.120 “User Parameters” ). forward To choose which messages are for- warded, adjust bit 7 of switch 8 with the User Parameters. Two settings are available. • Forward all incoming messages from specified senders (bit 7=0). -
Page 79: Wild Cards
Other Features Wild Cards This feature greatly enhances the ef- Reference fectiveness of the following features: Authorized Reception: see P.55 • Authorized Reception “Rejecting or accepting messages from specified senders (Authorized Recep- • Forwarding tion)”. In each of these features, you have to Forwarding: see P.59 “Forward- store the RTI or CSI of various termi- ing”. -
Page 80: Receiving Options
Receiving Options Receiving Options As receiving options, the Reverse Or- der Printing is available. Reverse Order Printing Normally, the machine prints the pages of received messages in the or- der that they were received uncollat- However, with Reverse Order Print- ing, the machine will collate the se- quence by printing the message from the last page first collated. -
Page 81: Reports You Can Printout Yourself
Other Features Reports You Can Printout Yourself You can print these reports at any Press the {Function} {4} {3} and time by following the steps below. the {Yes} key. Journal (Function 41) ALL LISTS? START/N QUICK/SPEED/GROUP In addition to the automatic output of this report, which we've described To print all the numbers (Quick earlier, you can print the Journal at... -
Page 82: Program List ( Function 44 )
Reports You Can Printout Yourself C Press the {Yes} and {Start} keys. START To print the Group list A Press the {No} key. SELECT LISTS QUICK DIAL LIST? B Press the {No} key. SELECT LISTS SPEED DIAL LIST? C Press the {No} key. SELECT LISTS GROUP LIST? D Press the {Yes} and {Start}... -
Page 83: Saving Energy
Other Features Saving Energy To print a fax message your fax ma- How to start the saving energy chine uses a heating roller to fuse the image to the paper. This roller must mode already be hot when the paper passes under it. -
Page 84: Which Saving Energy Mode Is Best For You
Saving Energy Which saving energy mode is best for you? You have two choices: You can let the roller cool to room temperature or you can let it cool to the midpoint. To choose which of the two settings you would prefer, set the user parameter switch. -
Page 85: Saving Energy With The Power Saving Timer
Other Features Saving Energy With The Power Saving Timer You can set sleep time to let the ma- Press the {Function} {6} then enter chine go to saving energy condition access code {2} {2} {2} {2}. Then and set the wake up time when it re- press {7} {1} and the {Yes} key. -
Page 86: Switching The Power Saving Timer On / Off ( Function 62 )
Saving Energy With The Power Saving Timer Input the time (9:00AM) : Press Switching the Power Saving {0} {9} {0} and {0} from the key Timer on / off ( Function 62 ) pad. The Power Saving timer feature must TIMER#1 TUE KPAD/Y be switched on using Function 62. -
Page 87: Copying
Other Features Copying If you need to make a copy of some- thing, and there is no copier available, use your fax machine. Just place your original in the feeder, and press the {Copy} key. Note By default, copies are made at De- tail resolution. -
Page 88: Calling To Request A Message (Polling)
Calling To Request A Message (Polling) Calling To Request A Message (Polling) Polling means “picking up” a docu- Enter the Dial number. ment that has been left for you at a re- mote fax terminal. POLLING RECV Y/START 2125551234kkkkkkkkkk Limitation Polling can only be used when both machines have the Polling Press the {Yes} key. - Page 89 Other Features Note Example: {2} {5} {6} {7} from the ten key pad. Press the {Yes} key. POLLING RECV OPTIONi DIAL FAX NUMBER Dial and press the {Start} key. Limitation In theory, you can poll up to 100 different destinations using the above procedure.
-
Page 90: User Function Keys
User Function Keys User Function Keys There are two Function keys (F1 and Press one of the User Function F2) on the operation panel. Keys. You can program each of these keys with a feature that you wish to use PROGRAM?Y/hi frequently. -
Page 91: Editing A Function Program
Other Features Press the {Yes} key. Editing a Function Program Y/N/hi Press the {Function} {3} {5} and CODE 03 GROUP KEY the {Yes} key. Press the {No} key. F1-F2/hi PRINT LISTh/SEARCHi Press the {Yes} and {Function} key. Press the user Function key that you wish to change. -
Page 92: Dual Access
Dual Access Dual Access Dual Access means that even if the machine is already carrying out a task, you may be able to operate the machine. For instance, if your machine is currently receiving a long fax message, but you want to send a message and go back to your desk without having to wait by the machine, you can place your message in the feeder, select the required transmis- sion features, dial the number, and press Start. - Page 93 Other Features This page is intentionally blank.
-
Page 94: Maintaining Your Machine
5. Maintaining Your Machine Loading Paper In The Main Cassette Pull out the paper cassette and place it on a flat surface. Note Remove any paper that may have dropped inside the machine in the area vacated by the paper cassette. Lift up the cassette cover and remove it. - Page 95 Maintaining Your Machine If the metal base plate is raised, push it firmly down until it locks into place. TSTC050N If you change the paper to Legal size, push the button (A), and extend the paper cassette(B). Note When you change the paper size, you need to adjust the paper size setting with Function 36.
- Page 96 Loading Paper In The Main Cassette Load the paper into the cassette. Replace the cassette cover. Note The frosted side of the cover must be face up when closed. TSTC220N Replace the cassette. Push it in firmly until it locks into place.
-
Page 97: Replacing The Toner Cassette And Cleaning Pad
Maintaining Your Machine Replacing The Toner Cassette And Cleaning Pad Note When the Add Toner indicator (D) starts to blink, the toner cassette is almost empty. You will make 100 more copies before you have to change the toner cassette. When the Add Toner indicator (D) remains lit, it is time to install a new toner cassette. - Page 98 Replacing The Toner Cassette And Cleaning Pad Grasp the old toner cassette as shown, and lift it out carefully. Do not incinerate waste toner. Toner dust may ignite suddenly when exposed to an open flame. ZAXT070E Remove the old cleaning pad. Install the cleaning pad a shown in the illustration.
- Page 99 Maintaining Your Machine Prepare the new toner cassette. Important Do not touch the green drum. Remove the new toner cassette from its bag. Do not remove any paper or tape yet. Hold the cassette horizontally and shake it gently from side to side a few times TSTT070N Hold the cassette as shown and rest it in the machine.
- Page 100 Replacing The Toner Cassette And Cleaning Pad Press down on the cassette until it locks into place. Note If you do not push the cassette right in, the top cover will not close. ZAXT020E Close the top cover. ZAXC040E Note Background gray cast is sometimes evident on printed messages just after installing a new toner cassette.
-
Page 101: Toner Cassette
Maintaining Your Machine Toner Cassette • Store in a cool, dark place. • Never store where they may be exposed to heat. • Keep out of the reach of children. • Do not eat toner. • Do not lay heavy objects on toner cassette. •... -
Page 102: Cleaning The Rollers And Scanner
Cleaning The Rollers And Scanner Cleaning The Rollers And Scanner To maintain the machine's condition, clean the rollers and scanner from time to time. Open the top cover. Wipe the rollers. Wipe the white roller with a damp cloth. Roll it round with your fingers so that you can wipe the whole surface. -
Page 103: Changing The Paper Size In The Paper Cassette
Maintaining Your Machine Changing The Paper Size In The Paper Cassette This example explains how to switch to A4 size paper. To switch to other paper sizes, follow the same steps but move the end plate and side rails to the appro- priate size mark on the cassette. - Page 104 Changing The Paper Size In The Paper Cassette If this is the main cassette and the metal base plate is raised, push it firmly down until it locks into place. TSTC050N Squeeze the green end plate slightly and remove it. Insert the end plate into the A4 slot as shown.
- Page 105 Maintaining Your Machine Remove the side rail (Squeeze in one of the plastic tabs on the underside of the cassette to loosen it). TSTC070N Replace the side rail in the A4 slots. Note There are two sets of slots and they are marked on the base. Make sure that the upper and lower tabs on the rail both fit in the inner set of slots.
- Page 106 Changing The Paper Size In The Paper Cassette Replace the plate, orienting it so that the A4 symbol is visible in the win- dow at the front of the cassette. TSTP110N Prepare a stack of blank paper. For smoother operation, square the edges. Load the paper into the cassette.
- Page 107 Maintaining Your Machine Replace the cassette cover. Note The frosted side of the cover must be face up when closed. TSTC220N Replace the cassette. Push it in firmly until it lock into place. Note It is a good idea at this time to check that the side rails have not dislodged while you were loading paper.
-
Page 108: Changing The Paper Size Setting
Changing The Paper Size Setting Changing The Paper Size Setting When you change the paper size loaded in the paper cassette, you need to change the paper size setting. Press the {Function} {3} {6} and the {Yes} key. Alternatively, if the machine is in standby mode, just press the W key. - Page 109 Maintaining Your Machine This page is intentionally blank.
-
Page 110: Troubleshooting
6. Troubleshooting If An Indicator Lights Up On The Operation Panel appears in the display: PRESS STOP KEY Press the {Stop} key. The Receive File indicator is lit: You've received a fax message which is now stored in the machine. See P.20 “Printing Received Messages That Have Been Stored (Substitute Reception)”... -
Page 111: Other Possible Problems
Troubleshooting Other Possible Problems You Want To Remove The Document In The Feeder Open the document feeder (see P.97 “Clearing a Document Jam” ), then remove the document. Important Do not pull out the document without opening the auto document feeder, or you will damage the scanning mechanism. -
Page 112: Clearing A Document Jam
Clearing a Document Jam Clearing a Document Jam When an original is jammed, CLEAR ORIGINAL is displayed — follow this pro- cedure to solve the problem. Note If copies, fax message or prints are jammed, follow the next procedure. Open the top cover to an angle of about 45°. Remove the original. -
Page 113: Clearing A Copy, Fax, Or Print Jam
Troubleshooting Clearing a Copy, Fax, or Print Jam When CLEAR COPY is displayed, follow this procedure to solve the problem. For how to clear original jams, see the previous procedure. Clear a Jam inside the machine Pull the lower unit release lever towards you and open the top cover. Note If you do not pull the lever, only the upper unit will open. - Page 114 Clearing a Copy, Fax, or Print Jam Remove any jammed paper underneath. Replace the toner cassette. ZAXT010E Close the top cover. ZAXC040E...
-
Page 115: Clear A Jam In The Cassette Entrance
Troubleshooting Clear a Jam in the Cassette Entrance Remove the main cassette and place it on a flat surface. Remove any paper from inside the machine. Push down the paper so that the base plate locks into place. TSTJ090N... -
Page 116: Clear A Jam In The Upper Rear Unit
Clearing a Copy, Fax, or Print Jam Replace the main cassette. Clear a Jam in the Upper Rear Unit Lift back the document table. ZAXF010 Open the upper rear cover. ZAXJ060... - Page 117 Troubleshooting Pull out any jammed paper. ZAXJ070 Close the upper rear cover. ZAXJ080...
-
Page 118: If Messages You Receive Don't Fit On Your Paper
If Messages You Receive Don't Fit On Your Paper If Messages You Receive Don't Fit On Your Paper Breaking Down Large Format Messages If the incoming document is longer than the paper in your fax machine, the ma- chine will split it into multiple sheets. The tail end of the message will be repro- duced at the head of the next page. -
Page 119: Communication Problems
Troubleshooting Communication Problems appears in the ERROR PRESS STOP display: Press the {Stop} key. Causes: • A poor line caused the communi- cation to fail. • The line is busy or noisy. Try to re- transmit. • The other machine is out of order. Ask the other party to check their machine. -
Page 120: Rds (Remote Diagnostic System)
RDS (Remote Diagnostic System) RDS (Remote Diagnostic System) If your machine has a problem, a Press the {Yes} key. service technician can perform vari- ous diagnostic tasks over the tele- Y/hi phone line from the service station to iOFF try to find out what is wrong with your machine. -
Page 121: Adjusting The Printing Margins (Function 95)
Troubleshooting Adjusting the Printing Margins (Function Follow these steps if you wish to ad- Press the {Yes} key. If the left just the top and left margins on print- margin is OK, go to step I. ed messages. You can chose the site of margins in TOP MARGIN Y/N/hi steps of about 0.5 mm. -
Page 122: Operating Difficulties
Operating Difficulties Operating Difficulties Problem Required Action STANDBY MODE Nothing happens when the Check the power cord. Is it properly plugged into the switch is turned on. outlet? Plug it in firmly. SET DOC. OR DIAL NO. is Switch the power on. not displayed. - Page 123 Troubleshooting Problem Required Action TRANSMISSION The original is not pulled into You did not feed the document far enough into the the auto document feeder. feeder. Insert the document into the feeder until it stops. Retransmit. Do user maintenance, especially rollers (1,8). The telephone line is disconnected.
- Page 124 Operating Difficulties Problem Required Action Frequent original misfeeds Multifeeds Incorrect positioning of originals Put the document in the feeder correctly. See P.13 “Memory Transmission (Memory Indicator Lit)”. Incorrect alignment of originals Align the edges of the document. See P.12 “Page Con- dition”.
- Page 125 Troubleshooting Problem Required Action Transmission cannot take The document is jammed in the feeder. place; CLEAR ORIGINAL ap- Remove the jammed document (see P.97 “Clearing a pears. Document Jam” ) and repeat the transmission proce- dure. The document may be longer than the maximum limit (see P.6 “Copy Paper”...
- Page 126 Operating Difficulties Problem Required Action Copies are blank. The original must be placed face down in the docu- ment feeder. Position the original correctly. See P.13 “Memory Transmission (Memory Indicator Lit)” . Copy paper misfeeds occur Is the proper paper in the paper cassette? frequently.
-
Page 127: Displayed Error Messages
Troubleshooting Displayed Error Messages The following messages may appear while you are operating or programming the machine. You cannot use the auto-dialer at the mo- CHECK AUTO-DIALING ment. Use the ten key pad or the handset. No polling reception operations have NO FILE EXISTS been programmed. - Page 128 Displayed Error Messages The toner cartridge is empty. Install a new ADD TONER cartridge. A document is jammed in the feeder. CLEAR ORIGINAL Paper is jammed in the printer. CLEAR COPY A cover is not closed properly. Check that CLOSE COVER all covers are closed.
-
Page 129: Error Codes
Troubleshooting Error Codes Fax machines use a telephone line. The same types of problems you experience while making phone calls (such as noisy lines, cross talk, disconnection during conversation, weak signals) also occur with faxing. Telephone callers can deal with the problems themselves (for example, by speaking a bit louder), but fax machines cannot. - Page 130 Error Codes Code Possible Cause 0-70 Incompatible or faulty terminal at the other end. 0-80 Poor line condition. 0-81 Incompatible or faulty terminal at the other end. 0-82 There is a problem with your machine. 0-83 0-84 0-85 0-86 0-87 0-88 1-00 Document jam...
- Page 131 Troubleshooting Code Possible Cause 6-01 Poor line condition, a problem with the machine at the other end, or a problem with your machine 6-02 6-03 6-04 6-05 6-06 6-07 6-08 6-09 6-10 6-11 6-08 A problem with the machine at the other end 6-09 A problem with the machine at the other end, or a problem with your machine 6-10...
-
Page 132: Calling The Service Station
Calling The Service Station Calling The Service Station The machine has a feature called Service Report Transmission. Use this feature when your machine is having problems. The machine will transmit information about the condition of your machine to your service repre- sentative. - Page 133 Troubleshooting This page is intentionally blank.
-
Page 134: Technical Reference
7. Technical Reference Access Code For Functions 61 To 95 Accessing functions 61 to 95 requires an access code. The sole purpose of this feature is to keep others from accidentally misad- justing the machine. This code cannot be changed, so do not rely on it as a security feature. -
Page 135: User Parameters
Technical Reference User Parameters Adjusting your machine sometimes requires that you change special settings called user parameters. For each user parameter, you must change a bit in a switch. A switch has eight bits. Each bit has a value of 1 or 0, and each bit is numbered 0 to 7 from the right. - Page 136 User Parameters -List of all relevant user parameters Many bit settings have no effect and are not listed. (Never change these). Digits & Definition Settings 0, 1, 2 and 3 Do not change these set- tings 4, 5: Default resolution when you send a Bit: 4, 5 message STANDARD: 0, 0...
- Page 137 Technical Reference Digits & Definition Settings 0: Automatically print memory transmis- Off: 0 sion reports. On: 1 COMMUNICATION RESULT REPORT(MEM- ORY TX) 2: Automatically print storage reports for Off: 0 memory transmission. On: 1 FILE RESERVE REPORT(MEMORY TX) 4: Automatically print polling reception re- Off: 0 ports.
- Page 138 User Parameters Digits & Definition Settings 2, 3: AUTHORIZED RECEPTION (Can also use function 62) 2 3: 0 X: Off 1 0: Receive messages only from senders whose RTI/ CSIs are programmed. 1 1: Receive messages only from senders whose RTI/ CSIs are not programmed.
-
Page 139: User Parameter Hints
Technical Reference User Parameter Hints Changing your machine's default settings These are the settings your machine assumes immediately after it is turned on, after clearing the machine, or after you or the power saving reactivates it. Many of the user parameters determine your machine's default settings. Clear modes after sending or loading a fax message (Switch 01, bit 7) Your machine can either reset itself or keep its settings (for a few minutes) af- ter it sends a fax message. -
Page 140: Adjusting The Volume Of Various Features (Function 92)
Adjusting The Volume Of Various Features (Function 92) Adjusting The Volume Of Various Features (Function 92) You can change the beeper (monitor) volume of the desired feature. Beeps to signal transmissions. TRANS MONITOR Beeps to signal receptions. RECV MONITOR Beeps to signal on hook dialing. ONHOOK MONITOR Beeps when a number is dialed. - Page 141 Technical Reference Adjust the BUZZER volume with W and V and press the {Yes} key when you're done. BUZZER Y/N/hi MIN iii Adjust the KEY volume with W and V and press the {Yes} key when you're done. Y/N/hi MIN iii Press the {Function} key to return to standby mode.
-
Page 142: Selecting The Display's Language (Function 93)
Selecting The Display's Language (Function 93) Selecting The Display's Language (Function 93) If you would rather use another lan- guage for messages and displays, fol- low the procedure below. Press the {Function} {6} then enter the access number {2} {2} {2} {2}. Then press {9} {3} and the {Yes} key. -
Page 143: Entering Characters
Technical Reference Entering Characters Use the ten key pad for entering numbers. Use Quick Dial keys 1 to 26 for enter- ing letters, the W and V keys to change to another letter, the {Yes} key to accept a character, and Quick Dial key 27 for spaces and Quick Dial key 28 for other characters. -
Page 144: Document & Paper Specifications
Document & Paper Specifications Document & Paper Specifications • Do not print to folded, stapled, Documents (Using The Auto clipped, glued, or taped paper. Document Feeder) • Do not print to paper with any kind of coating or printing. Do not print to metallic paper. -
Page 145: Capabilities
Technical Reference Capabilities Stored Numbers (Long Term) • 30 Quick Dial keys, each of which can hold an individual number. Any five of the Quick Dial keys can hold a group of numbers. • 50 individual numbers stored as two-digit Speed Dial codes (see P.27 “Storing &... -
Page 146: Specifications
Specifications Specifications Paper cassette capacity: Base Machine 250 sheets (20 lb) Paper Size: Power supply: Letter, Legal (Adjustable to A4, A5 115Vac, 60 Hz L, and F4 ) Power consumption: Dimensions (W × D × H): Energy saver mode: Average 2 W 13.4 ×... - Page 147 Technical Reference This page is intentionally blank.
-
Page 148: Installation
8. Installation Before Installation Before installing your machine, read the safety instructions at the begin- ning of this manual. To install the ma- chine, follow these procedures: Find a suitable location for the ma- chine. Remove all the pieces of tape at- tached to the machine. -
Page 149: Machine Environment
Installation Machine Environment When choosing a location for your • With the clearance as shown machine, please follow the safety in- struction given on the first section. Location For the best possible performance, in- stall your machine in a place which satisfies the following conditions. -
Page 150: Installing The Optional Memory Card
Installing The Optional Memory Card Installing The Optional Memory Card Turn off the power switch. TSTP040N Remove the cover from the front right of the machine. Hold the card in the way shown (pay attention to which side is printed) and insert it carefully into the slot. -
Page 151: Installing The Optional Handset
Installation Installing The Optional Handset Plug the handset jack into the “TEL1” socket at the rear of the machine. ZAXH040E Place the handset beside the machine. -
Page 152: Connecting The Machine
Connecting The Machine Connecting The Machine Before using the machine, connect the machine to the telephone line properly. Then plug in the power cable and switch on. Make sure the machine is properly connected to the telephone line and the pow- er outlet, as shown following. -
Page 153: Connecting Up To The Telephone Line
Installation Connecting Up To The Telephone Line There are similar sockets located at the rear of the machine: • TEL1: For the handset option or external telephone • LINE: Telephone line connection Insert the line cable into the socket labeled “LINE”. ZAXH050E Connect the other end to your telephone line. -
Page 154: Connecting The Power And Switching On
Connecting The Power And Switching On Connecting The Power And Switching On Do not switch on until everything is connected properly. Insert the power cable into the socket located at the rear of the machine. Plug in the cable to the mains. Turn the power switch on. -
Page 155: Initial Settings & Adjustments
Installation Initial Settings & Adjustments Before you connect your machine to Line: the telephone system, you must enter You must match the fax machine to a few settings and make a few adjust- the type of line you use: a tone line ments. - Page 156 Initial Settings & Adjustments Press the {Function} {6} then enter Enter your office, company, or the access code {2} {2} {2} {2}. personal name, or any other ap- Then enter {6} {1} and the {Yes} propriate identification. (Using key. the Quick Dial keys.) Y/NEXTi ABC Y/N SET OWN NUMBER...
-
Page 157: Setting The Access Number
Installation Press the {Yes} key to store your Enter your phone number includ- setting, then press the {Function} ing the country and area codes, (but no pauses). key. KPAD/Y/N Setting The Phone Line 12125551234kkkkkkkkk (Function 62) Note Should be the same as in step D. Press the {Function} {6} then enter the access code {2} {2} {2} {2}. -
Page 158: Setting The Date & Time (Function 91)
Initial Settings & Adjustments If the lower 2 digits are 89 or Setting The Date & Time less, the year is 20xx, where xx are the lower 2 digits. (Function 91) */#/Y Press the {Function} {6} then enter NOV. 30 2000 10:25AM the access code {2} {2} {2} {2}. - Page 159 Installation Use the W and V arrows on the scroll key to switch the feature on or off. This mode is off if the dis- play is shown. SUMMER TIME/DST Y/hi iOFF To store your setting, press the {Yes} key. Press the {Function} key to finish.
-
Page 160: Function List
9. Function List Function List Press the {Function} key followed by one of the numbers below. Feature Reference Picking a document stored elsewhere P.73 “Calling To Request A Message (Polling)” Erasing a message stored for transmis- P.36 “Erasing A Stored Message Before It sion Is Sent (Functions 21 &... - Page 161 Function List Feature Reference RTI ( a name ID sent to other machines) P.140 “Initial Settings (Function 61)” TTI ( an ID printed on messages you P.140 “Initial Settings (Function 61)” send ) CSI ( phone ID sent to other machines ) P.140 “Initial Settings (Function 61)” PSTN accessing code P.142 “Setting The Access Number”...
-
Page 162: Certification Label
10. Certification Label Certification Label The certification is located behind the machine. -
Page 163: Index
INDEX Counters , 45 Cover release button , 8 Access Code , 119 CSI (Called Station Identification) , 140 Access Number , 140 , 142 Activity Report , 44 Add Paperindicator , 9 Date & Time , 140 , 143 Add Toner Indicator , 82 Daylight Saving Time , 143 Add Tonerindicator , 9... - Page 164 Faxing , 11 , 13 Machine Environment , 134 Fax mode , 18 Machine Layout , 7 File list , 66 Main switch , 7 File Reserve Report , 43 Maintaining , 79 Forwarding , 59 Manual Receiveindicator , 9 , 18 Forwarding Mark , 63 Margin , 106 Free polling reception program , 47...
- Page 165 Journal , 43 , 44 , 66 Printing Page Number , 23 Polling Result Report , 44 Part of the Image , 44 Power Failure Report , 43 Received Messages , 20 , 39 Quick Dial List , 66 Stored Messages , 37 Service Report , 117 Telephone number list , 66 Speed Dial List , 28 , 66...
- Page 166 Troubleshooting , 95 TTI (Transmitter Terminal Identification) , 23 , 140 User Function keys , 10 , 75 User Parameter Hints , 124 User Parameter List , 121 User Parameters , 120 Using AI Redial key , 25 Dial Options , 33 Function Program , 75 Program , 47 Tone key , 53...
- Page 167 This page is intentionally blank.
- Page 168 This page is intentionally blank.
- Page 169 USA H545...
Need help?
Do you have a question about the FAX1900L and is the answer not in the manual?
Questions and answers