Table of Contents
Advertisement
Available languages
Available languages
Quick Links
Advertisement
Chapters
Table of Contents

Subscribe to Our Youtube Channel
Related Manuals for EMG VELOCIPTOR ES 108 EW HERO


Summary of Contents for EMG VELOCIPTOR ES 108 EW HERO
- Page 1 es 108 ew HERO manuale utente user guide MANUEL DE L’UTILISATEUR ®...
- Page 2 Vi ringraziamo per l’acquisto del monopattino elettrico VELOCIPTOR ES 108 EW Vi preghiamo di leggere il manuale prima dell’utilizzo del prodotto, e di mantenerlo in un luogo sicuro per future consultazioni. manuale Originale pittogramMi Obbligo di indossare un casco protettivo Leggere le istruzioni prima dell’uso...
-
Page 3: Table Of Contents
indice Nota sul manuale ....................4 Dati del caricabatterie ..................4 Avvertenze ......................5 Descrizione generale ..................9 Installazione del manubrio ................10 Primo utilizzo ..................... 11 Aprire e ripiegare il monopattino ..............11 Come ricaricare la batteria ................12 Autonomia ......................14 Display e comandi ..................... -
Page 4: Nota Sul Manuale
Nota sul manuale Questo manuale fornisce all’utente una descrizione delle caratteristiche e del fun- zionamento del veicolo. L’utilizzo del veicolo avviene sotto l’esclusiva responsabilità del conducente che, dopo aver letto e compreso il presente manuale, e dopo aver richiesto al venditore e/o al produttore gli eventuali chiarimenti ritenuti necessari, considera sé... -
Page 5: Avvertenze
Avvertenze • Prenditi il tempo necessario per imparare le basi della pratica di guida ed ac- quisire l’esperienza per evitare incidenti gravi che possono verificarsi nei primi periodi di utilizzo. • Contatta il venditore per essere indirizzato a un’organizzazione di formazione di guida adeguata. - Page 6 • L’uso prolungato del veicolo o su superfici irregolari potrebbe portare a nume- rose vibrazioni del corpo che potrebbero scatenare determinati dolori; utilizza- re il monopattino in modo ragionevole per limitare questi rischi. • Evita gli spazi ristretti o gli spazi con ostacoli. •...
- Page 7 • I minorenni che utilizzano il monopattino devono sempre essere sorvegliati da un adulto. • Non guidare il monopattino con più di una persona sul poggiapiedi poiché ciò potrebbe causare la perdita di controllo del veicolo. • Non utilizzare il monopattino in situazioni che potrebbero essere pericolose per la tua sicurezza e quella delle persone intorno a te.
- Page 8 • Il monopattino non deve essere dotato di sedile per l’utente perché è progetta- to per essere utilizzato in piedi. • Il monopattino è dotato di un campanello per tutti i segnali acustici. • Solo gli adulti o le persone di età superiore ai 14 anni possono guidare il monopattino. •...
-
Page 9: Descrizione Generale
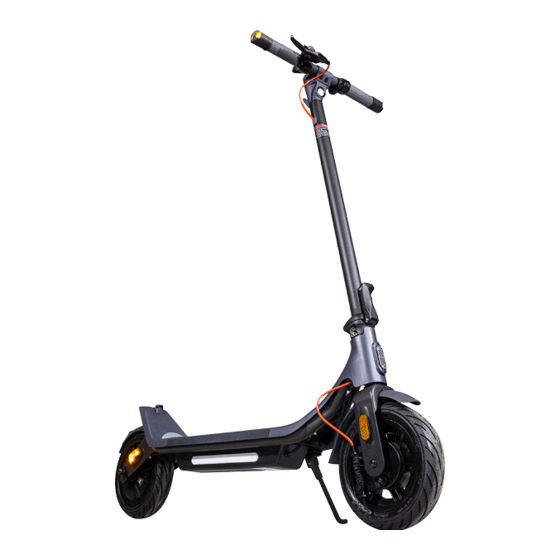
Descrizione generale 1. Manubrio con display 12. Indicatori di direzione frontali 2. Avvisatore acustico 13. freno elettronico 3. Controllo del freno a tamburo 14. Comando indicatori di direzione 4. Luce anteriore 15. Tasto accensione/spegnimento 5. Piantone manubrio 16. Acceleratore 6. Meccanismo di chiusura piantone 17. -
Page 10: Installazione Del Manubrio
installazione del manubrio Collegare i due connettori (uno nero e uno bianco) che escono dal manubrio ai connettori (nero e bianco) che escono dal piantone avendo cura di rispet- tare i colori (nero con nero e bianco con bianco) e il verso di inserimento di entrambi i connettori. -
Page 11: Primo Utilizzo
primo utilizzo Freno a tamburo Il freno a tamburo è regolato in fabbrica, ma è consigliabile verificarlo al primo utilizzo. a / l’intensità della frenata viene regolata dalla vite sulla leva del freno (1) o dal meccanismo del freno (2) che si trova sulla ruota anteriore. Tipologia e Pressione degli pneumatici Il monopattino monta pneumatici da 10”... -
Page 12: Come Ricaricare La Batteria
Aprire e ripiegare il monopattino Come aprire il monopattino Con il monopattino chiuso e il manubrio agganciato alla coda posteriore, sgan- ciare il manubrio agendo sulla leva di sblocco situata sul gancio del manubrio stesso; Sollevare leggermente il manubrio e guidarlo fuori dall’apposito scasso muo- vendo il manubrio verso il lato di uscita;... - Page 13 Come ricaricare la batteria Procedura di ricarica Aprire il cappuccio protettivo della presa di ricarica situata sul lato del mono- pattino e collegare la spina di ricarica del caricabatterie, facendo attenzione al verso di inserimento; Collegare il caricatore alla presa a muro a 220V Il processo di ricarica è...
-
Page 14: Autonomia
Autonomia La distanza massima percorribile con una singola carica della batteria è di circa 30 Km. Tuttavia questo valore deve essere considerato indicativo poiché può essere influenzato da numerosi fattori. Tra i fattori che maggiormente possono incidere sull’autonomia della batteria sono inclusi i seguenti: Peso trasportato: •... - Page 15 Display e comandi 9 10 Avvisatore acustico (campanello). 11. Gancio Controllo del freno a tamburo. 12. Tasto multifunzione; accensione/ Freno elettronico. spegnimento. Comando indicatori di direzione 13. Acceleratore 10. Display. Accensione e spegnimento Premere una volta il tasto multifunzione (12), per accendere il monopattino; tenerlo premuto 3 secondi per spegnerlo.
- Page 16 Display e comandi Nota: il LED anteriore è a luce bianca mentre il LED posteriore è a luce rossa fissa. Tirare la leva del freno a tamburo o abbassare il controllo del freno elettronico per far lampeggiare la luce posteriore a LED. Cambio unità...
-
Page 17: Utilizzo App
UTilizzo app Lo scooter può essere collegato e gestito per alcune sue funzioni tramite una App chiamata LEQISMART. L’App, per i dispositivi Android, è scaricabile da Google Play Store, mentre, per i dispositivi Iphone, è scaricabile da Apple Store, oppure, è possibile scansionare i seguenti codici QR in base al vostro smartphone: Per versioni Android Per versioni iOS... - Page 18 Applicazione per il controllo dello scooter 5. Scegliere il codice dello scooter nella lista dei dispositivi rilevati, sulla parte bassa dello schermo del telefono (il nome del monopattino sarà HERO); 6. Selezionare il comando “Associa” per completare il collegamento; 7. Nella pagina successiva scrivere il nome che si vuole dare allo scooter e poi sele- zionare “Associa”.
- Page 19 Applicazione per il controllo dello scooter Una volta connesso al vostro telefono, apparirà la pagina principale di controllo del- lo scooter. Suggerimenti Indicatore di e messaggi di connessione sistema Impostazioni Selezione monopattino se si hanno più mezzi collegati Tempo totale Livello batteria di utilizzo Chilometri dispo-...
- Page 20 Applicazione per il controllo dello scooter Nella sezione “Impostazioni” è possibile impostare diversi parametri, i più rilevanti sono i seguenti: Regolazione limite velocità Partenza a spinta/ senza spinta Selezione unità di misura Selezione intensità recupero energia Segnalazione di eventuali guasti Ripristino impostra- zioni di fabbrica Attenzione: Se il monopattino è...
-
Page 21: Come Utilizzare Il Monopattino
Come Utilizzare il monopattino 1. Premere il tasto per accendere lo Si prega di indossare casco, ginoc- chiere e gomitiere quando si deve scooter. imparare a guidare lo scooter. 2. Assicurarsi che il cavalletto sia in 3. Una volta che si ha abbastanza posizione di chiusura;... -
Page 22: Specifiche Tecniche
Come Utilizzare il monopattino 6. Per frenare, rilasciare l’accelera- 7. Quando lo scooter si ferma o tore, in modo da far agire il freno procede a bassa velocità, portare la motore, oppure, per frenate più gamba fuori dalla pedana per brusche, utilizzare contemporanea- rimanere in equilibrio. -
Page 23: Informazioni Agli Utenti Di Apparecchiature Domestiche
informazioni agli utenti di apparecchiature domestiche Ai sensi del Decreto Legislativo N° 49 del 14 Marzo 2014 “Attua- zione della Direttiva 2012/19/UE sui rifiuti di apparecchiature elettriche ed elettroniche (RAEE)”. Il simbolo del cassonetto barrato riportato sull’apparecchiatura indica che il prodotto alla fine della propria vita utile deve essere raccolto separatamente dagli altri rifiuti. -
Page 24: Garanzia
Garanzia 1. La garanzia entra in vigore alla data del documento fiscale e copre difetti di fab- bricazione e conseguenti guasti sorti durante il periodo di validità della garanzia. 2. In caso di guasto dell’apparecchio, per chiedere assistenza l’acquirente potrà rivolgersi al rivenditore presso cui ha acquistato il prodotto oppure a: Centro Trevi S.p.a. - Page 25 Garanzia 5. La mera autorizzazione all’invio del prodotto presso il centro assistenza non implica che il difetto sia stato riconosciuto coperto da garanzia con conseguente riparazione gratuita del prodotto. Il prodotto deve essere spedito all’interno della confezione originale, o in altra confezione idonea, e in ogni caso inserito in un im- ballo protettivo che sia idoneo ad una spedizione tramite corriere o servizio postale.
- Page 26 es 108 ew HERO Thank you for purchasing the electric scooter VELOCIPTOR ES 108 EW Please read the manual before using the product, and keep it in a safe place for future reference. pictograms Obligation to wear a protective helmet Read the instructions before use Translation of the original notice user guide...
- Page 27 index Note on the user guide ................... 28 Charger specifications ..................28 Warnings ......................29 General description ..................33 Installation of the handlebar ................34 First use ......................35 Open and fold the scooter ................35 How to charge battery ..................36 Autonomy ......................
- Page 28 Note on user guide This manual provides the user a description of the characteristics and operation. The use of the vehicle is the sole responsibility of the driver who, after reading and understanding this manual, and after asking the seller and/ or the ma- nufacturer for any clarifications deemed necessary, considers himself suitable from a psychological and physical point of view to the use of the vehicle.
- Page 29 warnings • Take the time to learn the basics of driving practice and gain experience to avoid serious accidents that can occur in the first periods of use. • Contact the seller to be directed to an appropriate driving training organization. •...
- Page 30 • Do not drive on slippery roads in rain or high humidity. • Do not drive the scooter on steep slopes which could affect the stability of the vehicle. • Any load attached to the handlebar will affect the stability of the vehicle. •...
- Page 31 • Do not use the vehicle under the influence of alcohol, drugs or psychotropic substances that can alter your emotional state, your sensory abilities and the control of your movements. • Always wear appropriate clothing that does not restrict movement, as well as flat shoes (preferably sneakers with a non-slip rubber surface) that provide the necessary grip and stability.
- Page 32 Safety Precautions Please, note that you may lose balance, crash or fall down when you ride an e-scoo- ter. To avoid injury, you should be familiar with this manual and keep the e-scooter in good condition. The manufacturer declines all responsibility for damage to persons or property occurring as a result of using the product.
- Page 33 General description 1. Handlebar with display 13. Electonic brake 2. Check the drum brake 14. Signal light switch 3. Bell 15. On/Off button 4. Front light Accelerator 5. Front tube 17. Stand for scooters 6. Folding Handle Front fender 7. Fixed Button Front wheel 20.
- Page 34 installation of the handlebar Connect the two connectors (one black and one white) that come out of the handlebar to the connectors (black and white) that come out of the column, taking care to respect the colors (black with black and white with white) and the insertion direction of both connectors Insert the handlebar into the vehicle column;...
- Page 35 FIRST USE Drum brake The drum brake is adjusted at the factory, but it is advisable to check it before first use. a / the braking intensity is adjusted by the screw on the brake lever (1) or by the brake mechanism (2) located on the front wheel.
- Page 36 OPEN AND FOLD THE SCOOTER Opening the scooter With the scooter closed and the handlebar hooked to the rear tail, release the handlebar by operating the release lever located on the hook of the handlebar itself; Slightly lift the handlebar and guide it out of the hole by moving the handlebar towards the output side;...
- Page 37 HOW TO RECHARGE THE BATTERY Open the rubber flap Plug the power adapter Fasten the rubber into the charging port flap after charging AUTONOMYY The maximum distance that can be covered with a single battery charge is approxi- mately 30 km. However, this value must be considered indicative since it can be influenced by numerous factors.
- Page 38 Display AND COMMANDS Functons mode: Cruise mode, Gear mode: Pedestrian mode, Fault prompt, L= Speed limit 6 Km/h Lights, Bluetooth, Lock. M= Speed limit 20 Km/h Speedometer: Displays the current H= Speed limit 25 Km/h speed + the remaining mileage Battery level: displays the remaining within 6 seconds after power-on.
- Page 39 Display AND COMMANDS Turning On and Off Press the multifunction button (12) once to turn on the scooter; press and hold it for 3 seconds to turn it off. Select the speed level The scooter has three speed levels. To change the speed level, with the scooter on, quickly press the multifunction but- ton (12) twice until the indicator corresponding to the desired speed level (4) appe- ars on the display: - In LOW mode (6Km/h), the letter “L”...
- Page 40 Display AND COMMANDS Integrated gyroscope. The scooter integrates, inside, a gyroscope that allows various automatic checks for the safety of the driver: When a user steps on the platform, based on his weight, the gyroscope transmits a signal to the motor which increases power. When the gyroscope detects an inclination greater than 45°...
- Page 41 Scooter control app Once the application has been downloaded: 1. Enable geolocation from your phone and activate the Bluetooth function; 2. Switch On the scooter; 3. Open the App and register by creating a personal account, so as not to lose data if you change your phone;...
- Page 42 Scooter control app Once connected to your phone, the main scooter control page will appear. Connection System hints and indicator messages Settings Scooter selection if you have seve- ral vehicles con- nected Total usage time Battery level Available Total distance kilometers based travelled on battery charge...
- Page 43 Scooter control app In the “Settings” it is possible to set various parameters, the most relevant are the following: Speed limit adjustment Push start/ no push start Unit of measure selection Energy recovery intensity selection Reporting of any faults Factory reset Warning: If the scooter has previously been binding with an external device, it can- not be binding with a second device;...
- Page 44 HOW TO USE THE SCOOTER...
- Page 45 HOW TO USE THE SCOOTER 6. To brake, release the accelerator to activate the engine brake, or, for more sudden braking, use the drum brake lever and the electronic brake lever at the same time. TECHNICAL SPECIFICATIONS ƒ Steel frame with a maximum capacity of 100Kg (passenger + luggage) ƒ...
- Page 46 Information to users ABOUT household appliances Precautions for correct disposal of the product. The symbol shown on the equipment indicates that waste must be disposed of in “separate collection” and so the product must not be disposed of together with urban waste. The user must take the product to special “separate waste col- lection centres”...
- Page 47 warranty 1. The warranty comes into force on the date of the tax document and covers ma- nufacturing defects and consequent failures that arose during the warranty period. 2. In the event of a device failure, the buyer can ask for assistance contact the retailer where you purchased the product or: center Trevi S.p.a.
- Page 48 warranty 5. The mere authorization to send the product to the service center does not imply that the defect has been recognized as covered by the warranty with consequent free repair of the product. The product must be shipped in the original packaging, or in another suitable packaging, and in any case inserted in a protective packaging that is suitable for shipment by courier or postal service.
- Page 49 es 108 ew HERO Merci d’avoir acheté la trottinette électrique VELOCIPTOR ES 108 EW Veuillez lire le manuel avant toute utilisation du produit et le conserver dans un endroit sûr pour toute consulta- tion ultérieure. pictogramme Obligation de porter un casque de protection Lire la notice avant utilisation Traduction de la notice originale MANUEL DE L’UTILISATEUR...
- Page 50 TABLE DES MATIÈRES À propos du manuel ..................51 Donnees du chargeur ..................51 Avertissements ....................52 Description generale ..................57 Installation du guidon ..................58 Première utilisation ..................59 Ouvrir et plier la trottinette ................59 Comment recharger la batterie ..............60 Autonomie de la trottinette ................
-
Page 51: À Propos Du Manuel
À PROPOS DU MANUEL Ce manuel fournit à l’utilisateur une description des caractéristiques et du fonction- nement du véhicule. L’utilisation du véhicule est sous la responsabilité exclusive du conducteur qui, après avoir lu et compris le présent manuel, et après avoir demandé au vendeur et/ou au fabricant toute explication jugée nécessaire, se considère comme apte à... -
Page 52: Avertissements
AVERTISSEMENTS • Prenez le temps d’apprendre les bases de la pratique pour éviter tout accident grave pouvant survenir dans les premiers mois. • Se rapprocher du vendeur pour etre oriente vers un organisme de formation approprie. • Éviter les zones à fort trafic ou les zones encombrées. •... - Page 53 AVERTISSEMENTS • Evitez les objets irréguliers comme rouler sur une branche, des déchets, des cailloux, des rues en pavés. • L’utilisation sur des passages accidentés ou une utilisation trop longue pourrait entrainer des vibrations nombreuses du corps pouvant déclencher certaines douleurs, utilisez la trottinette de manière raisonnable afin de limiter ces risques.
- Page 54 AVERTISSEMENTS • Quand vous utilisez la trottinette veuillez porter obligatoirement des chaussu- res et une tenue adaptée, ainsi que tous les éléments de protection nécessair- es: un casque, des genouillères, coudières et autres protections. • Vous devez aussi obligatoirement porter des chaussures lorsque vous manipu- lez la trottinette (entretien, montage, réparation…) •...
- Page 55 AVERTISSEMENTS • Débrancher l’alimentation avant de nettoyer la trottinette. Pour le nettoyage, utiliser un chiffon légèrement humidifié avec de l’eau ou une solution adaptée au nettoyage de ces appareils. Ne pas utiliser d’alcool ou de benzène. Une fois le nettoyage terminé, sécher immédiatement avec un chiffon doux. •...
- Page 56 NE roulez PAS quand il pleut. NE PAS rouler avec chargement Des mesures de sécurité NE roulez PAS avec deux per- doivent être prises avant de sonnes ou plus, uniquement rouler, par exemple: porter pour un seul cycliste. des vêtements de sport, un casque, une rotule, des coudières, etc.
-
Page 57: Description Generale
Description generale 1. Guidon avec écran 13. Frein électronique 2. Levier de frein à tambour 14. Commutateur de feux de 3. Cloche signalisation 4. Feu avant 15. Bouton Marche/Arrêt 5. Tube avant Accélérateur 6. Poignée pliante 17. Support pour trottinettes 7. -
Page 58: Installation Du Guidon
INST ALLATION DU GUIDON Connectez les deux connecteurs (un noir et un blanc) qui sortent du guidon aux connecteurs (noir et blanc) qui sortent de la colonne en prenant soin de respecter les couleurs (noir avec noir et blanc avec blanc) et l’insertion sens des deux connecteurs;... -
Page 59: Première Utilisation
PREMIÈRE UTILISATION Frein à tambour Le frein à tambour est réglé en usine, mais il est conseillé de le vérifier avant la pre- mière utilisation. a / l’intensité du freinage est réglée par la vis du levier de frein (1) ou par le mécan- isme de frein (2) situé... -
Page 60: Comment Recharger La Batterie
OUVRIR ET PLIER LA TROTTINETTE Comment ouvrir la trottinette Avec le scooter fermé et le guidon accroché à la queue arrière, relâchez le gui- don en actionnant le levier de déverrouillage situé sur le crochet du guidon lui-même; Soulevez légèrement le guidon et guidez-le hors du trou en déplaçant le guidon vers le côté... -
Page 61: Autonomie De La Trottinette
COMMENT RECHARGER LA BATTERIE Ouvrez le rabat en Branchez l’adaptateur Fixez le rabat en caoutchouc secteur dans le port de caoutchouc après le charge chargement AUTONOMIE DE LA TROTTINETTE La distance maximale pouvant être parcourue avec une seule charge de batterie est d’environ 30 km. -
Page 62: Afficheur Et Commandes
AUTONOMIE DE LA TROTTINETTE Utilisation et entretien corrects de la batterie: • une bonne gestion des cycles de charge et de décharge de la batterie (voir paragraphe “Comment recharger la batterie”) aidera à conserver plus longtemps la pleine efficacité de la batterie et à... - Page 63 AFFICHEUR ET COMMANDES Cloche. 12. Appuyez dessus pour allumer, main- Levier de frein. tenez enfoncé pendant 3 secondes Commande de freinage pour éteindre; en état de marche, électronique. appuyez une fois pour allumer/ Interrupteur des feux de éteindre la lumière et appuyez deux signalisation.
-
Page 64: Utilisation De L'app
AFFICHEUR ET COMMANDES Feux de signalisation. Le scooter est également équipé de feux de signalisation, qui peuvent être facile- ment activés par la commande (9) positionnée sur le guidon. La flèche gauche con- trôle le signal lumineux gauche et vice versa. Régulateur de vitesse. -
Page 65: Application Pour Le Contrôle De La Trottinette
Pour la version Android Pour la version iOS APPLICATION POUR LE CONTRÔLE DE LA TROTTINETTE Une fois l’application téléchargée: 1. Activez la géolocalisation depuis votre téléphone et activez la fonction Bluetooth; 2. Allumez la trottinette; 3. Ouvrez l’application et enregistrez-vous en créant un compte personnel, afin de ne pas perdre de données si vous changez de téléphone;... - Page 66 APPLICATION POUR LE CONTRÔLE DE LA TROTTINETTE 5. Choisissez le code du scooter dans la liste des appareils détectés, en bas de l’écran du téléphone (le nom du scooter sera HERO); 6. Sélectionnez la commande “Liaison” pour terminer la connexion; 7.
- Page 67 APPLICATION POUR LE CONTRÔLE DE LA TROTTINETTE Une fois la connexion réalisée, la page principale de contrôle de la trottinette s’af- fiche. Indicateur de Conseils et messa- connexion ges du système Paramètres Sélection scooter si vous avez plu- sieurs véhicules connectés Temps d’utilisation Niveau de batterie...
- Page 68 APPLICATION POUR LE CONTRÔLE DE LA TROTTINETTE Dans les “Paramètres”, il est possible de définir différents paramètres, les plus per- tinents sont les suivants: Réglage de la limite de vitesse Pousser le démarr- age/pas de dém- arrage Sélection de l’unité de mesure Sélection de l’inten- sité...
-
Page 69: Comment Utiliser La Trottinette
COMMENT UTILISER LA TROTTINETTE Veuillez porter un casque, une ro- 1. Appuyez sur le bouton POWER tule, une coudière lorsque vous ap- pendant 3 secondes. prenez à conduire le scooter. 2. Mettez un pied sur la pédale, 3. Équilibrez les deux pieds sur vo- poussez du sol avec votre jambe tre trottinette lorsque vous avez forte. -
Page 70: Spécifications Techniques
COMMENT UTILISER LA TROTTINETTE 7. Lorsque le scooter s’arrête ou Pour freiner, relâchez l’ac- célérateur pour activer le frein mo- roule à faible vitesse, vous pouvez teur ou, pour un freinage plus bru- descendre. tal, utilisez simultanément le levier de frein à tambour et le levier de frein électronique. -
Page 71: Informations Destinées Aux Utilisateurs D'équipements Ménagers
INFORMATIONS DESTINÉES AUX UTILISATEURS D’ÉQUIPEMENTS ÉNAGERS Recommandations pour l’élimination correcte du produit Le symbole figurant sur l’appareil indique que le produit fait l’objet d’u- ne “collecte séparée“. C’est pourquoi, le produit ne doit pas être éliminé avec les déchets urbains. L’utilisateur doit remettre le produit auprès de “décharges spécialisées de collecte séparée“... -
Page 72: Garantie
GARANTIE 1. La garantie entre en vigueur à la date du document fiscal et couvre les défauts de fabrication et les défaillances successives qui surviennent pendant la période de validité de la garantie. 2. En cas de défaillance de l’appareil, pour toute assistance l’acheteur peut contacter le revendeur auprès duquel il a acheté... - Page 73 GARANTIE 5.La simple autorisation d’envoyer le produit au centre d’assistance n’implique pas que l’on considère le défaut comme couvert par la garantie et que le produit sera réparé gratuitement. Le produit doit être expédié dans son emballage d’origine ou dans un autre emballage approprié et, en tout cas, inséré dans un emballage de protection convenable à...
- Page 74 Trevi S.p.A.Strada Consolare Rimini-San Marino 62, 47924 Rimini (RN) Italia...
Need help?
Do you have a question about the VELOCIPTOR ES 108 EW HERO and is the answer not in the manual?
Questions and answers