Johnson Controls Tyco HS2TCHPRO User Manual
Hide thumbs
Also See for Tyco HS2TCHPRO:
- User manual (140 pages) ,
- Installation instructions manual (18 pages) ,
- User manual (54 pages)
Table of Contents
Advertisement
Available languages
Available languages
Quick Links
HS2TCHPRO/HS2TCHPROBLK Touchscreen User Manual
Uživatelská příručka dotykové obrazovky
HS2TCHPRO/HS2TCHPROBLK
HS2TCHPRO/HS2TCHPROBLK Touchscreen
Benutzerhandbuch
WARNING:
This manual contains information on limitations regarding product use, function and information
on the limitation as to liability of the manufacturer. The entire manual should be carefully read.
UPOZORNĚNÍ: Tento návod obsahuje informace o omezení ve využívání výrobku a jeho funkci, a také informace
o omezení odpovědnosti výrobce. Celý návod si pečlivě přečtěte.
WARNUNG: Dieses Handbuch enthält Informationen hinsichtlich der Einschränkungen bei der Verwendung des
Produkts und der Funktionen und Informationen zu den Einschränkungen bezüglich der Haftung des Her-stellers.
Lesen Sie das gesamte Handbuch aufmerksam durch.
Advertisement
Chapters
Table of Contents

Related Manuals for Johnson Controls Tyco HS2TCHPRO


Summary of Contents for Johnson Controls Tyco HS2TCHPRO
- Page 1 HS2TCHPRO/HS2TCHPROBLK Touchscreen User Manual Uživatelská příručka dotykové obrazovky HS2TCHPRO/HS2TCHPROBLK HS2TCHPRO/HS2TCHPROBLK Touchscreen Benutzerhandbuch WARNING: This manual contains information on limitations regarding product use, function and information on the limitation as to liability of the manufacturer. The entire manual should be carefully read. UPOZORNĚNÍ: Tento návod obsahuje informace o omezení...
-
Page 2: Table Of Contents
Table of Contents Table of Contents Safety Notes Important Safety Instructions Regular Maintenance and Troubleshooting Handling Precautions Cleaning Troubleshooting Introduction General System Operation About Your Security System Carbon Monoxide Detection (must be enabled by your Installer) Fire Detection (must be enabled by your Installer) Testing Monitoring Maintenance... - Page 3 Additional Functions Photos Quick Exit Time & Date Programming Keypad Mode Door Chime (Chime enable/disable) Zone Bypass Zone Status Indicators Bypassed Zones Bypassing Zones with a HS2TCHPRO/HS2TCHPROBLK Options Menu Access Codes Assign Proximity Tags Delete Proximity Tags User Code Attributes Inherent Attributes (all codes except installer and maintenance) Programmable Attributes Bell Squawk Attribute...
- Page 4 Testing Your System Testing Your Keypad Sounder and Siren Testing Your Entire System Walk Test Mode Allowing Computer Access To Your System Reference Sheets System Information Enabled? For Service Central Station Information: Installer Information: Battery Installation / Service Date: Access Codes (copy as needed) Sensor / Zone Information (copy as needed) Guidelines for Locating Smoke Detectors and CO Detectors Smoke Detectors...
-
Page 5: Safety Notes
Safety Notes Safety Notes This manual shall be used in conjunction with the PowerSeries Pro User manual for the compatible alarm control panel: HS3032, HS3128, HS3248. Always ensure you obtain the latest version of the User Guide. Updated versions of this User Guide are available by contacting your distributor. -
Page 6: Introduction
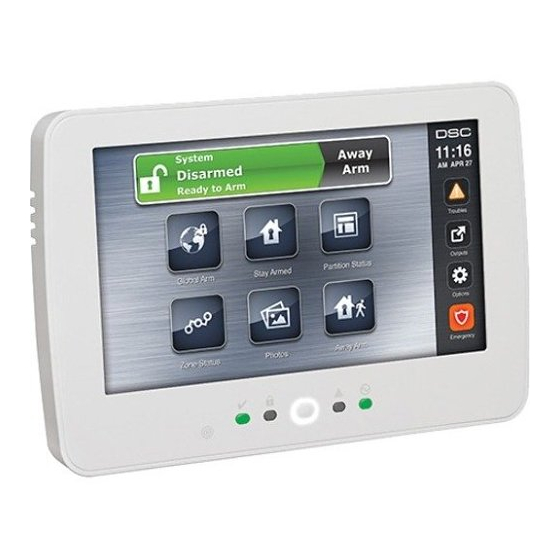
Introduction Introduction Figure 1- Controls and Indicators The HS2TCHPRO/HS2TCHPROBLK Touchscreen is an interactive touch-sensitive color LCD that can be used on any PowerSeries Pro control panel. Due to the custom requirements of individual installations, some of the fea- tures described here may perform differently than described. Refer to your Installer's Instructions for the details of your specific installation and to the User Manual for general security system information. -
Page 7: Carbon Monoxide Detection (Must Be Enabled By Your Installer)
Introduction Carbon Monoxide Detection (must be enabled by your Installer) This equipment is capable of monitoring carbon monoxide detectors and providing a warning if carbon monoxide is detected. Please read the Family Escape Planning guidelines in this manual and instructions that are available with the carbon monoxide detector. -
Page 8: Specifications And Features
Specifications and Features Specifications and Features Display 7" TFT (800 x 480) pixel) Color Touchscreen Home button Home/Calibration/Reset LED indicators 4 (Ready, Armed, Trouble, AC) Dimensions (mounting) 8.5" x 5.1" x 0.8" [127.9 mm (L) x 195 mm (W) x 20.35 mm (D)] Horizontal viewing angle 70°... -
Page 9: Emergency Keys
Emergency Keys Emergency Keys Figure 3- Emergency Screen When the emergency key is pressed, a new screen is displayed with: Fire Fire Assistance Required. Press and hold for 2 seconds to activate. Medical Medical Assistance Required. Press and hold for 2 seconds to activate. Panic Police Assistance Required. -
Page 10: Arming And Disarming The System
Arming and Disarming the System Arming and Disarming the System Stay Arm (Arming the Perimeter) Ask your alarm company if this function is available on your system. Stay arming bypasses the interior protection (i.e., motion sensors) and arms the perimeter of the system (i.e., doors and windows). -
Page 11: Disarm
Arming and Disarming the System The Disarm screen is displayed. The Ready Indicator turns OFF. “Stay Armed-Bypass” is displayed in the Status Bar. Note: This screen will go into stand-by mode after 15 minutes. Tap the screen to restore the display. Disarm If Disarm is selected: A numerical keypad is displayed. -
Page 12: Bell/Siren Sounds After Away Arming
Arming and Disarming the System Bell/Siren Sounds After Away Arming Audible Exit Fault In an attempt to reduce false alarms, the Audible Exit Fault is designed to notify you of an improper exit when arming the system in the Away mode. In the event that you fail to exit the premises during the allotted exit delay period, or if you do not securely close the Exit/Entry door, the system will notify you that it was improperly armed in two ways: the keypad will emit one continuous beep and the bell or siren will sound. -
Page 13: If The Intrusion Alarm Was Accidental
Arming and Disarming the System If the Intrusion Alarm was Accidental 1. Enter your Access Code to silence the alarm. If the code is entered within 30s (or the programmed value of the alarm transmission delay) the transmission of the alarm to the monitoring station will be canceled. 2. -
Page 14: Troubles
Troubles Troubles When a trouble condition is detected, the Trouble ( ) or System indicator will turn on, and the keypad will beep every 10 seconds. Press the ( ) key to silence the beeps. Press ( ) to view the trouble condition. The Trouble ( ) or System indicator will flash. -
Page 15: Sensor Reset
Troubles Figure 5- Alarms in Memory Sensor Reset Certain sensors, after having detected an alarm condition, require a reset to exit the alarm condition (e.g., glass break sensors, smoke detectors, etc.). Ask your alarm company if this function is required on your system. To reset the detectors, press the Reset (Command Output 2 if the installer did not program a label) button on the Outputs screen. -
Page 16: Additional Functions
Additional Functions Additional Functions Photos You can create a slideshow of photos to View on the keypad. Photos are added using an SD card (32x24x2.1 mm. Not supplied). The photos must be .jpg format and can be up to 1280 x 720 in size. For best results, use 800 x 480 resolution. Use photo editing software to adjust the size of your photos. -
Page 17: Zone Status Indicators
Options Menu Figure 7- Zone Closed Zone Status Indicators Ready Zone is closed Open The zone is open and needs to be closed Bypassed Zones Use the zone bypass feature when a zone is open but the system needs to be armed. Bypassed zones will not cause an alarm when opened. -
Page 18: Access Codes
Options Menu Figure 8- Options Access Codes When Access Codes is selected from the Options menu, the keypad prompts for a Master Code. When a valid Master Code is entered, a numeric keypad is displayed with arrows to scroll through the list of users. Press the Select button to enter the user options. -
Page 19: User Code Attributes
Options Menu 3. Select Prox Tag Prog then delete. User Code Attributes 1. The default attributes of a new code will be the attributes of the code used to enter User Programming whether it is a new code or an existing code being programmed. 2. -
Page 20: User Functions
Options Menu User Functions First disarm the system then enter Options, User Functions, then Master Code. This command is used to gain access to the following list of master functions of the system: Time and Date Enter desired time and date. Auto-Arm Time The system can be programmed to arm at a programmed time each day, per partition. -
Page 21: Auto-Arm/Disarm Control
Options Menu All smoke detectors must be tested by your smoke detector installer once a year to ensure proper oper- ation. Auto-Arm/Disarm Control Pressing Auto-Arm while in the User Function menu will enable (three beeps) or disable (one long beep) the Auto-Arm and Auto-Disarm feature, by partition. -
Page 22: Chime Enabled/Disabled
Options Menu Figure 10- Clean Mode Home Page: can be configured in one of two different views, Classic (square buttons) and Contemporary (rondel). Chime Enabled/Disabled Door Chime: To turn the door chime function On/Off, tap the Chime icon. 3 beeps indicate that the chime is ON. -
Page 23: Keypad Mode
Managing Partitions Figure 11- Partition Status Keypad Mode This option allows the HS2TCHPRO/HS2TCHPROBLK Touchscreen to function as a traditional DSC keypad. Managing Partitions A partition is a limited area of the premises which operates independently from the other areas. Partitioning a sys- tem can be beneficial if the property has outbuildings that need to be secured independently of a main area or if the home has a separate apartment. -
Page 24: Global Keypad Operation
Managing Partitions To loan a keypad to another partition: 1. Select Options > Partition Status. 2. Enter your access code. 3. Select the partition to loan the keypad to. If the keypad is inactive for more than 30 seconds, it will return to its original partition. -
Page 25: Fire And Co Zone Types
Managing Partitions Fire and CO Zone Types If a Fire zone generates an alarm only the partition the fire zone is assigned to will go into alarm. Other partitions retain their current state. If the [F] key on a global keypad is used to generate an alarm all enabled partitions will go into alarm. One or more fire keypads may be located on any partition. -
Page 26: Testing Your System
Testing Your System Testing Your System Note: If you are going to perform a System Test, call your Monitoring Station to inform them when you begin and also when you end the test. Testing Your Keypad Sounder and Siren The System Test performs a two-second check of the keypad sounder and bell or siren, in addition to testing the keypad status lights and the panel backup battery. -
Page 27: Reference Sheets
Reference Sheets Reference Sheets Fill out the following information for future reference and store this guide in a safe place. System Information Enabled? [F] FIRE [+] Medical [P] PANIC The Exit Delay Time is ___ seconds The Entry Delay Time is ___ seconds For Service Central Station Information: Account #: ________________ Telephone #: ________________... -
Page 28: Access Codes (Copy As Needed)
Reference Sheets Access Codes (copy as needed) HS3032/HS3128/HS3248 MASTER CODE [01]: ______________________ User Access Code User Access Code User - 28 -... -
Page 29: Sensor / Zone Information (Copy As Needed)
Reference Sheets Sensor / Zone Information (copy as needed) Zone Protected Area Sensor Type - 29 -... -
Page 30: Guidelines For Locating Smoke Detectors And Co Detectors
Guidelines for Locating Smoke Detectors and CO Detectors Guidelines for Locating Smoke Detectors and CO Detectors The following information is for general guidance only and it is recommended that local fire codes and reg- ulations be consulted when locating and installing smoke and CO alarms. Smoke Detectors Research has shown that all hostile fires in homes generate smoke to a greater or lesser extent. -
Page 31: Carbon Monoxide Detectors
Guidelines for Locating Smoke Detectors and CO Detectors Carbon Monoxide Detectors Carbon monoxide is colorless, odorless, tasteless, and very toxic. It also moves freely in the air. CO detectors can measure the concentration and sound a loud alarm before a potentially harmful level is reached. The human body is most vulnerable to the effects of CO gas during sleeping hours;... -
Page 32: Household Fire Safety Audit
Guidelines for Locating Smoke Detectors and CO Detectors Household Fire Safety Audit Read this section for important information about fire safety. Most fires occur in the home. To minimize this danger, we recommend that a household fire safety audit be conducted and a fire escape plan be developed. 1. -
Page 33: License Agreement
License Agreement IMPORTANT - READ CAREFULLY: DSC Software purchased with or without Products and Components is copyrighted and is purchased under the following license terms: - This End-User License Agreement (“EULA”) is a legal agreement between You (the company, individual or entity who acquired the Software and any related Hardware) and Digital Security Controls, a division of Tyco Safety Products Canada Ltd. - Page 34 WARNING: DSC recommends that the entire system be completely tested on a regular basis. However, despite frequent testing, and due to, but not limited to, criminal tampering or electrical disruption, it is possible for this SOFTWARE PRODUCT to fail to perform as expected. FCC Compliance Statement- CAUTION:Changes or modifications not expressly approved by DSC could void your authority to use this equipment.
- Page 35 Uživatelská příručka dotykové obrazovky HS2TCHPRO/HS2TCHPROBLK UPOZORNĚNÍ: Tato příručka obsahuje informace o omezeních týkajících se používání výrobku a jeho funkcí a také informace o omezení odpovědnosti výrobce. Celou příručku si pečlivě přečtěte.
-
Page 36: Obsah
Obsah Obsah Bezpečnostní pokyny Důležité bezpečnostní pokyny Pravidelná údržba a řešení potíží Pokyny pro zacházení Čištění Řešení potíží Úvod Obecná funkce systému O bezpečnostním systému Detekce oxidu uhelnatého (musí být povoleno instalátorem) Detekce požáru (musí být povoleno instalátorem) Testování Monitorování Údržba Důležité... - Page 37 Dodatečné funkce Fotografie Rychlý odchod Programování času a data Režim klávesnice Dveřní zvonek (povolení/zakázání zvonku) Vynechání zóny Kontrolky stavu zóny Vynechané zóny Vynechávání zón se zařízením HS2TCHPRO/HS2TCHPROBLK Nabídka možnosti Přístupové kódy Přiřazení bezkontaktních čipů Odebrání bezkontaktních čipů Atributy uživatelských kódů Základní atributy (všechny kódy kromě instalátora a údržby) Programovatelné...
- Page 38 Testování systému Testování bzučáku klávesnice a sirény Testování celého systému Režim zkoušení průchodu Umožnění přístupu počítače k systému Referenční listy Informace o systémuPovoleno? Pro účely servisu Informace o hlavní stanici: Informace o osobě provádějící instalaci: Datum instalace/servisu baterie: Přístupové kódy (kopírujte podle potřeby) Informace o senzoru/zóně...
-
Page 39: Bezpečnostní Pokyny
Bezpečnostní pokyny Bezpečnostní pokyny Tato příručka by se měla používat v kombinaci s uživatelskou příručkou ke kompatibilní ústředně alarmu PowerSeries Pro: HS3032, HS3128, HS3248. Vždy se ujistěte, že jste získali nejnovější verzi uživatelské příručky. Aktualizované verze této uživatelské příručky jsou dostupné tak, že se obrátíte na distributora. Upozornění: Tyto pokyny si přečtěte a uložte. -
Page 40: Úvod
Úvod Úvod Obrázek 1– Ovládací prvky a kontrolky Dotyková obrazovka HS2TCHPRO/HS2TCHPROBLK je interaktivní dotykový barevný LCD displej, který lze použít u libovolné řídicí ústředny PowerSeries Pro. Kvůli jedinečným požadavkům jednotlivých instalací mohou některé ze zde popsaných funkcí fungovat odlišně, než jak je popsáno. Podrobné informace o konkrétní instalaci naleznete v Manuálu pro instalátora a obecné... -
Page 41: Detekce Oxidu Uhelnatého (Musí Být Povoleno Instalátorem)
Úvod Detekce oxidu uhelnatého (musí být povoleno instalátorem) Toto zařízení je schopné monitorovat detektory oxidu uhelnatého a poskytuje varování, pokud je detekován oxid uhelnatý. Přečtěte si pokyny pro plánování úniku rodiny v této příručce a pokyny, které jsou k dodávány s detektorem oxidu uhelnatého. Detekce požáru (musí být povoleno instalátorem) Toto zařízení... -
Page 42: Specifikace A Funkce
Specifikace a funkce Specifikace a funkce Displej 7" TFT (800 × 480) pixelů) barevná dotyková obrazovka Tlačítko Domů Domů/Kalibrace/Reset Kontrolky LED 4 (Připraveno, Střežení aktivováno, Problém, Střídavý proud) Rozměry (montáž) 127,9 mm (d) × 195 mm (š) × 20,35 mm (h) Horizontální pozorovací 70 ° úhel Vertikální... -
Page 43: Nouzové Klíče
Nouzové klíče Nouzové klíče Obrázek 3– Pohotovostní obrazovka Po stisku pohotovostní klávesy se zobrazí nová obrazovka s: Požár Je požadována požární pomoc. Chcete-li aktivovat, stiskněte a podržte po dobu 2 sekund. Lékař Je požadována zdravotní pomoc. Chcete-li aktivovat, stiskněte a podržte po dobu 2 sekund. Nouze Je požadována policejní... -
Page 44: Aktivace A Deaktivace Systému
Aktivace a deaktivace systému Aktivace a deaktivace systému Aktivace v režimu Pobyt (aktivace střežení perimetru) Zeptejte se u společnosti zajišťující služby alarmu, zda je tato funkce v systému k dispozici. Aktivace v režimu Pobyt vynechává zabezpečení interiéru (tj. senzory pohybu) a aktivuje střežení perimetru systému (tj. -
Page 45: Deaktivace Střežení
Aktivace a deaktivace systému Zobrazí se obrazovka Deaktivace střežení. Kontrolka LED Připraveno zhasne. Ve stavovém řádku se zobrazí text „Aktivace v režimu Pobyt – Vynechání“. Poznámka: Tato obrazovka po 15 minutách přejde do pohotovostního režimu. Klepnutím na obrazovku obnovíte zobrazení. Deaktivace střežení... -
Page 46: Znění Zvonku/Sirény Po Aktivaci V Režimu Pryč
Aktivace a deaktivace systému Znění zvonku/sirény po aktivaci v režimu Pryč Slyšitelná chyba odchodu V rámci snahy o snížení falešných alarmů je Slyšitelná chyba odchodu navržena tak, aby vás upozorňovala na nesprávný odchod při zapnutí systému v režimu Pryč. V případě, že se vám nepodaří opustit prostory během stanovené... -
Page 47: Nepřetržitá Siréna Alarmu Vniknutí (Vloupání)
Aktivace a deaktivace systému Nepřetržitá siréna alarmu vniknutí (vloupání) Pokud si nejste jisti zdrojem alarmu, postupujte opatrně! Pokud byl alarm vyvolán náhodně, zadejte svůj přístupový kód pro utišení alarmu. Zavolejte centrální stanici, abyste předešli výjezdu. Pokud byl alarm vniknutí vyvolán náhodně 1. -
Page 48: Problémy
Problémy Problémy Když je zjištěn problémový stav, rozsvítí se kontrolka Problém ( ) nebo Systém a klávesnice vydá každých 10 sekund pípnutí. Stiskem klávesy ( ) utišíte pípání. Stiskem klávesy ( ) zobrazíte problémový stav. Bude blikat kontrolka Problém ( ) nebo Systém. Rozsvítí se odpovídající problém. Problémy Komentáře Akce... -
Page 49: Resetování Senzorů
Problémy Obrázek 5– Alarmy v paměti Resetování senzorů Některé senzory po zjištění stavu alarmu vyžadují pro ukončení stavu alarmu resetování (např. senzory tříštění skla, detektory kouře atd.). Zeptejte se u společnosti zajišťující služby alarmu, zda je tato funkce v systému vyžadována. Chcete-li detektory resetovat, stiskněte tlačítko Reset (příkazový výstup 2, pokud instalátor nenaprogramoval označení) na obrazovce Výstupy. -
Page 50: Dodatečné Funkce
Dodatečné funkce Dodatečné funkce Fotografie Můžete vytvořit prezentaci z fotografií a zobrazovat ji na klávesnici. Fotografie jsou přidávány pomocí karty SD (32 × 24 × 2,1 mm. Není součástí balení). Fotografie musí být ve formátu .jpg a mohou mít velikost až 1280 × 720. Pro dosažení nejlepších výsledků použijte rozlišení... -
Page 51: Kontrolky Stavu Zóny
Nabídka možnosti Obrázek 7– Zóna uzavřena Kontrolky stavu zóny Připravena Zóna je uzavřena Otevřená Zóna je otevřená a musí být uzavřena Vynechané zóny Pokud je zóna otevřená, ale systém musí být aktivován, použijte funkci vynechání zóny. Vynechané zóny nebudou při otevření generovat alarm. Vynechávání zón snižuje úroveň zabezpečení. Pokud vynecháváte zónu, protože nefunguje, zavolejte neprodleně... -
Page 52: Přístupové Kódy
Nabídka možnosti Obrázek 8– Možnosti Přístupové kódy Pokud jsou v nabídce Možnosti vybrány Přístupové kódy, klávesnice vyzve k zadání hlavního kódu. Po zadání platného hlavního kódu se zobrazí číselná klávesnice s šipkami pro procházení seznamu uživatelů. Stisknutím tlačítka Vybrat vyberte možnosti uživatele. Nastavit přístupový kód: přidání/úprava 4ciferného nebo 6ciferného kódu Nastavit oddíly: přiřazení... -
Page 53: Odebrání Bezkontaktních Čipů
Nabídka možnosti Odebrání bezkontaktních čipů Chcece-li odebrat bezkontaktní čipy: 1. Zvolte Možnosti, Přístupové kódy [zadejte hlavní kód]. 2. Vyberte uživatele, kterého chcete odstranit. 3. Zvolte možnost Prog bezkont. čipu a poté jej odstraňte. Atributy uživatelských kódů 1. Výchozími atributy nového kódu budou atributy kódu používaného pro vstup do části Programování uživatele, ať... -
Page 54: Vymazání Přístupového Kódu
Nabídka možnosti Vymazání přístupového kódu Chcete-li kód smazat, vyberte kód a zvolte Odstranit uživatele. Systém okamžitě odstraní kód a uživatel bude navrácen k volbě jiného kódu. Nabídka instalátora Tyto funkce jsou určeny pouze pro potřeby instalátora. Uživatelské funkce Nejprve deaktivujte systém a poté zadejte Možnosti, Uživatelské funkce a poté hlavní kód. Tento příkaz slouží k získání... -
Page 55: Ovládání Automatické Aktivace/Deaktivace Střežení
Nabídka možnosti Chcete-li ověřit, že systém nadále pracuje zamýšleným způsobem, je zapotřebí jej jednou týdně zkoušet. U aplikací s certifikací UL HOME HEALTH CARE (UL domácí zdravotní péče) musí být systém rovněž testován jednou týdně bez napájení střídavým proudem. Chcete-li odpojit napájení střídavým proudem od řídicí... -
Page 56: Zvonek Povolen/Zakázán
Nabídka možnosti Obrázek 10– Režim čištění Domovská stránka: lze nakonfigurovat v jednom ze dvou různých vzhledů, klasický (čtvercová tlačítka) a moderní (oblá). Zvonek povolen/zakázán Dveřní zvonek: Chcete-li zapnout nebo vypnout funkci dveřního zvonku, klepněte na ikonu Zvonek. 3 pípnutí signalizují, že zvonek je zapnutý. 1 dlouhé pípnutí signalizuje, že zvonek je vypnutý. Střežení... -
Page 57: Režim Klávesnice
Správa oddílů Obrázek 11– Stav oddílů Režim klávesnice Tato možnost umožňuje dotykové obrazovce HS2TCHPRO/HS2TCHPROBLK fungovat jako tradiční klávesnice DSC. Správa oddílů Oddíl je omezenou oblastí prostor, která funguje nezávisle na ostatních oblastech. Rozdělení systému na oddíly může být prospěšné, pokud prostory obsahují přístavby, které je třeba zabezpečit nezávisle na hlavní oblasti nebo pokud domácnost obsahuje samostatný... -
Page 58: Provoz Globální Klávesnice
Správa oddílů Chcete-li zapůjčit klávesnici jinému oddílu: 1. Zvolte Možnosti > Stav oddílů. 2. Zadejte přístupový kód. 3. Vyberte oddíl, kterému chcete klávesnici zapůjčit. Pokud je klávesnice neaktivní po dobu delší než 30 sekund, vrátí se do původního oddílu. Provoz globální klávesnice Jakmile je zadán platný... -
Page 59: Typy Požárních A Co Zón
Správa oddílů Typy požárních a CO zón Pokud požární zóna generuje alarm, do alarmu přejde pouze oddíl, ke kterému je požární zóna přiřazena. Ostatní oddíly zachovávají svůj aktuální stav. Pokud je ke generování alarmu použito tlačítko [F] na globální klávesnici, všechny povolené oddíly přejdou do alarmu. -
Page 60: Testování Systému
Testování systému Testování systému Poznámka: Pokud budete provádět test systému, telefonicky kontaktujte monitorovací stanici, abyste její pracovníky informovali, kdy test zahájíte a kdy jej ukončíte. Testování bzučáku klávesnice a sirény Test systému provede dvousekundovou kontrolu bzučáku klávesnice a zvonku nebo sirény a dále testování kontrolek stavu klávesnice a záložní... -
Page 61: Referenční Listy
Referenční listy Referenční listy Následující informace vyplňte pro budoucí použití a tuto příručku uložte na bezpečném místě. Informace o systému Povoleno? [F] POŽÁR [+] Zdravotní [P] NOUZE Čas prodlevy odchodu je ___ sekund Čas prodlevy příchodu je ___ sekund Pro účely servisu Informace o hlavní... -
Page 62: Přístupové Kódy (Kopírujte Podle Potřeby)
Referenční listy Přístupové kódy (kopírujte podle potřeby) HS3032/HS3128/HS3248 HLAVNÍ KÓD [01]: ________________________ Uživatelská Přístupový kód Uživatelská Přístupový kód Uživatelská - 28 -... -
Page 63: Informace O Senzoru/Zóně (Kopírujte Podle Potřeby)
Referenční listy Informace o senzoru/zóně (kopírujte podle potřeby) Zóně Chráněná oblast Typ senzoru - 29 -... -
Page 64: Pokyny Pro Umisťování Detektorů Kouře A Detektorů Co
Pokyny pro umisťování detektorů kouře a detektorů CO Pokyny pro umisťování detektorů kouře a detektorů Následující informace jsou pouze obecné pokyny a doporučuje se, aby se při lokalizaci a instalaci kouřových a CO hlásičů konzultovali místní požární kódy a předpisy. Detektory kouře Průzkumy ukazují, že všechny nežádoucí... -
Page 65: Detektory Oxidu Uhelnatého
Pokyny pro umisťování detektorů kouře a detektorů CO Detektory oxidu uhelnatého Oxid uhelnatý je bezbarvý, bez zápachu, bez chuti a velmi toxický. Rovněž se volně pohybuje ve vzduchu. Detektory CO jsou schopné měřit koncentraci a před dosažením potenciálně škodlivé úrovně vydávat hlasitý alarm. Lidské tělo je nejvíce ohroženo působením CO během spánku; proto by detektory CO měly být umístěny v oblasti pro spaní... -
Page 66: Audit Požární Bezpečnosti Domů
Pokyny pro umisťování detektorů kouře a detektorů CO BEZPEČNOSTNÍ POKYNY A INFORMACE PRO HAVARIJNÍ SITUACE NAJDETE V PŘÍRUČCE S NÁVODEM K INSTALACI A PROVOZU DETEKTORU OXIDU UHELNATÉHO (CO). Audit požární bezpečnosti domů V této části jdou uvedeny důležité informace o požární bezpečnosti. K většině požárů dochází v domácnosti. Pro minimalizaci tohoto nebezpečí... -
Page 67: Licenční Smlouva
Licenční smlouva DŮLEŽITÉ – ČTĚTE POZORNĚ: Software DSC, zakoupený s produkty a komponenty nebo bez nich, je chráněn autorským zákonem a je zakoupen podle následujících licenčních podmínek: - Tato licenční smlouva s koncovým uživatelem (EULA) je právní smlouvou mezi vámi (společností, jednotlivcem nebo fyzickou osobou, která získala software a veškerý související... - Page 68 OBJEKTIVNÍ ODPOVĚDNOSTI NEBO JAKÉKOLI JINÉ PRÁVNÍ TEORIE. K TAKOVÝM ŠKODÁM SE POČÍTÁ MIMO JINÉ UŠLÝ ZISK, ZTRÁTA SOFTWAROVÉHO PRODUKTU NEBO S NÍM SOUVISEJÍCÍHO VYBAVENÍ, ZTRÁTY NA KAPITÁLU, NÁKLADY NA NÁHRADU NEBO VÝMĚNU ZAŘÍZENÍ, VYBAVENÍ NEBO SLUŽEB, PROSTOJE VÝROBY, PRACOVNÍ DOBA NÁKUPČÍCH, REKLAMACE TŘETÍCH STRAN, JAKO NAPŘÍKLAD ZÁKAZNÍKŮ, A ŠKODY NA MAJETKU.
- Page 69 HS2TCHPRO/HS2TCHPROBLK Touchscreen Benutzerhandbuch Warnung: Dieses Handbuch enthält Informationen hinsichtlich der Einschränkungen bei der Verwendung des Produkts und der Funktionen und Informationen zu den Einschränkungen bezüglich der Haftung des Herstellers. Lesen Sie das gesamte Handbuch aufmerksam durch.
- Page 70 Inhaltsverzeichnis Inhaltsverzeichnis Sicherheitshinweise Wichtige Sicherheitshinweise Regelmäßige Wartung und Fehlerbeseitigung Hinweise zur Behandlung Reinigung Störungsbehebung Einleitung Allgemeine Bedienungshinweise Informationen zu Ihrem Sicherheitssystem Erkennung von Kohlenmonoxid (muss durch Errichter aktiviert werden) Branderkennung (muss durch Errichter aktiviert werden) Testen Überwachung Wartung Wichtiger Hinweis Spezifikationen und Funktionen Begrüßungsbildschirm Notfalltasten...
- Page 71 Zusätzliche Funktionen Fotos Schnell verlassen Programmierung von Datum und Uhrzeit Bedienteil-Modus Türgong (Gong aktivieren/deaktivieren) Linienabschaltung Linienstatusanzeigen Abgeschaltete Linien Linienabschaltung mit einem HS2TCHPRO/HS2TCHPROBLK Einstellungsmenü Zugangscodes Transponder zuordnen Transponder löschen Benutzercode-Attribute Ständige Attribute (alle Codes außer Errichter und Wartung) Programmierbare Attribute Sirenenanschlags-Attribut Bereichszuordnung Zugangscode löschen Errichtermenü...
- Page 72 Testen des Systems Signalgeber des Bedienteils und Sirene testen Testen des kompletten Systems Gehtestmodus Computerzugriff zu Ihrem System gestatten Referenzblätter Systeminformationen Aktiviert? Für Service Notrufzentrale Informationen: Errichter Informationen: Batterie-Installation / Wartung: Zugangscodes (ggf. kopieren) Sensor- / Linieninformationen (ggf. kopieren) Richtlinien zur Platzierung von Rauch- und CO-Meldern Rauchmelder Kohlenmonoxidmelder Brandschutzprüfung Zuhause...
-
Page 73: Sicherheitshinweise
Sicherheitshinweise Sicherheitshinweise Dieses Handbuch ist in Verbindung mit dem PowerSeries Pro Benutzerhandbuch für die kompatiblen Alarm- zentralen HS3032, HS3128, HS3248 zu verwenden. Achten Sie stets darauf, die neueste Ausgabe des Benutzerhandbuchs zu haben. Aktualisierte Versionen dieses Benutzerhandbuchs erhalten Sie bei Ihrem Fachhändler. Warnhinweis: Bewahren Sie diese Anleitungen auf! Befolgen Sie alle Warnungen und Anleitungen in diesem Dokument bzw. -
Page 74: Einleitung
Einleitung Einleitung Abbildung 1- Bedienelemente und Anzeigen Der HS2TCHPRO/HS2TCHPROBLK Touchscreen ist ein interaktives, berührungsempfindliches Farb-LCD, das mit jeder PowerSeries Pro Alarmzentrale verwendet werden kann. Aufgrund kundenspezifischer Anforderungen an indi- viduelle Installationen können einige der hier beschriebenen Funktionen abweichen. In Ihrer Installationsanleitung finden Sie Einzelheiten Ihrer spezifischen Installation und in dieser Bedienungsanleitung finden Sie allgemeine Informationen zum Sicherheitssystem. -
Page 75: Erkennung Von Kohlenmonoxid (Muss Durch Errichter Aktiviert Werden)
Einleitung Erkennung von Kohlenmonoxid (muss durch Errichter aktiviert werden) Dieses Gerät ist in der Lage, Kohlenmonoxidmelder zu überwachen und zu warnen, wenn Kohlenmonoxid fest- gestellt wird. Bitte lesen Sie den Abschnitt Planung von Fluchtwegen für die Familie in dieser Anleitung, sowie die Hinweise, die Sie mit den Kohlenmonoxidmeldern erhalten. -
Page 76: Spezifikationen Und Funktionen
Spezifikationen und Funktionen Spezifikationen und Funktionen Display 7" TFT (800 x 480 Pixel) Farb-Touchscreen Schaltfläche Start Start/Kalibrierung/Rückstellung LED-Anzeigen 4 (Betriebsbereit, Scharf, Störung, Netz) Abmessungen (Montage) 127,9 mm (L) x 195 mm (B) x 20,35 mm (T) [8,5" x 5,1" x 0,8"] Horizontaler Blickwinkel 70°... -
Page 77: Notfalltasten
Notfalltasten Notfalltasten Abbildung 3- Notrufmenü Beim Drücken der Notruftaste wird ein neuer Bildschirm angezeigt: Feuer Hilfe im Brandfall wird angefordert. Halten Sie die Schaltfläche für 2 Sekunden berührt. Medizinischer Notfall Medizinische Hilfe erforderlich. Halten Sie die Schaltfläche für 2 Sekunden berührt. Panik Polizeiliche Hilfe wird angefordert. -
Page 78: System Scharfschalten Und Unscharfschalten
System Scharfschalten und Unscharfschalten System Scharfschalten und Unscharfschalten Anwesend Scharfschalten (Scharfschalten der Außenhaut) Fragen Sie Ihren Errichter, ob diese Funktion auf Ihrem System zur Verfügung steht. Anwesend Scharfschalten umgeht die Innenmelder (wie Bewegungsmelder) und schaltet die Außenhaut des Sys- tems scharf (also Türen und Fenster). Schließen Sie alle Melder (d.h., bewegen Sie sich nicht und schließen Sie die Türen). -
Page 79: Unscharfschaltung
System Scharfschalten und Unscharfschalten Der Bildschirm Unscharfschalten wird angezeigt. Die Betriebsbereit-LED erlischt. „Abwesend Scharf-Abschalten“ wird im Statusbalken angezeigt. Hinweis: Dieser Bildschirm wechselt nach 15 Minuten in den Stand-by-Betrieb. Tippen Sie auf den Bildschirm, um die Anzeige wieder herzustellen. Unscharfschaltung Wenn Unscharfschalten gewählt wird: Ein Ziffernblock wird angezeigt. -
Page 80: Sirenentöne Nach Abwesend Scharfschalten
System Scharfschalten und Unscharfschalten Sirenentöne nach Abwesend Scharfschalten Akustischer Ausgangsfehler Der hörbare Ausgangsfehler dient Ihrer Benachrichtigung eines unkorrekten Ausgangs beim Scharfschalten des Sys- tems im Abwesendmodus, um Fehlalarme zu vermeiden. Verlassen Sie den gesicherten Bereich nicht während der zugewiesenen Ausgangsverzögerungsdauer oder falls Sie die Eingangs-/Ausgangstür nicht richtig schließen, mel- det Ihnen das System auf zweierlei Weise, dass es nicht korrekt scharfgeschaltet wurde: das Bedienteil gibt einen kontinuierlichen Signalton ab und die Sirene ertönt. -
Page 81: Einbruchalarm Kontinuierliche Sirene
System Scharfschalten und Unscharfschalten Einbruchalarm kontinuierliche Sirene Wenn Sie unsicher hinsichtlich der Ursache des Alarms sind, gehen Sie es mit der gebotenen Vor- sicht an! Wurde der Alarm versehentlich ausgelöst, so geben Sie Ihren Zugangscode ein, um den Alarm stummzuschalten. Rufen Sie Ihre Notrufzentrale an, um einen Einsatz zu vermeiden. Wenn der Einbruchalarm ein Fehlalarm war 1. -
Page 82: Störungen
Störungen Störungen Wird eine Störung erkannt, leuchtet die Anzeige Störung ( ) oder System und das Bedienteil geben alle 10 Sekunden einen Signalton ab. Drücken Sie ( ), um die Signaltöne abzuschalten. Drücken Sie ( ), um die Störung anzuzeigen. Die Anzeige Störung ( ) oder System blinkt. -
Page 83: Sensor Zurücksetzen
Störungen schalten Sie das System scharf und unscharf. Wurde im scharfgeschalteten Zustand ein Alarm ausgelöst, so ruft das Bedienteil automatisch den Alarmspeicher auf, wenn Sie das System unscharf schalten. In diesem Fall seien Sie vor- sichtig, da sich ein Einbrecher noch im Gebäude bzw. im gesicherten Bereich befinden könnte. Abbildung 5- Alarmspeicher Sensor zurücksetzen Bestimmte Melder müssen nach Erkennung eines Alarmzustands zurückgesetzt werden, um den Alarmzustand zu... -
Page 84: Zusätzliche Funktionen
Zusätzliche Funktionen Zusätzliche Funktionen Fotos Sie können eine Diashow mit Fotos zur Anzeige auf dem Bedienteil erstellen. Fotos werden mit einer SD-Karte hin- zugefügt (32 x 24 x 2,1 mm. Gehört nicht zum Lieferumfang). Die Fotos müssen im Format .jpg sein und können bis zu 1280 x 720 groß sein. Für beste Ergebnisse verwenden Sie eine Auflösung von 800 x 480. -
Page 85: Linienstatusanzeigen
Einstellungsmenü Abbildung 7- Linie geschlossen Linienstatusanzeigen Betriebsbereit Linie ist geschlossen Offen Die Linie ist offen und muss geschlossen werden Abgeschaltete Linien Benutzen Sie die Linienabschaltfunktion, wenn eine Linie offen ist, aber das System scharfgeschaltet werden soll. Abgeschaltete Linien lösen im geöffneten Zustand keinen Alarm aus. Das Abschalten von Linien verringert das Sicherheitsniveau. -
Page 86: Zugangscodes
Einstellungsmenü Bereichsstatus Bedienteil-Modus Abbildung 8- Optionen Zugangscodes Wenn Zugangscodes im Menü Optionen gewählt werden, fordert Sie das Bedienteil zur Eingabe eines Mastercodes auf. Wird ein gültiger Mastercode eingegeben, so wird ein Zahlenfeld mit Pfeilen zum Scrollen durch die Liste der Benutzer angezeigt. -
Page 87: Transponder Löschen
Einstellungsmenü 3. Drücken Sie 2. 4. Führen Sie den registrierten Transponder zum Lesegerät. Transponder löschen Zum Löschen eines Transponders gehen Sie wie folgt vor: 1. Wählen Sie Optionen, Zugangscodes [geben Sie den Mastercode ein]. 2. Wählen Sie einen zu löschenden Benutzer. 3. -
Page 88: Zugangscode Löschen
Einstellungsmenü Die Attribute des Mastercodes können nicht geändert werden. Wenn ein neuer Code in der Benutzerprogrammierung programmiert wird, wird er gegen alle anderen Codes im System geprüft. Wird ein duplizierter Code erkannt, so erfolgt ein Fehlersignal und er wird auf seinen vorherigen Wert zurückgestellt. -
Page 89: Systemtest
Einstellungsmenü Systemtest Der Signalausgang, die Anzeigen des Bedienteils und das Wählgerät des Systems werden getestet. Dieser Test misst auch die Stand-by-Batterie der Alarmzentrale. Wichtig: Zur Gewährleistung, dass Ihr System auch weiterhin bestimmungsgemäß funktioniert, müssen Sie es wöchentlich testen. Für PRIVATE GESUNDHEITSFÜRSORGE UL-gelistete Anwendungen muss das System ebenfalls wöchentlich ohne Netzspannung getestet werden. -
Page 90: Gong Aktiviert/Deaktiviert
Einstellungsmenü Bilderrahmen: Wählt die Bilder, die in der Diashow gezeigt werden. Kalibrierung: Kalibriert den Touchscreen. Uhrmodus: Zeigt die digitale Uhr an. Reinigungsmodus: Ermöglicht dem Benutzer die Berührung des Displays (z. B. zum Reinigen), ohne dabei Funk- tionen zu aktivieren oder zu deaktivieren. Der Bildschirm bleibt für 30 Sekunden in diesem Modus und kehrt dann in das Menü... -
Page 91: Bedienteil-Modus
Verwalten von Bereichen zugleich mit seinem aktuellen Status identifiziert. Abbildung 11- Bereichsstatus Bedienteil-Modus Diese Option ermöglicht es dem HS2TCHPRO/HS2TCHPROBLK Touchscreen, wie ein herkömmliches DSC- Bedienteil zu funktionieren. Verwalten von Bereichen Ein Bereich ist ein begrenzter Abschnitt der Räumlichkeiten/des Grundstücks, der unabhängig von den anderen Bereichen überwacht wird. -
Page 92: Ausleihen Von Bedienteilen Für Andere Bereiche
Verwalten von Bereichen Ausleihen von Bedienteilen für andere Bereiche Das HS2TCHPRO/HS2TCHPROBLK Touchscreen-Bedienteil kann ausgeliehen werden, um andere Bereiche zu bedienen. Wird ein Bedienteil an einen anderen Bereich verliehen, so verhält es sich auf diesem Bereich so, als wäre es ihm ursprünglich zugordnet. Ein Zugangscode muss eingegeben werden, bevor ein Bedienteil an einen anderen Bereich ausgeliehen wird. -
Page 93: Feuer- Und Co-Linientypen
Verwalten von Bereichen Bereich Beschreibung Statussymbol Bereich ist in Zugangsverzögerung Bereich ist scharfgeschaltet Feuer- und CO-Linientypen Löst eine Brandmeldelinie einen Alarm aus, so begibt sich nur der Bereich, welchem die Brandmeldelinie zugeordnet ist, in Alarmzustand. Andere Bereiche behalten ihren aktuellen Zustand bei. Wird die [F] Taste auf einem globalen Bedienfeld zum Auslösen eines Alarms benutzt, so begeben sich alle aktivierten Bereiche in Alarmzustand. -
Page 94: Testen Des Systems
Testen des Systems Testen des Systems Hinweis: Bevor Sie einen Systemtest durchführen, rufen Sie Ihre Notrufzentrale an und informieren Sie sie über den Beginn und das Ende des Tests. Signalgeber des Bedienteils und Sirene testen Der Systemtest führt zusätzlich zur Überprüfung der Bedienteil-Statusanzeigen und der Notstromversorgung eine 2-Sekunden-Überprüfung des Signalgebers des Bedienteils und der Sirene durch. -
Page 95: Referenzblätter
Referenzblätter Referenzblätter Füllen Sie die folgenden Informationen für zukünftiges Nachschlagen aus und bewahren Sie sie auf. Systeminformationen Aktiviert? [+] Medi- [F] FEUER [P] PANIK zinischer Notfall Die Dauer der Ausgangsverzögerung beträgt _______ Sekunden Die Dauer der Zugangsverzögerung beträgt _______ Sekunden Für Service Notrufzentrale Informationen: Konto: ___________________ Telefon: ________________... -
Page 96: Zugangscodes (Ggf. Kopieren)
Referenzblätter Zugangscodes (ggf. kopieren) HS3032/HS3128/HS3248 MASTERCODE [01]: _______________________ Benutzer Zugangscode Benutzer Zugangscode Benutzer - 28 -... -
Page 97: Sensor- / Linieninformationen (Ggf. Kopieren)
Referenzblätter Sensor- / Linieninformationen (ggf. kopieren) Linien Gesicherter Bereich Sensortyp - 29 -... -
Page 98: Richtlinien Zur Platzierung Von Rauch- Und Co-Meldern
Richtlinien zur Platzierung von Rauch- und CO-Meldern Richtlinien zur Platzierung von Rauch- und CO-Mel- dern Die folgenden Informationen dienen nur einem allgemeinen Überblick und es wird empfohlen, die lokalen Brand- schutzbestimmungen bei der Platzierung und Installation von Rauch- und CO-Meldern zu beachten. Rauchmelder Untersuchungen haben gezeigt, dass alle Schadensfeuer in Haushalten mehr oder weniger Rauch entwickeln. -
Page 99: Kohlenmonoxidmelder
Richtlinien zur Platzierung von Rauch- und CO-Meldern Kohlenmonoxidmelder Kohlenmonoxid ist farb-, geruch- und geschmacklos und sehr giftig. Es bewegt sich frei in der Luft. CO-Melder können die Konzentration messen und geben einen lauten Alarm aus, bevor eine schädliche Menge erreicht wird. Der menschliche Körper ist im Schlaf am anfälligsten für die Wirkung von CO-Gas. -
Page 100: Brandschutzprüfung Zuhause
Richtlinien zur Platzierung von Rauch- und CO-Meldern Platzieren Sie den Melder nicht in unmittelbarer Nähe zu einem Fahrzeugauspuff - dies führt zur Beschä- digung des Melders. BITTE BEACHTEN SIE DIE MONTAGE- UND BETRIEBSANLEITUNGEN DES CO-MELDERS UND DIE SICHERHEITS- UND NOTFALLHINWEISE. Brandschutzprüfung Zuhause Lesen Sie diesen Abschnitt für wichtige Informationen zur Brandsicherheit. - Page 101 Richtlinien zur Platzierung von Rauch- und CO-Meldern hinsichtlich Brandschutz im Hause und Fluchtplanung einholen. Wenn möglich, lassen Sie den örtlichen Brandschutzbeauftragten eine Brandschutzinspektion durchführen. - 33 -...
-
Page 102: Lizenzvereinbarung
Lizenzvereinbarung WICHTIG - AUFMERKSAM LESEN: DSC-Software, die mit oder ohne Produkte und Komponenten erworben wird, ist urheberrechtlich geschützt und wird unter fol- genden Lizenzbedingungen erworben: - Diese Endverbraucher-Lizenzvereinbarung ist ein rechtsgültiger Vertrag zwischen Ihnen (Unternehmen, Einzelperson oder Körperschaft, welche die Software und ent- sprechende Hardware erworben hat) und Digital Security Controls, einem Tochterunternehmen von Tyco Safety Products Canada Ltd. - Page 103 SEITENS DSC. DSC GIBT KEINE WEITEREN GARANTIEN AB. DSC GESTATTET KEINEN ANDEREN PERSONEN DIE HANDLUNG IN SEINEM AUFTRAG, UM DIESE GARANTIEN ZU ÄNDERN ODER ZU MODIFIZIEREN, NOCH ANDERE GARANTIEN ODER HAFTUNGEN BEZÜGLICH DIESES SOFTWAREPRODUKTS ZU ÜBERNEHMEN. (e) AUSSCHLIEßLICHE NACHBESSERUNG UND BESCHRÄNKUNG DER GARANTIE – UNTER KEINEN UMSTÄNDEN IST DSC FÜR IRGENDWELCHE BESONDERE, ZUFÄLLIGE, NACHFOLGENDE ODER INDIREKTE SCHÄDEN BASIEREND AUF VERSTOß...
- Page 104 © 2018 Tyco Security Products. Alle Rechte vorbehalten Toronto, Kanada • www.dsc.com In diesem Dokument dargestellte Marken, Logos und Dienstleistungsmarken sind in den Vereinigten Staaten [oder anderen Ländern] registriert. Eine missbräuchliche Nutzung der Marken ist verboten und Tyco setzt seine geistigen Eigentumsrechte aggressiv mit allen rechtlichen Mitteln durch, einschließlich strafrechtlicher Verfolgung, wenn nötig.
Need help?
Do you have a question about the Tyco HS2TCHPRO and is the answer not in the manual?
Questions and answers