
Related Manuals for Black & Decker IMPACT IR3001


Summary of Contents for Black & Decker IMPACT IR3001
- Page 1 ADVANCED STEAM IRON PLANCHA CON SISTEMA AVANZADO DE VAPOR us e and care m an u a l man u al d e us o y c ui d ad o IR3001...
-
Page 2: Important Safety Instructions
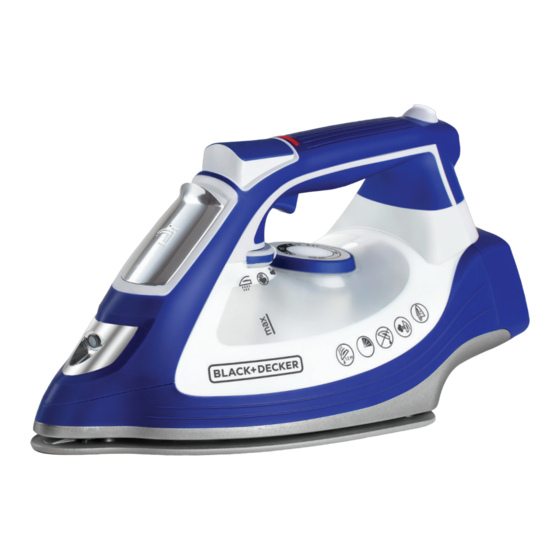
IMPORTANT SAFETY INSTRUC- TIONS • READ ALL INSTRUCTIONS BEFORE • Close supervision is necessary for USING. any appliance being used by or near children. Do not leave iron • Only use iron for intended use. unattended when plugged in or on an •... - Page 3 G E T T ING TO KN OW YO UR IMPACT I R ON ™ Ceramic Soleplate Variable temperature control dial Spray nozzle Water tank Water-fill cover 10. Heel rest Burst of steam button Fabric setting guide Power indicator light 12.
-
Page 4: How To Use
HOW TO U S E This product is for household use only. G E T T I NG STARTE D • Remove all labels, tags and stickers attached to the body, cord, or soleplate of the iron. • Remove and save literature. FILLING THE WATER TANK With the iron on a flat surface, with the soleplate down, open the water-fill cover. -
Page 5: Setting Guide
To iron without steam (dry iron), it is not necessary to empty the water tank. Simply slide the Variable Steam Selector all the way to the left to the Dry Iron setting. When finished ironing, turn the Steam Selector to the Off/Dry Iron setting and set the Temperature Control Dial to the minimum temperature setting. - Page 6 3-way Auto Shut-Off The iron will automatically switch to Auto Shut-Off mode and stop heating after being left inactive for 30 seconds on the soleplate or side, and 8 minutes on the heel rest. When the iron is in Auto Shut-Off mode, the red light on the handle will blink.
- Page 7 Selector all the way to the right and hold in the Auto-Clean ™ position. Be careful, as hot water and steam with come out of iron vents. Continue to hold the button down until all of the water has emptied. If necessary, slightly tilt the iron from side-to-side and front-to-back to aid the process.
- Page 8 • To prevent iron marks on fabric, iron the fabric inside out. • For optimum performance, allow the iron to stand on the heel rest for about two minutes after filling, prior to ironing. • When unsure of fabric content, first test a small area (on the inside seam or hem) before ironing entire garment or cloth.
-
Page 9: Troubleshooting
TROUBLESHOOTING Problem Cause Solution The iron is plugged in, Power supply issue. Check that the plug is but the soleplate is not properly inserted into the heating outlet or try plugging the iron into a different outlet. Not enough steam or Steam setting is set at Dry Slide the Variable Steam no steam is coming out... -
Page 10: Need Help
NE ED H EL P? For service, repair or any questions regarding your appliance, please call our Customer Service Line at 1-800-231-9786. Please DO NOT return the product to the place of purchase. Also, please DO NOT mail product back to manufacturer, nor bring it to a service center. -
Page 11: Instrucciones Importantes De Seguridad
INSTRUCCIONES IMPORTANTES DE SE- GURIDAD • LEA TODAS LAS INSTRUCCIONES en la cubierta de este manual. El ANTES DE USAR El APARATO. reensamblaje incorrecto podría ocasionar • Utilice solamente con el propósito para el un riesgo de descarga eléctrica cuando el que ha sido diseñado. - Page 12 CON OZC A S U P L A NC HA I MPACT ™ Suela Cerámica Dial de control de temperatura variable Boquilla de rocío Tanque de agua Tapa del orificio de llenado 10. Talón de descanso Botón de potente disparo de vapor Guía de ajustes de tejidos Luz indicadora de funcionamiento 12.
-
Page 13: Primeros Pasos
COMO USAR Este producto es para uso doméstico solamente. PRIMEROS PASOS • Retire todas las etiquetas y calcomanías adheridas al cuerpo, cable o suela de la plancha. • Retire y conserve la literatura. LLENADO DEL TANQUE DE AGUA Con la plancha colocada con la suela sobre una superficie plana, abra la tapa del orificio de llenado. -
Page 14: Guía De Ajustes
posición de la cantidad de vapor deseado. Se recomienda que el vapor NO sea utilizado en los ajustes de temperaturas bajas. Pare obtener resultados óptimos, siga las instrucciones en la Guía de Ajustes en la página 15. Para planchar sin vapor (planchar en seco), no es necesario vaciar el tanque de agua. -
Page 15: Cuidado Y Limpieza
Potente Disparo de Vapor Presione el botón de potente disparo de vapor para generar vapor adicional momentáneamente. Utilice en tejidos aptos para vapor en la posición vertical u horizontal. Para el mejor desempeño, deje pasar varios segundos entre los disparos. Rocío Fino Presione el botón de rocío fino para generar un rocío de agua ligero. - Page 16 Este producto no contiene piezas que deban ser reparadas por el usuario. Para servicio, consulte a personal de servicio calificado. SISTEMA DE LIMPIEZA AUTOMÁTICA AUTO-CLEAN™ Utilice esta función para mantener la plancha libre de acumulación. Para resultados óptimos a través del tiempo, es recomendado limpiar su plancha cada 2 a 4 semanas o con más frecuencia en hogares con sistemas de agua más dura.
- Page 17 Verifique que la plancha esté ajustada a la posición de temperatura mínima y posición de vapor de planchar en seco ( ) y que se haya enfriado completamente. Vacíe el tanque de agua, abriendo la tapa del orificio de llenado e invirtiendo la plancha sobre un fregadero.
-
Page 18: Resolución De Problemas
Vertical para más detalles. • ¿Sabia usted que para mantener su plancha adecuadamente y obtener un desempeño óptimo a través del tiempo, esta plancha debe limpiarse por lo menos una vez al mes? Consulte la sección de Función de Limpieza Automática Auto-Clean™ para más detalles. RES O LU C IÓN DE P R O B LE MAS PROBLEMA CAUSA POSIBLE... - Page 19 PROBLEMA CAUSA POSIBLE SOLUCIÓN Está saliendo agua Hay acumulación de Vacíe el tanque de agua decolorada a través residuos en la cavidad de después de cada uso de los orificios y está la suela o en los orificios y utilice la función de manchando el tejido.
-
Page 20: N Ec Esi Ta Ayuda
¿N EC ESI TA AYUDA? Para servicio, reparaciones o preguntas relacionadas al producto, por favor llame al número del centro de servicio que se indica para el país donde usted compró su producto. NO devuélva el producto al fabricante. Llame o lleve el producto a un centro de servicio autorizado. - Page 21 Por favor llame al número correspondiente que aparece en la lista a continuación para solicitar que se haga efectiva la garantía y donde Ud. puede solicitar servicio, reparaciones o partes en el país donde el producto fué comprado. Argentina Honduras Atención al consumidor Serviteca 0800 444 7296...
- Page 22 Sello del Distribuidor: Comercializado por: Spectrum Brands de México SA de C.V Fecha de compra: Autopista México Querétaro No 3069-C Oficina 004 Modelo: Colonia San Andrés Atenco, Tlalnepantla Estado de México, C.P. 54040 MÉXICO. Teléfono: (55) 5831-7070 Servicio y Reparación Art.
- Page 23 NOTES/NOTAS...
- Page 24 www.BlackAndDeckerHome.com T22-5003107 2016/12/22/37 © 2017 The Black and Decker Corporation and Spectrum Brands, Inc. Middleton, WI 53562...
Need help?
Do you have a question about the IMPACT IR3001 and is the answer not in the manual?
Questions and answers