Tektronix MSO24 Quick Start Manual
Mixed signal oscilloscopes
Hide thumbs
Also See for MSO24:
- Quick start manual (320 pages) ,
- Help manual (275 pages) ,
- Service manual (25 pages)
Table of Contents
Advertisement
Quick Links
2 Series Mixed Signal Oscilloscopes
MSO24, MSO22
Quick Start Manual
Warning: The servicing instructions are for use by qualified personnel only. To avoid personal injury, do not perform any servicing unless you are qualified
to do so. Refer to all safety summaries prior to performing service.
Supports product firmware V2.2 and above.
Register now!
Click the following link to protect your product.
tek.com/register
*P077176803*
077-1768-03
June 2023
Advertisement
Table of Contents

Related Manuals for Tektronix MSO24


Summary of Contents for Tektronix MSO24
- Page 1 2 Series Mixed Signal Oscilloscopes MSO24, MSO22 Quick Start Manual Warning: The servicing instructions are for use by qualified personnel only. To avoid personal injury, do not perform any servicing unless you are qualified to do so. Refer to all safety summaries prior to performing service.
- Page 2 Copyright © 2023, Tektronix. 2023 All rights reserved. Licensed software products are owned by Tektronix or its subsidiaries or suppliers, and are protected by national copyright laws and international treaty provisions. Tektronix products are covered by U.S. and foreign patents, issued and pending. Information in this publication supersedes that in all previously published material. Specifications and price change privileges reserved.
-
Page 3: Table Of Contents
Connect the oscilloscope to a PC using a USB cable......................43 Connect a keyboard or mouse.............................43 Operating basics..................................44 Add a channel waveform to the display..........................44 Configure channel or waveform settings..........................45 2 Series Mixed Signal Oscilloscopes MSO24, MSO22 Quick Start Manual... - Page 4 Contents Autoset to quickly display a waveform..........................45 How to trigger on a signal..............................46 Set the acquisition mode..............................47 Set Horizontal parameters ..............................48 Add a math, reference, or bus waveform..........................48 Add a measurement................................49 Configure a measurement..............................51 Add a Search..................................53 Delete a Measurement or Search badge..........................
-
Page 5: Important Safety Information
Use only the AC adapter specified for this product. Connect and disconnect properly Do not connect or disconnect probes or test leads while they are connected to a voltage source. 2 Series Mixed Signal Oscilloscopes MSO24, MSO22 Quick Start Manual... - Page 6 Important safety information Use only insulated voltage probes, test leads, and adapters supplied with the product, or indicated by Tektronix to be suitable for the product. Connect the probe output to the measurement instrument before connecting the probe to the circuit under test. Connect the probe reference lead to the circuit under test before connecting the probe input.
-
Page 7: Probes And Test Leads
De-energize the circuit under test before connecting or disconnecting the current probe. Connect the probe reference lead to earth ground only. Do not connect a current probe to any wire that carries voltages or frequencies above the current probe voltage rating. 2 Series Mixed Signal Oscilloscopes MSO24, MSO22 Quick Start Manual... -
Page 8: Service Safety Summary
Important safety information Inspect the probe and accessories Before each use, inspect probe and accessories for damage (cuts, tears, or defects in the probe body, accessories, or cable jacket). Do not use if damaged. Ground-referenced oscilloscope use Do not float the reference lead of this probe when using with ground-referenced oscilloscopes. The reference lead must be connected to earth potential (0 V). -
Page 9: Terms On The Product
Functional Earth Use only on an Connection and Do not connect Terminal insulated wire. disconnection to to or remove hazardous bare wire from an uninsulated permitted. conductor that is HAZARDOUS LIVE. 2 Series Mixed Signal Oscilloscopes MSO24, MSO22 Quick Start Manual... -
Page 10: Operating Safely With Battery Power
Inspect the cable, insulation, and terminal ends for damage before use. Do not use a damaged grounding cable. Contact Tektronix for a replacement. If you choose not to attach the grounding cable, you are not protected against electric shock if you connect the oscilloscope to a hazardous voltage. -
Page 11: Compliance Information
Measurement Category II. For measurements performed on circuits directly connected to the low-voltage installation. • Measurement Category III. For measurements performed in the building installation. • Measurement Category IV. For measurements performed at the source of low-voltage installation. 2 Series Mixed Signal Oscilloscopes MSO24, MSO22 Quick Start Manual... -
Page 12: Environmental Compliance
If the instrument is being transported to Tektronix for service, remove the rechargeable batteries before repacking the instrument and do not include the batteries in the shipment. Do not ship removable batteries to Tektronix Service Centers. -
Page 13: Security Disclaimer
This Software and its associated Equipment are not designed or intended to be used with unsecure networks. You acknowledge that use of the Equipment may rely upon certain networks, systems, and data communication mediums that are not controlled by Tektronix and that may be vulnerable to data or security breaches, including, without limitation, internet networks used by Your internet providers and the databases and servers controlled by Your internet providers. -
Page 14: Preface
Advanced serial bus triggering and analysis option lets you decode and trigger on industry standard buses • Industry standard VESA interface can be used with several accessories offered by Tektronix and it is also compatible with off the shelf VESA mounts Documentation Review the following user documents before installing and using your instrument. -
Page 15: Install Option Upgrade Licenses
10. If you installed a bandwidth upgrade, rerun signal path compensation (SPC). Then carefully remove the model/bandwidth label from the lower-left corner of the front panel and install the new model/bandwidth label that was sent through normal mail channels as part of the upgrade purchase. 2 Series Mixed Signal Oscilloscopes MSO24, MSO22 Quick Start Manual... -
Page 16: Check Shipped Accessories
Preface Check shipped accessories Make sure that you received everything you ordered. If anything is missing, contact Tektronix Customer Support. In North America, call 1-800-833-9200. Worldwide, visit www.tek.com to find contacts in your area. Check the packing list that came with your instrument to verify that you have received all standard accessories and ordered items. If you purchased factory installed options such as a Serial Bus and Triggering option, tap Help >... -
Page 17: Input Signal Requirements
If one or more power-on self tests shows Failed: 1. Power cycle the instrument. 2. Select Utility > Self Test. If one or more power-on self tests still shows Failed, contact Tektronix Customer Support. Connecting probes to the instrument Probes connect the instrument to your device under test (DUT). Use a probe that best matches your signal measurement needs. -
Page 18: Rackmount Option Information
Preface Rackmount option information An optional rackmount kit lets you install the oscilloscope in standard equipment racks. Please refer to the product datasheet at tek.com for information on rackmount options. -
Page 19: Getting Acquainted With Your Instrument
6 Use the Miscellaneous controls to turn touchscreen capability off, restore the oscilloscope settings to the default settings, automatically display a stable waveform, and save files or settings (using the current File > Save As settings). Table continued… 2 Series Mixed Signal Oscilloscopes MSO24, MSO22 Quick Start Manual... -
Page 20: Button And Knob Functions
Getting acquainted with your instrument Description 7 After connecting the supplied power cord, use the power button to power the instrument on and off. The power button color indicates the following instrument states; amber is standby, blue is on, unlit is off. When the batteries in the 2-BP battery pack on your instrument have a low battery charge and the power cord is not connected, the power button will blink twice and then your instrument will turn off. - Page 21 Waveform View). Push the button again to display the waveform. If two or more Reference waveforms are displayed, pushing the button cycles through selecting each Reference waveform. Table continued… 2 Series Mixed Signal Oscilloscopes MSO24, MSO22 Quick Start Manual...
- Page 22 Getting acquainted with your instrument Button Description Adds or selects a bus waveform on the Waveform view. If no Bus waveform exists, pushing the button adds a Bus waveform to the Waveform view and opens the Bus configuration menu. If only one Bus waveform is displayed, pushing the button turns off the Bus waveform (removes it from Waveform view).
-
Page 23: Rear And Side Panel Connections
Hold onto the power cord latch and move it away from the power connector slot to disconnect the power cord. 8 Use the security lock connector to secure the oscilloscope to a work bench or other location with a standard PC/laptop lock cable. Table continued… 2 Series Mixed Signal Oscilloscopes MSO24, MSO22 Quick Start Manual... - Page 24 Getting acquainted with your instrument Description 9 Use the battery interface connector to connect the external battery pack to the instrument. See the instructions that come with the battery pack for more information. CAUTION: The battery interface connector is susceptible to Electrostatic Discharge (ESD). Use ESD precautions with installing or removing the battery pack.
-
Page 25: Instrument Stand Installation
3. Turn the instrument upside-down and hand tighten the top two screws on the stand to the bottom two VESA screw mounts. The instrument is now secured to the stand at a seventy-five degree angle when the stand is laying flat. 2 Series Mixed Signal Oscilloscopes MSO24, MSO22 Quick Start Manual... -
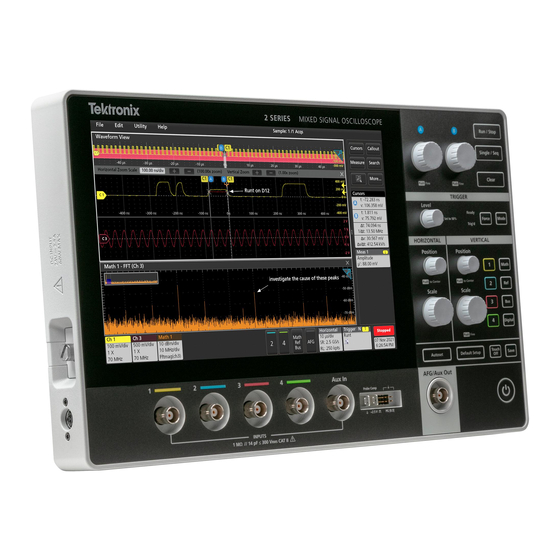
Page 26: User Interface
Getting acquainted with your instrument User interface The touch screen user interface contains waveforms and plots, measurement readouts, and touch-based controls to access all oscilloscope functions. Description The menu bar provides menus for typical operations including: Saving, loading, and accessing files Undoing or redoing an action Setting oscilloscope display and measurement preferences Configuring network access... - Page 27 Channel and Waveform badges that let you configure the individual waveform parameters Configuration menus let you quickly change the parameters of the selected user interface item. You can open configuration menus by double-tapping on badges, screen objects, or screen areas. 2 Series Mixed Signal Oscilloscopes MSO24, MSO22 Quick Start Manual...
-
Page 28: User Interface Elements
Getting acquainted with your instrument User interface elements Each area of the user interface has a specific function that helps manage information or controls. The Waveform Record View is a graphical high-level view of the overall waveform record length, how much of the record is on the screen (shown in brackets), the location of key time events including the trigger event, and the current position of waveforms cursors. -
Page 29: Badges
Most Channel and Waveform badges also have Scale buttons, shown by single-tapping the badge. Use the Scale buttons to increase or decrease the vertical scale setting for that waveform. 2 Series Mixed Signal Oscilloscopes MSO24, MSO22 Quick Start Manual... - Page 30 Getting acquainted with your instrument You can drag Channel and Waveform badges to change their position in the Settings bar and open the badge right-click menu to access a quick-action menu. There are two ways to delete Channel and Waveform badges. •...
- Page 31 A label defined in the badge configuration menu. Tested The total number of waveforms tested against the mask. Passed The number of waveforms that contained no samples that violated the mask. Table continued… 2 Series Mixed Signal Oscilloscopes MSO24, MSO22 Quick Start Manual...
- Page 32 Getting acquainted with your instrument Badge readout Description Failed The number of waveforms that contained one or more samples that violated the mask. Displays in red if greater than or equal to the total failures threshold. Cons The highest number of consecutively failed waveforms in the test run. Displays in red if greater than or equal to the consecutive failures threshold.
- Page 33 • Don’t ask for remaining items: Default is unchecked. If you leave it unchecked and clear the information dialog, then the dialog will appear again for the next measurement deletion. 2 Series Mixed Signal Oscilloscopes MSO24, MSO22 Quick Start Manual...
- Page 34 Getting acquainted with your instrument • If the box is checked, it proceeds with deleting the rest of the items without bringing up the dialog box again. The dialog box appears for each set of measurements you want to delete. Signal Clipping and Badges WARNING: Clipping is caused by excessive or dangerous voltage at the probe tip, and/or a vertical scale setting that is not adequate to display the entire vertical range of the waveform.
- Page 35 A dimmed Channel badge means the screen waveform is turned off (but not deleted). A dimmed Waveform badge means that the waveform display is turned off, or it is being used as a source by a measurement and cannot be deleted until the measurement is deleted. 2 Series Mixed Signal Oscilloscopes MSO24, MSO22 Quick Start Manual...
-
Page 36: Configuration Menus
Getting acquainted with your instrument Configuration menus Configuration menus let you quickly set the parameters for channels, system settings (Horizontal, Trigger), measurements, cursor readouts, Waveform and Plot views, callout text, and so on. Double-tap an item (badge, Waveform View or Plot View, cursor readouts, callout text, and so on) to open its configuration menu. For example, double-tap a Channel badge in the Settings Bar to open its configuration menu. -
Page 37: Zoom User Interface
Double tap the Horizontal Zoom Position or Horizontal Zoom Scale fields to enter a value using a numerical keypad. To exit the zoom display mode, tap the Zoom icon in the corner of display or tap the X in the Zoom Title Bar. 2 Series Mixed Signal Oscilloscopes MSO24, MSO22 Quick Start Manual... -
Page 38: Using The Touch Screen Interface For Common Tasks
Getting acquainted with your instrument Math-FFT or XY plot view zoom Use the A and B multipurpose knobs to adjust the zoom for Math-FFT or XY plot view. In a Math-FFT or XY plot view, if A and B multipurpose knobs are assigned to Zoom, the zoom box is highlighted and the multipurpose knobs within the Zoom Box are enabled. - Page 39 Touch and drag the badge to a new position in Click and drag the badge to a new position in the the Settings Bar or Results Bar. the same bar. same bar. 2 Series Mixed Signal Oscilloscopes MSO24, MSO22 Quick Start Manual...
-
Page 40: Configure The Instrument
Configure the instrument Configure the instrument Configurations to help operate your instrument efficiently. Refer to the instrument help for additional configuration information. Download and install the latest instrument firmware Installing the latest firmware helps ensure that your instrument has the latest features and is taking the most accurate measurements. Before you begin Save any important on-instrument files such as waveforms, screen captures, and setups to a USB drive or network. -
Page 41: Run Signal Path Compensation (Spc)
1. Connect a supported probe to Channel 1. 2. Connect the probe tip and ground lead of the probe to the PROBE COMP terminals. Connect only one probe at a time to the PROBE COMP terminals. 2 Series Mixed Signal Oscilloscopes MSO24, MSO22 Quick Start Manual... - Page 42 Configure the instrument 3. Turn on the Channel 1 and turn off all other channels. 4. Tap File > Default Setup. 5. Push the Autoset button on the front-panel or tap File > Autoset from the menu bar. The screen should display a square wave with the levels between approximately 0 V - 2.5 V and 1 kHz.
-
Page 43: Connect To A Network (Lan)
If it does not, try the following: 1. Remove and reinsert the USB cable or dongle in the same port. 2. Insert the USB cable or dongle into a different USB port. 2 Series Mixed Signal Oscilloscopes MSO24, MSO22 Quick Start Manual... -
Page 44: Operating Basics
Operating basics Operating basics These procedures are an introduction to using the interface to do common tasks. Refer to the instrument help for detailed information on menu and field settings. Add a channel waveform to the display Use this procedure to add a channel signal to the Waveform View. 1. -
Page 45: Configure Channel Or Waveform Settings
(analog or digital) and adjusts the horizontal, vertical, and trigger settings accordingly to display a triggered waveform for that channel. The Vertical scale is adjusted in each waveform slice of all active waveforms to maximize ADC utilization. 2 Series Mixed Signal Oscilloscopes MSO24, MSO22 Quick Start Manual... -
Page 46: How To Trigger On A Signal
Operating basics When using the Overlay Display mode, the instrument adjusts the horizontal and trigger settings of the trigger source channel to display a triggered waveform for that channel. Vertical scale and position adjustments for all active channels in Overlay Display mode are controlled by the Autoset in Overlay Display Mode Optimizes selection in the Autoset panel of the User Preferences menu. -
Page 47: Set The Acquisition Mode
2. Select the acquisition method from the Acquisition Mode list. Set any other parameters associated with the selected acquisition type. 3. Tap the Help icon on the menu title for more information on these settings. 4. Tap outside the menu to close the menu. 2 Series Mixed Signal Oscilloscopes MSO24, MSO22 Quick Start Manual... -
Page 48: Set Horizontal Parameters
Operating basics Set Horizontal parameters Use this procedure to set the horizontal time base parameters such as mode, minimum sample rate, horizontal scale, delay, and trigger delay time (relative to the center of the waveform record. 1. Double-tap the Horizontal badge on the Settings bar to open the Horizontal configuration menu. 2. -
Page 49: Add A Measurement
7. Tap outside the menu to close the menu. Add a measurement Use this procedure to select and add measurements. Acquire the channel(s) and/or waveform(s) on which you want to take measurements. 2 Series Mixed Signal Oscilloscopes MSO24, MSO22 Quick Start Manual... - Page 50 Operating basics Note: Waveforms do not need to be displayed to be used for measurements, as long as the channel or waveform badge is on the Settings bar and is acquiring the signal to measure. Tap the Measure button to open the Add Measurements configuration menu or drag the Measure button onto a waveform in the waveform display area to automatically set the source.
-
Page 51: Configure A Measurement
Use this procedure to add statistical readouts to the measurement badge, display plots for the measurement, and refine measurement parameters (configuration, global versus local scope of settings, gating, filtering, and so on). 1. Double-tap a measurement badge to open its Measurement configuration menu. 2 Series Mixed Signal Oscilloscopes MSO24, MSO22 Quick Start Manual... - Page 52 Operating basics 2. Tap Show Statistics in Badge to add statistical readouts to the measurement badge. 3. Tap available panel titles to make changes for those categories. 4. Use the available fields to refine the measurement conditions. Displayed fields depend on the measurement. Selection changes take effect immediately.
-
Page 53: Add A Search
The example image shows search criteria set to find positive pulse widths that are less than 70 ns wide. 4. To stop showing marks on a waveform, double-tap the Search badge and tap Display to Off. 2 Series Mixed Signal Oscilloscopes MSO24, MSO22 Quick Start Manual... -
Page 54: Delete A Measurement Or Search Badge
Operating basics 5. To move the waveform to center marks on the display, push the Run/Stop front panel button to stop acquisition, single-tap a Search badge, and tap the < or > Navigation button. Note: Navigation buttons are only functional when the oscilloscope acquisition mode is set to Stop. This opens the Zoom mode and moves the waveform to the previous or next event mark on the waveform. -
Page 55: Display And Configure Cursors
1. Tap the waveform slice (in Stacked mode), or the channel or waveform badge (in Overlay mode) to which you want to add cursors. 2. Tap the Cursors button. The cursors are added to the display. 2 Series Mixed Signal Oscilloscopes MSO24, MSO22 Quick Start Manual... - Page 56 Operating basics 3. Use Multipurpose Knobs A and B to move the cursors, or touch and drag a cursor. Cursors show readouts that show position and difference measurements between the cursors. 4. To move the cursors to a different channel or waveform, just tap in that waveform graticule. 5.
- Page 57 7. Tap the Help icon on the menu title for more information on the menu settings. 8. To stop showing cursors, open the Cursors configuration menu and set Display to Off. 2 Series Mixed Signal Oscilloscopes MSO24, MSO22 Quick Start Manual...
-
Page 58: Connect The Oscilloscope To A Pc Using A Usb Cable
Operating basics Connect the oscilloscope to a PC using a USB cable Use a USB cable to connect the oscilloscope directly to a PC for remote instrument control. 1. On the oscilloscope, select Utility > I/O from the menu bar. 2. -
Page 59: Maintenance
Use a 75% isopropyl alcohol solution as a cleaner for cabinet parts. Before using any other type of cleaner, consult your Tektronix Service Center or representative. Inspection - Exterior. Inspect the outside of the instrument for damage, wear, and missing parts. Immediately repair defects that could cause personal injury or lead to further damage to the instrument. -
Page 60: Check For Common Problems
One or more defective point of load regulators. Flat-panel display blank or has streaks in display Faulty LCD screen or video circuitry. Service the instrument For more information on troubleshooting, maintenance, and replacing parts on your instrument contact a Tektronix Service Center. -
Page 61: Returning The Instrument For Service
Reason for returning. • A complete description of the required service. Mark the address of the Tektronix Service Center and the return address on the shipping carton in two prominent locations. 2 Series Mixed Signal Oscilloscopes MSO24, MSO22 Quick Start Manual... -
Page 62: Index
Index Environment requirements ESD, preventing acquisition menu, open Ethernet, connect to expansion point, waveform a channel to the display a measurement badge a search badge signal to the screen firmware, how to update waveform to the screen Add New Bus waveform button Math waveform button GPIB talk/listen address 43, Ref waveform button... - Page 63 (waveforms) USB cable, connect to PC 43, 2 Series Mixed Signal Oscilloscopes MSO24, MSO22 Quick Start Manual...
- Page 64 use cursors user documentation using mouse with the touchscreen waveform expansion point intensity persistence record view waveform badge Waveform View Zoom box zoom icon Zoom overview Zoom title bar...
Need help?
Do you have a question about the MSO24 and is the answer not in the manual?
Questions and answers