
Related Manuals for Hameg HM 1004-3.01


Summary of Contents for Hameg HM 1004-3.01
- Page 1 ® Instruments M A N U A L Oscilloscopes HM 1004- .01/.02/.03 HM 1505- .01/.02/.03 FRANKFURT ● ● ● ● ● PARIS ● ● ● ● ● LUTON ● ● ● ● ● BARCELONA ● ● ● ● ● NEW YORK ● ● ● ● ● OCEANSIDE ● ● ● ● ● HONG KONG...
-
Page 2: Table Of Contents
Table of contents General information regarding the CE marking ..4 General Information ............6 Symbols ................. 6 Use of tilt handle ............6 Safety ................6 Intended purpose and operating conditions ....6 EMC ................7 Warranty ................. 7 Maintenance .............. -
Page 3: General Information Regarding The Ce Marking
General information regarding the CE marking HAMEG instruments fulfill the regulations of the EMC directive. The conformity test made by HAMEG is based on the actual generic- and product standards. In cases where different limit values are applicable, HAMEG applies the severer standard. For emission the limits for residential, commercial and light industry are applied. - Page 4 - in laboratory as well as in field service use. It is another example Power consumption: approx. 38 Watt at 50Hz Min./Max. ambient temperature: 0°C...+40°C of HAMEG’s dedication to engineering excellence. Protective system: Safety class I (IEC1010-1) Weight: approx. 5.9kg. Color: techno-brown...
-
Page 5: General Information
General Information General Information instrument operates according to Safety Class I (three- conductor power cord with protective earthing conductor and a plug with earthing contact). This oscilloscope is easy to operate. The logical arrangement of the controls allows anyone to quickly become familiar with The mains/line plug shall only be inserted in a socket outlet the operation of the instrument, however, experienced users provided with a protective earth contact. -
Page 6: Emc
2 years. This warranty shall become null and void. not apply to any defect, failure or damage caused by improper use or inadequate maintenance and care. HAMEG shall not be obliged to provide service under this warranty to repair Fuse type: damage resulting from attempts by personnel other than Size 5x20mm;... -
Page 7: Type Of Signal Voltage
Type of signal voltage Type of signal voltage tions in oscilloscope measurements, the peak-to-peak volt- age (Vpp) value is applied. The latter corresponds to the real potential difference between the most positive and most The oscilloscopes HM1004-3 and HM1505-3 allow examina- negative points of a signal waveform. -
Page 8: Total Value Of Input Voltage
40Hz this influence is negligible. F = 1/T, the following equations can be stated: With the above listed exceptions HAMEG 10:1 probes can be used for DC measurements up to 600V or AC voltages (with a mean value of zero volt) of 1200Vpp. The 100:1 probe HZ53 allows for 1200V DC or 2400Vpp for AC. -
Page 9: Connection Of Test Signal
When using a 50Ω cable such as the HZ34, a 50Ω through tot 2 osc 2 termination type HZ22 is available from HAMEG. When In this t tot is the total measured risetime, t osc is the risetime transmitting square signals with short rise times, transient of the oscilloscope amplifier (HM1004-3 approx. -
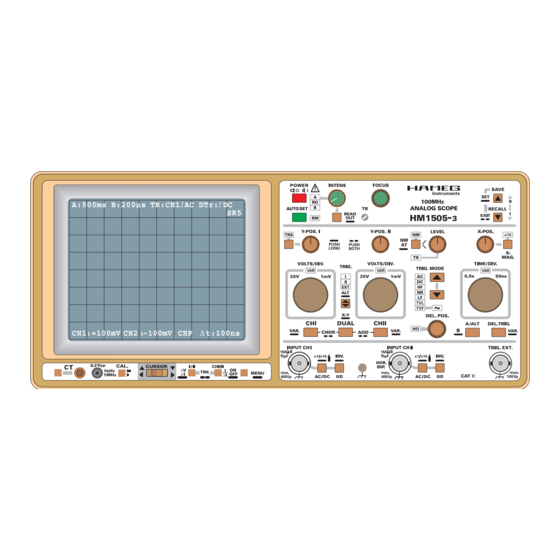
Page 10: Controls And Readout
During this With AC coupling of low frequency signals, the atte- time the HAMEG logo and the software version are nuation is no longer independent of frequency, pulses displayed on the screen. After the internal test is com- can show pulse tilts. - Page 11 Controls and Readout In DUAL mode the CURSOR lines are related to the signal The AUTOSET function switches the readout on and which is used for internal triggering. selects A timebase mode (A-LED lit). The INTENS setting for each function is automatically set to the mean value, If the signal height is insufficient, the CURSOR lines do if less intensity was previously selected.
- Page 12 Controls and Readout XY and ADD (addition) mode. (10)Y-POS. II - Control knob. The vertical trace position of channel II can be set with this control knob. In ADD (addition) mode both (Y-POS. I and Y-POS. II) control knobs are active. If the instrument is set to XY mode this control knob is inactive and the X- POS.
- Page 13 Controls and Readout Each time this pushbutton is briefly pressed, the slope results in a higher timebase speed (lower time deflection direction switches from falling edge to rising edge and coefficient), all time and frequency relevant information in vice versa. the readout is switched over.
- Page 14 Controls and Readout Both deflection coefficients are then displayed. The pre- In XY mode the deflection coefficients are displayed as vious trigger setting stays as it was, but can be changed. “Y...” for channel I and “X...” for channel II, followed by “XY”.
- Page 15 Controls and Readout 1mV/div up to 20V/div. The knob is automatically switched AC (DC content suppressed), inactive if the channel related to it is switched off, or if the DC (peak value detection inactive), input coupling is set to GD (ground). HF (high-pass filter cuts off frequencies below approx.
- Page 16 Controls and Readout In A timebase mode, time deflection coefficients be- indicates the signal part which is displayed by the B tween 500ms/div and 50ns/div can be chosen in 1-2-5 timebase. sequence, if the X-MAG. x10 function is not activated. The intensified segment can be shifted horizontally by the During alternate (A and B) and B timebase operation, the DEL.
- Page 17 Controls and Readout in triggered delay mode. In this mode, the former A (27)INPUT CH I - BNC socket. timebase trigger settings regarding the trigger mode This BNC socket is the signal input for channel I. In XY (automatic or normal), -coupling, -slope and -level set- mode, signals at this input are used for the Y deflection.
- Page 18 ~ (AC) or = If "PRESS SECURITY KEY" is displayed, this function is (DC) symbol. available only for HAMEG authorized workshops. Press AUTOSET (3) to switch back to the menu. The GD setting disables the input signal, the AC/DC (32) pushbutton and the VOLTS/DIV (20) knob.
- Page 19 Controls and Readout cient is present and there is no requirement to select Dual mode. between different deflection coefficients. Consequently The CURSOR lines must be set on the channel I or the pushbutton is inactivated in combination with ∆V channel II signal. As the deflection coefficients may be measurements.
-
Page 20: Menu
After a few seconds the HAMEG logo and the 1. MAIN MENU instrument software release is displayed on the screen. As long as the HAMEG logo is visible different internal checks are 1.1 CALIBRATE made. Thereafter the instrument will revert to its last used Information regarding this can be found in the section operating mode. -
Page 21: Adjustment At 1Khz
First Time Operation For this purpose a square wave signal with a very fast rise bumps) to an absolute minimum. time and minimum overshoot should be used, as the sinusoidal contents cover a wide frequency range. Using the probes HZ51, 52 and 54, the full bandwidth of the oscilloscope can be utilized without risk of unwanted wave- The built-in calibration generator provides a square wave form distortion. -
Page 22: Operating Modes Of The Vertical Amplifiers In Yt Mode
First Time Operation The voltage provided at a high-impedance input (1MΩ II 15- trols and Readout” ). 30pF) will correspond to the division ratio of the probe used (10:1 = 20mVpp output). Suitable probes are HZ51, 52, and In XY mode the timebase is deactivated. The signal applied to the input of channel II - front panel marking HOR. -
Page 23: Phase Difference Measurement
Triggering and timebase Measurement of amplitude modulation increased (compared with C short-circuited), then the test voltage leads the reference voltage and vice versa. This applies only in the region up to 90° phase shift. Therefore C The momentary amplitude u at time t of a HF-carrier voltage, should be sufficiently large and produce only a relatively small which is amplitude modulated without distortion by a sinusoidal just observable phase shift. -
Page 24: Triggering And Timebase
Triggering and timebase where a = U T (1+m) and b = U T (1-m). Automatic mode is recommended for all uncomplicated meas- uring tasks. However, automatic triggering is also the appropri- The variable controls for amplitude and time can be set ate operation mode for the “entry”... -
Page 25: Trigger Coupling
Triggering and timebase zero or ground potential and absolute voltage values. The indicator is switched off. As only the separated synchronisa- positive slope may also lie in a negative part of a signal. tion pulses are used for triggering the relationship between the displayed signal and the trigger signal is lost. -
Page 26: Alternate Triggering
Triggering and timebase by 180° by using the trigger slope (11) pushbutton. The trigger As the external trigger signal applied at the TRIG. EXT socket point symbol is inactive in line/mains trigger mode as there is normally has no relation to the signal height of the displayed no direct amplitude relationship between the trigger voltage signal, the trigger point symbol is switched off. -
Page 27: B-Timebase (2Nd Timebase)/ Triggering After Delay
Triggering and Timebase Auto Set amplitudes. Only a very exact trigger level adjustment makes Within certain limits this can be compensated by the intensity a single display possible. The use of the holdoff control setting. To avoid high contrast between the A and B timebase simplifies the right adjustment. -
Page 28: Save/Recall
Save/Recall Component Tester of the CRT and other components are unavoidable. In mind. However, most electronic components can normally be DUAL mode the channel I trace is set to the upper half and the tested without any restriction. channel II trace to the lower half of the CRT. Using the Component Tester The 1mV/div and 2mV/div deflection coefficients will not be selected by AUTO SET as the bandwidth is reduced on these... -
Page 29: Testing Semiconductors
Component Tester transformers) can also be tested. The determination of the for the same terminal is then absolutely necessary. value of inductance needs some experience, because inductors have usually a higher ohmic series resistance. However, the impedance value (at 50Hz) of an inductor in the range from 20 Ohm to 4.7kΩ... -
Page 30: Test Instructions
Test Instructions are strictly supervised by HAMEG. The selection of a cathode- ray tube without any tolerances is practically impossible. Astigmatism Check Check whether the horizontal and vertical sharpness of the display are equal. This is best seen by displaying a square- wave signal with the repetition rate of approximately 1MHz. -
Page 31: Operating Modes: Ch.i/Ii, Dual, Add, Chop ., Invert And X-Y Operation
A suited generator for this test Triggering Checks is HZ60 from HAMEG. Of course, the quality of the transmission performance is not The internal trigger threshold is important as it determines the only dependent on the vertical amplifier. -
Page 32: Timebase
In case of disregard of the safety from time to frequency measurement, the readout displays warnings contained in this manual, HAMEG refuses any the required signal frequency in each timebase setting. liability regarding personal injury and/or damage of equip- ment. -
Page 33: Rs232 Interface - Remote Control
RS232 Interface - Remote Control The RS232 parameter are: After the remote state has been switched off the RM -LED (3) N-8-2 (no parity bit, 8 data bits, 2 stop bits, is dark. RTS/CTS hardware protocol). Please note: Baud-Rate Setting A minimum time must elapse between the commands RM=1...
Need help?
Do you have a question about the HM 1004-3.01 and is the answer not in the manual?
Questions and answers