Table of Contents
Advertisement
Available languages
Available languages
Quick Links
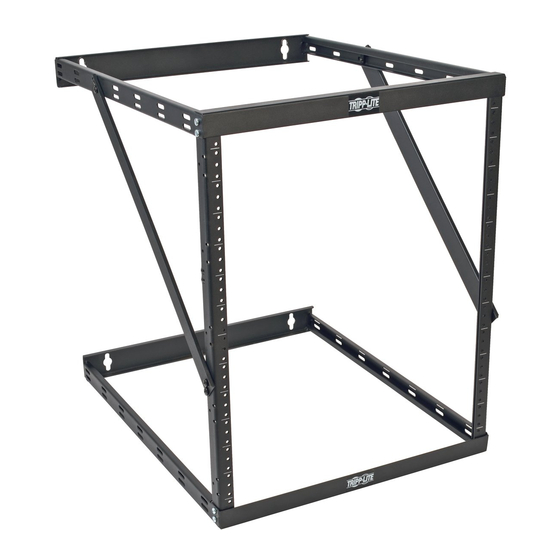
Wall-Mounted 2-Post Open Frame Rack
Register your product for quicker service and ultimate peace of mind.
You could also win an ISOBAR6ULTRA surge protector-a $100 value!
17-11-213-933342.indb 1
Owner's Manual
8U/12U/22U Configurable
Model: SRWO8U22
PROTECT YOUR INVESTMENT!
www.tripplite.com/warranty
1111 W. 35th Street, Chicago, IL 60609 USA • www.tripplite.com/support
Copyright © 2017 Tripp Lite. All rights reserved.
1
2
2
2
3
3
4
5
6
6
6
7
13
11/29/2017 11:02:11 AM
Advertisement
Chapters
Table of Contents

Related Manuals for Tripp Lite SRWO8U22DP


Summary of Contents for Tripp Lite SRWO8U22DP
-
Page 1: Table Of Contents
Register your product for quicker service and ultimate peace of mind. You could also win an ISOBAR6ULTRA surge protector—a $100 value! www.tripplite.com/warranty 1111 W. 35th Street, Chicago, IL 60609 USA • www.tripplite.com/support Copyright © 2017 Tripp Lite. All rights reserved. 17-11-213-933342.indb 1 11/29/2017 11:02:11 AM... -
Page 2: Introduction
Introduction Tripp Lite’s SRWO8U22 is the perfect multi-option 2-post open frame rack solution for applications where space is limited. 8U, 12U or 22U rack space options allow configuration flexibility without having to buy separate rack fixtures, all in an out-of-the-way wall-mount form factor. -
Page 3: Installation/Wall-Mounting
Installation/Wall-Mounting WARNING: Do not attempt to mount the rack to the wall with equipment mounted to the rack. WARNING: The wall surface, the wall studs and all user-supplied mounting hardware must be able to support the combined weight of the rack and all equipment that will be installed in the rack. The rack can support an equipment load up to 150 lb. -
Page 4: Configuration
Installation/Wall-Mounting continued 12U Configuration Step Insert one end of the longer vertical mounting rails into the corners of the bottom panel frame (both panel frames can be used as a top or a bottom) opposite the mounting side and secure them with 2 of the M5 x 10 mm Phillips head screws on each side. -
Page 5: 22U Configuration
Installation/Wall-Mounting continued 22U Configuration Step Using one of the mounting rail tie plates and four of the M5 x 10 mm Phillips head screws, connect one set of shorter and longer vertical mounting rails. Repeat this step for the other set of rails. Step Insert one end of the combined vertical mounting rails into the corners of the bottom panel frame (both panel frames can be used as a top or a bottom) opposite the... -
Page 6: Equipment Installation
Product Registration Visit www.tripplite.com/warranty today to register your new Tripp Lite product. You’ll be automatically entered into a drawing for a chance to win a FREE Tripp Lite product!* * No purchase necessary. Void where prohibited. Some restrictions apply. See website for details. -
Page 7: Español
Instalación/Montaje en la pared Configuración 8U Configuración 12U Configuración 22U Instalación de equipos Almacenamiento y servicio Garantía English Français 1111 W. 35th Street, Chicago, IL 60609 USA • www.tripplite.com/support Copyright © 2017 Tripp Lite. Todos los derechos reservados. 17-11-213-933342.indb 7 11/29/2017 11:02:16 AM... -
Page 8: Introducción
Introducción SRWO8U22 de Tripp Lite es la solución de rack de bastidor abierto de 2 puestos multiopción ideal para aplicaciones en donde el espacio es limitado. Las opciones de espacio de racks 8U, 12U o 22U permiten flexibilidad en la configuración sin tener que adquirir mezclas de racks, todo en un factor de forma fuera de serie. -
Page 9: Instalación/Montaje En La Pared
Instalación/Montaje en la pared ADVERTENCIA: No intente montar el rack en la pared con equipos montados en el rack. ADVERTENCIA: La superficie de la pared, los pasadores de la pared y todas las herramientas de montaje suministradas por el usuario deben poder soportar el peso combinado del rack y todos los equipos que se instalarán en el rack. -
Page 10: Configuración 12U
Instalación/Montaje en la pared (continuación) Configuración 12U Paso Inserte uno de los extremos de los rieles de montaje verticales largos en las esquinas del bastidor del panel inferior (ambos bastidores de paneles pueden utilizarse como inferior o superior) opuesto al lado de montaje y asegúrelos con 2 de los tornillos Phillips M5 x 10 de cada lado. -
Page 11: Configuración 22U
Instalación/Montaje en la pared (continuación) Configuración 22U Paso Utilizando una de las placas de ajuste de riel de montaje y cuatro de los tornillos Phillips M5 x 10, conecte un juego de rieles de montaje vertical corto y largo. Repita este paso para los otros juegos de rieles. Paso Inserte uno de los extremos de los rieles de montaje verticales combinados en las esquinas del bastidor del panel inferior (ambos bastidores de paneles pueden... -
Page 12: Instalación De Equipos
Tripp Lite o un centro de servicio autorizado por Tripp Lite. Los productos que se envían a Tripp Lite o un centro de servicio autorizado por Tripp Lite debe tener prepagos los cargos de envío. Escriba el número RMA en el exterior del paquete. -
Page 13: Français
Installation/ Montage mural Configuration 8U Configuration 12U Configuration 22U Installation de l’équipement Entreposage et service Garantie English Español 1111 W. 35th Street, Chicago, IL 60609 USA • www.tripplite.com/support Copyright © 2017 Tripp Lite. Tous droits réservés. 17-11-213-933342.indb 13 11/29/2017 11:02:17 AM... -
Page 14: Introduction
Introduction Le SRWO8U22 de Tripp Lite est la solution parfaite d’un bâti à cadre ouvert à 2 supports à options multiples pour les applications où l’espace est restreint. Les options 8U, 12U ou 22U de l’espace du bâti assure la flexibilité de la configuration sans avoir à acheter des accessoires supplémentaires pour le bâti;... -
Page 15: Installation/Montage Mural
Installation/Montage mural AVERTISSEMENT : Ne pas tenter d’installer le bâti au mur avec de l’équipement monté sur le bâti. AVERTISSEMENT : La surface du mur, les poteaux de cloison et toute la quincaillerie servant au montage fournie par l’utilisateur doivent être capables de supporter le poids combiné du bâti et de tout l’équipement qui sera installé... -
Page 16: Configuration 12U
Installation/Montage mural (suite) Configuration 12U Étape Insérer une extrémité des rails de montage verticaux courts dans les coins du cadre inférieur (les deux cadres peuvent être utilisés indifféremment pour le dessus ou le dessous) du côté opposé à celui du montage et les fixer de chaque côté au moyen de 2 vis Phillips M5 x 10. -
Page 17: Configuration 22U
Installation/Montage mural (suite) Configuration 22U Étape Utilisant une des plaques d’attache des rails de montage et 4 vis Phillips M5 x 10, raccorder un ensemble de rails de montage verticaux courts et longs. Répéter cette étape pour l’autre ensemble de rails. Étape Insérer une extrémité... -
Page 18: Installation De L'équipement
à Tripp Lite ou à un centre de réparation reconnu par Tripp Lite n’est pas couvert sous cette garantie. Les produits envoyés à Tripp Lite ou un centre de réparation reconnu par Tripp Lite doivent être envoyés en port prépayé. - Page 19 17-11-213-933342.indb 19 11/29/2017 11:02:18 AM...
- Page 20 1111 W. 35th Street, Chicago, IL 60609 USA • www.tripplite.com/support 17-11-213 93-3342_RevC 17-11-213-933342.indb 20 11/29/2017 11:02:18 AM...
Need help?
Do you have a question about the SRWO8U22DP and is the answer not in the manual?
Questions and answers