Table of Contents
Advertisement
Available languages
Available languages
Quick Links
Low-Profile Wall-Mount
SmartRack
Register your product for quicker service and ultimate peace of mind.
You could also win an ISOBAR6ULTRA surge protector—a $100 value!
16-04-227-9335C5.indb 1
Owner's Manual
Models: SRWF12U38, SRWF16U38
Table of Contents
1. Important Safety Instructions
2. Overview
3. Feature Identification
4. Preparation
4.1. Unpacking
4.2. Disassembly
5. Installation
5.1. Mounting the Backplate
5.2. Unit and Equipment Installation
6. Enclosure Configuration
6.1. Cable Access and Management
6.2. Ground Connection
7. Specifications
8. Storage and Service
9. Warranty and Product Registration
Español
Français
Русский
PROTECT YOUR INVESTMENT!
www.tripplite.com/warranty
1111 W. 35th Street, Chicago, IL 60609 USA • www.tripplite.com/support
Copyright © 2016 Tripp Lite. All rights reserved.
Enclosures
®
17
25
1
2
2
2
3
3
3
4
4
5
7
7
7
7
7
8
9
9/2/2016 10:18:55 AM
Advertisement
Chapters
Table of Contents

Subscribe to Our Youtube Channel
Related Manuals for Tripp Lite SRWF12U38


Summary of Contents for Tripp Lite SRWF12U38
-
Page 1: English
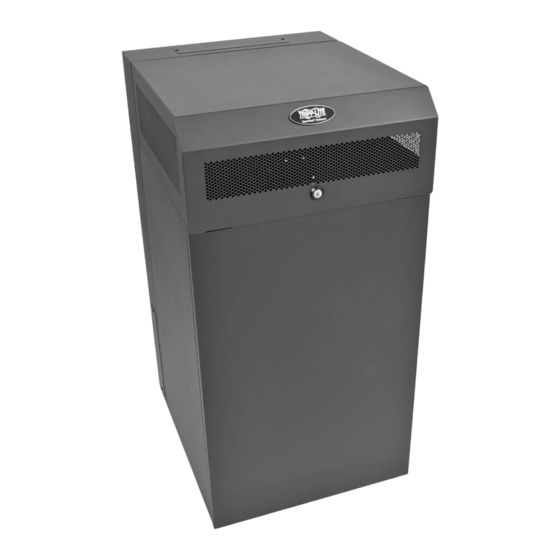
Register your product for quicker service and ultimate peace of mind. You could also win an ISOBAR6ULTRA surge protector—a $100 value! www.tripplite.com/warranty 1111 W. 35th Street, Chicago, IL 60609 USA • www.tripplite.com/support Copyright © 2016 Tripp Lite. All rights reserved. 16-04-227-9335C5.indb 1 9/2/2016 10:18:55 AM... - Page 2 Using a modular design that easily assembles and disassembles, the enclosures support 8U (SRWF12U38) or 12U (SRWF16U38) of vertically mounted equipment up to 38 inches deep and 4U of patch panels. Both units support up to 400 lb. maximum weight.
- Page 3 With one person on each side, carefully lift the enclosure out of the box and place on a firm, level surface. Examine the enclosure for any damage or loose parts. Confirm all parts are present. If anything is missing or damaged, contact Tripp Lite for assistance.
- Page 4 2-Post Rack-Mount Installation The SRWF12U38 and SRWF16U38 are also designed for 2-post rack mounting. To attach, drive #12-24 screws (not included) through the Backplate into the corresponding 2-post mounting holes. Use a minimum of 10 locations for full payload rating of 400 lb.
- Page 5 5. Installation 5.2. Unit and Equipment Installation Side Panel Installation After ensuring the Backplate is securely fastened to the wall or 2-post rack, install the Side Panels by inserting the Side Panel hooks into the rectangular cutouts in the Backplate. Apply downward pressure to properly seat the panels Notes: The smooth surface of the Side Panels should face away from one another.
- Page 6 Cover Installation With user-supplied standard rack hardware (#12-24 screws), Place cover onto the Side Panels and slide toward the vertically mount up to 8U (SRWF12U38) or 12U (SRWF16U38) Backplate. When properly seated, the cover should be flush of network equipment , and up to 4U of patch panels against the Backplate and level with the top of the Backplate.
- Page 7 Service Your Tripp Lite product is covered by the warranty described in this manual. A variety of Extended Warranty and On-Site Service Programs are also available from Tripp Lite. For more information on service, visit www.tripplite.com/support. Before returning your product for service, follow these steps: 1.
- Page 8 Product Registration Visit www.tripplite.com/warranty today to register your new Tripp Lite product.You’ll be automatically entered into a drawing for a chance to win a FREE Tripp Lite product!* * No purchase necessary. Void where prohibited. Some restrictions apply. See website for details.
-
Page 9: Table Of Contents
6.2. Conexión a Tierra 7. Especificaciones 8. Almacenamiento y Servicio 9. Garantía English Français Русский MÁS D E 1111 W. 35th Street, Chicago, IL 60609 EE. UU. • www.tripplite.com/support Copyright © 2016 Tripp Lite. Todos los derechos reservados. 16-04-227-9335C5.indb 9 9/2/2016 10:19:07 AM... -
Page 10: Instrucciones De Seguridad Importantes
áreas previamente consideradas imposibles para la colocación. Usando un diseño modular que se ensambla y desensambla fácilmente, el gabinete soporta 8U (SRWF12U38) o 12U (SRWF16U38) de equipo instalado verticalmente de hasta 38" de profundidad y 4U de paneles de acoplamiento. -
Page 11: Preparación
Examine el gabinete para detectar cualquier daño o parte floja. Confirme que todas las partes estén presentes. Si algo está faltante o dañado, póngase en contacto con Tripp Lite para solicitar ayuda. No intente usar el gabinete si ha sido dañado. -
Page 12: Instalación
Instalación en Rack de 2 Postes El SRWF12U38 y SRWF16U38 están también diseñados para instalación en rack de 2 postes. Para instalar, coloque tornillos #12-24 de rosca gruesa (suministrados) a través de la Placa de Respaldo en los orificios de instalación correspondientes para 2... -
Page 13: Instalación De La Unidad Y El Equipo
5. Instalación 5.2. Instalación de Unidad y Equipo Instalación de Panel Lateral Después de asegurar que la placa de respaldo está firmemente atornillada a la pared o rack de 2 postes, instale los Paneles Laterales insertando los ganchos del Panel Lateral en los recortes cuadrados en la Placa de Respaldo. - Page 14 Instalación de la Cubierta Con accesorios para rack estándar, suministrados por el Coloque la cubierta sobre los Paneles Laterales y deslícela usuario, instale verticalmente hasta 8U (SRWF12U38) o 12U hacia la Placa de Respaldo. Cuando asiente correctamente, (SRWF16U38) de equipo de red...
-
Page 15: Configuración Del Gabinete
Para mejorar la eficiencia de enfriamiento y un aspecto más limpio de la instalación, todos los orificios de acceso de cable son compatibles con el accesorio de placa de tira de cepillo SRBRUSHWM de Tripp Lite. La placa de tira de cepillo se ajusta en el panel de conducción de cableado para bloquear el flujo de aire indeseable. -
Page 16: Garantía
Números de Identificación de Conformidad Regulatoria Para el propósito de certificaciones e identificación de conformidad con las normas, su producto Tripp Lite ha recibido un número de serie exclusivo. El número de serie puede encontrarse en la etiqueta de placa de identificación, junto con todas las marcas e información requeridas de aprobación. Al solicitar información de conformidad para este producto, refiérase siempre al número de serie. -
Page 17: Français
6.2. Connexion à la terre 7. Caractéristiques techniques 8. Caractéristiques techniques 9. Garantie English Español Русский 1111 W. 35th Street, Chicago, IL 60609 USA • www.tripplite.com/support Droits d'auteur © 2016 Tripp Lite. Tous droits réservés. 16-04-227-9335C5.indb 17 9/2/2016 10:19:10 AM... -
Page 18: Consignes De Sécurité Importantes
En utilisant une conception modulaire qui s'assemble et se démonte facilement, les boîtiers peuvent accueillir 8U (SRWF12U38) ou 12U (SRWF16U38) d'équipement monté verticalement jusqu'à 96,5 cm [38 po] de profondeur et 4U de panneaux de câblage. Les deux appareils peuvent supporter jusqu'à 181 kg [400 lb]. -
Page 19: Préparation
Vérifier que le boîtier n’est pas endommagé et qu'il n'y a pas de pièces desserrées. Confirmer qu'il ne manque aucune pièce. Si quoi que ce soit manque ou est endommagé, contacter Tripp Lite pour obtenir de l'aide. Ne pas tenter d'utiliser le boîtier s'il a été endommagé. -
Page 20: Installation
Installation dans un bâti à 2 montants Le SRWF12U38 et le SRWF16U38 sont également conçus pour être montés dans un bâti à 2 montants. Pour fixer, visser des vis nº 12-24 (fournies) à travers la bride de fixation murale, puis dans les trous de montage à... -
Page 21: Installation De L'appareil Et De L'équipement
5. Installation 5.2. Installation de l'appareil et de l'équipement Installation des panneaux latéraux Après s'être assuré que la bride de fixation murale est fixée de façon sécuritaire au mur ou au bâti à 2 montants, installer les panneaux latéraux en insérant les crochets des panneaux latéraux dans les découpes rectangulaires dans la bride de fixation murale. - Page 22 Installation du couvercle En utilisant de la quincaillerie fournie par l’utilisateur, monter Placer le couvercle sur les panneaux latéraux et le glisser verticalement jusqu’à 8U (SRWF12U38) ou 12U (SRWF16U38) vers la bride de fixation murale. Lorsque le couvercle repose d’équipement de réseautage et jusqu’à...
-
Page 23: Configuration Du Boîtier
Les dommages (directs, indirects, particuliers ou consécutifs) encourus par le produit lors du transport à Tripp Lite ou à un service autorisé Tripp Lite ne sont pas couverts par la garantie. Les frais liés au transport des produits expédiés à... -
Page 24: Garantie
Numéros d'identification à la conformité réglementaire À des fins de certification de conformité réglementaire et d'identification, un numéro de série unique a été attribué à votre produit Tripp Lite. Le numéro de série ainsi que toutes les marques d'homologation et les renseignements requis se trouvent sur la plaque signalétique du produit. Lorsque vous demandez des renseignements concernant la conformité... -
Page 25: Русский
6.1. Отверстия для ввода кабелей и оптимизация кабельных соединений 31 6.2. Заземление Технические характеристики Хранение и техническое обслуживание Гарантии English Español Français 1111 W. 35th Street, Chicago, IL 60609 USA • www.tripplite.com/support Охраняется авторским правом © 2016 Tripp Lite. Перепечатка запрещается. 16-04-227-9335C5.indb 25 9/2/2016 10:19:11 AM... -
Page 26: Важные Указания По Технике Безопасности
производителя и поставляются полностью в сборе для обеспечения быстроты и легкости ввода в эксплуатацию в местах, ранее считавшихся непригодными для их размещения. Эти шкафы модульной конструкции, обеспечивающей простоту их сборки и разборки, вмещают в себя вертикально монтируемое оборудование высотой до 8U (мод. SRWF12U38) или 12U (мод. -
Page 27: Подготовка
Расположившись по одному человеку с каждой стороны, аккуратно выньте шкаф из коробки и поместите его на прочную и ровную поверхность. Осмотрите шкаф на предмет наличия каких-либо повреждений или незакрепленных деталей. Убедитесь в наличии всех деталей. В случае отсутствия или повреждения каких-либо деталей обратитесь за помощью в компанию Tripp Lite. Не пользуйтесь шкафом в случае его повреждения. 4.2. Разборка... -
Page 28: Установка
компонентами. Установочный комплект для монтажа в однорамную стойку Шкафы моделей SRWF12U38 и SRWF16U38 также рассчитаны на монтаж в однорамную стойку. Для крепления вверните винты с крупным шагом резьбы #12-24 (поставляются в комплекте) через заднюю панель в соответствующие отверстия для монтажа в... -
Page 29: Установка Элементов Модуля И Оборудования
5. Установка 5.2. Установка элементов модуля и оборудования Установка боковых панелей Убедившись в том, что задняя панель надежно прикреплена к стене или однорамной стойке, установите боковые панели, вставив расположенные на них крючкообразные захваты в прямоугольные прорези задней панели. Для надлежащей фиксации панелей... - Page 30 С помощью стандартного стоечного крепежа (винты #12-24), не входящего в Поместите крышку на боковые панели и вдвиньте ее по направлению к задней комплект, установите сетевое оборудование высотой до 8U (для мод. SRWF12U38) панели. При правильной посадке крышка находится вровень с задней панелью по...
-
Page 31: Расположение Элементов Конструкции Шкафа
особыми обстоятельствами), связанные с транспортировкой изделия в адрес компании Tripp Lite или ее уполномоченного сервисного центра, действие гарантии не распространяется. Стоимость транспортировки изделий в адрес компании Tripp Lite или ее уполномоченного сервисного центра должна быть оплачена авансом. Номер RMA должен быть указан на... -
Page 32: Гарантии
Идентификационные номера соответствия нормативным требованиям В целях сертификации на соответствие нормативным требованиям и опознавания приобретенному вами изделию марки Tripp Lite присвоен уникальный серийный номер. Серийный номер располагается на заводской табличке вместе со всеми необходимыми отметками о приемке и прочей информацией. При запросе информации о соответствии данного изделия нормативным требованиям обязательно...
Need help?
Do you have a question about the SRWF12U38 and is the answer not in the manual?
Questions and answers