Advertisement
Quick Links
Advertisement

Related Manuals for Sage BTM800


Summary of Contents for Sage BTM800
- Page 1 Tea Maker ™ Instruction Book – BTM800...
-
Page 2: Table Of Contents
If you have any concerns please contact your local electricity company. • Your Sage appliance includes ® a BS 13 amp moulded mains IMPORTANT plug on the supply cord. - Page 3 • As the colours of the wire water and tea only. Under no may not correspond with circumstances should this product be used to heat or boil the coloured markings any other liquids or foodstuffs. which identify the terminals in your plug, please refer •...
- Page 4 Always fill • The use of accessory the glass jug to at least the attachments not recommended ‘MIN’ marking. Should it be by Sage may result in fire, ® operated without water, the electric shock or injury boil-dry protection will shut to persons.
- Page 5 • To disconnect from the wall If dropped or struck extremely outlet, first turn OFF the hard, it may break or weaken, appliance then remove and could at a later time shatter the power plug from the into many small pieces wall outlet.
- Page 6 • Do not use the appliance if power cord, power plug or appliance becomes damaged in any way. If damaged or maintenance other than cleaning is required, please contact Sage Customer ® Service on 0808 178 1650 / 0333 0142 970 or go to sageappliances.com.
- Page 7 • Consult a qualified electrician if the grounding instructions are not completely understood, or if doubt exists as to whether the appliance is properly grounded. WARNING • Do not operate the appliance on an inclined surface. Do not move the appliance while it is switched on.
-
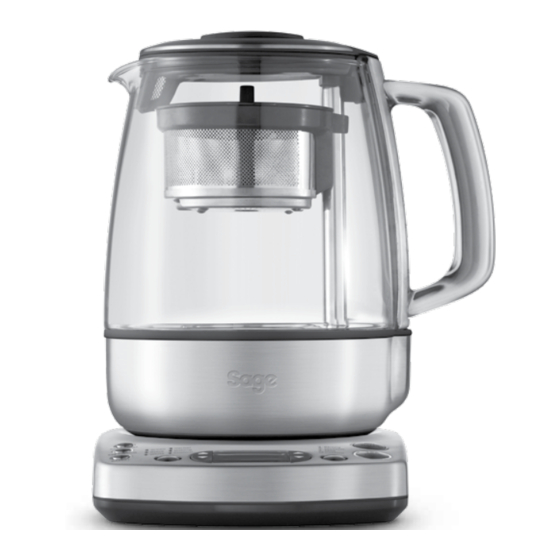
Page 8: Components
Components A. Jug lid F. Glass jug 1500ml water max, 1200ml tea max B. Stainless steel scale filter G. Immersed temperature sensor C. Tea basket lid H. Tea scoop D. Stainless steel tea basket I. Cord storage E. Jug post Concealed on the underside of the power base Magnetically attaches the tea basket. - Page 9 Components K. AUTO START button O. Variable temperature control Set the Tea Maker™ to automatically begin Overrides the preset brew temperatures. brewing at a pre-selected time. P. Backlit LCD L. KEEP WARM button Q. Variable time control Keeps the brewed tea or heated water Overrides the preset brew times.
-
Page 10: Tips
leaves, roots or seeds. Common herbal beverages are chamomile, peppermint, Functions fennel, rose hip, and lemon verbena. Herbal infusions that do not contain tea will generally not become bitter TEA TYPES with extended brews. These can often be brewed with boiling water 3 times There are four main types of tea from the without jeopardising the taste. - Page 11 Water to Tea Scoop Ratio GLASS JUG CUPS SCOOPS MARKING 500mL Approx. 2 Cups/500ml 2 Scoops 750mL Approx. 3 Cups/750ml 3 Scoops 1000mL Approx. 4Cups/1000ml 4 Scoops Approx. 5 Cups/1200ml 5 Scoops 1200mL BEFORE FIRST USE WARNING PREPARING THE TEA MAKER™ Never fill the glass jug with chilled water.
- Page 12 7. Press the left ARROW UP 2. Place the basket on a flat, dry surface. button until the LCD screen Remove basket lid by lifting from the sides. displays 100°C. The 'Custom' LED will automatically illuminate. 3. Use the provided tea scoop to fill the basket with tea leaves.
- Page 13 GREEN WHITE OOLONG HERBAL BLACK TEA TYPE PRESET 80˚C 85˚C 90˚C 100˚C 100˚C BREW TEMP PRESET 3:00 3:00 3:00 4:00 2:00 BREW TIME SELECTING THE TEA STRENGTH NOTE The desired tea strength determines the brew time. The correct brew time depends on the tea The ‘BREW TIME’...
- Page 14 SELECTING THE ‘KEEP WARM’ 3. During this time, the glass jug can be removed from the Power Base, however FEATURE the ‘Keep Warm’ feature will automatically This feature allows the brewed tea switch off. You can re-select the ‘Keep or heated water to remain warm for up to Warm’...
- Page 15 2. During the brewing cycle, the NOTE BASKET button surround will flash while the basket slowly lifts and Once a customised temperature has been lowers within the heated water. selected and once tea making or water heating cycle has been activated, the customised 3.
- Page 16 CUSTOMISING BREW CUSTOMISING BREW TIME TEMPERATURE & TIME In addition to the 5 preset brew times (see Page 16, Selecting the Tea Strength), CUSTOMISING BREW TEMPERATURE the Tea Maker™ also features a customisable In addition to the 5 preset brew brew time setting to suit your personal taste.
- Page 17 ii) Continue to press the right Setting the ‘Auto Start’ Feature ARROW UP button. The LCD screen 1. Press and hold the AUTO START button will display ‘MANUAL LIFT’ and for 2 seconds. The button surround will ‘- - : - -‘ on the right side of the LCD. illuminate and the tea alert will sound.
- Page 18 MOVING THE TEA BASKET NOTE STANDBY MODE Insufficient water may discolour your Tea Maker™ base! When the Tea Maker™ is plugged into a wall outlet, the LCD screen will illuminate for 8. Once the selected START TIME is 3 minutes before entering standby mode. reached, the Tea Maker™...
- Page 19 TEMPERATURE CONVERSION (˚C TO ˚F) The temperature reading on the Tea Maker™ is preset to Celsius but can be converted to Fahrenheit. Simultaneously press and hold the TEA TYPE and TEA STRENGTH buttons for 2 seconds. The corresponding ‘°C’ or ‘°F’ symbol will be displayed on the LCD screen.
-
Page 20: Care & Cleaning
4. To remove the build-up of tannin, the astringent chemical constituent of Care & Cleaning tea, fill the glass jug with water up to the water maximum mark (1500mL WATER MAX) and either: CLEANING THE GLASS JUG a) Bring water to boil and allow water to cool for one minute. - Page 21 CLEANING THE JUG LID AND Ensure the Tea Maker™ is turned OFF by pressing the TEA/Cancel button (when INTEGRATED SCALE FILTER brewing tea) or the HOT WATER/Cancel button (when heating water) on the power 1. Wash the jug lid in warm soapy water with base.
- Page 22 DESCALING STORAGE 1. Empty one sachet (25g) into 1 litre 1. Ensure the Tea Maker™ is switched off, of warm water, stir to dissolve. cleaned and dried before storing. 2. Ensure that the assembled tea basket is securely attached to the magnetic post within the glass jug.
-
Page 23: Troubleshooting
‘RESET’ message continues. • The LCD screen The LCD screen will display a flashing ‘ERROR’ when there is a non-resettable issue with the displays ‘ERROR’ appliance. Should this occur, call the Sage ® Customer Service Centre 0808 178 1650. - Page 24 Troubleshooting PROBLEM WHAT TO DO • I would like to have Even when unplugged from the wall outlet, the Tea Maker™ will remember the last setting used the Tea Maker™’s for each function. default settings back • To restore the Tea Maker™’s default settings for each function, simultaneously press and hold AUTO START and KEEP WARM buttons for 2 seconds.
- Page 25 Aufgrund kontinuierlicher Produktverbesserungen kann das auf dieser Verpackung dargestellte Produkt leicht vom tatsächlichen Produkt abweichen. Due to continued product improvement, the products illustrated or photographed in this document may vary slightly from the actual product. Copyright BRG Appliances 2017. BTM800 – A18...
Need help?
Do you have a question about the BTM800 and is the answer not in the manual?
Questions and answers