Benning DUSPOL combi - Two-pole voltage tester Operating Manual
- Operating manual (1 page)
Advertisement
Overview


Safety instructions
- Hold the voltage tester only by the insulated handles
![]() and
and ![]() and do not touch the contact electrodes (probe tips)
and do not touch the contact electrodes (probe tips) ![]() !
! - Immediately before use: Check the voltage tester for correct operation! The voltage tester must not be used if one or several display functions fail or if the voltage tester is not ready to operate (IEC 61243-3)!
- The voltage tester (voltage class A) must be used only within the nominal voltage range of 12 V up to AC 400 V/ DC 750 V!
- The voltage tester complies with protection class IP 64 and therefore can also be used under wet conditions (designed for outdoor use).
- For testing, firmly grasp the voltage tester by the handles
![]() and
and ![]() .
. - Never connect the voltage tester to voltage for longer than 30 seconds (maximum permissible operating time = 30 s)!
- The voltage tester only operates correctly within the temperature range of -10°C up to +55°C at relative air humidity of 20% up to 96%.
- Do not dismantle the voltage tester!
- Please protect the housing of the voltage tester against contamination and damages!
- Please store the voltage tester under dry conditions.
- To prevent injuries and discharge of the battery, provide the contact electrodes (probe tips) with the enclosed cover after using the voltage tester!
 !
! Attention:
After maximum load (i.e. after a measurement of 30 seconds at AC 400 V/ DC 750 V), the voltage tester must not be used for a duration of 240 seconds!
The voltage tester is marked with international electric symbols and symbols for indication and operation with the following meaning:
| symbol | meaning |
 | Device or equipment for working under voltage |
 | Push button |
 | Alternating current (AC) |
 | Direct current (DC) |
 | Direct and alternating current (DC and AC) |
 | Push button (manually actuated); indicates that respective indications only occur when both push buttons are actuated |
 | Symbol for phase and continuity test |
Functional description
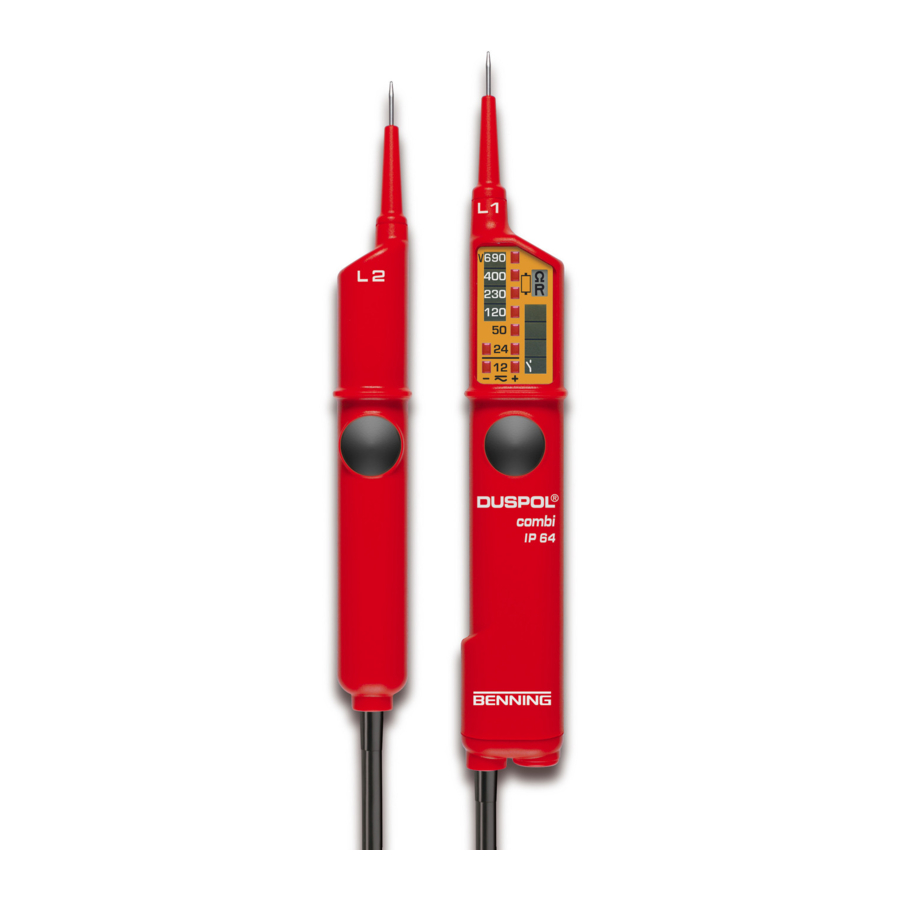
The DUSPOL® combi is a two-pole voltage tester according to IEC 61243-3 with visual display. As a supplementary device, the voltage tester is equipped with a continuity check function. For this function, the voltage tester has two built-in solar cells. The signaling of the continuity check is done optically by means of a LC display. The voltage tester is designed for DC and AC voltage tests within the voltage range of 12 V up to AC 400 V/DC 750 V.
It can be used to perform polarity tests in DC and phase tests in AC. The voltage tester consists of the test probes L1  and L2
  and a connecting cable
  . The test probe L1 is equipped with a display
 . Both test probes are provided with push buttons
  . Without pressing both push buttons, the following voltage steps (AC or DC) can be indicated: 24 V+; 24 V-; 50 V; 120 V; 230 V; 400 V; 750 V. By pressing both push buttons, the voltage tester switches to a lower internal resistance (suppression of inductive and capacitive voltages). Thus, also the indication of 12 V+ and 12 V– is activated. Furthermore, a vibrating motor (motor with a flyweight) is put under voltage. From approximately 200 V this motor is set in rotation. With the voltage increasing, the motor's speed and vibration increases as well so that additionally by means of the handle of test probe L2 the voltage value can be estimated roughly (e.g. 230/ 400 V). The duration of the test with a lower internal resistance of the device (load test) depends on the value of the voltage to be measured. To prevent excessive warming of the voltage tester, it is equipped with a thermal protection (reverse control). With this reverse control, the speed of the vibrating motor decreases as well.
Display field
The display system consists of high-contrast lightemitting diodes (LED)  indicating DC and AC voltages in steps of 12 V; 24 V; 50 V; 120 V; 230 V; 400 V; 750 V
  . The indicated voltages are nominal voltages. With DC voltage, the LEDs also indicate the polarity for 12 V and 24 V. The 12 V LED can only be activated by pressing both push buttons.
The two solar cells are top left and bottom right of the display field. These cells generate the auxiliary voltage necessary for the continuity check.
LC display
The LC display serves for the phase test with alternating current (AC) and indicates the successful continuity check.
Functional check
- The voltage tester must be used only within the nominal voltage range of 12 V up to AC 400 V/ DC 750 V!
- Never connect the voltage tester to voltage for longer than 30 seconds (maximum permissible operating time = 30 s)!
- Check the voltage tester for correct function immediately before use!
- Test all functions by means of known voltage sources.
- For DC voltage tests use e.g. a car battery.
- For AC voltage tests use e.g. a 230 V socket.
- Connect the two test electrodes
![]() to test the continuity check function.
to test the continuity check function.
 to test the continuity check function.
Do not use the voltage tester unless all functions are operating correctly!
Check the function of the LC display  by single-pole connection of the contact electrode of the test probe L1 to an external conductor (phase).
How to test AC voltages
- The voltage tester must be used only within the nominal voltage range of 12 V up to AC 400 V!
- Never connect the voltage tester to voltage for longer than 30 seconds (maximum permissible operating time = 30 s)!
- Firmly grasp the insulated handles
![]() and
and ![]() of the test probes L1 and L2.
of the test probes L1 and L2. - Place the contact electrodes
![]() of the test probes L1
of the test probes L1 ![]() and L2
and L2 ![]() against the relevant points of the unit under test.
against the relevant points of the unit under test. - For AC voltages from 24 V onwards and when pressing both push buttons (load test) from 12 V onwards, the LEDs "plus" and "minus"
![]() and
and ![]() light up. Furthermore, all LEDs light until the step value of the applied voltage is reached.
light up. Furthermore, all LEDs light until the step value of the applied voltage is reached. - When pressing both push buttons
![]() and from an applied voltage of approx. 200 V onwards, a vibrating motor is put in rotation inside the test probe L2
and from an applied voltage of approx. 200 V onwards, a vibrating motor is put in rotation inside the test probe L2 ![]() . With the voltage increasing, the speed of this motor is increasing as well.
. With the voltage increasing, the speed of this motor is increasing as well.
 and
and  light up. Furthermore, all LEDs light until the step value of the applied voltage is reached.
 and from an applied voltage of approx. 200 V onwards, a vibrating motor is put in rotation inside the test probe L2
 Please make sure that you touch the voltage tester at the insulated handles of test probes L1 and L2 only! Do not cover the display and do not touch the contact electrodes!
How to test the phase at AC voltage
- The voltage tester must be used only within the nominal voltage range of 12 V up to AC 400 V!
- The phase test is possible in the earthed mains from 230 V onwards!
- Firmly grasp the handle of test probe L1
![]() .
. - Place the contact electrode
![]() of test probe L1
of test probe L1 ![]() against the relevant point of the unit under test.
against the relevant point of the unit under test. - Never connect the voltage tester to voltage for longer than 30 seconds (maximum permissible operating time = 30 s)!
Never touch the contact electrode of test probe L2 during the single-pole test (phase test)!
If the symbol " " appears on the LC display
  , the phase of an alternating voltage (AC) is at this point of the unit under test.
Note:
The reading of the LC display might be impaired due to unfavorable light conditions, protective clothing or in insulated locations.
How to test DC voltages
- The voltage tester must be used only within the nominal voltage range of 12 V up to DC 750 V!
- Never connect the voltage tester to voltage for longer than 30 seconds (maximum permissible operating time = 30 s)!
- Firmly grasp the insulated handles
![]() and
and ![]() of the test probes L1 and L2.
of the test probes L1 and L2. - Place the contact electrodes
![]() of the test probes L1
of the test probes L1 ![]() and L2
and L2 ![]() against the relevant points of the unit under test.
against the relevant points of the unit under test. - For AC voltages from 24 V onwards and when pressing both push buttons (load test) from 12 V onwards, the LEDs "plus" and "minus"
![]() and
and ![]() light up. Furthermore, all LEDs light until the step value of the applied voltage is reached.
light up. Furthermore, all LEDs light until the step value of the applied voltage is reached. - When pressing both push buttons
![]() and from an applied voltage of approx. 200 V onwards, a vibrating motor is put in rotation inside the test probe L2
and from an applied voltage of approx. 200 V onwards, a vibrating motor is put in rotation inside the test probe L2 ![]() . With the voltage increasing, the speed of this motor is increasing as well.
. With the voltage increasing, the speed of this motor is increasing as well.
Please make sure that you touch the voltage tester at the insulated handles of test probes L1 and L2 only! Do not cover the display and do not touch the contact electrodes!
How to test the polarity at DC voltage
- The voltage tester must be used only within the nominal voltage range of 12 V up to DC 750 V!
- Never connect the voltage tester to voltage for longer than 30 seconds (maximum permissible operating time = 30 s)!
- Firmly grasp the insulated handles
![]() and
and ![]() of the test probes L1 and L2.
of the test probes L1 and L2. - Place the contact electrodes
![]() of the test probes L1
of the test probes L1 ![]() and L2
and L2 ![]() against the relevant points of the unit under test.
against the relevant points of the unit under test. - If LED
![]() lights up, the "positive pole" of the unit under test is at test probe
lights up, the "positive pole" of the unit under test is at test probe ![]() .
. - If LED
![]() lights up, the "negative pole" of the unit under test is at test probe
lights up, the "negative pole" of the unit under test is at test probe ![]() .
.
Please make sure that you touch the voltage tester at the insulated handles of test probes L1 and L2 only! Do not cover the display and do not touch the contact electrodes!
How to test an electrically conductive connection (continuity check)
- The continuity check must be performed on the relevant points of a "dead" (not being under voltage) unit under test. If necessary, the capacitors must be discharged.
- The necessary test voltage is supplied by means of the power supply (2 solar cells) integrated in the test probe L1
![]() .
. - The test is possible within the range of 0 - 600 kΩ.
- Firmly grasp the handles
![]() and
and ![]() .
. - Place the test probes and with the contact electrodes
![]() against the relevant points of the unit under test.
against the relevant points of the unit under test. - When contacting an electrically conductive connection with the contact electrodes
![]() , the symbol "
, the symbol "![]() " appears on the LC display
" appears on the LC display ![]() .
.
Note:
When actuating both push buttons, the system measures its own internal resistance!
How to test the conducting and nonconducting direction of semiconductors
- The polarity-depending test must be performed on the relevant points of a "dead" (not being under voltage) unit under test.
- The necessary test voltage is supplied by means of the power supply (2 solar cells) integrated in the test probe
![]() . Test probe L1 is the "positive pole".
. Test probe L1 is the "positive pole". - The test is possible within the range of 0 - 600 kΩ or 1 P-N junction (diode).
- Firmly grasp the handles
![]() and
and ![]() .
. - Place the contact electrodes
![]() of the test probes
of the test probes ![]() and
and ![]() against the relevant points of the unit under test.
against the relevant points of the unit under test. - n case of current flow of the measuring voltage in conducting direction to a semiconductor, the symbol "
![]() " appears on the LC display
" appears on the LC display ![]() . In case of contacting in non-conducting direction, no indication must appear.
. In case of contacting in non-conducting direction, no indication must appear.
Note:
When actuating both push buttons, the system measures its own internal resistance!
General maintenance
Clean the exterior of the housing with a clean dry cloth (exception: special cleansing cloths). Do not use solvents and/ or abrasives to clean the voltage tester.
Technical data
- Guideline for two-pole voltage testers: IEC 61243-3
- Protection class: IP 64, IEC 60529 (DIN 40050), also for outdoor use!
- Nominal voltage range (voltage class A): 12 V to AC 400 V/ DC 750 V
- Internal resistance, measuring circuit: 180 kΩ, parallel 4.7 nF (2.35 nF)
- Internal resistance, load circuit – both push buttons actuated!: approx. 3.7 kΩ...(150 kΩ)
- Current consumption, measuring circuit: max. In 3.3 mA (400 V ) AC/ 4.4 mA (750 V) DC
- Current consumption, load circuit – both push buttons actuated!: Is 0.2 A (750 V)
- Polarity indication: LED +; LED - (indicating handle = positive polarity)
- Indicating steps LED: 12 V+*, 12 V-*, 24 V+, 24 V-, 50 V, 120 V, 230 V, 400 V and 750 V (*: only with both push buttons actuated)
- max. indicating errors: Un ± 15%, ELV Un – 15%
- Nominal frequency range f: 0 to 60 Hz
- Phase indication: ≥ Un 230 V
- Vibrating motor, starting: ≥ Un 230 V
- max. permissible operating time: ED = 30 s (max. 30 seconds), 240 s pause
- Test current, continuity check: max. 5 μA - Idling voltage, continuity check: max. 5 V
- Testing range, conducting resistance: 0 - 600 kΩ, 1 P-N junction (diode)
- Solar cells: 2 x 1.75 cm²
- Weight: approx. 170 g
- Connecting cable length: approx. 900 mm
- Operating and storing temperature range: -10°C to +55°C (climate category N)
- Relative air humidity: 20% to 96% (climate category N)
- Reverse control times (thermal protection):
| voltage | time |
| 230 V | 30 s |
| 400 V | 9 s |
| 750 V | 2 s |

Documents / ResourcesDownload manual
Here you can download full pdf version of manual, it may contain additional safety instructions, warranty information, FCC rules, etc.
Download Benning DUSPOL combi - Two-pole voltage tester Operating Manual
Advertisement


Need help?
Do you have a question about the DUSPOL combi and is the answer not in the manual?
Questions and answers