Table of Contents
Advertisement
Quick Links
INSTALLATION INSTRUCTIONS
MANUAL FOR ANNUAL MAINTENANCE
BOX 70
Barbas wishes you many cosy evenings with your new fi re
This document is an essential part of your fi re.
Read it carefully before installation and maintenance
of the gas fi re and keep it in a safe place!
Version number: 05 - 344028
Date: 06-06-2019
&
Serial number:
Production date:
Advertisement
Table of Contents

Related Manuals for barbas BOX 70


Summary of Contents for barbas BOX 70
- Page 1 & MANUAL FOR ANNUAL MAINTENANCE BOX 70 Barbas wishes you many cosy evenings with your new fi re This document is an essential part of your fi re. Read it carefully before installation and maintenance of the gas fi re and keep it in a safe place!
- Page 3 Name, registered trade name or registered trade mark Barbas Bellfires BV; Hallenstraat 17; 5531 AB Bladel; The Netherlands and contact address of the manufacturer as required pursuant to Article 11(5)
- Page 4 Name, registered trade name or registered trade mark Barbas Bellfires BV; Hallenstraat 17; 5531 AB Bladel; The Netherlands and contact address of the manufacturer as required pursuant to Article 11(5)
-
Page 5: Table Of Contents
BOX 70 TABLE OF CONTENTS Page Introduction 1.1 General ....................Safety and installation instructions ............Placing 2.1 Included ....................2.2 Preparation for positioning ..............2.3 Accessories ..................Installation 3.1 Instructions ................... 3.2 Flue gas channel .................. 3.3 Fitting ....................3.4 Preparation / Function check ............... - Page 6 BOX 70 Installation instructions...
-
Page 7: Introduction
BOX 70 INTRODUCTION 1.1 GENERAL The appliance must be positioned and connected by a Barbas dealer/specialist in accordance with the following installation instructions, nationally and locally applicable regulations. This manual contains directions for both positioning the appliance and for its environmentally-friendly use. It also contains technical data for the appliance, parts information and directions in the event of problems. -
Page 8: Safety And Installation Instructions
BOX 70 1.2 SAFETY AND INSTALLATION INSTRUCTIONS • Do not place fl ammable objects within 110 cm of the radiation area of the appliance. Pay special attention to furnishings and ornaments around the appliance. • To ensure safe operation, the following minimum distances must be maintained between the appliance and any combustible material at the side, rear and top of the appliance (temperature ≤... - Page 9 • It is essential that the appliance, the fl ue and combustion air supply are cleaned and inspected annually by a Barbas dealer/specialist. The safe operation of the appliance will thus remain guaranteed. • The appliance is suitable and approved for periodical use.
-
Page 10: Included
BOX 70 LOCATION INCLUDED Set documentation • Directions for use • Installation instructions Attributes • Glove (Heat resistant up to max. 95°C) • Operating hook / Poker N.B. If any part is missing, please contact your dealer. ACCESSORIES The following accessories can be supplied by your dealer:... -
Page 11: Preparation For Positioning
BOX 70 PREPARATION FOR POSITIONING Check all functions of the appliance before fi tting. • Check the opening and closing operation of the door. Turn the handle all the way down: Door is locked. Handle forwards: The door releases from its lock and can be opened forwards. - Page 12 BOX 70 • Check whether the 2 baffl e plates are located correctly in the supports. • Check the operation of the slider for the regulation of the combustion air intake (middle below the window). • Check whether the ashtray is completely empty.
-
Page 13: Installation 3.1 Instructions
BOX 70 INSTALLATION INSTRUCTIONS 3.1 FITTING INSTRUCTIONS When fi tting the stove, local and/or national regulations relating to fi re safety must be followed. In case of doubt, consult the fi re safety department of the local fi re brigade, particularly if the stove is to be fi... - Page 14 BOX 70 Between the stove and chimney, use thick-walled smoke piping (Steel, ≥2 mm). See Chapter 2.2. The fi rst pipe connected to the appliance must have a diameter of 130 mm at both ends. This will prevent any condensation from the chimney running over the external end of the pipe.
- Page 15 BOX 70 If the dwelling has mechanical ventilation that creates under pressure in the room where the appliance is located, it is necessary to fi t a fl ue gas fan. The type of fl ue gas fan is dependent on the capacity of the mechanical ventilation system.
-
Page 16: Preparation / Function Check
BOX 70 FITTING THE STOVE 3.4.1 Positioning The appliance can make use of either a top or rear connection Ø150 mm for the fl ue (chimney). This connection is intended for steel stovepipes, double/single-skinned stainless steel (insulated) fl ues or double/single-skinned fl exible stainless steel fl ues. - Page 17 BOX 70 3.4.2 Connecting to the chimney Ceiling connection: Insert a pipe into the sliding sleeve (niche pipe) to the ceiling as deep as possible. Position a chimney pipe on the top plate and mark off where the top pipe should be shortened.
-
Page 18: Operation
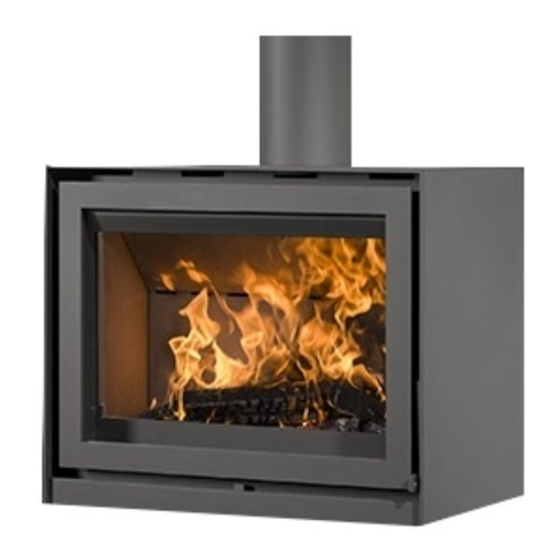
BOX 70 OPERATION Figure 1: Operation Box Handle Ceramic heat-proof glass Grate Ashtray Combustion air-supply slider (Combined operation for the primary, secondary and tertiary combustion air-supply) Inlet opening (2x) combustion air from living-room, if a direct outside air supply is not connected. - Page 19 BOX 70 Figure 2: Operation Box with wood log store module Handle Ceramic heat-proof glass Grate Ashtray Combustion air-supply slider (Combined operation for the primary, secondary and tertiary combustion air-supply) Inlet opening (2x) combustion air from living-room, if a direct outside air supply is not connected.
-
Page 20: Annual Maintenance
ANNUAL MAINTENANCE It is essential that the appliance, the chimney and the combustion air supply are cleaned and inspected annually, by a Barbas-dealer/expert. The safe operation of the appliance will thus remain guaranteed. Start with maintence 24 hours after the last burning period. - Page 21 Wait for the appliance to cool down suffi ciently before cleaning. Never use scouring powder, aggressive cleaners or fi re polish on the appliance. • Any lacquer damage can be repaired with a BARBAS heat resistant paint spray can. (Pay atention that the appliance is suffi ciently cooled down !) …...
-
Page 22: Replacement Parts
BOX 70 REPLACEMENT PARTS Pos nr. Article no Description 341089 Baffl e plate stainless steel 340751 Stone baffl e plate 339976 Stone side left 340750 Stone rear 341086 Bottom 340077 Combustion grate 339975 Stone side right 341087 Wood rack 341115 Ceramic glass When ordering, please give the serial number. - Page 23 BOX 70 Pos nr. Article no Description 341089 Baffl e plate stainless steel 340751 Stone baffl e plate 339976 Stone side left 340750 Stone rear 341086 Bottom 340077 Combustion grate 339975 Stone side right 341087 Wood rack 341115 Ceramic glass When ordering, please give the serial number.
- Page 24 BOX 70 SEQUENCE FOR REPLACING THE INTERIOR OF THE APPLIANCE • Remove the grate and the ashtray. Although the heat resistant panels have been manufactured with the greatest care, there is the possibility that some sharp parts may stick out, possibly causing injuries. We therefore urgently recommend wearing safety gloves when handling the panels.
- Page 25 BOX 70 • Unscrew the locking pin with the aid of an Allen key and a wrench. You can now remove the top baffl e plate by pulling it forward slightly and then tipping it downwards The baffl e plate can now be pulled forwards and out.
- Page 26 BOX 70 • Remove carefully the rear panel, by lifting it upwards and remove it diagonally forward. • Remove carefully the left-hand side panel. • Remove carefully the right-hand side panel. Make sure the rear panels do not fall forwards !
- Page 27 BOX 70 • Finally, remove the wood rack. The entire interior is now disassembled. The interior is reassembled in the reverse order. Make sure, when reassembling the interior to start with the wood rack. Installation instructions...
-
Page 28: Dimensions
BOX 70 DIMENSIONS BOX 70 Installation instructions... - Page 29 BOX 70 BOX 70 WITH WOOD LOG STORAGE MODULE Installation instructions...
-
Page 30: Technical Data
BOX 70 TECHNICAL DATA Combustion: Measured in compliance with EN 13240 : 2001 and EN 13240 - A2 : 2004 Fuel Wood Nominal output 10 kW Effi ciency Emissions (dry, at 13% O , 273 K, 1013 hPa): Carbon monoxide (CO) 0.07%;... -
Page 31: Warranty Terms
1.1. If Barbas Bellfi res B.V. determines that the Barbas appliance you have purchased is defective as a result of a fl aw in the construction or material, Barbas Bellfi res B.V. guarantees to repair or replace the appliance free of charge, without charging any costs for labour or spare parts. - Page 32 Article 5: Warranty period 5.1. This warranty will only be granted during the warranty period. 5.2. The body of the Barbas appliance is guaranteed for a period of 10 years against construction and/or material faults, starting from the moment of purchase.
- Page 33 BOX 70 Installation instructions...
- Page 34 BOX 70 Installation instructions...
- Page 36 Your Barbas dealer 05 - 060619 - 344028...
Need help?
Do you have a question about the BOX 70 and is the answer not in the manual?
Questions and answers