
Related Manuals for Kärcher K 3.350


Summary of Contents for Kärcher K 3.350
- Page 1 K 3.350 HIGH PRESSURE WASHER - OPERATOR MANUAL NETTOYEUR HAUTE PRESSION - MANUEL D'UTILISATION MANUAL DE USUARIO DEL LIMPIADOR DE ALTA PRESIÓN English Français Español 59637800 (01/11)
-
Page 2: Table Of Contents
HIGH PRESSURE WASHER OPERATOR MANUAL Part No. 1.602-700.0 HIGH PRESSURE WASHER OPER- ATOR MANUAL ... 3 Serial no. MODEL OVERVIEW ..4 For household use only! IMPORTANT SAFETY INSTRUC- TIONS . -
Page 3: Model Overview
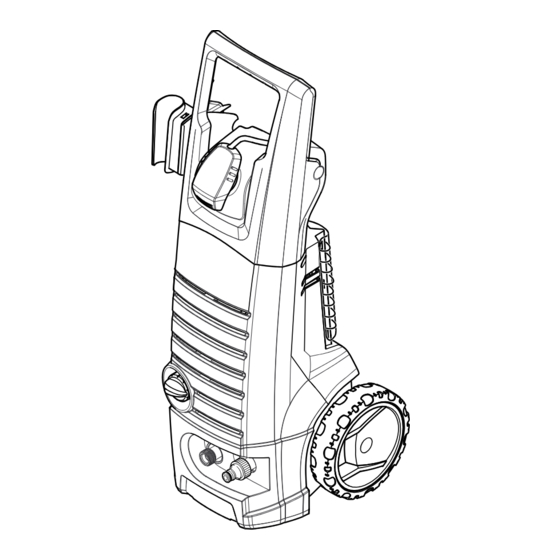
MODEL OVERVIEW 1 Garden hose connector (female) 10 Power cord with Ground Fault Cir- cuit Interrupter (GFCI) 2 Water inlet connector 11 Wheels 3 Water inlet with filter 12 Trigger gun 4 High pressure outlet 13 Trigger gun safety lock 5 ON/OFF switch 14 Key to detach the high pressure 6 Detergent tank (removeable) -
Page 4: Important Safety Instructions
IMPORTANT SAFETY INSTRUCTIONS WARNING WARNING When using this product basic precau- Risk Of Explosion – Do not spray tions should always be followed, in- flammable liquids. cluding the following: Do not use acids, alkaline, solvents, or any flammable material in this product. - Page 5 the skin. do not point the gun at anyone CI) built into the plug of the power-sup- or any part of the body. In case of pen- ply cord. This device provides etration seek medical aid immediately. additional protection from the risk of This system is capable of producing electric shock.
-
Page 6: Assembly Instructions
ASSEMBLY INSTRUCTIONS For more detailed information on Connect the high pressure hose to how to assemble this pressure the hand spray gun washer, please visit STEP 3: www.karcherresidential.com/ Push the high pressure hose into assembly the trigger gun until it locks audibly. Assembly Note: Make sure the connection nipple is aligned correctly. -
Page 7: Operating Instructions
OPERATING INSTRUCTIONS STEP 1: STEP 4: Connect the high pressure hose to Screw the supplied garden hose the unit’s high pressure outlet. connector on to the end of your gar- den hose. STEP 2: STEP 5: Insert the spray wand of your ... - Page 8 STEP 7: STEP 9: Plug the Ground Fault Circuit Inter- Turn on the high pressure washer rupter (GFCI) into a receptacle. (I/ON). Press RESET button, indicator The motor starts only if the trig- should be “ON”. ger of the gun is pulled and shuts off when the trigger is released.
-
Page 9: Using The Accessories
USING THE ACCESSORIES WARNING Dirtblaster ® To avoid serious injury never point This nozzle features a 0º pencil jet spray nozzle at yourself, other per- which rotates 360º for maximum dirt sons or animals. cutting action, effectively increasing Always test an inconspicuous area cleaning performance up to 50%. -
Page 10: Taking A Break ..Five Minutes Or More
STEP 3: Always Use Kärcher Detergent for ® Best Results Turn on the pressure washer (I). Kärcher biodegradable detergents Pull trigger to operate unit. Liquid ® are specially formulated to protect the detergent is drawn into the unit and environment and your pressure wash- mixed with water. -
Page 11: Shutting Down & Clean-Up
SHUTTING DOWN & CLEAN-UP STEP 1: STEP 5: Turn the switch to OFF (0) position Disconnect the garden hose from and unplug cord from outlet. the water inlet on the unit. STEP 2: STEP 6: Turn off the water source. Disconnect the high pressure hose STEP 3: ... -
Page 12: Winterizing And Long-Term Storage
WINTERIZING AND LONG-TERM STORAGE 1: Disconnect all water connec- of heat as it may dry out the pump tions. seals. 2: Turn on the machine for a few CAUTION seconds, until the water which had Failure to follow the above directions remained in the pump exits, turn off will result in damage to the pump as- immediately. -
Page 13: Cleaning Tips
CLEANING TIPS House Siding CAUTION Before cleaning any surface an in- (with or without detergent). Pre-rinse conspicuous area should be cleaning surface with fresh water. If us- cleaned to test spray pattern and ing detergent, apply to surface at low distance for maximum cleaning re- pressure (for best results, limit your sults. - Page 14 detergent to dry on surface. If needed, use special wash brush attachment (not included) to remove stubborn dirt. Rinse at high pressure in a sweeping motion keeping the spray nozzle ap- proximately 6-8 inches from the clean- ing surface (distance should increase when rinsing pin-striping or other sen- sitive surfaces).
-
Page 15: Optional Cleaning Accessories
OPTIONAL CLEANING ACCESSORIES Optional accessories are available to causes the inner brushes to gently further enhance your cleaning capabil- spin, making your cleaning job much ities. These accessories are accurate easier. The angle of brush head is ad- as of the printing date of this manual. justable to help you reach difficult ar- Please check our website for pricing eas. - Page 16 material and attack the rust and paint with our eco-friendly alternative. Fits most Kärcher pressure washers up to ® 2300 PSI. (bayonet) Part No. 2.638-792.0 Detergent Foamer Attachment Ideal for applications which require a thick foam. Simply fill the resevoir cup with liquid pressure washer detergent to generate a foam spray.
-
Page 17: Troubleshooting
TROUBLESHOOTING Disconnect the machine from the pow- CAUTION er source before making any repair. Symptom Cause Solution Motor will not start On/Off switch is in the “OFF” Turn switch to the “ON” (I) posi- (0) position. tion Power cord is not plugged in. Plug in power cord. Electrical outlet does not sup- Try a different outlet. - Page 18 Symptom Cause Solution No detergent. Detergent suction tube not Check connection. properly connected to the machine. Detergent is too thick. Dilute detergent, for best re- sults use Kärcher detergent. ® Filter on detergent suction Run warm water through filter tube is clogged. to remove debris.
Need help?
Do you have a question about the K 3.350 and is the answer not in the manual?
Questions and answers