Table of Contents
Advertisement
Available languages
Available languages
Quick Links
Advertisement
Chapters
Table of Contents

Related Manuals for Kenmore 790.79623


Summary of Contents for Kenmore 790.79623
- Page 1 DUAL FUEL rAngE Use & Care Guide ESTUFA DE FUEL DUAL Manual del Usuario Model, modelo 790.79623 Sears Brands Management Corporation, Hoffman Estates, IL 60179 U.S.A. www.sears.com P/n 318203970 rev. A (1106)
-
Page 2: Table Of Contents
Table of Contents Kenmore Pro Appliance Warranty ..........2 Air Circulation in the Oven ............13 IMPOrTAnT SAFETY InSTrUCTIOnS ........3-5 Control Button Features ............14 Product record ................5 Setting the Clock ...............14 Serial Plate Location ..............5 Setting Oven Controls ............15-19 Conversion to Liquefied Petroleum gas (or L.P. gas) ....5 Self-Cleaning .................20-21... -
Page 3: Important Safety Instructions
Important Safety Instructions read all instructions before using this appliance. Save these instructions for future reference. This manual contains many important safety messages. Always read and obey all safety messages. The safety symbol calls your attention to safety messages that inform you of hazards that can kill or hurt you or others, or cause damage to the product. - Page 4 Important Safety Instructions heating elements may be hot even though they are dark of utensil to the surface burner will also improve in color. Areas near surface burners may become hot efficiency. • Utensil handles should be turned inward and not enough to cause burns.
-
Page 5: Product Record
Important Safety Instructions SELF CLEAnIng OvEnS reposition. Do not let potholders contact the hot heating elements in the oven/warmer drawer (if equipped). • In the self-Cleaning cycle only clean the parts listed Remove all utensils from the rack before moving. in this Use and Care guide. -
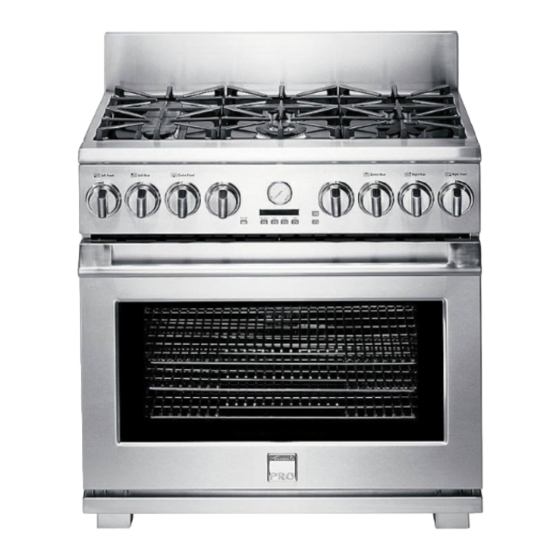
Page 6: Range Features
range Features Electronic Oven Controls with Center Front Your Dual Clock and Kitchen Timer Oven Temperature Left Rear & Burner Knob Fuel range Control Knob Bridge Burner Oven Function Features At a Center Rear Dishwasher Safe Knob Control Knob Burner Knob Burner Grates glance Left Front... -
Page 7: Before Setting Surface Controls
Before Setting Surface Controls Locations of the gas Surface Burners The STAnDArD sized burners are used for most surface cooking needs. These burners are located at the center rear and right rear positions on the cooktop. They can also be used as SIMMEr burners with the simmer plate to simmering delicate aliments as chocolate, sauces, etc. - Page 8 Before Setting Surface Controls Check Burner Cap Placement Before Operating the Surface Burners Double ring Style Burners The Double Ring burner only operates properly with two burner caps in place. Be sure the burner cap lips are Fig. 1 positioned facing down towards the burner head (Fig. 1) and Burner Caps into the recessed areas (Fig.
-
Page 9: Setting Surface Controls
Setting Surface Controls Operating the gas Surface Controls: Do not place plastic items such as salt and pepper shakers, spoon 1. Place cooking utensil on surface burner. holders or plastic wrappings on top of 2. Push the surface control knob down and turn counterclockwise out of the OFF position (See Figure 1). - Page 10 Setting Surface Controls (cont’d) Setting the Bridge Burner The Bridge Burner should be used with rectangular shaped cookware. Cookware like the cast-iron Griddle that is supplied with your cooktop is designed specifically for best results with the Bridge Burner. The Bridge Burner feature may be used to combine the cooking power of 2 or if needed 3 gas surface Burners located along the left-hand side of the glass cooktop.
- Page 11 Setting Surface Burner Controls Setting the Dual ring Burner The Dual Ring Burner has two rings of flame that you can control for two different heat levels, one for small and one for large cookware. Large Cookware Operation (Figure 1; Zone A & B) 1.
-
Page 12: Surface Cooking
Surface Cooking COrrECT InCOrrECT • Curved and warped pan Use Proper Cookware bottoms. Cookware should have flat bottoms that make good contact with the • Flat bottom and straight entire surface heating sides. • Pan overhangs burner element. Check for grate by more than 2.5 cm •... -
Page 13: Before Setting Oven Controls
Surface Cooking Care & Seasoning of the griddle Before first use: • Wash Griddle in hot soapy water. Rinse and then dry completely. • Apply a thin coat of vegetable oil to the entire surface (front and back of griddle). •... -
Page 14: Air Circulation In The Oven
Before Setting Oven Controls (cont’d) Arranging Oven racks ALWAYS ARRANGE OVEN RACKS WHEN THE OVEN IS COOL (PRIOR TO OPERATING THE OVEN). Always use oven mitts when the oven is hot. Always use pot holders or oven mitts when adjusting the oven 1 Oven Rack racks. -
Page 15: Control Button Features
Control Button Features rEAD THE InSTrUCTIOnS CArEFULLY BEFOrE USIng THE OvEn. For satisfactory use of your oven, become familiar with the various features and functions of the oven as described below. Detailed instructions for each feature and function follow later in this Use & Care guide. OvEn TEMPErATUrE COnTrOL KnOB—... -
Page 16: Setting Oven Controls
Setting the Clock (cont’d) Setting Continuous Bake or 12 Hour Energy Saving The oven control has a factory preset built-in 12 Hour Energy Saving that will shut off the oven if the oven control is left on for more than 11 hours and 59 minutes. The oven can be programmed to override this feature for Continuous Baking. To set the control for Continuous Bake or 12 Hour Energy Saving features 1. - Page 17 Setting Oven Controls (cont’d) Oven Baking For best cooking results, pre-heat the oven before baking cookies, breads, cakes, pies or pastries, etc. The cooking times and temperatures needed to bake a product may vary slightly from your previously owned appliance. If you feel your oven is too hot or too cold, you can adjust its temperature.
- Page 18 Setting Oven Controls (cont’d) Setting Convection Bake Use the Convection Bake feature when faster cooking is desired. The oven can be programmed for Convection baking at any temperature between 170°F and 550°F. Convection baking uses a fan to circulate the oven’s heat evenly and continuously within the oven (See Figure 1).
- Page 19 Setting Oven Controls (cont’d) Using the Temperature Probe Feature For many foods, especially roasts and poultry, testing the internal temperature is the best method to insure properly cooked food. The Temperature Probe gets the exact temperature you desire without having to guess. IMPOrTAnT: 1.
- Page 20 Setting Oven Controls (cont’d) Setting the Warm & Hold™ Feature The Warm & Hold feature will maintain an oven temperature of 170°F, and will keep oven baked foods warm for serving for 3 hours after cooking has finished. The Warm & Hold feature may be used without any other cooking operations or can be used after cooking has finished.
-
Page 21: Self-Cleaning
Self-Cleaning During the self-cleaning cycle, Self-Cleaning Oven the outside of the wall oven can become A Self-Cleaning oven cleans itself with high temperatures (well above very hot to the touch. DO nOT leave small cooking temperatures) which eliminate soils completely or reduces them children unattended near the appliance. -
Page 22: Adjusting Oven Temperature
Self-Cleaning (cont’d) Self-Clean Cycle Time Length To avoid possible burns use care when opening If you are planning to use the oven directly after a self-clean cycle remember to the oven door after the Self- allow time for the oven to cool down and the oven door to unlock. This normally takes Cleaning cycle. -
Page 23: General Care & Cleaning
general Care & Cleaning Cleaning various Parts of Your Oven Before cleaning any part of the oven, be sure all controls are turned OFF and the oven is COOL. REMOVE SPILLOVERS AND HEAVY SOILING AS SOON AS POSSIBLE. REGULAR CLEANINGS NOW WILL REDUCE THE EXTENT AND DIFFICULTY OF MAjOR CLEANING LATER. - Page 24 general Care & Cleaning (cont’d) removing and replacing the Oven Door The door is heavy. For safe, temporary storage, lay the door flat with the inside of the door facing down. Hinge Lever To remove Oven Door: 1. Open the door to the fully opened position. 2.
- Page 25 general Care & Cleaning (cont’d) Cleaning the grates The burner grates are dishwasher safe and may be cleaned in the dishwasher. Remove any excessive soils before placing in the dishwasher. IMPOrTAnT ● For proper gas fl ow and ignition of the burners — DO NOT allow spills, food, cleaning agents or any other material to enter the gas orifi ce opening.
- Page 26 general Care & Cleaning (cont’d) Ceramic glass Cooktop Cleaning and Maintenance Consistent and proper cleaning is essential to maintaining your ceramic glass cooktop Prior to using your cooktop for the first time, apply the recommended CookTop® Cleaning Creme to the ceramic surface (on the web visit www.sears.com for replacement cooktop cleaner, item number 40079).
- Page 27 general Care & Cleaning (cont’d) Do not use the following on the ceramic glass cooktop • Do not use abrasive cleaners and scouring pads, such as metal and some nylon pads. They may scratch the cooktop, making it more difficult to clean. •...
-
Page 28: Before You Call
Before You Call Solutions To Common Problems Before you call for service, review this list. It may save you time and expense. The list includes common occurrences that are not the result of defective workmanship or materials in this appliance. OCCUrrEnCE POSSIBLE CAUSE/SOLUTIOn Oven Control Beeps and... - Page 29 Before You Call Solutions To Common Problems OCCUrrEnCE POSSIBLE CAUSE/SOLUTIOn Self-cleaning cycle does Make sure the oven door is closed. not work. Controls not set properly. Follow instructions. Self-cleaning cycle was interrupted. Stop time must be set 2-4 hours past the start time. Follow steps under “Stopping or Interrupting a Self-Cleaning Cycle”...
-
Page 30: Protection Agreements
Master Protection Agreements Acuerdos maestros de protección Enhorabuena por haber hecho una compra inteligente. Su nuevo producto Congratulations on making a smart purchase. Your new Kenmore ® está diseñado y fabricado para brindarle años de funcionamiento Kenmore product is designed and manufactured for years of ®... - Page 31 notes...
- Page 32 Get it fixed, at your home or ours! Your Home For troubleshooting, product manuals and expert advice: www.managemylife.com For repair – in your home – of all major brand appliances, lawn and garden equipment, or heating and cooling systems, no matter who made it, no matter who sold it! For the replacement parts, accessories and owner’s manuals that you need to do-it-yourself.
- Page 33 Dual Fuel range Use & Care Guide eSTuFa De Fuel Dual Manual del Usuario Model, modelo 790.79623 Sears Brands Management Corporation, Hoffman estates, Il 60179 u.S.a. www.sears.com P/n 318203970 rev. a (1106)
- Page 34 Tabla de materias antes de ajustar los Controles del Horno ....12-13 garantía de electrodomésticos Kenmore Pro ....2 Funciones de las Teclas de Control ......14 Instrucciones Importantes de Seguridad ....3-5 adjuste del reloj ............14-15 registro del Producto ............5 ajuste de los Controles del Horno ......
-
Page 35: Instrucciones Importantes De Seguridad
Instrucciones Importantes de Seguridad lea todas las instrucciones antes de utilizar el aparato guarde estas instrucciones para futura consultación Este manual contiene símbolos e instrucciones de seguridad importantes. Preste mucha atención a estos símbolos y siga todas las instrucciones. Este símbolo le advertirá sobre situaciones que pueden causar lesiones corporales graves, muerte o daños materiales. - Page 36 Instrucciones Importantes de Seguridad u otros materiales inflamables entren en contacto parte de la flama al contacto directo, lo que puede con estas áreas hasta que haya transcurrido tiempo incendiar la ropa. La utilización de utensilios de una talla suficiente para que se enfríen. proporcional a la del elemento aumentara además su •...
-
Page 37: Registro Del Producto
Instrucciones Importantes de Seguridad • Mantenga los ductos de ventilación sin obstrucción encienda el ventilador. Consulte las instrucciones del alguna. El horno es ventilado por la parte central fabricante para la limpieza. trasera. Tocar las superficies en estas áreas cuando •... -
Page 38: Caracteristicas Del Estufa De Fuel Dual
Características del estufa de fuel dual Perilla de control para la Perilla de Válvula y perilla del quemador Válvula y perilla Temperatura del Horno del quemador Control de trasero izquierdo o válvula y Controles electrónicos delantero central Selección perilla del quemador de puente del horno con reloj, Válvula y perilla contador de minutos y... -
Page 39: Antes De Ajustar Los Controles Superiores
antes de ajustar los Controles Superiores ubicación de los controles de los quemadores superiores a gas Los quemadores de tamaño nOrMal se pueden usar para la mayoría de las necesidades de cocción. Estos quemadores se encuentran en las posiciones trasera central y trasera derecha de la cubierta. - Page 40 antes de ajustar los Controles Superiores Quemadores de anillo doble El quemador de anillo doble sólo funciona debidamente con sus dos tapas de quemador en su lugar. Asegúrese de que los rebordes de las tapas de los quemadores estén orientados hacia abajo hacia la cabeza del quemador (Figura 1) y en las cavidades (Figura 2) a cada lado de la cabeza del quemador.
- Page 41 ajuste de los Controles Superiores (cont) Funcionamiento de los quemadores superiores a gas: ATENCION Plástico como saleros 1. Coloque el utensilio sobre el quemador superior. o pimenteros, contenedores para 2. Oprima la perilla de control del quemador hacia adentro y gírela a la cucharas o bolsas de plástico encima izquierda alejada de la posición ‘OFF’...
- Page 42 ajuste de los Controles Superiores (Cont.) ajuste del quemador de puente o triple El quemador de puente debe usarse con utensilios rectangulares. Los utensilios tales como la plancha de hierro fundido que se incluye con su estufa están diseñados específicamente para obtener los mejores resultados del quemador de puente. El quemador de puente se puede usar para combinar la potencia de cocción de 2 o, si es necesario, de 3 quemadores superiores ubicados en el lado izquierdo de la cubierta de vidrio cerámico.
-
Page 43: Ajuste De Los Controles Superiores
ajuste de los Controles Superiores ajuste del Quemador Doble (algunos modelos) El quemador doble puede utilizarse con diferentes tamaños de utensilios de cocina. Utensilios grandes y pequeños pueden usarse con este nuevo quemador. Operando el doble quemador (Fig. 1; áreas a y B)) 1. -
Page 44: Cocinando En La Plancha De Cocina
Cocinando en la plancha de cocina use el utensilio correcto BuenO POBre • Debajo de sartén torcados y Use utensilios de fondo plano para que tengan alabeados. buen contacto con toda la superficie del elemento • Parte de debajo plana y lados calefactor. -
Page 45: Antes De Ajustar Los Controles Del Horno
Cocinando en la plancha de cocina (cont.) Cuidado y acondicionamiento de la plancha antes de usar la plancha por primera vez: • Lave la plancha en agua jabonosa caliente. Enjuague y seque completamente. • Aplique una capa delgada de aceite vegetal sobre la superficie completa (partes delantera y trasera de la plancha). - Page 46 antes de ajustar los Controles del Horno (cont.) Circulación del aire en el Horno Si se usa 1 parrilla, colóquela en el centro del horno. Si se usan varias parrillas, altérnelas como se muestra en la ilustración. Para los mejores resultado de horneado y circulación de aire permita 2”-4” (5-10 1 Parrilla del Horno cm.) alrededor de los refractarios para la correcta circulación de aire, asegúrese que los moldes y refractarios no se toquen entre ellos, no toquen la puerta...
-
Page 47: Funciones De Las Teclas De Control
Funciones de las Teclas de Control lea CuIDaDOSaMenTe laS InSTruCCIOneS anTeS De uSar el HOrnO. Para uso satisfactorio de su horno aprenda a utilizar las diversas funciones que se describen a continuación. las instrucciones detalladas para cada característica y función han sido incluidas más adelante en este Manual del usuario. PerIlla De COnTrOl De PerIlla De COnTrOl De SeleCCIÓn- Utilice para seleccionar las funciones Bread TeMPeraTura—... -
Page 48: Ajuste De Los Controles Del Horno
ajuste del reloj (cont) Horneado Continuo o ahorro de energía de 12 Horas El control del horno ha sido preajustado en la fábrica para la característica de ahorro de energía de 12 horas que apagará el horno si el control del horno es dejado encendido durante más de 11 horas y 59 minutos. El horno puede ser programado para anular esta característica para Horneado Continuo. - Page 49 ajuste de los controles del horno (cont) Horneado Para los mejores resultados de horneado, caliente el horno antes de hornear galletas, panes, pasteles, o tartas, etc. No hay necesidad de precalentar el horno para rostizar carne u hornear cazuelas. El tiempo de horneado y temperaturas necesarias para hornear pueden variar ligeramente de las utilizadas en su anterior electrodoméstico.
- Page 50 ajuste de los controles del horno (cont) Horneado por Convección Circulación Use la característica de horneado por convección cuando desea cocinar en del aire forma rápida. El horno puede ser programado para hornear por convección a durante el horneado cualquier temperatura entre 170°F a 550°F. El horneado por convección usa un ventilador para circular el calor uniforme y convección continuamente dentro del horno (Ver Figura 1).
- Page 51 ajuste de los controles del horno (cont) Característica de Horneado con el Termómetro de alimentos (sonda) Para diversos alimentos, especialmente guisados asados y aves, verificar la temperatura al interior del alimento es el mejor método para asegurar que los alimentos estén cocidos adecuadamente. El termómetro obtiene la temperatura exacta que usted desea sin tener que adivinar.
- Page 52 ajuste de los controles del horno (cont) ajuste del dispositivo Servir Tibio El botón WarM & HOlD enciende el dispositivo Servir Tibio y mantendrá una temperatura de 170°F. El dispositivo SERVIR TIBIO mantendrá los alimentos tibios para servir hasta 3 horas después de haber terminado la cocción. Luego de estas 3 horas, el dispositivo se apagará.
-
Page 53: Limpieza Del Horno
limpieza del Horno Ciclo de autolimpieza Un horno autolimpiante se limpia por si mismo a altas temperaturas, lo ATENCION Durante el ciclo de que elimina completamente la suciedad o la reduce a una ceniza fina que se puede limpiar con un paño húmedo. Estas temperaturas son autolimpieza la parte exterior de la estufa bastante más elevadas que las temperaturas de cocción normales. -
Page 54: Ajuste De La Temperatura Del Horno
limpieza del Horno (cont) Para Comenzar el Ciclo de autolimpieza ATENCION Para evitar Si está planeando usar el horno inmediatamente después de un ciclo de quemaduras, tenga cuidado al abrir autolimpieza recuerde que es necesario esperar un tiempo hasta que el horno la puerta del horno después del se enfríe y la puerta del horno se pueda abrir. -
Page 55: Cuidado Y Limpieza General
Cuidado y limpieza general limpieza de diferentes partes del horno de pared Antes de limpiar cualquier parte del horno, asegúrese que todos los controles están apagados y que el horno este fría. RETIRE LOS DERRAMES Y LAS MANCHAS DIFíCILES TAN PRONTO COMO PUEDA. LA LIMPIEzA CONSTANTE DISMINUIRÁ... - Page 56 Cuidado y limpieza general (cont.) Para retirar o reemplazar la Puerta del Horno 1. Abra la puerta del horno por completo. 2. Levante el seguro de cada bisagra, puede ser que tenga que presionar un poco para levantarlo. 3. Tome la puerta por los lados, jale el fondo de la puerta hacia arriba y al frente para sacar los soportes de la bisagra.
- Page 57 Para limpiar las rejillas Rejillas pueden lavarse en el lavaplatos. Remover excesos de suciedad antes de meter en el lavaplatos. IMPOrTanTe ● Para un buen fl ujo de gas y encendido de secadoras - No permitir marchas, comida, agentes de limpieza o cualquier otro material que puede obstruir la salida del gas (orifi ca).
- Page 58 Cuidado y limpieza general (cont.) limpieza y Mantenimiento de la Cubierta Es esencial limpiar regularmente y en forma correcta la cubierta de vidrio cerámico. Antes de usar su cubierta por primera vez, aplique en la superficie de vidrio la crema de limpieza para cubiertas recomendada (P/N 40079).
-
Page 59: Antes De Solicitar Servicio
Cuidado y limpieza general (cont.) Modelos con Quemadores Sellados (algunos modelos) Recomendaciones de Limpieza para Cubiertas de Vidrio Cerámico. No use los siguientes productos en la cubierta de vidrio cerámico: • No use limpiadores abrasivos ni esponjas de restregar, tales como esponjas CLORO de metal y algunas esponjas de nilón. - Page 60 antes de Solicitar Servicio (cont.) Soluciones de Problemas Comunes SITuaCIÓn POSIBle CauSa/SOluCIÓn el horno no funciona. Cortocircuito en el cable/enchufe. Cambiar el cable/enchufe. Los controles no están bien definidos. Ver las instrucciones en Configurar los Controles del Horno y seguir las instrucciones. Se ha quemado un fusible de la casa o el disyuntor saltó...
- Page 61 antes de Solicitar Servicio (cont.) Soluciones de Problemas Comunes SITuaCIÓn POSIBle CauSa/SOluCIÓn llamas desde el interior del Derrames excesivos dentro del horno. Esto es normal, especialmente para los de horno o vapor de la rejilla pasteles o grasas en la base del horno. Limpie los derrames excesivos antes de de ventilación.
-
Page 62: Acuerdos De Protección
Master Protection Agreements Acuerdos maestros de protección Enhorabuena por haber hecho una compra inteligente. Su nuevo producto Congratulations on making a smart purchase. Your new Kenmore está diseñado y fabricado para brindarle años de funcionamiento ® Kenmore product is designed and manufactured for years of ®... - Page 63 notes...
- Page 64 Get it fixed, at your home or ours! Your Home For troubleshooting, product manuals and expert advice: www.managemylife.com For repair – in your home – of all major brand appliances, lawn and garden equipment, or heating and cooling systems, no matter who made it, no matter who sold it! For the replacement parts, accessories and owner’s manuals that you need to do-it-yourself.
Need help?
Do you have a question about the 790.79623 and is the answer not in the manual?
Questions and answers