Advertisement
Quick Links
Advertisement

Subscribe to Our Youtube Channel
Related Manuals for ATV CTRT7212W


Summary of Contents for ATV CTRT7212W
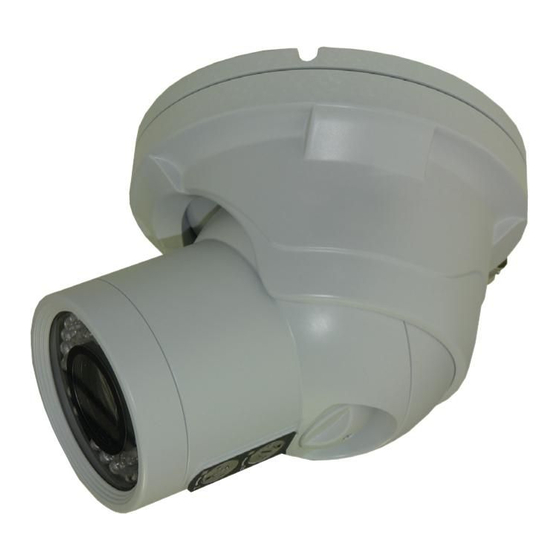
- Page 1 Operating Manual 사 용 설 명 서 사 용 설 명 서 USER'S INSTRUCTIONS High Resolution DNR Day/Night Color Camera...
- Page 2 USER'S MANUAL 사 용 설 명 서 In USA and Canada, Use Class 2 Power Supply Only - 2 -...
- Page 3 USER'S MANUAL 사 용 설 명 서 IMPORTANT SAFETY INSTRUCTIONS 1) Read the 2) Keep these instruct 3) Heed 4) Follow all instructions. 5) Do not use this apparatus nea 6) Clean only with dry c 7) Do not block any ventilation openings. Install in accordance with the manufacturer’s instructions. 8) Do not install near any heat sources such as radiators, heat registers, stoves, or other apparatus (including amplifiers) that produce heat.
- Page 4 USER'S MANUAL 사 용 설 명 서 Contents Camera Features ........... Installing &...
- Page 5 USER'S MANUAL 사 용 설 명 서 Camera Features Ultra High Sensitivity ● The built-in high sensitivity COLOR CCD produces a clear image even in 0.0001Lux(Sens-up x512) lower illumination. 700TV Lines ● By adopting a diagonal 6mm(1/3") 520,000(NTSC) pixel, 610,000(PAL) pixel SONY CCD, the camera produces clear picture quality with a horizontal resolution of 700 TV lines for color and a horizontal resolution of 750 TV lines for BW mode.
- Page 6 사 용 설 명 서 USER'S MANUAL Installing & Adjusting 1. Installation - Place the mounting plate on a flat installation surface and mount with the provided screws. - Feed the cable through the center of the mounting plate. - Place the camera body in the mounting plate socket and hold.
- Page 7 USER'S MANUAL 사 용 설 명 서 Dimension & Specification 1. Dimension & Connection Dimension Connection 2. Specification Image Pick-Up Device 1/3" Sony Super HAD CCD TV System NTSC Total Pixels 976(H) * 508(V) 976(H) * 494(V) Scanning Frequency 15.734KHz(H) & 59.94Hz(V) Scanning System 2:1 Interlace Synchronization...
- Page 8 사 용 설 명 서 USER'S MANUAL OSD Control Button 1. OSD Button could be used when it needs to OSD control. ▲ Up button : Moves the cursor upwards. Use this button to select an item or adjust the parameters. ▼...
- Page 9 사 용 설 명 서 USER'S MANUAL On Screen Display (OSD) Menu On Screen Display (OSD) Menu Camera functions and settings can be adjusted or changed by activating the OSD manu. When the OSD menu is activated text will display on the monitor. The user can then move the cursor to the desired function to change the setting.
- Page 10 사 용 설 명 서 USER'S MANUAL Accessing the OSD Menu Settings continued 1. Press the SETUP button. ● Settings can now be made. The SETUP menu is displayed on the monitor. MAIN SETUP 1. LENS ▶ ← 2. EXPOSURE ←...
- Page 11 USER'S MANUAL 사 용 설 명 서 ■ Lens Using this function, you can control the screen brightness. 1. When the SETUP menu screen is displayed, select 'LENS' by using the Up and Down buttons so that the arrow indicates 'LENS'. MAIN SETUP 1.
- Page 12 USER'S MANUAL 사 용 설 명 서 2. Select the desired mode using Up and Down buttons. EXPOSURE SETUP 1. BRIGHTNESS ▶ |||||*|||||||||||||||| 2. SHUTTER - - - 3. AGC HIGH 4. SENS-UP 5. RETURN ← ▶ BRIGHTNESS : Adjusts the exposure brightness. ▶...
- Page 13 사 용 설 명 서 USER'S MANUAL ▶ RETURN : Select this to save the changes in the EXPOSURE menu and return to the SETUP menu. ☞ NOTE ● If you press the SET button in 'AUTO' mode, you can adjust brightness by increasing or decreasing the shutter speed.
- Page 14 USER'S MANUAL 사 용 설 명 서 ■ White Balance control Use the White Balance Function to adjust the screen color. 1. When the SETUP menu screen is displayed, select 'WHITE BAL' by using the Up and Down buttons so that the arrow indicates 'WHITE BAL'. 2.
- Page 15 USER'S MANUAL 사 용 설 명 서 ■ BLC (Back Light Compensation) 1. When the SETUP menu screen is displayed, select 'BACKLIGHT' by using the Up and Down buttons so that the arrow indicates 'BACKLIGHT'. MAIN SETUP 1. LENS ← 2.
- Page 16 USER'S MANUAL 사 용 설 명 서 HLC SETUP ▶ 1. LEVEL MIDDLE 2. LIMIT NIGHT ONLY 3. MASK COLOR BLACK 4. MASK TONE |||*||||||||||||||||||| 5. TOP *|||||||||||||||||||||| 6. BOTTOM ||||||||||||||||||||||* 7. LEFT *|||||||||||||||||||||| 8. RIGHT ||||||||||||||||||||||* 9. RETURN ← HLC continued ▷...
- Page 17 사 용 설 명 서 USER'S MANUAL ■ DNR3 This function reduces the background noise in a low luminance environment. 1. When the SETUP menu screen is displayed, select 'DNR3' by using the Up and Down buttons so that the arrow indicates 'DNR3'. MAIN SETUP 1.
- Page 18 USER'S MANUAL 사 용 설 명 서 ■ Day/Night Yon can display pictures in color or black and white. 1. When the SETUP menu screen is displayed, select 'DAY/NIGHT' by using the Up and Down buttons so that the arrow indicates 'DAY/NIGHT'. MAIN SETUP 1.
- Page 19 USER'S MANUAL 사 용 설 명 서 ■ Special 1. When the SETUP menu screen is displayed, select 'SPECIAL' by using the Up and Down buttons so that the arrow indicates 'SPECIAL'. Press SETUP to enter the 'SPECIAL' menu. MAIN SETUP 1.
- Page 20 USER'S MANUAL 사 용 설 명 서 ● PIP (Picture-in-Picture) : Displays a full size image along with the thumbnail to provide more detailed information. The position of the thumbnail is adjustable. ● D-ZOOM : You can use a digital zoom of x1 ~ x16. ●...
- Page 21 USER'S MANUAL 사 용 설 명 서 ☞ NOTE ● When the CAM TITLE menu is 'OFF', on title will be displayed on the monitor screen even if you enter one. ● Only English is available is this mode. ● If you move the cursor to CLR and press the SET button, all the letters are deleted. To edit a letter, change the cursor to the buttom left arrow and press the SET button.
- Page 22 USER'S MANUAL 사 용 설 명 서 MOTION DET continued ▷ MASK AREA 1. AREA AREA1 ▶ 2. MODE 3. TOP |||||*|||||||||||||||||| 4. BOTTOM ||||||||*||||||||||||||| 5. LEFT *||||||||||||||||||||||| 6. RIGHT ||||||||*||||||||||||||| 7. RETURN ← ● MASK AREA : Specify a detection exception area to mask. Select a mask area number and specify the size and position.
- Page 23 USER'S MANUAL 사 용 설 명 서 ▶ DIS (Digital Image Stabilizer) : This function mitigates any picture movement due to external factors such as wind. ☞ NOTE ● As the DIS function uses the digital zoom, the camera's resolution will decrease. ●...
- Page 24 사 용 설 명 서 USER'S MANUAL ■ Exit Select a desired EXIT mode using the Left and Right buttons depending on the camera purpose. ▶ SAVE : Save the current settings and exit the MAIN SETUP menu. ▶ NOT SAVE : Do not save the current settings and exit the MAIN SETUP menu. ▶...
- Page 25 USER'S MANUAL 사 용 설 명 서 ■ Trouble Shooting - 25 -...
- Page 26 사 용 설 명 서 USER'S MANUAL...
- Page 27 USER'S MANUAL 사 용 설 명 서...
- Page 28 사 용 설 명 서...
Need help?
Do you have a question about the CTRT7212W and is the answer not in the manual?
Questions and answers