Table of Contents
Advertisement
Quick Links
Advertisement
Table of Contents

Related Manuals for Trotec LD20HC


Summary of Contents for Trotec LD20HC
- Page 1 LD20HC ORIGINAL INSTRUCTIONS CORRELATOR...
-
Page 2: Table Of Contents
• Do not expose the charger to rain or wet conditions. Water Follow the manual entering an electrical appliance increases the risk of Information marked with this symbol indicates that the electric shock. instructions must be observed. • Keep the charger clean. Contamination entails a risk of electric shock. correlator LD20HC... - Page 3 Do not leave the packaging lying around. Children may Intended use use it as a dangerous toy. The device LD20HC is a combined detector for electro-acoustic Warning leak detection using correlation, for electro-acoustic listening to The device is not a toy and does not belong in the surfaces / fittings and for acoustic pipe location.
-
Page 4: Information About The Device
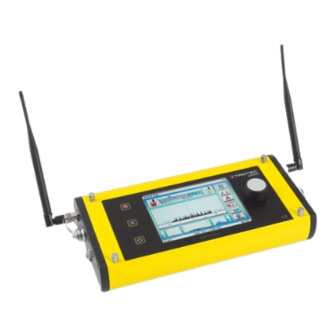
256 freely selectable filters to be used for the signal received. Designation Shoulder strap Rotary button Touchscreen Control panel Port with cover for PC connection cable Headphone connection with cover Left antenna connection Right antenna connection Microphone connection Charging socket LEDs battery status correlator LD20HC... - Page 5 Designation Cancel button Displays Record button 15 a Arrow button up Transmitter device depiction Arrow button down Confirm or On/Off button Designation Displays Jack socket for headphones Connection for structure-borne sound receiver Shoulder strap Charging connection Transmitter antenna connection correlator LD20HC...
- Page 6 Microphones and sensors Designation Central unit antenna (2x) Transmitter antenna (2x) Headphones Designation Charger with distributor and connection cables Probe rod upper part Reset dongle Tripod magnet Structure-borne sound receiver Probe rod extensions Probe rod lower part Ground microphone correlator LD20HC...
- Page 7 Temperature conditions Operation: -20 °C to +60 °C Housing aluminium, powder-coated Storage: -25 °C to +65 °C Operating time approx. 7 h in continuous operation Dimensions approx. 380 x 155 x 67 mm with fully charged battery (length x width x height) Weight approx. 2,900 g Weight approx. 2,300 g correlator LD20HC...
-
Page 8: Transport And Storage
3. Plug the charging cable into the charging socket (10) of the central unit. Make sure that the red marks on the charging socket and on the charging cable connector are aligned. ð The orange and blue LEDs (11) light up. correlator LD20HC... - Page 9 2. Orient the two antennas (21) towards the top. 3. Wait until the battery is fully charged. 4. Remove the cable from the charging socket and reattach the cover to the charging socket. correlator LD20HC...
- Page 10 If, after the sensors have been installed and the transmitters switched on, no noise can be heard and the display on the transmitter indicates a value near 0, reduce the distance from the leak or select another sensor type. correlator LD20HC...
-
Page 11: Operation
The amplification is selected on the basis of the available useful signal. The automatic amplification usually also corresponds to the optimal measurement setting. If the automatic amplification is too strong or too weak, the amplification must be changed manually. correlator LD20HC... - Page 12 High pass (frequencies below this numerical value amplification level [1] can be reached. The negative range are clipped) cannot be selected. This means that only frequencies within the two displayed numerical values are sent to the central unit (correlator) via radio. correlator LD20HC...
- Page 13 4 other preset frequency ranges. 4. The filter levels can be adjusted for both the high pass (only frequencies above this numerical value are considered) and the low pass (only frequencies below this numerical value are considered) in steps of 50 Hz. correlator LD20HC...
- Page 14 Factory settings Device information Exit menu Units Frequency settings / correlation 55 a Trans Auto Correlator inputs Frequency range / geophones Date and time Navigate to the desired settings item and select it in order to make the following configurations: correlator LD20HC...
- Page 15 5. To confirm the selection, press the rotary button again. To abort the changes, press the Cancel button (13). 6. To confirm the newly set values and leave the menu, press the door symbol. To discard all settings and leave the settings menu, press the Cancel button (13). correlator LD20HC...
- Page 16 Cancel button (13). door symbol on the screen. 6. To confirm the newly set values and leave the menu, press the door symbol. To discard all settings and leave the settings menu, press the Cancel button (13). correlator LD20HC...
- Page 17 6. To confirm the newly set values and leave the menu, press the door symbol. To discard all settings and leave the the door symbol. To discard all settings and leave the settings menu, press the Cancel button (13). settings menu, press the Cancel button (13). correlator LD20HC...
- Page 18 5. To leave the submenu, press the Cancel button (13) or the necessary to recalibrate the touchscreen. In this case, door symbol on the screen. follow the instructions on the screen. Afterwards, the touch function should function normally again. correlator LD20HC...
- Page 19 3. You can select the desired combination by turning the These settings can also be made in the submenu for manual rotary button or using the touchscreen. correlation. 4. To leave the submenu, press the Cancel button (13) or the door symbol on the screen. correlator LD20HC...
- Page 20 3. To leave the submenu, press the Cancel button (13) or the 3. You can select the desired setting by turning the rotary button or using the touchscreen. door symbol on the screen. 4. To leave the submenu, press the Cancel button (13) or the door symbol on the screen. correlator LD20HC...
-
Page 21: Correlation
4. Remove the antennas from the central unit and from the Data exchange with a PC transmitters. Settings 5. Stow the device and the accessories away in the transport Correlation measurement case. Date and time indication 6. Store the device according to the Storage chapter. correlator LD20HC... - Page 22 Automatic measurement corresponding column. 1. Start an automatic measurement by using the rotary button (2) or by pressing the button for automatic correlation measurement (61) on the display. ð The submenu for entering the pipe parameters opens. correlator LD20HC...
- Page 23 Stop measurement (70). The localised source of noise, which generally corresponds to the location of the leak, is shown symbolically (69) in the upper image (85), and the distance from the respective transmitters is indicated. correlator LD20HC...
- Page 24 Overview of measuring path window. In the former case, you will return to the start screen; in the latter case, you will return to the main correlation window. correlator LD20HC...
- Page 25 If the line is moved via the rotary button, the position must be confirmed by pressing the rotary button once again. The new distances will then be displayed on the Pipe burst indication (69 in the main correlation window). correlator LD20HC...
-
Page 26: Acoustic Leak Detection
ð A new window opens showing a list of all stored to the central unit and using it for a measurement. Use correlations. the sensor connection to connect a sensor to the central unit. Refer to Optionally available accessories for a selection of available transmitters. correlator LD20HC... - Page 27 Sensor selection (default filter settings) ð The window for selecting the default filter setting opens. Measuring mode Save measurement Load measurement Adjustment of sensor sensitivity Selection of filter setting Adjustment of volume (headphones) correlator LD20HC...
- Page 28 Cancel button (13). 4. To confirm the selected setting, press the rotary button or press the volume symbol once again. Info Modifying the volume neither has any influence on the measurement curve nor does it delete the current measurement series. correlator LD20HC...
- Page 29 1. If you press the Record button (14) or the push button at the microphone handle, the measurement will be started and carried out for as long as you hold the respective button. 2. Once you let go of the button, the measurement will be terminated and saved. correlator LD20HC...
- Page 30 Every time the filter setting is changed, the current measurement series will be deleted! To exit the window, press the Cancel button (13) or tap on the frequency display at the bottom (107). correlator LD20HC...
-
Page 31: Practical Information
ð The measurement is saved or loaded. sound at the point of leakage. Info When saving a measurement, please note that any existing measurement on the selected memory space will be overwritten. correlator LD20HC... - Page 32 When positioning the ground microphone, the distance between two positioning points must be as small as possible to avoid missing the leak. As a rule, the distances should be less than one metre. correlator LD20HC...
-
Page 33: Errors And Faults
Always attach the sensor so that it cannot slip off. fitting / pipe. The pipe in the ground is made of Plastic pipes conduct sound only very poorly. We recommend to another material (plastic) than always use so-called hydrophones for measuring in such cases. indicated on the plan. correlator LD20HC... - Page 34 The battery voltage is too low. Charge the batteries of the central unit. dark after switch-on The measurement box is Contact the Trotec customer service. defective. The measurement box can no The measuring box freezes due to Contact the Trotec customer service.
-
Page 35: Maintenance And Repair
Do not modify the device or install any spare parts. For repairs or device testing, contact the manufacturer. ð The device switches off. 2. Remove the reset dongle. 3. You can switch the device on again using the Power button (12). correlator LD20HC... -
Page 36: Disposal
Disposal Declaration of conformity Always dispose of packing materials in an environmentally We – Trotec GmbH – declare in sole responsibility that the friendly manner and in accordance with the applicable local product designated below was developed, constructed and disposal regulations. produced in compliance with the requirements of the EU Radio Equipment Directive in the version 2014/53/EU. - Page 37 Trotec GmbH Grebbener Str. 7 D-52525 Heinsberg +49 2452 962-400 +49 2452 962-200 info@trotec.com www.trotec.com...
Need help?
Do you have a question about the LD20HC and is the answer not in the manual?
Questions and answers