Table of Contents
Advertisement
Advertisement
Table of Contents

Related Manuals for BIOS Diagnostics Protocol 7D


Summary of Contents for BIOS Diagnostics Protocol 7D
- Page 1 Visit biosmedical.com for a FREE Log Book! ‡ † Instruction Manual Model: BD240...
- Page 2 Office and manufacturing plant, Church St, Toronto 1934 Trusted by Canadians for 3 Generations At BIOS Diagnostics , we are proud of our legacy in blood pressure monitoring in Canada. From the early 1930’s to 1987 we manufactured “Tycos” brand professional blood pressure equipment for doctors and hospitals in Canada.
-
Page 3: Table Of Contents
Blood Pressure Monitor Instruction Manual Table of Contents Introduction Features Important Information 1.2A Safety Information 1.2B Care of the Device About Blood Pressure Normal Blood Pressure Values Common Blood Pressure Questions and Answers Getting Started About the Blood Pressure Monitor About the LCD Screen Inserting the Batteries Using the AC/DC Power Adapter... -
Page 4: Introduction
1. Introduction Thank you for purchasing the BIOS Diagnostics Protocol 7D Blood Pressure Monitor. Designed for convenient and easy operation, this device provides a simple, yet accurate method to measure your blood pressure. Your blood pressure is an important parameter that can be used to monitor your health. This device enables you to monitor your blood pressure regularly, and maintain a record of your blood pressure measurements. - Page 5 blood pressure is lower when you are asleep and higher when you are active. Your blood pressure may be higher when recorded at a hospital or a clinic and may be lower when measured in the relaxing comfort of your home. Due to these variations, we recommend that you record your blood pressure regularly at home as well as at your doctor’s clinic.
-
Page 6: B Care Of The Device
1.2B Care of the Device • Do not drop or bang the unit. Prevent sudden jerks, jars, or shocks to the device to prevent damage. • Do not insert any foreign objects in any device openings or vents. • Do not disassemble the unit. •... - Page 7 Category Systolic Blood Pressure Diastolic Blood Pressure Optimal < 120 < 80 Normal 120 - 129 80 - 84 High Normal 130 - 139 85 - 89 High Blood Pressure (measured in a doctor’s office) High Blood Pressure (when home ≥...
-
Page 8: Getting Started
• After consuming alcohol • After taking a bath Why is the doctor’s reading different from the reading taken at home? Your blood pressure can vary due to the environment (temperature, nervous condition). When measuring blood pressure at the doctor’s office, it is possible for blood pressure to increase due to anxiety and tension. Why should I monitor blood pressure at home? One or two readings will not provide a true indication of your normal blood pressure. -
Page 9: Inserting The Batteries
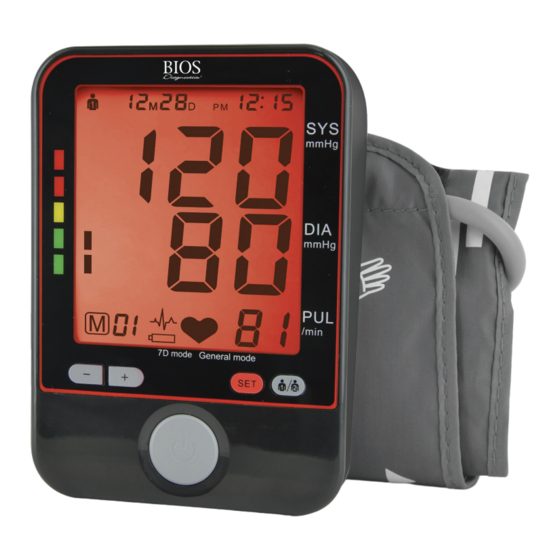
The LCD screen displays the systolic and diastolic blood pressure measurements along with your heart rate. It also displays previously recorded measurements and the date and time, when the appropriate button is pressed. Date/Time User Systolic blood pressure Blood pressure classification Diastolic blood pressure Irregular heartbeat... -
Page 10: Using The Device
You may also operate this monitor using the included AC/DC adapter. Use only the included adapter to avoid damaging the unit. 1. Ensure that the AC/DC adapter and cable are not damaged. 2. Plug the adapter cable into the AC/DC adapter port on the top of the blood pressure monitor. -
Page 11: B Common Sources Of Error
the measurement result. Relax by sitting in an armchair or at a table in a quiet atmosphere for about 5 minutes before the measurement. right and left arms while recording your blood pressure as there may be a difference of up to 10mmHg pressure between the two arms. - Page 12 c) Pull the cuff and tighten it by attaching the Velcro fastener. ® Normally, the left arm is used, unless there is a physical reason for using the right arm. d) The cuff should fit snugly around the arm, but not too tight. You should be able to fit two fingers under the cuff.
- Page 13 7D Mode is used in consultation with your physician for assessing white coat hypertension or sustained hypertension, based on a protocol of measurements taken at home. The protocol calls for 2 measurements to be taken in the morning (AM) and 2 measurements in the evening (PM) for 7-days consecutively.
-
Page 14: General Mode
3.5 General Mode In General Mode, a user can take blood pressure measurements outside of the Protocol Software (7D Mode). 1. When the monitor is OFF, press the SET button, a small triangle will appear above 7D Mode on the monitor. Press the “+” or “-“ buttons to switch between 7D Mode and General Mode. -
Page 15: Clear Measurements From Memory
First select 7D Mode, then press the “+” or “-“ button. A. If the Protocol was done correctly, the monitor will display “ ”, meaning all 28 measurements have been saved in the memory, and then display the Average Measurement as per the Protocol software. In the Average Measurement screen the date will display the second day the Protocol measurements were started and then change to the 7 day the Protocol measurements ended. -
Page 16: Error Messages / Malfunctions
The classification is based on standards adopted by Hypertension Canada. (mmHg) The indicator bar rises according to your measurement. 14 5 135-14 5 85-95 measurement is in the green zone, or “Normal”. 121-134 Yellow 80-84 or “High Normal”. Green 110-120 71-80 Green Blood Pressure with Self / Home Monitoring”. -
Page 17: Care And Maintenance
Malfunction 1. Check batteries for correct polarity. The display remains blank when the device is 2. If using the AC adapter, ensure it is correctly switched on. inserted. The pressure does not rise even though the pump is Check the connection of the cuff tube and connect running. -
Page 18: Year Warranty
6. 10 Year Warranty This BIOS Diagnostics blood pressure monitor has a 10 Year Warranty to be free of manufacturing defects for the life of the original owner. This warranty does not include the inflation system including the cuff and inflation bladder. -
Page 19: Technical Specifications
7. Technical Specifications 5 to 40°C / 41 to 104°F -20 to 55°C / -4 to 131°F 287 g (not including batteries) 139 x 100 x 46 mm Oscillometric during deflation 0 – 299 mmHg Pulse 40 – 199 beats per minute 1 mmHg pressure within ±...
Need help?
Do you have a question about the Protocol 7D and is the answer not in the manual?
Questions and answers