Table of Contents
Advertisement
Quick Links
Advertisement
Table of Contents

Related Manuals for BIOS Diagnostics PREMIUM A130


Summary of Contents for BIOS Diagnostics PREMIUM A130
- Page 1 PREMIUM Blood Pressure Monitor instruction Manual...
- Page 3 Premium Blood Pressure Monitor Instruction Manual Table of Contents Introduction 1.1 Important Facts about Blood Pressure and Self-Measurement 1.2 Important Information 1.2A Safety Information 1.2B Care of the Device 1.3 How do I evaluate my blood pressure? Getting Started 2.1 About the A130 2.2 Activating the fitted batteries 2.3 Setting the date and time 2.4 Changing the language 2.5 Adjusting the volume Using the Device 3.1 Appearance of (Patented Arythmia Detection) 3.2 Traffic Light Indication Data Memory 4.1 Viewing the stored values 4.2...
- Page 4 1. Introduction Thank you for purchasing the BIOS Diagnostics Premium Blood Pressure Monitor. Designed for convenient and ™ easy operation, this device provides a simple, yet accurate method to measure your blood pressure. Your blood pressure is an important parameter that can be used to monitor your health. This device enables you to monitor your blood pressure regularly, and maintain a manual record of your blood pressure measurements. You can then use this record to assist your physician in diagnosing and maintaining a healthy blood pressure level. 1.1 Important Facts about Blood Pressure and Self-Measurement • Blood pressure is the pressure of the blood flowing in the arteries generated by the pumping of the heart. Two values, the systolic (upper) value and the diastolic (lower) value, are always measured. • The instrument also indicates the pulse rate (the number of times the heart beats in a minute). • Permanently high blood pressure values can damage your health and must be treated by your doctor! • Always discuss your values with your doctor and tell him/her if you have noticed anything unusual or feel unsure. Never rely on single blood pressure readings. • There are many causes of excessively high blood pressure values. Your doctor will explain them in more detail and offer treatment where appropriate. Besides medication, relaxation techniques, diet, weight loss and exercise can also lower your blood pressure. • Under no circumstances should you alter the dosages of any drugs prescribed by your doctor! • Depending on physical exertion and condition, blood pressure is subject to wide fluctuations as the day progresses. You should therefore take your measurements in the same quiet conditions and when you feel relaxed! Take at least two measurements per day, one in the morning and one in the evening. • It is quite normal for two measurements taken in quick succession to produce significantly different results. • Deviations between measurements taken by your doctor or in the pharmacy and those taken at home are quite normal, as these situations are completely different. • Several measurements provide a much clearer picture than just one single measurement. • Leave a small break of at least 15 seconds between two measurements. • If you are pregnant, you should monitor your blood pressure very closely as it can change drastically during this time! 1.2 Important Information • If you suffer from an irregular heartbeat, measurements taken with this instrument should only be evaluated after consultation with your doctor.
- Page 5 most appropriate time to measure your blood pressure. Never alter the dosages of any medication without direction from your doctor. • Your blood pressure depends on several factors, such as age, gender, weight, and physical condition. It also depends on the environment and your state of mind at the time of measurement. In general, your blood pressure is lower when you are asleep and higher when you are active. Your blood pressure may be higher when recorded at a hospital or a clinic and may be lower when measured in the relaxing comfort of your home. Due to these variations, we recommend that you record your blood pressure regularly at home as well as at your doctor’s clinic. • Try to record your blood pressure regularly at the same time of the day and under the same conditions. This will help your physician detect any extreme variations in your blood pressure and thus treat you accordingly. • Morning Hypertension ( > 135 / 85 mm Hg): Recently, several studies have identified elevated cardiovascular risks (heart failure, stroke, angina) associated with “morning hypertension”. There is a typical rise in blood pressure during the physiological changes from sleep to arising for the day. • The ideal time to measure your blood pressure is in the morning just after you wake up before breakfast and any physical activity, and in the absence of the urge to urinate. If this is not possible, try to take the measurements later in the morning, before you start any physical activity. Relax for a few minutes before you record your blood pressure. • Your blood pressure increases or decreases under the following circumstances: Blood pressure is higher than normal: — when you are excited, nervous, or tense — while taking a bath — during and after exercise or strenuous physical activity — when it is cold — within one hour after meals — after drinking tea, coffee, or other caffeinated drinks — after smoking tobacco — when your bladder is full Blood pressure is lower than normal: —...
- Page 6 — Do not mix different types, brands, or size of batteries. This may cause damage to the product. — Do not mix old and new batteries. — Remove batteries and dispose of them according to the proper regulations in your area. — Do not disassemble batteries or expose them to heat or fire. — Do not short-circuit the batteries. — Do not use rechargeable batteries. 1.2B Care of the Device For prolonged life of your blood pressure monitor, note the following instructions: • Do not drop or bang the unit. Prevent sudden jerks, jars, or shocks to the device to prevent damage. • Do not insert any foreign objects in any device openings or vents. • Do not disassemble the unit. • If the unit has been stored at very low or freezing temperatures, allow it to reach room temperature before use. • Do not store the unit in direct sunlight, high humidity, or in places with a lot of dust. • Clean the device with a soft dry cloth. Do not use gasoline, thinner or similar solvents. Carefully remove spots on the cuff with a damp cloth and soap. Do not wash the cuff. 1.3 How do I evaluate my blood pressure? Table for classifying blood pressure values in adults in accordance with the World Health Organisation (WHO) in 2003. Data in mmHg Range...
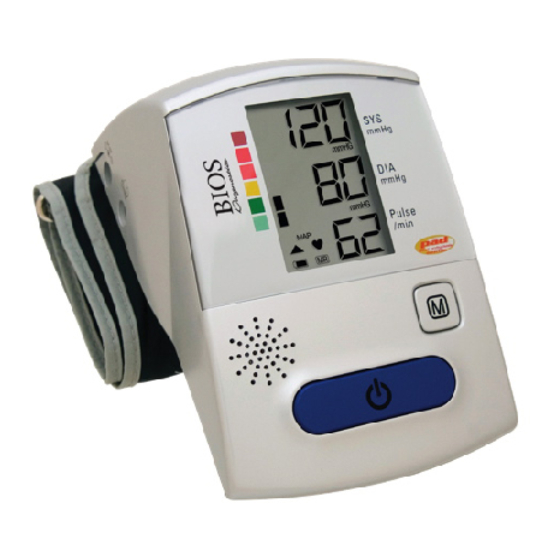
- Page 7 2. Getting Started 2.1 About the A130 Monitor: Display: 1. ON/OFF Button 12. Date/Time 2. Display 13. Systolic Value 3. Speaker 14. Diastolic Value 4. Cuff Socket 15. Pulse 5. Mains Adapter Socket 16. Stored Value 6. Volume Control 17. Heart Arrhythmia Indicator 7.
- Page 8 2.2 Activating the fitted batteries Pull out the protective strip projecting from the battery compartment 2.3 Setting the date and time 1. After the new batteries are fitted, the year number flashes in the display. You can set the year by pressing the M-button. To confirm and then set the month, press the TIME button. 2. You can now set the month using the M-button. Press the time button to confirm and then set the day. 3. Please follow the instructions above to set the day, hour and minutes. 4. Once you have set the minutes and pressed the TIME button, the date and time are set and the time is displayed. 5. If you want to change the date and TIME, press and hold the time button down for approx. 3 seconds until the year number starts to flash. Now you can enter the new values as described above. 2.4 Changing the language You can change the language by using the following procedure: 1. While the device is switched off keep the ON/OFF button pressed until you see the letters «LAn» on the LCD. 2. Now you can change the language by continuously pressing the M-button: 1=English, 2=Russian, 3=German, 4=French, 5=Spanish,6=Polish. 3. Confirm the selection by pressing the ON/OFF button. 2.5 Adjusting the volume Use the VOLUME CONTROL to adjust the volume of the speaker.
-
Page 9: Using The Device
3. Using the Device Checklist for taking a reliable measurement 1. Avoid activity, eating or smoking immediately before themeasurement. 2. Sit down for at least 5 minutes before the measurement and relax. 3. Always measure on the same arm (normally left). 4. Remove close-fitting garments from the upper arm. To avoid constriction, shirt sleeves should not be rolled up - they do not interfere with the cuff if they are laid flat. 5. Always ensure the cuff is positioned correctly, as shown on the cuff. • Fit the cuff closely, but not too tight. • Make sure that the cuff is 2 cm (0.75 inch) above your elbow with the tube on the inside of your arm. • Support your arm so it is relaxed. • Ensure that the cuff is at the same height as your heart. 6. Press the ON/OFF button to start the measurement. 7. The cuff will now pump up automatically. Relax, do not move and do not tense your arm muscles until the measurement result is displayed. Breathe normally and do not talk. 8. When the correct pressure is reached, the pumping stops and the pressure falls gradually. If the required pressure was not reached, the instrument will automatically pump some more air into the cuff. 9. During the measurement, the heart symbol flashes in the display and a beep sounds every time a heartbeat is detected. 10. The result, comprising the systolic and the diastolic blood pressure and the pulse is displayed and a longer beep is heard. At the same time, the blood pressure monitor will announce the result. Note also the explanations on further displays in this booklet. 11. When the measurement has finished, remove the cuff. -
Page 10: Data Memory
4. Data Memory At the end of each measurement, this instrument automatically stores the result, including date and time. 4.1 Viewing the stored values Press the M-button briefly, when the instrument is switched off. The display first shows «M» and then a value, e.g. «M17». This means that there are 17 values in the memory. The instrument then switches to the last stored result. Pressing the M-button again displays the previous value. Pressing the M-button repeatedly enables you to move from one stored value to another. 4.2 Memory full Pay attention that the maximum memory capacity of 100 is not exceeded. When the memory is full, the old values are automatically overwritten with new ones. Values should be evaluated by a doctor before the memory capacity is reached – otherwise data will be lost. 4.3 Clearing all values If you are sure that you want to permanently remove all stored values, hold down the M-button (the instrument must have been switched off beforehand) until «CL» appears and then release the button. To permanently clear the memory, press the M-button while «CL» is flashing. Individual values cannot be cleared. 4.4 How not to store a reading Press the ON/OFF button while the reading is being displayed. Keep the button pressed until «M» is flashing and then release it. Confirm by pressing the M-button. 5. Setting the Alarm Function This instrument allows you to set 2 alarm times at which an alarm signal will then be triggered. This can be a useful aid, for instance as a reminder to take medication. - Page 11 6. Battery Indicator and Battery Charge 6.1 Low battery When the batteries are approximately ¾ empty the battery symbol will flash as soon as the instrument is switched on. Although the instrument will continue to measure reliably, you should obtain replacement batteries. 6.2 Flat battery – replacement When the batteries are flat, the flat battery symbol will flash as soon as the instrument is switched on (flat battery displayed). You cannot take any further measurements and must replace the batteries. 1. Open the battery compartment 7 at the bottom of the instrument. 2. Replace the batteries – ensure correct polarity as shown by the symbols in the compartment. 3. To set date and time, follow the procedure described in «Section 2.». • The memory retains all values although date and time (and possibly also set alarm times) must be reset – the year number therefore flashes automatically after the batteries are replaced 6.3 Which batteries and which procedure? Use 4 new, long-life 1.5V, size AA batteries. • Do not use batteries beyond their date of expiry. Remove batteries if the instrument is not going to be used for a prolonged period. 6.4 Using rechargeable batteries You can also operate this instrument using rechargeable batteries. Only use «NiMH» type reusable batteries. • The batteries must be removed and recharged if the battery symbol appears. They must not remain inside the instrument as they may become damaged (total discharge as a result of low use of the instrument, even when switched off).
-
Page 12: Care And Maintanence
7. Error Messages / Malfunctions Error Description Potential cause and remedy «ERR 1» Signal too weak The pulse signals on the cuff are too weak. Re-position the cuff and repeat the measurement. «ERR 2» Error signal During the measurement, error signals were detected by the cuff, caused for instance by movement or muscle tension. Repeat the measurement, keeping your arm still. «ERR 3» No pressure in the cuff An adequate pressure cannot be generated in the cuff. A leak may have occurred. Check that the cuff is correctly connected and is not too loose. Replace the batteries if necessary. Repeat the measurement. «ERR 5» Abnormal result The measuring signals are inaccurate and no result can therefore be displayed. Read through the check- list for performing reliable measurements and then repeat the measurement. «HI» Pulse or cuff pressure too high The pressure in the cuff is too high (over 300 mmHg) OR the pulse is too high (over 200 beats per minute). -
Page 13: Instrument Care
Ensure that children do not use the instrument unsupervised; some parts are small enough to be swallowed. Instrument care Clean the instrument only with a soft, dry cloth. Cleaning the cuff Carefully remove spots on the cuff with a damp cloth and soapsuds. WARNING: Do not wash the cuff in a washing machine or dishwasher! Accuracy test We recommend this instrument is tested for accuracy every 2 years or after mechanical impact (e.g. being dropped). Please contact BIOS-Service to arrange the test. 1-866-536-2289 Disposal Batteries and electronic instruments must be disposed of in accordance with the locally applicable regulations, not with domestic waste. 9. Reference to Standards Device standard: Device corresponds to the requirements of the standard for non-invasive blood pressure monitors: AAMI/ANSI SP10 IEC 60601-1 IEC 60601-1-2... -
Page 14: Technical Specifications
0 - 299 mmHg Resolution: 1 mmHg Static accuracy: pressure within ± 3 mmHg Pulse accuracy: ± 5 % of the readout value Voltage source: • 4 x 1.5 V Batteries; size AA • Mains adapter DC 6V, 600 mA (optional) Accessories: Wide range cuff BD051 for arm circumference 22-42 cm 11. Lifetime Guarantee BIOS Diagnostics™ blood pressure monitors have a lifetime warranty to be free of manufacturing defects for the life of the original owner. This warranty does not include the inflation system including the cuff and inflation bladder. The cuff is warranted for two years. The warranty does not cover damage from misuse or tampering. If you have questions regarding the operation of your monitor call the BIOS Diagnostics™ Blood Pressure Hotline:1-866-536-2289 Should repair be necessary, return the unit with all component pieces. Enclose proof of purchase and $5.00 for return shipping and insurance. Ship the unit prepaid and insured (at owners option) to: Thermor Ltd. Repair Department 16975 Leslie Street Newmarket, ON L3Y 9A1 www.biosexactly.com thermor@thermor-ins.com Please include your name, return address, phone number, and email address. Thermor will repair or replace (at Thermor’s option) free of charge any parts necessary to correct the defect in material or workmanship. Please allow 10 days for repair and return shipping. -
Page 15: Contact For Support
12. Contact for Support Thermor Ltd. 16975 Leslie Street Newmarket, ON L3Y 9A1 www.biosexactly.com Toll Free Help Line: 1-866-536-2289 Email: thermor@thermor-ins.com Made in China TH1858_101410...
Need help?
Do you have a question about the PREMIUM A130 and is the answer not in the manual?
Questions and answers