Tower T17101 - 7 in 1 Air Fryer with Steamer 2 Litre Manual
- User manual (28 pages)
Advertisement
- 1 THIS BOX CONTAINS
- 2 SPECIFICATIONS
- 3 IMPORTANT SAFETY INFORMATION
- 4 WIRING SAFETY FOR UK USE ONLY
- 5 GETTING TO KNOW YOUR AIR FRYER
- 6 STRUCTURE OF YOUR APPLIANCE
- 7 BEFORE FIRST USE
- 8 USING YOUR AIR FRYER
- 9 AIR FRY MODE SUGGESTED TIME/TEMPS
- 10 STEAM MODE SUGGESTED TIME/TEMPS
- 11 ACCESSORIES/SPARE PARTS
- 12 CLEANING AND CARE
- 13 TROUBLESHOOTING
- 14 Documents / Resources
THIS BOX CONTAINS
- Instruction Manual
- 7L Digital Steam Air Fryer
![]()
- Removable Grill Plate
![]()


SPECIFICATIONS
| RATED VOLTAGE | AC 220 - 240V~ |
| FREQUENCY | 50/60Hz |
| POWER CONSUMPTION | 1700W |
| CAPACITY | Litre |
| TEMPERATURE RANGE | 80°C - 200°C |
| TIME RANGE | 1-60 minutes |
| DIMENSIONS (MM) | H: 387 x W 319: x D: 427mm |
| WEIGHT | 7.2Kg |
IMPORTANT SAFETY INFORMATION
Please read these safety NOTES carefully BEFORE using your Tower appliance.
These warnings have been provided in the interest of safety. Basic safety precautions should always be followed including the following:
KEY SAFETY POINTS

During operation:
- Surfaces are hot. DO NOT touch the hot surfaces.
- Hot steam is released through the air outlet openings. Keep your hands and face at a safe distance from the steam and from the air outlet openings.
- Hot steam and air may escape when the appliance drawer is opened.
GENERAL SAFETY
- DO NOT immerse cords, plugs or any part of the appliance in water or any other liquid.
- Close supervision is necessary when any appliance is used by or near children.
- Children should not play with the appliance.
- This appliance can be used by children aged from 8 years and above and persons with reduced physical, sensory or mental capabilities or lack of experience and knowledge if they have been given supervision or instruction concerning use of the appliance in a safe way and understand the hazards involved.
- Cleaning and user maintenance should not be undertaken by children without supervision.
- Take care when any appliance is used near pets.
- Switch off and unplug before fitting or removing accessories, after use and before cleaning.
- Allow the appliance to cool down for approximately 30 minutes before fitting or removing accessories or cleaning.
- If the supply cord or appliance is damaged, stop using the appliance immediately and seek advice from the manufacturer, its service agent or a similarly qualified person.
- The use of accessory attachments is not recommended by the appliance manufacturer, apart from those supplied with this product.
- DO NOT use the appliance outdoors.
- DO NOT place the appliance on or near a hot stove top or heated oven.
- Take care when moving the appliance, or removing accessories and food as hot oil or other hot liquids may be present.
- This appliance is for household use only.
- DO NOT place anything on top of the appliance.
- DO NOT use this appliance for anything other than its intended use.
- DO NOT clean the appliance with metal kitchen utensils, caustic or abrasive cleaning agents or scouring sponges.

It is important that this instruction manual is retained for future reference. If the appliance is given to someone else, it should always be accompanied by these operating instructions, as they form an integral part of the appliance.
WHILST AIR FRYING
- Please ensure that the appliance is used on a stable, level, and heat resistant surface.
- DO NOT place the appliance on or near combustible materials such as a tablecloth or curtain.
- DO NOT place the appliance against a wall or against other appliances. Leave at least 10cm free space on the back and sides and 10cm free space above the appliance.
- DO NOT place the appliance in the presence of explosive and/or flammable fumes.
- DO NOT cover the air inlet and outlet during operation.
- Any accessories, baking trays or oven dishes used in the appliance will become hot. Always use oven gloves when handling or removing anything from the appliance.
- DO NOT place food that is still packed in plastic wrap or plastic bags in the appliance.
- DO NOT allow food to come into contact with the heating element of the appliance.
- If the appliance begins to emit smoke, unplug it immediately. Only open the door once the smoke has cleared. Remove burnt remnants.
- DO NOT leave this appliance unattended whilst operating.
PLUG AND CORD
- Check that the voltage of the main circuit corresponds with the rating of the appliance before operating.
![]()
DO NOT let the cord hang over the edge of a table or counter, serious burns may result from the air fryer being pulled off the counter where it may be grabbed by children or become entangled with the user.- DO NOT let the supply cord touch hot surfaces.
- DO NOT carry the appliance by the power cord.
- DO NOT use any extension cord with this appliance.
- T he appliance is not intended to be operated by means of an external timer or separate remote-control system.
- DO NOT pull the plug out by the cord as this may damage the plug and/or the cable.
- DO NOT plug and unplug with wet hands.
WIRING SAFETY FOR UK USE ONLY

As the colours in the mains lead of this appliance may not correspond with the coloured markings identifying the terminals in your plug, please proceed as follows:
The wires in the mains lead are labelled in accordance with the following code:
Blue neutral [N] Brown live [L] Green/ Yellow [EARTH] ![]()
PLUG FITTING DETAILS (WHERE APPLICABLE)
- The wire labelled blue is the neutral and must be connected to the terminal marked [N].
- The wire labelled brown is the live wire and must be connected to the terminal marked [L].
- The wire labelled green/yellow must be connected to the terminal marked with the letter [E].
- On no account must either the brown or the blue wire be connected to the [EARTH] terminal.
- Always ensure that the cord grip is fastened correctly.
- The plug must be fitted with a fuse of the same rating already fitted and conforming to BS 1362 and be ASTA approved.
- If in doubt consult a qualified electrician who will be pleased to do this for you.
NON-REWIREABLE MAINS PLUG
If your appliance is supplied with a non-rewireable plug fitted to the mains lead and should the fuse need replacing, you must use an ASTA approved one (conforming to BS 1362 of the same rating).
If in doubt, consult a qualified electrician who will be pleased to do this for you.
If you need to remove the plug - disconnect it from the mains - then cut it off of the mains lead and immediately dispose of it in a safe manner. Never attempt to reuse the plug or insert it into a socket outlet as there is a danger of an electric shock.

This appliance MUST be earthed!
In the unlikely event the appliance develops a fault, stop using it immediately and seek advice from the Customer Support Team.
+44 (0) 333 220 6066 6
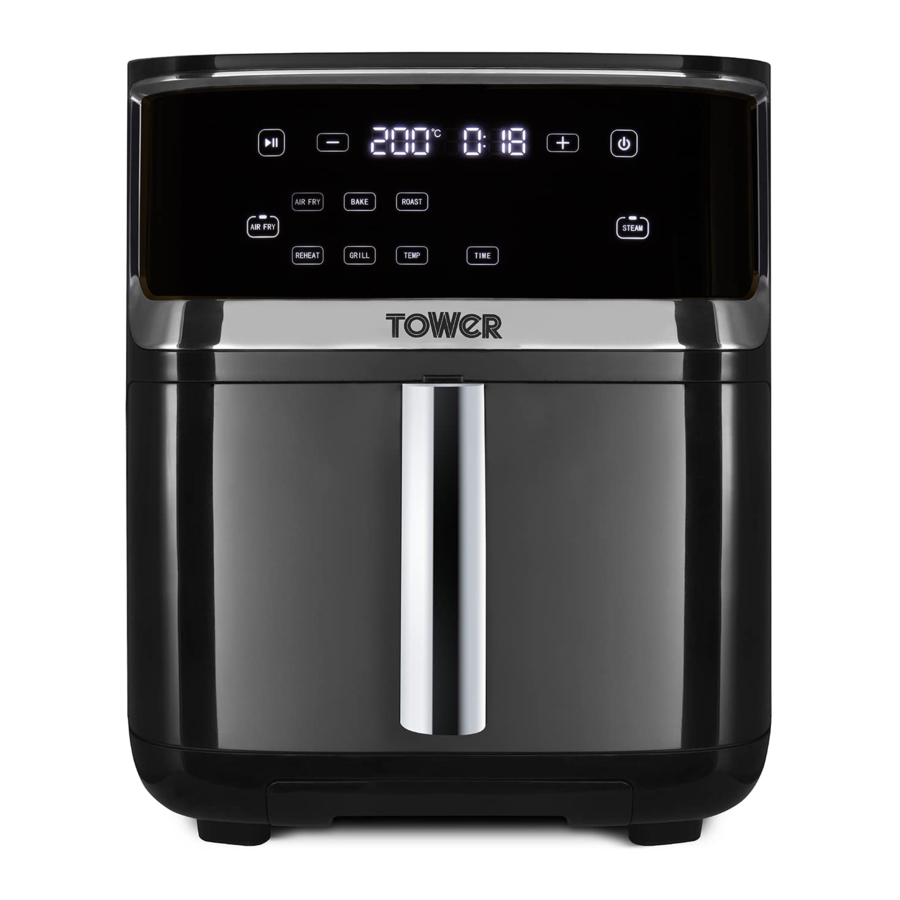
GETTING TO KNOW YOUR AIR FRYER

CONTROL PANEL AND DISPLAY
- Start/Pause Key
- Time/Temperature - Key
- LED Display
- Time/Temperature + Key
- Power ON/OFF Key
- Function Indicators
- Steam Function Control Panel
- Time Selection Key
- Temperature Selection Key
- Air Frying Function Control Panel
AIR FRYING MODE
Air Fry – A regular air fry cycle, ideal for creating low-fat fried snacks.
Bake - Automatically sets the ideal time and temperature for baking bread, cakes or snacks.
Roast – Automatically sets the ideal time and temperature for roasting meat, fish or vegetables.
Grill - Automatically sets the ideal time and temperature for grilling meat, fish or vegetables.
Reheat - Automatically sets the ideal time and temperature for reheating ingredients.
STEAM MODE
Steam – A regular steam cycle, ideal for creating a variety of simple steamed meals.
Combo Cook – This function combines the unit's air frying and steaming functions within a single cycle, making it ideal for creating full meals in one go.
Steam Clean – This function automatically cleans the unit after a cooking cycle, minimizing the need for manual maintenance.
Pump Water – This function pumps the remaining water out of the water tank after a cycle, minimizing the need for manual emptying.
STRUCTURE OF YOUR APPLIANCE

BEFORE FIRST USE
PREPARING FOR USE
- Remove your appliance from the packaging.
- C heck that there is no damage to the cord or any visible damage to the body.
- Check that all listed parts are present.
- Remove any stickers or labels from the appliance. DO NOT remove the rating plate or any warnings.
- D ispose of the packaging in a responsible manner.
- Locate the appliance on a stable, horizontal, even and heat-resistant surface in accordance with the Important safety information section.
- Thoroughly clean the drawer and grill plate with hot water, some washing up liquid and a non-abrasive sponge.
- Wipe the inside and outside of the appliance with a moist cloth.
- DO NOT fill the drawer with oil, frying fat or any other liquid. This is an oil-free fryer that works on hot air.
- Place the grill plate in the drawer.
- DO NOT put anything on top of the appliance, as this will disrupt the airflow and the hot air frying will be affected as a result.
AIR FRYER DRAWER SAFETY SWITCH:
For your safety, this air fryer contains a safety switch in the drawer designed to keep if from accidentally turning on when the drawer is not properly situated inside the appliance. Before using the air fryer, please ensure that the drawer is fully closed.
TURNING THE APPLIANCE ON
- Plug the unit into a mains socket. There will be a sound prompt and the
![]() key will illuminate and begin to flash to show the unit has been powered on.
key will illuminate and begin to flash to show the unit has been powered on. - Once the unit is plugged in, touch the
![]() key on the unit's control panel to turn it on. The
key on the unit's control panel to turn it on. The ![]() , +/-, mode selection, Temp and Time keys on the unit's control panel will illuminate to show it has been turned on.
, +/-, mode selection, Temp and Time keys on the unit's control panel will illuminate to show it has been turned on.
NOTE: The unit will also emit a sound prompt when it is disconnected from the mains. This is a normal feature of the appliance, and not indicative of malfunction.
 key on the unit's control panel to turn it on. The
 AUTO-OFF FUNCTION
- When cooking is not in progress, the appliance will automatically go into Standby mode if there has been no contact with the control panel for 1 minute. The
![]() key will remain illuminated and begin to flash, but all other indicators as well as the LED display will go out to show the unit is in Standby mode.
key will remain illuminated and begin to flash, but all other indicators as well as the LED display will go out to show the unit is in Standby mode. - Touch the
![]() key while the unit is in this state to bring it out of Standby mode. The indicators on the unit's control panel will light up to show the unit has been taken out of Standby mode
key while the unit is in this state to bring it out of Standby mode. The indicators on the unit's control panel will light up to show the unit has been taken out of Standby mode
USING YOUR AIR FRYER
SELECTING A COOKING MODE AND PROGRAM
- This unit is equipped with two cooking modes: air fry and steam.
NOTE: A cooking cycle cannot be started until a cooking mode is selected.
AIR FRY MODE
To select the air frying mode, touch the Air Fry key on the unit's control panel. The corresponding programmes will then light up to show this mode has been selected.
Once Air Frying mode has been selected, touch any of the program keys within its control panel to select the corresponding program. The key will begin to flash and the default time and temperature for that mode will appear on the unit's LED display to show it has been selected.
The programs available in Air Frying mode are as follows
| PROGRAM | DEFAULT TIME (MIN) | DEFAULT TEMP (ºC) |
| Air Fry | 18 | 200 |
| Bake | 16 | 170 |
| Roast | 25 | 200 |
| Reheat | 6 | 120 |
| Grill | 20 | 200 |
STEAM MODE
NOTE: Ensure the water tank is filled before attempting to use Steam mode. If Steam mode is selected when the water tank has not been sufficiently filled, the unit will give off a sound prompt and the error code 'E12' will replace the default cooking time on the unit's LED display. When this occurs, fill the water tank as indicated in Filling The Water Tank section.
To select the steam mode, touch the Steam key on the unit's control panel. The corresponding programmes will then light up to show this mode has been selected.
Once Steam Cooking mode has been selected, touch any of the program keys within its control panel to select the corresponding program. The key will begin to flash and the default time and temperature for that mode will appear on the unit's LED display to show it has been selected.
The programs available in Steam mode are as follows:
| PROGRAM | DEFAULT TIME (MIN) | DEFAULT TEMP (ºC) |
| Steam | 30 | 100 |
| Combo Cook | 30 | 180 |
| Steam Clean | 30 | 100 |
COMBO COOK FUNCTION
This unit Is equipped with a unique Combo Cook function, accessible from the Steam mode function selection panel. In this mode, the unit will combine the air frying and steaming functions within a single cycle, easily creating succulent and nutritious meat, fish or vegetable meals.
NOTE: Before using the Combo Cook function you must fill the water tank to allow steam to be produced.
To start a combo cooking cycle, carry out the following steps:
- Touch the 'Steam' key on the unit's control panel to select Steam mode. The Steam mode control panel will light up to show this mode has been selected.
- Once the Steam Mode function selection panel has been activated, touch the Combo Cook key. The Combo Cook key will begin to flash and the function's default time and temperature will be displayed on the unit's control panel to show this mode has been selected.
- If necessary, adjust the cooking time and temperature, as detailed in the corresponding section of this instruction manual.
- Once Combo Cook mode has been selected, press the
![]() key to launch the cooking cycle. The unit will now automatically alternate between Air Frying and Steaming mode, as appropriate.
key to launch the cooking cycle. The unit will now automatically alternate between Air Frying and Steaming mode, as appropriate.
FILLING THE WATER TANK
- To use any of the steam programs, begin by filling the water tank located at the top of the unit. To do this, firmly grip the tank and pull it up and away from the main body of the unit, then unscrew the water tank valve by turning it counterclockwise until it detaches.
- Once the water tank valve has been removed, carefully pour water through the corresponding hole until the tank is sufficiently full.
- Once the tank is sufficiently filled with water, replace the water tank valve and turn it clockwise until it is firmly secured into place, then place the water tank back onto its corresponding slot at the top of the unit.
SETTING THE TEMPERATURE
This unit is equipped with adjustable temperature settings, from 80 to 200 degrees Celsius.
- Touch the Temp key on the unit's control panel once to activate the Temperature Selection function. The corresponding digits will begin to flash on the LED display to show this function has been selected. Once the Temperature function has been activated, touch the + and - keys on the unit's control panel to adjust the temperature by increments of 5, from 80 to 200 degrees Celsius. Short touch each key to adjust this setting gradually or touch and hold to change the time more quickly.
- Once the correct temperature is set, touch the
![]() key to start the cooking process. The unit will automatically begin to operate at the latest selected settings.
key to start the cooking process. The unit will automatically begin to operate at the latest selected settings.
NOTE: The temperature can be changed during operation. To do this, touch the Temp key while a cooking cycle is in progress, then follow the steps outlined above.
SETTING THE TIMER
This unit is equipped with an adjustable 60-minute timer.
- Touch the Time key on the unit's control panel to activate the Timer function on either or both cooking modes. The corresponding digits will begin to flash on the LED display to show this function has been selected.
- Once the Time function has been activated, touch the + and - keys on the unit's control panel to adjust the time by increments of 1, from one (0:01) to 60 (1:00) minutes. Short touch each key to adjust this setting gradually or touch and hold to change the time more quickly.
- Once the correct time for each cooking mode is set, touch the
![]() key to start the cooking process. The unit will automatically begin to operate at the latest selected settings.
key to start the cooking process. The unit will automatically begin to operate at the latest selected settings.
NOTE: The time can be changed during operation. To do this, touch the Time key while a cooking cycle is in progress, then follow the steps outlined above.
START/PAUSE
- Once the appropriate mode, program, time and temperature have been set touch the
![]() key. All mode keys except for the one selected will go out, the function key for the selected mode or program will flash, the relevant indicators will illuminate on the unit's LED display. The unit will then begin to operate on the selected settings. The LED display will show the selected temperature and the remaining cooking time for the duration of the cooking cycle.
key. All mode keys except for the one selected will go out, the function key for the selected mode or program will flash, the relevant indicators will illuminate on the unit's LED display. The unit will then begin to operate on the selected settings. The LED display will show the selected temperature and the remaining cooking time for the duration of the cooking cycle. - Touch the
![]() key again while the unit is in operation to pause the cooking process. All the function keys on the control panel will illuminate and the unit's fan will stop working after a few seconds to show the cooking process has been interrupted.
key again while the unit is in operation to pause the cooking process. All the function keys on the control panel will illuminate and the unit's fan will stop working after a few seconds to show the cooking process has been interrupted. - Touch the
![]() key again while the unit is paused to resume the cooking process. The unit's fan will start to operate again, and the unit will continue to operate on the latest selected settings.
key again while the unit is paused to resume the cooking process. The unit's fan will start to operate again, and the unit will continue to operate on the latest selected settings.
WEIGHTS AND MEASURES
| METRIC | IMPERIAL | US CUPS |
| 250ml | 8 fl oz | 1 cup |
| 180ml | 6 fl oz | 3/4 cup |
| 150ml | 5 fl oz | 2/3 cup |
| 120ml | 4 fl oz | 1/2 cup |
| 75ml | 2 ½ fl oz | 1/3 cup |
| 60ml | 2 fl oz | 1/4 cup |
| 30ml | 1 fl oz | 1/8 cup |
| 15ml | 1/2 fl oz | 1 tablespoon |
| IMPERIAL | Metric | |
| 1/2 oz | 15g | |
| 1 oz | 30g | |
| 2 oz | 60g | |
| 3 oz | 90g | |
| 4 oz | 110g | |
| 5 oz | 140g | |
| 6 oz | 170g | |
| 7 oz | 200g | |
| 8 oz | 225g | |
| 9 oz | 255g | |
| 10 oz | 280g | |
| 11 oz | 310g | |
| 12 oz | 340g | |
| 13 oz | 370g | |
| 14 oz | 400g | |
| 16 oz | 425g | |
| 1 lb oz | 450g | |
FOOD ALLERGIES
Some of the recipes contained in this document may contain nuts and/or other allergens. Please be careful when making any of our sample recipes that you ARE NOT allergic to any of the ingredients. For more information on allergies, please visit the Food Standards Agency's website at: www.food.gov.uk
SETTINGS
The table on the next page will help you select the basic settings for a variety of common ingredients.
NOTE: Keep in mind that these settings are indications. As ingredients differ in origin, size, shape and brand the best settings for the ingredients cannot be guaranteed.
NOTE: Because the Rapid Air technology instantly reheats the air inside the appliance instantly, removing the compartment briefly out of the appliance during hot air frying barely disturbs the process.
NOTE: Add 3 minutes to the preparation time before you start frying if the appliance is cold.
AIR FRY MODE SUGGESTED TIME/TEMPS
| Time (mins) | Temp (°C) | Extra information | Shake | |
| POTATO & FRIES | ||||
| Thin Frozen Fries | 18-25 | 200 | Yes | |
| Thick Frozen Fries | 20-25 | 200 | Yes | |
| Potato Gratin | 20-25 | 200 | ||
| MEAT & POULTRY | ||||
| Steak | 12-18 | 180 | No | |
| Pork Chops | 12-18 | 180 | No | |
| Hamburger | 10-20 | 180 | No | |
| Sausage Roll | 13-15 | 200 | No | |
| Drumsticks | 25-30 | 180 | No | |
| Chicken Breast | 18-25 | 180 | No | |
| SNACKS | ||||
| Spring Rolls | 8-10 | 200 | Yes | |
| Frozen Chicken Nuggets | 8-12 | 180 | Yes | |
| Frozen Fish Fingers | 6-10 | 200 | No | |
| Frozen Bread Crumbed Cheese Snacks | 8-10 | 180 | No | |
| Stuffed Vegetables | 12-20 | 160 | No | |
| BAKING | ||||
| Cake | 8-15 | 180 | No | |
| Quiche | 20-22 | 180 | No | |
| Muffins | 15-18 | 200 | No | |
| Sweet Snacks | 20 | 160 | No | |
STEAM MODE SUGGESTED TIME/TEMPS
| Time (mins) | Temp (°C) | Extra information | Shake | |
| STEAM SETTINGS | ||||
| Fresh Shrimp | 13-15 | 100 | No | |
| Fish | 13-15 | 100 | No | |
| Rice | 30-35 | 100 | No | |
| Broccoli | 13-15 | 100 | No | |
| Corn | 25-30 | 100 | No | |
| Ribs | 30-35 | 100 | No | |
| Chicken Breast | 30 | 100 | No | |
ACCESSORIES/SPARE PARTS
Spare part replacements and accessories are available to purchase via:
 +44 (0) 333 220 6066
 www.towerhousewares.co.uk
| PART NO | DESCRIPTION | IMAGE |
| T1710101 | Drawer |  |
| T1710102 | Crisper Grill Plate |  |
| T1710103 | Water Tank (Valve not included) |  |
| T1710104 | Water Tank Valve |  |
| T1710105 | Water Drip Tray |  |
| T1710106 | Excess Steam Collector Pot |  |
CLEANING AND CARE

Do not immerse the appliance in water or any other liquid.
NOTE: Clean the appliance after every use.
GENERAL CLEANING AND CARE
- Switch off the appliance, remove the mains plug from the wall socket and let the appliance cool down.
NOTE: Keep the drawer open to let the unit cool down more quickly. - DO NOT use metal kitchen utensils or abrasive cleaning materials to clean the drawer, as this may damage the nonstick coating.
- C lean the drawer with hot water, some washing-up liquid and a non-abrasive sponge or brush.
TIP: If food residue is stuck to the bottom of the drawer, leave it to soak in hot water and some washing-up liquid for a few hours or overnight. - Wipe the outside of the appliance with a damp cloth.
- W ipe the inside of the appliance with hot water and a non-abrasive sponge.
- Clean the heating element with a cleaning brush to remove any food residues.
- Ensure all parts are thoroughly dry before use.
THE SELF CLEANING FUNCTION
- This unit is equipped with a selfcleaning function, which helps ensure the unit remains clean and in optimal functioning condition.
- To enable the self-cleaning function, touch the corresponding key on the Steam Cooking control panel. Press
![]() and the unit will automatically begin to carry out a self-cleaning cycle with the default settings (30 minutes at 100 degrees.
and the unit will automatically begin to carry out a self-cleaning cycle with the default settings (30 minutes at 100 degrees.
NOTE: When running a self-cleaning cycle, the default time and temperature are fixed and cannot be adjusted.
THE PUMP WATER FUNCTION
- This unit is equipped with a Pump Water function, which helps dispose of any excess water left in the tank after a self-cleaning cycle.
- To enable the Pump Water function, touch the corresponding key on the Steam Cooking control panel. Press
![]() and the unit will automatically begin to pump water into the drawer for a period of five minutes.
and the unit will automatically begin to pump water into the drawer for a period of five minutes. - Once the cycle has complete empty the drawer ensuring its free of water.
NOTE: When running a self-cleaning cycle, the default time and temperature are fixed and cannot be adjusted.
EMPTYING THE WATER TANK
NOTE: Ensure the water tank is emptied after every use, or whenever the unit will not be used for prolonged periods of time.
- To clean the water tank, detach it from the main body of the unit, unscrew the water tank valve by turning it counterclockwise, and pour out the excess water onto a sink or equivalent surface.
- Alternatively, use the Pump Water function to remove excess water from the tank. Refer to the corresponding section below for guidance on how to use the Pump Water functionality.
EMPTYING THE EXCESS STEAM COLLECTOR POT
- This unit is equipped with a steam drip tank on the back of the unit, which collects excess water generated during the steam cooking process. This tank should be emptied after every use.
- To empty this tank, grip it by the protruding tabs on either side and carefully manoeuvre it loose. Be careful not to exert excessive force, as this could damage the tank.
- Once the steam drip tank has been removed from the unit, turn it upside down to dispose of any collected water, then place it back onto its slot at the back of the unit. Take care to ensure the tank is firmly secured into place before attempting to use the unit for steaming.
EMPTYING THE WATER DRIP TRAY
- This unit is equipped with a drip tray, which collects water when using the steam function. This tank should be emptied after every use.
- To empty this tank, pull it out from its slot at the bottom of the unit until it fully detaches. Be careful not to exert excessive force, as this could damage the drip tray or unit.
- Once the steam drip tank has been removed from the unit, carefully tip it forward to dispose of its contents, then place it back onto its slot at the bottom of the unit until it slides into place. Take care to ensure the drip tray is firmly secured into place before attempting to use the unit for air frying.
STORING YOUR APPLIANCE
- Ensure that the appliance is cool, clean and dry before storing.
- Store the appliance in a cool and dry place.
TROUBLESHOOTING
| PROBLEM | POSSIBLE CAUSE | POSSIBLE SOLUTION |
The air fryer does not work | The appliance is not plugged in. | Plug the appliance into an earthed wall socket. |
The  key has not been touched. key has not been touched. | Touch the key. | |
| The drawer is open and the selected function is paused. | Close the drawer to automatically resume the selected function. | |
The drawer will not slide inside the unit properly | There is too much food in the drawer. | Do not over fill the drawer. |
| The drawer is not correctly placed inside the unit correctly. | Ensure the drawer is correctly placed and sitting flush inside the compartment. | |
| Fried snacks are not crispy when they come out of the fryer. | Wrong type of snacks used. | Use oven snacks or lightly brush some oil onto the snacks for a crispier result. |
| Food stuck together or not in an even layer. | Shake or turn the food periodically through the cooking process. | |
The fried ingredients are not done | Too much food has been added to the air fryer. | Put smaller batches of ingredients in the air fryer. Smaller batches are fried more evenly. |
| The set temperature is too low. | Set to an appropriate temperature. | |
| The cooking time is too short. | Set an appropriate cooking time. | |
| Fresh fries are fried unevenly in the air fryer. | Wrong type of potatoes used. | Use fresh potatoes and make sure they stay firm during frying. |
| The potato sticks were not rinsed adequately before frying | Rinse the potato sticks properly to remove the starch from the outside. | |
| Fresh fries are not crispy when they come out of the air fryer. | The crispiness of the fries depends on the amount of oil and water in them. | Make sure you dry the potato sticks properly before you add the oil. |
| Cut the potato sticks smaller for a crispier result. | ||
| Add slightly more oil for a crispier result. | ||
The appliance is smoking | The ingredients have a high oil content. | Smoking will be normal. Follow the suggested settings or food manufacturer's recommendations. |
| The appliance contains grease from previous use. | White smoke is caused by grease heating up inside the fryer. Clean the appliance properly after each use. | |
The food is burned | The food was before preheating was complete. | Add food to the appliance once pre-heating is completed. |
| The food was cooked for too long. | Check on the progress of the food periodically through the cooking process. | |
| The food was left in the appliance after the cooking time had expired. | Remove the food from the appliance as soon as the cooking time has elapsed. | |
Water is leaking from the water tank | The water tank valve is not sufficiently tightened. | Turn the water tank valve clockwise to tighten it and secure it into place. |
| The water tank is damaged. | Contact the Customer Service department. | |
| Ingredients are not cooked enough when using the Steam function. | There is too much food in the drawer or the food pieces are too big. | Put less food into the drawer or cut the ingredients into smaller pieces. |
| The food did not cook for long enough. | Set a longer cooking cycle, as detailed in the corresponding section of this instruction manual. | |
| The steam generator is dirty. | Use the Steam Clean function to clean the steam generator, as detailed in the corresponding section of this instruction manual. If required, add in a cleaning solution made up of 10g citric acid for every 1 litre of water. | |
| Not enough water in the water tank. | Ensure a sufficient amount of water has been added to the water tank before attempting to steam cook with the unit. | |
| Too much water has been pumped into the cooking drawer, resulting in steam leakages. | Refrain from pumping water into the cooking drawer while cooking, or from creating excessive steam inside it. | |
| The error code 'E12' is being displayed when attempting to cook in Steam mode. | The water tank is empty or does not have enough water. | Fill the water tank as instructed in the corresponding section of this instruction manual. |
| An unpleasant smell is emanating from the appliance after not being used for an extended period of time. | The unit has not been cleaned out correctly after the previous use. | Clean the unit thoroughly after each use, as detailed in the Cleaning and Care section of this instruction manual. |
| The steam drip tank has not been emptied out. | Empty out the steam drip tank, as detailed in the Cleaning and Care section of this instruction manual. | |
| The water tank has not been drained after the previous use. | Drain the water tank and dispose of any excess water using the Pump Water function. Refer to the corresponding section of this instruction manual for guidance on how to use this function. |

Documents / Resources
References
Download manual
Here you can download full pdf version of manual, it may contain additional safety instructions, warranty information, FCC rules, etc.
Download Tower T17101 - 7 in 1 Air Fryer with Steamer 2 Litre Manual
Advertisement


Need help?
Do you have a question about the T17101 and is the answer not in the manual?
Questions and answers