Chef's Choice Hybrid Diamond Hone 270 Instruction Manual
Hide thumbs
Also See for Hybrid Diamond Hone 270:
- Instruction manual (32 pages) ,
- Instruction manual (32 pages) ,
- Instruction manual (32 pages)

Related Manuals for Chef's Choice Hybrid Diamond Hone 270


Summary of Contents for Chef's Choice Hybrid Diamond Hone 270
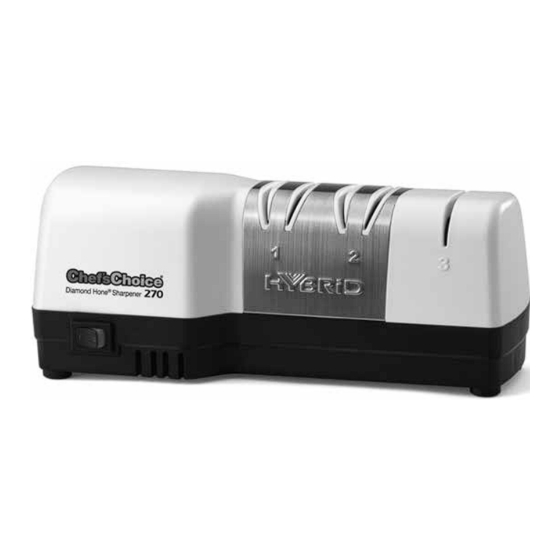
- Page 1 INSTRUCTION MANUAL Hybrid Diamond Hone ® ® Knife Sharpener Model 270 Read instructions before use. It is essential that you follow these instructions to achieve optimal results.
-
Page 2: Important Safeguards
IMPORTANT SAFEGUARDS When using electrical appliances, basic safety precautions should always be followed including the following: 1. Read all instructions. For your safety, every user should read this manual. 2. To protect against electrical hazards, do not immerse the Chef’sChoice Hybrid ®... - Page 3 Congratulations on your selection of the Chef’sChoice Hybrid ® ® Diamond Hone Model 270! ® The three stage Hybrid Diamond Hone Model 270 is manufactured in Avondale, ® ® Pennsylvania by EdgeCraft — the home of Chef’sChoice sharpeners — the World’s Leader in Cutting Edge Technology .
- Page 4 USING THE MODEL 270 SHARPENER Note: Always clean your knife before sharpening in the Hybrid ! For your safety, keep your ® fingers clear of the blade edge at all times. You will find that the Hybrid can create and maintain a very sharp and effective edge ®...
- Page 5 blade. However, if the knife is initially very dull you may find that 10 or more alternating pairs of pulls in the left and right slots of Stage 1 will be needed the first time as you reshape and sharpen the old edge. Always pull the blade toward you. Never push the blade away from you when using Stage 1.
- Page 6 than you experienced in Stage 1. Pull slower if needed to develop a detectable burr before moving to Stage 3. You will notice that the edge developed in Stage 2 is sharper than the edge formed in Stage 1. Do not move to Stage 3 (manual) until you are confident that you detect a burr after Stage 2. Once a burr is detected, you can make a pair of faster pulls in Stage 2 to remove the burr and minimize the time you will need to hone and polish the edge in Stage 3.
- Page 7 SERRATED BLADES Serrated blades can be sharpened in Stage 3 (see Figure 7). Center the blade in the slot of Stage 3 and make five (5) back and forth pairs of strokes. Examine the edge and if necessary make another 5 full stroke pairs. Test the blade for sharpness. If the blade to be sharpened is very dull, first make two fast but full pairs of pulls —...
- Page 8 BRANDS OF KNIVES The Hybrid will put an excellent edge on all conventional metal Euro/American and ® Santoku style knives regardless of brands, including Henckels, Wüsthof, Sabatier, Lamson and Goodnow, Global, Russell Harrington, Chef’sChoice, Messermeisser, Forshner, Mundial, Cuisinart, Kitchen Aid, Shun and many, many more. TEST FOR SHARPNESS To test for sharpness and cutting ability of your fine edge knives, hold a sheet of paper vertically by its upper edge and carefully cut down through the sheet a small (but safe)
- Page 9 KÄYTTÖOHJE Chef’sChoice Hybridi ® ® Timanttilaikka Veitsenteroitin 270 ® Lue ohjeet huolellisesti ennen käyttöä. Ohjeiden seuraaminen auttaa parhaan teroitustuloksen saavuttamisessa.
- Page 10 TÄRKEITÄ TURVALLISUUSASIOITA Käytettäessä sähköisiä laitteita, tulee esimerkiksi seuraavat turvallisuuteen liittyvät asiat huomioida: 1. Lue kaikki ohjeet. Turvallisuutesi takia jokaisen käyttäjän tulisi lukea tämä ohjekirja. 2. Älä upota laitetta veteen tai muuhun nesteeseen. 3. Huolehdi, että vain puhtaat veitset teroitetaan tällä laitteella. 4.
- Page 11 Onnittelut Chef’s Choicen Hybridimallin 270 valinnasta! Tämä kolmivaiheinen teroitin on valmistettu Avondalessa, Pennsylvaniassa USA:ssa EdgeCraftin toimesta. Tämä teroitin yhdistää Chef’s Choicen patentoidun sähkö- ja manuaalisen Criss Cross-teroitustekniikan, jotka yhdessä antavat miltei mille tahansa veitselle tehokkaan kolmivaiheisen terän. Viimeistellessä veitsen terä hiotaan, mutta siihen jää mikroskooppisen pieniä hampaita, jotka tekevät veitsestä...
- Page 12 MALLI 270:N KÄYTTÖ Huom!: Puhdista aina veitsi ennen teroittamista. Pidä sormesi poissa terältä koko teroituksen ajan. Tulet huomaamaan, että tämä teroitin antaa kestävän terän kaikille veitsillesi. Veitsen perusterä muotoutuu vaiheessa 1, 20 asteen kulmaan veitsen molemmille puolille. Vaiheet 2 ja 3 antavat veitselle toisen ja kolmannen kulman hieman suuremmalla kulmaluvulla, joka johtaa vahvaan kolminkertaiseen terärakenteeseen.
- Page 13 että 5 vetoliikettä molemman puolen hahloissa riittää teroittamaan veitsen. Veitsen ollessa todella tylsä, saattaa olla että tarvitsen jopa 10 paria vetoliikkeitä saadaksesi tarpeeksi terävän lopputuloksen. Vedä aina veistä itseesi päin, ei koskaan poispäin! Ennen siirtymistä teroittamisen seuraavaan vaiheeseen on hyvä varmistaa, että veitsen terän laidalla on ohut pursi (tuntuu sivuilta hieman karhealta “kierre”).
- Page 14 VAIHE 3 Voit kytkeä virran pois laitteesta, sillä viimeinen vaihe on manuaalinen. Mikäli veitsi on teroitettu kunnolla aiemmissa vaiheissa vain 4-5 edestakaista vetoa riittää tässä vaiheessa (kuva 6). Teroitetun veitsen pitäisi leikata paperia suoraan ja vaivattomasti. Parhaan tuloksen saavutat pitämällä terää koko sen mitalta hahlon keskellä samalla painaessasi pienellä...
- Page 15 teroitusliikettä. Jos veitsi on teroitettaessa todella tylsä tee kaksi nopeaa vetoliikettä vaiheessa 2 molemmille puolille ja siirry sitten vaiheeseen 3. HUOM! Älä tee montaa vetoliikettä vaiheessa 2, ettei sahalaita kulu pois veitsen terästä. AASIALAISTYYLISET VEITSET Teroittimella voidaan teroittaa myös aasialaistyyliset kaksipuoliset veitset 20 asteen kulmaan, mutta optimituloksen saat teroitinmalleilla 15XV tai 1520.
- Page 16 TERÄVYYDEN TESTAUS Testataksesi veitsen terävyyden pidä paperiarkkia edessäsi sivuttaissuunnassa paperin yläkulmasta. Leikkaa varovasti mahdollisimman läheltä (mutta silti turvallisen etäisyyden päästä) sormiasi ja yritä viiltää paperista pala irti. Vaihtoehtoisesti voit testata terävyyttä tomaattiin. Terävän veitsen tulisi leikata tomaatti siististi ilman suurempaa voimaa. HUOLTO • Ulkopinnat voi putsata kostealla märällä pyyhkeellä tai rievulla • Poista silloin tällöin metallipöly teroittimesta kääntämällä se ylösalaisin ja koputtamalla...
Need help?
Do you have a question about the Hybrid Diamond Hone 270 and is the answer not in the manual?
Questions and answers