Advertisement
- 1 IMPORTANT SAFEGUARDS
- 2 INTRODUCTION
- 3 DESCRIPTION OF THE Chef'sChoice Hybrid AngleSelect KNIFE SHARPENER MODEL 290
- 4 DESCRIPTION OF EURO/AMERICAN AND ASIAN BLADES
- 5 EUROPEAN/AMERICAN BLADES (20º FACETS)
- 6 CONTEMPORARY ASIAN KNIVES (15º FACETS)
- 7 SHARPENING CONTEMPORARY ASIAN KNIVES AND OTHER 15º KNIVES
- 8 SHARPENING EUROPEAN/AMERICAN KNIVES AT 20º
- 9 RESHARPENING
- 10 CONVERTING EUROPEAN/AMERICAN KNIVES EDGE TO 15° ASIAN STYLE EDGE
- 11 SHARPENING SERRATED BLADES
- 12 SUGGESTIONS
- 13 NORMAL MAINTENANCE
- 14 SERVICE
- 15 Documents / Resources
IMPORTANT SAFEGUARDS
When using electrical appliances, basic safety precautions should always be followed including the following:
- Read all instructions. For your safety, every user should read this manual.
- To protect against electrical hazards, do not immerse the Chef'sChoice ® Hybrid ® sharpener in water or other liquid.
- Make sure that only clean knife blades are inserted in Model 290.
- Disconnect the appliance from its power source when not in use, before cleaning, during service and when replacing parts.
- Avoid contacting moving parts.
- Do not operate any appliance with a damaged cord or plug or after the appliance malfunctions, or is dropped or damaged in any manner.
U.S. customers: You can return your sharpener to EdgeCraft's factory for service where the cost of repair or electrical or mechanical adjustment can be estimated. When the electrical cord on this appliance is damaged, it must be replaced by the Chef'sChoice ® factory or other qualified service to avoid the danger of electrical shock.
Outside U.S.: Please return your sharpener to your local distributor where the cost of repair or electrical or mechanical adjustment can be estimated. If the supply cord of this appliance is damaged, it must be replaced by a repair facility appointed by the manufacturer because special tools are required. Please consult your Chef'sChoice ® distributor. ![]()
This appliance may be fitted with a polarized power plug (one blade is wider than the other). To reduce the risk of electric shock, this plug will fit in a polarized outlet only one way. If the plug does not fit fully in the outlet, reverse the plug. If it still does not fit, contact a qualified electrician. Do not modify the plug in anyway.- The use of attachments not recommended or sold by EdgeCraft Corporation may cause fire, electric shock or injury.
- The Chef'sChoice ® Model 290 sharpener is designed to sharpen American, European, and Asian style knives as described in following sections. Do not attempt to sharpen scissors, ax blades or any blade that does not fit freely in the slots.
- Do not let the cord hang over edge of table or counter or touch hot surfaces.
- When in the "ON" position (Red flash on switch is exposed when "ON"), the Chef'sChoice ® sharpener should always be on a stable countertop or table.
![]()
KNIVES PROPERLY SHARPENED ON YOUR Chef'sChoice ® Hybrid ® Model 290 SHARPENER WILL BE SHARPER THAN YOU EXPECT. TO AVOID INJURY, USE AND HANDLE THEM WITH EXTREME CARE. DO NOT CUT TOWARD ANY PART OF YOUR FINGERS, HAND OR BODY. DO NOT RUN FINGER ALONG EDGE. STORE IN A SAFE MANNER.- Do not use outdoors.
- Appliance is not intended to be used or cleaned by children or persons with reduced physical, sensory or mental capabilities or lack of experience and knowledge of the hazards involved.
- Do not use honing oils, water or any other lubricant with the Chef'sChoice ® Hybrid ® sharpener Model 290.
- For household use only.
- SAVE THESE INSTRUCTIONS.


INTRODUCTION
As an owner of the highly versatile Chef'sChoice® Hybrid® AngleSelect® 290 knife sharpener you will appreciate how easy it is to maintain all of your American, European and double-sided Asian style knives in factory sharp condition. A guide system is provided to position each style knife at the optimum sharpening angle as customized diamond abrasive disks quickly restore and hone a fresh edge. You will appreciate the joy of effortless cutting and the unmatched presentation of each flawless slice.
The Model 290 is designed to sharpen your Asian style knives with primary edge facets of 15 degrees (30 degree total) matching the sharpness and edge shape of the highest quality Asian style knives. Your traditional American or European knives on the other hand will be sharpened with primary edge facets of 20 degrees (40 degrees total), the conventional angle for those knives.
Because the typical Asian edge is formed with its primary edge facet at an angle of 15 degrees (30 degrees total) it is inherently a "sharper" edge than the conventional European/ American edge formed at the larger 20 degrees (40 degrees total). Since the Asian edge is thinner it is usually considered to be a weaker edge.
We strongly encourage you to read the following sections that detail optimum sharpening procedures for each style blade. Enjoy!
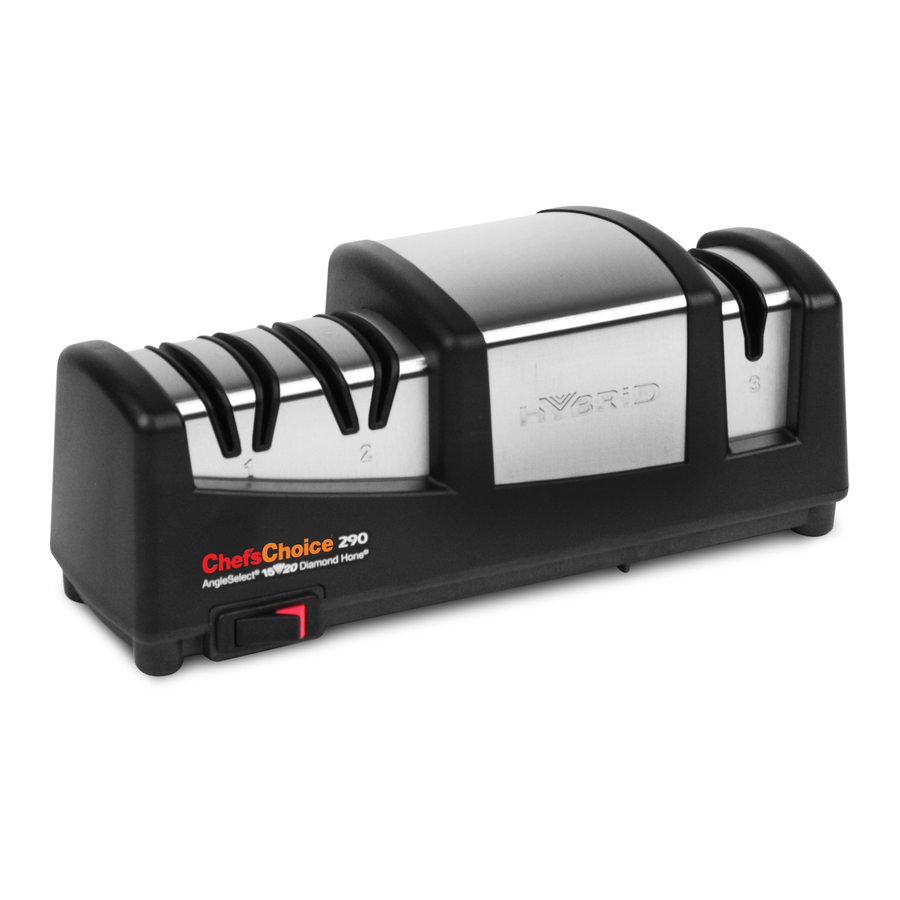
DESCRIPTION OF THE Chef'sChoice® Hybrid® AngleSelect® KNIFE SHARPENER MODEL 290
The Model 290 (Figure 1) is a unique three stage sharpener with Stage 1 designated to sharpen Asian style and other 15º edge knives. Stage 2 is designed primarily to sharpen conventional American and European knives (20° edge). Stage 3 contains ultrafine abrasive disks designed for both Asian and Euro/American blades to create a microscopic bevel along the edge and to polish it to a super sharp and effective edge.

Asian style and other 15° edge knives are sharpened first with fine diamond abrasives in Stage 1 and then polished with micro diamond abrasives in Stage 3.
American and European knives (20° edge) are sharpened first with fine diamond abrasives in Stage 2, followed by polishing with diamond micro abrasives in Stage 3. Knives of the 20º design are not sharpened in Stage 1 unless you wish to convert this 20º edge facet to the narrower Asian angle of 15º.
The Model 290 is not recommended for sharpening traditional-single sided Asian style knives such as sashimi knives.
Because of their thickness and heavy duty blade design we do not recommend the Model 290 for the much older thick European cleavers. These can be readily sharpened in Chef'sChoice Models 120, 2000 and 2100. However, the Model 290 is ideal for sharpening Asian cleavers.
Never operate the sharpener from the back side. Use just enough downward pressure
when sharpening to ensure uniform and consistent contact of the blade edge with the abrasive disks on each stroke. (See Suggestions) Additional pressure is unnecessary and will not speed the sharpening process. Avoid excessive cutting into the plastic enclosure. Accidental cutting into the enclosure however will not functionally impact operations of the sharpener or damage the edge.
Try a practice pull through the sharpener with the power "OFF". Slip the knife blade smoothly into the left slot of Stage 1 or Stage 2 allowing the left face of the blade to rest
Handle on the left face of the slot. Move the blade down in the slot until you feel it contact the diamond disk while maintaining contact with the left angle guide. Pull it towards you lifting the handle slightly as you approach the tip. This practice pull will give you a feel for the proper use of the sharpener. Remove the knife and read the following instructions specific to the type of knife you will be sharpening.


DESCRIPTION OF EURO/AMERICAN AND ASIAN BLADES
Over the years, the European and American blades have been designed to prepare foods common to their own culture and heritage – namely for heavier foods including a wide variety of meats and more fibrous vegetables. As a result these knives are generally heavier, thicker, and sharpened with sturdy 20° edge facets (40° total angle) (see Figure 3b). By contrast the Asian foods have been lighter, designed primarily for seafood, and less fibrous vegetables. Consequently many of the Asian knives are thinner and sharpened with the more delicate 15° facets (see Figure 3a). Sharpened correctly they are exceedingly sharp.
In recent years, as cultures and foods of the eastern and the western countries have become more ubiquitous and available on a global scale, the knives commonly associated with those foods also have become widely available. Many European and American brands are selling Santoku blades and certain traditional European styles are now manufactured with the narrower 15° edge angle.
The Model 290 is designed to sharpen virtually any of this growing variety of blades and to maintain the angles and edge designs of their tradition.
If one can identify the manufacturer of a knife or establish the country of origin of the knife's particular design it is relatively easy to classify the edge as Asian (15°) or as European/ American (20°) and to sharpen accordingly. For example the Santoku knife is characteristically sharpened as an Asian blade (15°) regardless of where the knife is manufactured. Otherwise if you are using a given knife for heavier cutting or chopping it is probably best sharpened as an European/American blade at 20°. If you use a small or medium size knife only for light work such as paring, peeling, or light slicing you may prefer to sharpen it as an Asian knife at 15° in order to take advantage of its increased sharpness.
The following descriptions may be helpful in identifying your knives or in explaining their edge structures.
EUROPEAN/AMERICAN BLADES (20º FACETS)
European/American fine edge blades are universally double beveled and are sharpened on both sides of the blade. Most of the Euro/American knives, shown on the right, Figure 4 have a thick cross-section designed for heavier work. However, the associated conventional paring, fillet and utility blades, are smaller and have a relatively thin cross-section well suited to their intended application.

CONTEMPORARY ASIAN KNIVES (15º FACETS)
The most popular Asian style blades; the thin, light weight Santoku and Nakiri for example are generally double faceted (sharpened on both faces of the blade) as shown in Figure 5.

There are other but somewhat heavier double-faceted Asian knives, the Deba and Gyutou, popular in Asia, which are used for chopping hard vegetables, for tailing and filleting fish and for meats. These are basically Asian Chef's knives designed for heavier duty work. While these heavier knives are commonly sold with 15° facets, you may wish to sharpen them with 20º angles. The Chinese cleaver is included in this class.
SHARPENING CONTEMPORARY ASIAN KNIVES AND OTHER 15º KNIVES
Virtually all Asian style blades are factory sharpened at 15°. The popular Santoku blade shown below is a typical contemporary Asian style, double faceted and each of its edge facets is sharpened on each side at 15° to create a total edge angle of 30º.
STAGE 1 (SHARPENING) 15º KNIVES
To sharpen, place the sharpener on the table gripping it securely with your left hand. Push on the power switch. Insert the knife blade, (Figure 6) near its handle, into the far left slot of Stage 1 and allow the left face of the blade to rest on the slanted left face of the slot as you pull the knife toward you. The knife edge should be in sustained moving contact with the internal diamond abrasive coated disk. Only light downward force will be necessary as you pull the blade toward you. Listen carefully to insure your knife maintains good contact with the rotating diamond disk. Take about 5 seconds to make each pull if you have a six inch (6") long blade. Increase the time of each pull for longer blades or decrease the time for shorter blades. Make one pull of the blade in the left slot as described above and then repeat the same procedure in the adjacent (right) slot of Stage 1 (see Figure 7). As you pull the knife through the right slot, hold the right face of the knife against the slanted right face of the slot. If your knife, before sharpening, is not very dull you will find that only about 5-6 pairs of pulls, alternating in the left and right slots of Stage 1, will be sufficient to put a keen edge on the blade. However, if the knife is initially very dull you may find that 10 or more alternating pairs of pulls in the left and right slots of Stage 1 will be needed the first time as you reshape and sharpen the old edge. Always pull the blade toward you. Never push the blade away from you when using Stage 1. Before leaving Stage 1 it is important to examine the knife edge to insure there is a small burr along one side of the edge. Figure 8 illustrates how to check for the burr. Proceed as follows: If your last sharpening pull was in the right slot there should be a small burr on the right side of the blade edge. If the last pull was in the left slot there should be a small burr along the left side of the edge. If there is no burr make another pair of pulls and again check for a burr. Repeat making pairs of alternating right and left pulls until you create a small burr along the entire edge. (Sometimes it is easier to create the burr if you pull the blade slower.) Make another single pull and confirm there is a burr along the entire edge after each pull. Only then are you are ready to polish the edge in Stage 3.

(Figure 8. Develop a distinct burr along knife edge before polishing in Stage 3. Burr can be detected by sliding finger across and away from the edge.

Do not slide your finger along the edge to avoid cutting your finger.)
STAGE 3 (POLISHING) 15º KNIVES
Since Stage 3 is a manual polishing stage, you can turn off the power switch. If the 15° knife has been adequately sharpened in Stage 1 only 6-7 back and forth stroke pairs in Stage 3 (see Figure 9) will create a small second bevel and the edge will be very sharp and effective. It should cut paper smoothly allowing you to make straight or curved cuts easily. If not make a few additional stroke pairs.
For optimum results center the blade (left and right) in the Stage 3 slot and keep the entire length of the blade edge in contact with the two internal sharpening disks as you hone and polish. Apply only light downward pressure, about 3-4 pounds on the blade in Stage 3. Hold the blade level, make smooth consistent strokes while maintaining recommended downward pressure. Listen to confirm that the two sharpening disks are turning. Do not polish excessively in Stage 3.
SHARPENING EUROPEAN/AMERICAN KNIVES AT 20º
All knives from European or American manufacturers are double sided, and consequently must be sharpened on both sides of the blade. The edge is customarily sharpened at 20° forming two facets, each at that angle to create a total edge angle of 40°. Whereas these knives are generally used for heavier tasks, the stronger 20° faceted edge is usually most appropriate.
Sharpening the European/American knife is a two step sharpening process, sharpening first in Stage 2 and followed by polishing in Stage 3. (You do not use Stage 1 for these knives unless you wish to convert them to the Asian style angle of 15° as described later.)
STAGE 2 (SHARPENING) 20º KNIVES
Do not use Stage 1.
Stage 2 will create the primary facet of 20° on the European/American knife. To sharpen, place the sharpener on the table gripping it securely with your left hand. Push on the power switch. Insert the knife blade, (Figure 10) near its handle, into the far left slot of Stage #2 and allow the left face of the blade to rest on the slanted left face of the slot as you pull the knife toward you. The knife edge should be in sustained moving contact with the internal diamond abrasive coated disk. Only light downward force will be necessary as you pull the blade toward you. Listen carefully to insure your knife maintains good contact with the rotating diamond disk. Take about 5 seconds to make each pull if you have a six inch (6") long blade. Increase the time of each pull for longer blades or decrease the time for shorter blades.
Make one pull of the blade in the left slot as described above and then repeat the same procedure in the adjacent (right) slot of Stage 2 (see Figure 11). As you pull the knife through the right slot, hold the right face of the knife against the slanted right face of the slot. If your knife, before sharpening, is not very dull you will find that only about 6-8 pairs of pulls, alternating in the left and right slots of Stage 2, will be sufficient to put a keen edge on the blade. However, if the knife is initially very dull you may find that 10 or more alternating pairs of pulls in the left and right slots of Stage 2 will be needed the first time as you reshape and sharpen the old edge. Always pull the blade toward you. Never push the blade away from you when using Stage 2. Before leaving Stage 2 it is important to examine the knife edge to insure there is a small burr along one side of the edge.
Figure 12 illustrates how to check for the burr. Proceed as follows: If your last sharpening pull was in the right slot there should be a small burr on the right side of the blade edge. If the last pull was in the left slot there should be a small burr along the left side of the edge. If there is no burr make another pair of pulls and again check for a burr. Repeat making pairs of alternating right and left pulls until you create a small burr along the entire edge. (Sometimes it is easier to create the burr if you pull the blade slower.) Make another single pull and confirm there is a burr along the edge after each pull. Only then are you are ready to polish the edge in Stage 3.
 20º KNIVES - Step 1")
 20º KNIVES - Step 2")
(Figure 12. Develop a distinct burr along knife edge before polishing in Stage 3. Burr can be detected by sliding finger across and away from the edge.
Do not slide your finger along the edge to avoid cutting your finger.)
STAGE 3 (POLISHING) 20º KNIVES
Since Stage 3 is a manual polishing stage, you can turn off the power switch. If the 20 degree knife is correctly sharpened in Stage 2, only 4-5 back and forth stroke pairs in Stage 3 (see Figure 13) will complete the small second bevel and the entire edge will be very sharp and effective. For optimum results center the blade (left and right) within the Stage 3 slot and keep the length of the blade aligned with the center line of the slot as you hone and polish. Apply only light downward pressure, about 3-4 pounds, in Stage 3. Make smooth consistent strokes while maintaining recommended downward pressure. Listen to confirm that the two sharpening disks are turning. The finished blade should cut paper smoothly allowing you to easily make straight or curved cuts.
 20º KNIVES")
RESHARPENING
RESHARPENING THE 20º EUROPEAN/AMERICAN KNIVES
Follow the procedure for Stage 3 described for 20° knives and make two to three (2-3) back and forth pairs of strokes while maintaining recommended downward pressure. Listen to confirm the two sharpening disks are turning. Test edge for sharpness. If this process does not provide the desired sharpness make four (4) pairs of alternating pulls in Stage 2 followed by four to five (4-5) back and forth stroke pairs in Stage 3.
Generally you should be able to resharpen several times using only Stage 3 of Model 290.
RESHARPENING THE 15º EDGE KNIVES
Follow procedure for Stage 3 as described above for 15° knives, making two to three (2-3) back and forth pairs of strokes while maintaining recommended light downward pressure. Listen to confirm the two sharpening disks are turning. Test edge for sharpness. If this process does not provide the desired sharpness make four (4) pairs of alternating pulls in Stage 1 followed by four to five (4-5) back and forth stroke pairs in Stage 3.
Generally you should be able to resharpen several times using only Stage 3 of Model 290.
CONVERTING EUROPEAN/AMERICAN KNIVES EDGE TO 15° ASIAN STYLE EDGE
With the Model 290 you can convert any European or American style knives that are used primarily for light duty work to the 15° Asian edge. For example you might consider converting light duty paring knives and thin utility blades to 15°. To make this conversion follow the Instructions for Sharpening Asian Blades. Initial sharpening in Stage 1 will take longer than you might expect but subsequent resharpening time will be normal.
SHARPENING SERRATED BLADES
Serrated blades can be sharpened in Stage 3 (see Figure 14). Center the blade in the slot of Stage 3 and make four to five (4-5) back and forth stroke pairs. Test the edge and if necessary make another 4-5 full stroke pairs. Examine the blade.
If the blade to be sharpened is very dull, first make two fast but full pairs of alternating pulls in Stage 2 and then make five (5) (back and forth) paired strokes in Stage 3. Because of its nature, a serrated knife will never appear as sharp or cut as smoothly as a straight edged blade. Caution: Do not make many pulls in Stage 2 which can quickly remove metal from a serrated edge.

SPECIALIZED ASIAN BLADES
The Model 290 is designed to sharpen double faceted Asian blades such as the Santoku which is traditionally sharpened at 15°. However it should not be used to sharpen any single sided, single faceted 15° Asian knives, such as the traditional sashimi styled blade that is commonly used to prepare ultra thin sashimi. The Model 290 sharpens simultaneously both sides of the cutting edge in Stage 3, while the sashimi knives are designed to be sharpened only on one side of the blade. Chef'sChoice offers electric sharpeners Models 15XV and 1520 that are designed to sharpen all types of Asian style knives, including single sided ones.
CERAMIC KNIVES
The Model 290 is not recommended for ceramic knives.
SCISSORS
Do not attempt to use the Model 290 to sharpen scissors. EdgeCraft does manufacture both electric and manual scissor sharpeners.
BRAND OF KNIVES
The Model 290 will put an excellent edge on all conventional metal Euro/American and Asian style knives regardless of brands, including Global, Wusthof, Henckels, Sabatier, Lamson, Chicago, Russell Harrington, Mundial, Chef'sChoice, Messermeister, Forschner, Cuisinart, Kitchen Aid, Shun and many, many more.
TEST FOR SHARPNESS
To test for sharpness and cutting ability of your knife, hold a sheet of paper vertically by its upper edge and carefully cut down through the sheet a small (but safe) distance from your fingers. A sharp edge (on a straight edge blade) will cut smoothly without tearing the paper.
Alternatively try cutting a tomato. A sharp knife should penetrate the skin of the tomato and cut through it on the first pull without applying significant force to the knife.
SUGGESTIONS
- Always clean all food, fat and foreign materials from the knife blade surfaces before sharpening or resharpening. If badly soiled, use detergent and water to clean.
- Some contemporary Asian knives and Granton type blades are dimpled and some contemporary and traditional Asian blades are made of layered Damascus steel. All of these should be sharpened accordingly to these instructions.
- Always pull the blades in Stages 1 and 2 at the recommended speed and at a constant rate over length of blade. Never interrupt or stop the motion of the blade when in contact with abrasive disks.
- Carefully follow the detailed procedures for each type blade for best results and to extend the useful life of your knives.
- The edge of the knife blade, while sharpening, should remain in contact with the abrasive disks as the knife is withdrawn from the guiding slot. To sharpen the blade near the tip of a curved edge blade, lift the handle up slightly as you approach the tip of the blade but just enough so that the edge as it is being sharpened maintains audible contact with the honing or stropping disk.
- To increase your proficiency with the Chef'sChoice a burr along the edge (as described on pages 7 and 8). While you might be able to sharpen well without using this technique, it is the fastest way to determine when you have sharpened sufficiently in the preliminary steps. This will help you avoid oversharpening and ensure incredibly sharp edges every time. Cutting a tomato or a piece of paper is a convenient method of checking for finished blade sharpness.
- Use only light downward pressure when sharpening – just enough to establish secure contact with the abrasive disk.
- Used correctly, you will find you can sharpen the entire blade to within bolster or the knife handle. This is a major advantage of the Chef'sChoice compared to other sharpening methods—especially important when sharpening chef's knives where you need to sharpen the entire blade length in order to maintain the curvature of the edge line. If your chef's knives have a heavy, thick bolster near the handle extending to the edge, a commercial grinder can modify or remove the lower portion of the bolster so it will not interfere with the sharpening action, allowing you to sharpen the entire blade length.
- Do not attempt to use this sharpener to sharpen either ceramic knives or scissors.
NORMAL MAINTENANCE
No lubrication is required for any moving parts, motor, bearings, or on sharpening surfaces. Once a year or so as needed you should remove metal dust that will accumulate inside the sharpener from repeated sharpenings.
Remove the small rectangular clean-out cover (Figure 15) that covers an opening on the underside of the sharpener. You will find metal particles adhered to a magnet attached to the inside of that cover. Simply rub off or brush off accumulated filings from the magnet with a paper towel or tooth brush and reinsert the cover in the opening. If larger amounts of metal or other dust have been created you can shake out any remaining dust through the bottom opening onto a newspaper, paper towel, or other paper sheet when the cover is removed. After cleaning, replace the cover securely with its magnet in place. The exterior of the Model 290 can be cleaned with a damp soft cloth. Do not use detergents or abrasives.

SERVICE
In the event post-warranty service is needed, return your sharpener to the EdgeCraft factory where the cost of repair can be estimated before the repair is undertaken. Outside the USA, contact your retailer or national distributor.
Please include your return address, daytime telephone number and a brief description of the problem or damage on a separate sheet inside the box. Retain a shipping receipt as evidence of shipment and as your protection against loss in shipment.
EdgeCraft Corporation
825 Southwood Road, Avondale, PA 19311 U.S.A.
Customer Service (800) 342-3255 or 610-268-0500
Assembled in the U.S.A.
www.chefschoice.com
This product may be covered by one or more EdgeCraft patents and/or patents pending as marked on the product.
Chef'sChoice®, EdgeCraft®, Diamond Hone® and Hybrid® are registered trademarks of EdgeCraft Corporation, Avondale, PA.
Conforms to UL Std. 982 Certified to CAN/CSA Std. E60335-1/4E
© EdgeCraft Corporation 2014

Documents / Resources
References

Download manual
Here you can download full pdf version of manual, it may contain additional safety instructions, warranty information, FCC rules, etc.
Download Chef's Choice Hybrid AngleSelect Diamond Hone 290 Manual
Advertisement


Need help?
Do you have a question about the Hybrid AngleSelect Diamond Hone 290 and is the answer not in the manual?
Questions and answers