Table of Contents
Advertisement
Quick Links
2007 Cadillac STS/STS-V Navigation System
Overview ........................................................ 3
Overview
.................................................. 4
Features and Controls ................................ 15
Features and Controls
Navigation Audio System ............................ 91
Navigation Audio System
............................ 16
........................ 92
Voice Recognition ..................................... 121
Voice Recognition
Vehicle Customization ............................... 137
Vehicle Customization
Phone ......................................................... 149
Phone
.................................................. 150
Index .......................................................... 159
M
................................. 122
........................... 138
1
Advertisement
Table of Contents

Subscribe to Our Youtube Channel
Related Manuals for Cadillac STS 2007


Summary of Contents for Cadillac STS 2007
- Page 1 2007 Cadillac STS/STS-V Navigation System Overview ............3 Voice Recognition ........121 Overview ..........4 Voice Recognition ......... 122 Features and Controls ........ 15 Vehicle Customization ....... 137 Features and Controls ......16 Vehicle Customization ......138 Navigation Audio System ......91 Phone ............
- Page 2 For vehicles first sold in Canada, substitute the name General Motors of Canada Limited for Cadillac Motor Car Division whenever it appears in this manual. GENERAL MOTORS, GM, the GM Emblem, Keep this manual with the owner manual in the CADILLAC, the CADILLAC Crest &...
- Page 3 Section 1 Overview Overview ............4 Getting Started ..........6 Navigation System Overview ......4 Cleaning the Display ........14...
- Page 4 Overview Navigation System Overview...
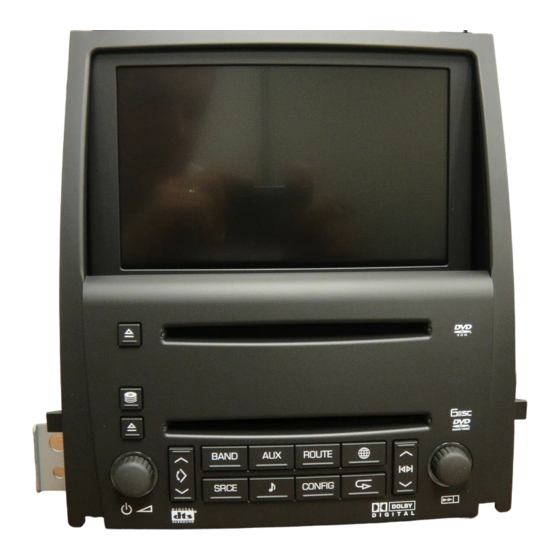
- Page 5 A. Audio Status Line (Power/Volume) Knob. See “Hard Keys” under Using the Navigation System on B. Audio Source Screen Button. See Navigation page 16 for more information. Audio System on page 92 for more information. ¦m ¥ C. North Up/Heading Up Symbol. See Symbols (Navigation Screen Tilt) Key (in/out).
- Page 6 W. SRCE (Source) Key. See Navigation Audio advantage of its features. Your navigation system System on page 92 for more information. includes not only navigation, but also audio functions. While your vehicle is parked: (Audio) Key. See Navigation Audio System •...
- Page 7 Other functions may also be locked out while driving and they too will appear grayed out on the CAUTION: screen — but all functions are available when parked. Some functions can be performed while Looking at the moving map on the driving, as long as you can do so without diverting too much of your attention from your driving.
- Page 8 The information in the system may not always be language of the system. For more information on complete. Road conditions such as prohibited changing the language, see Personalization on turns, detours, and construction zones, change page 138. frequently. It is important to consider whether you When getting started you may set the navigation can follow the directions given by the system system to your preference using various...
- Page 9 Setting Radio Station Presets Setting the Time To set preset radio stations, do the following: To set the time, do the following: 1. Press the power/volume knob to turn 1. Press the power/volume knob to turn the the system on. system on.
- Page 10 Setting the Region, Entering an Entering an Address Address and Point of Interest, and To set a destination by entering a street address, do the following: Storing a Home Destination and Preset Destinations 1. Press the power/volume knob to turn the system on.
- Page 11 Entering a Point of Interest (POI) 6. Select the desired street name with the correct designation (Dr., Ln., St., etc.) from To set a destination by entering a Point of Interest the list. (POI), do the following: 7. If there is more than one city, the system will 1.
- Page 12 7. Press the Add screen button. 8. Select the (destination) symbol screen button. 8. Press the Address screen button and enter all address information. 9. Select the Guide screen button. 9. Press the OK screen button. 10. Once you begin driving you will hear an audio prompt to “Proceed to the highlighted route.”...
- Page 13 A notice may appear. Touch the I agree 6. Press the Preset Dests. screen button. screen button to proceed. 7. Press the Add screen button and select 3. Press the ROUTE hard key. Verify that the the numbered preset row to store the selected Region is correct.
- Page 14 Canceling Guidance > 3. Press the Volume screen button. 4. Select the desired volume or select Off. The Guidance will be canceled once you arrive at your system will play back the new volume level. final destination. To cancel guidance prior to arrival at the final destination, do the following: See “Volume”...
-
Page 15: Table Of Contents
Section 2 Features and Controls ® Features and Controls ........16 OnStar System .......... 74 Using the Navigation System ....... 16 Configure Menu ........... 75 Maps ............18 Global Positioning System (GPS) ....87 Symbols ............21 Vehicle Positioning ........88 Head-Up Display (HUD) Problems with Route Guidance .... -
Page 16: Features And Controls
Features and Controls (CD/DVD Eject): Press the eject key next to the CD/DVD changer loading slot to begin ejecting DVDs or CDs. See Six-Disc CD/DVD Using the Navigation System Changer on page 103 for more information. This section presents basic information you will (Power/Volume): Press the power/volume need to know to operate the navigation system. - Page 17 y©¨z AUX (Auxiliary): Press the AUX key to access (Seek/Scan): Press the seek/scan ® screens from which you will operate Bluetooth arrows to go to the next or previous radio station, ® ® OnStar , or control video input. See Bluetooth or press and hold to scan stations.
-
Page 18: Maps
Touch-Sensitive Screen Buttons Others: Touch this screen button to display special characters. There are two pages of Touch-sensitive screen buttons are located on the characters available. Use the right and left arrow screen. When a screen button has been screen buttons to view the pages. selected, a beep will sound. - Page 19 Installing the DVD Map Disc Ejecting the DVD Map Disc When your vehicle is delivered from the factory, When the DVD map disc is not loaded, you will the dealer may have installed the map DVD. If the not be able to use the navigation portion of map DVD was not installed, use the following the system.
- Page 20 Map Scales Hold your finger in any direction outside of the scroll symbol and the map will continue to scroll in that direction until you remove your finger from To view a larger or the map screen. smaller scale of the map, touch the If scrolling while your vehicle is in PARK (P), the map scale arrows.
-
Page 21: Symbols
Symbols The waypoint symbol will be displayed on the The following symbols are the most common map after a waypoint symbols that will appear on a map screen. has been added to your route. Your vehicle is shown as this symbol. It indicates the current position and heading The waypoint symbol will be numbered from one... - Page 22 The distance and time to The north up symbol destination symbol indicates the map with indicates the distance North Up, known as and the estimated time North Up mode. remaining to your final destination or arrival time, depending on the option selected.
- Page 23 The No GPS symbol will This symbol indicates appear, in the upper the position of the next right corner of the map guidance maneuver. screen, when your vehicle is not receiving a Global Positioning System (GPS) satellite signal. The following symbols can also be found on a map screen: See Global Positioning System (GPS) on page 87.
- Page 24 Touch anywhere on the Select the POI screen button to display the map to display this following screen: button. Select the memory point symbol to store the location on the screen as a memory point. The system will automatically store the memory point in the Marked Point folder/category.
- Page 25 List Categories: Select this screen button to Delete: To delete a category, do one of the display more POI categories that are not part of following: the POI categories listed. The following screen will • To delete the last added POI category, select be displayed after List Categories has been the Delete screen button.
- Page 26 Select the back screen button to return to the previous page. Select the cancel screen button to return to the first menu of the selected option. Once a POI icon has been selected, the scroll symbol will appear around the POI icon on the map and the name of the POI will appear on the display.
- Page 27 Guidance Windows Single Map Mode Select the map view Select the guidance symbol to display more window symbol, from of the map with a the map, to display window that gives the the guidance window direction and distance to options. the upcoming maneuver.
- Page 28 Dual Map Mode Select the dual view symbol to display two map screens that will allow different scale levels and heading directions for each. Touch anywhere inside the right map to change the scale level, 2D and 3D view, and to turn the POIs on and off.
- Page 29 Turn List Mode Select the turn list symbol to display the next three upcoming maneuvers. Directional arrows, street name, and distance to the next turn will be displayed. As you approach the next turn, the system will automatically display a zoomed-in view of the upcoming maneuver.
- Page 30 Next Turn Mode Select the arrow guidance symbol to display the next turn. A directional arrow, the street name, and the distance to the next turn will be displayed. As you approach the next turn, the system will automatically display a zoomed-in view of the upcoming maneuver.
- Page 31 Use the up and down arrows to scroll through the displayed list. To view the available POIs for an exit, select the exit, then select the Map screen button. The navigation system will display highway guidance any time you have a route on a highway or freeway or you can select the symbol.
-
Page 32: Head-Up Display (Hud) (During Route Guidance)
Auto Reroute Head-Up Display (HUD) (During Route Guidance) When your destination is set and you are off the planned route, the system will automatically plan a When a route is planned the Head-Up Display new route and begin to reroute. You will see the (HUD) will display information when the vehicle is new route highlighted on the screen. -
Page 33: Navigation Menu
Navigation Menu C. Street Name Line — Displays the name of the street that you will be turning on. Select the Menu screen button, from the map D. Mile/Kilometer Scale — Indicates the scale of screen, to access the NAV. (Navigation) MENU. the distance bar. - Page 34 Change Route The search condition screen allows you to view your current destination and to change the Select Change Route to access the ROUTE planning methods between each destination. Each OPTIONS menu. The availability of these screens distance between waypoints and final destination depends on if a route is planned or if you are can have an individual setting.
- Page 35 Detour Route Pref. (Route Preferences) Select this screen button from the ROUTE Select this screen button from the ROUTE OPTIONS screen to access the DETOUR screen. OPTIONS screen to access the ROUTE PREFERENCES screen. From this screen, choose to detour 1 mile, 3 miles, or 5 miles around the current route.
- Page 36 (Allow Time Restricted Road): This feature allows the system to use time restricted roads when calculating a route. (Allow Toll Road): This feature allows the system to use toll roads when calculating a route. (Allow Ferry): This feature allows the system to use ferries when calculating a route.
- Page 37 Display route Turn List: Select this screen button to view or to edit the list of upcoming maneuvers for the Select this screen button from the ROUTE entire route. A list of every turn on the route will OPTIONS screen to view the entire planned route display.
- Page 38 Reroute/ (Back): Select either screen button to calculate the route based on the selected avoided maneuvers. Delete: Press this screen button to cancel an avoided turn after the route has been replanned. A list of all of the avoided turns will display. Select the street that you want to add back to the route.
- Page 39 (Pause): Select this screen button to pause the route preview. (Scroll to Destination): Select this screen button to scroll to the destination, next way point, or next POI depending on the mode selected. This button will toggle between slow and fast speed.
- Page 40 Memory Points Category Selection: Select one of the categories from the list to add or replace the current POI Selecting Memory Points from the NAV. MENU category. will take you to the STORED LOCATIONS screen. Calculate From the STORED LOCATIONS screen, you can access the following options: Select this screen button, from the ROUTE OPTIONS screen, to calculate your route, after...
- Page 41 This feature allows you the ability to store memory To store a point: points. Storing memory points makes these 1. Select the Memory Points screen button from points easily available to set as a destination. See the STORED LOCATIONS screen. “Memory Points”...
- Page 42 4. Select the memory point from the list. 5. Select the Name screen button. Use the Dist. (distance), Icon, Name, and Date 6. Use the backspace screen button to delete screen buttons to change the sort methods. the current name or use the alpha keypad to make changes.
- Page 43 To move the memory point from one 6. The system will say “Name please.” State folder/category to another: what you would like to call the memory point. 1. Select the Memory Points screen button from the STORED LOCATIONS screen. 7. The system will play back what was recorded and then will ask you to confirm the nametag.
- Page 44 4. Select the memory point from the list. 6. Select the desired icon. There are two pages of icons and a page of icons that have sounds 5. Select the Position screen button. associated with them. 6. The system will display the map screen with 7.
- Page 45 3. Select the Delete screen button. To delete all of the memory points in a folder/category: 4. Select the memory point from the list. Use the sort feature to sort by distance, icon, name, or 1. Select the Memory Points screen button from date as needed.
- Page 46 3. Select the desired method of entering a Avoid Area destination to enter the area to be avoided. This feature allows you to store or delete an area See Destination on page 55 for more to be avoided, while on a planned route. Up to information.
- Page 47 To edit the position of the point to be avoided: 1. Select the Avoid Area screen button from the STORED LOCATIONS screen. 2. Select the Edit screen button. 3. Select the point to be changed from the list. 4. Select the Position screen button. 5.
- Page 48 To delete all of the points to be avoided: 1. Select the Avoid Area screen button from the STORED LOCATIONS screen. 2. Select the Del.All screen button. 3. The system will display a pop-up confirmation message. Select Yes to have all of the points deleted;...
- Page 49 To change the order of the route: 4. Select the (Way point) symbol on the map screen to save the way point. 1. Select the Dest. & Way Pt. screen button from the STORED LOCATIONS screen. 5. Repeat Steps 1 - 4 to add up to five way points to your route.
- Page 50 To change the location of a way point: To delete a way point from your current route: 1. Select the Dest. & Way Pt. screen button from 1. Select the Dest. & Way Point screen button the STORED LOCATIONS screen. from the STORED LOCATIONS screen.
- Page 51 4. Select the OK screen button to store the Home destination. The home icon will now be This feature allows you to add, delete, or edit a highlighted on the DESTINATION ENTRY point to be stored as your home destination. screen.
- Page 52 & Previous Dest. (Destination) Preset Dests. (Destinations) This feature allows you to delete one or all This feature allows you to add, delete, or change previous destinations that have been previously one of five preset destinations. Storing preset entered and automatically stored. destinations makes these destinations easily available to set as a destination.
- Page 53 To edit the name of a preset destination: 5. Select the OK screen button to save your changes. 1. Select the Preset Dests. screen button from You can choose whether or not to have the the STORED LOCATIONS screen. name show on the map screen, next to 2.
- Page 54 To add or change the phone number of a preset 3. Select the preset destination you want to destination: delete. 1. Select the Preset Dests. screen button from 4. The system will display the map screen with a the STORED LOCATIONS screen. pop-up confirmation message.
-
Page 55: Destination
Destination preferences, route options, map appearances, or add a way point at this time. You may also set Press the ROUTE key to access the Destination the destination without making any further Entry screen. From this screen, you can changes. See “Getting Started on Your Route” choose from several options to plan a route by following in this section for more information entering destination points. - Page 56 to return to the DESTINATION ENTRY screen. The new selection will be stored once you select the back screen button. Address The address destination entry method allows you to input an address by providing the system with a house number, street name, and city. Touch the REGION screen button from the DESTINATION ENTRY screen to see a list of states included in the highlighted region, or...
- Page 57 To use the house number first destination entry To use the street name first destination entry method, do the following: method, do the following: 1. Touch the numeric keypad to input the house 1. Touch the Street screen button from the number.
- Page 58 To use the city name first destination entry 4. The House number screen will be displayed. method, do the following: Enter the house number using the numeric keypad. 1. Touch the City button. 5. Select the Street screen button from the 2.
- Page 59 Point of Interest (POI) To input the POI name, do the following: 1. Use the alpha keypad to enter the POI name. The Point of Interest (POI) destination entry Touch Sym. (symbol) to select symbols and method allows you to choose a destination from numbers for the POI, touch Others to the POI list.
- Page 60 To select a POI from a category, do the following: To select a POI by inputting a city name, do the following: 1. Touch the Category screen button from the POINT OF INTEREST screen to view a list 1. Select the city screen button, then select; Any of POI categories.
- Page 61 3. A list of POIs will appear using the information from the alpha keypad input. A list of available The map destination entry method allows you to POIs will display when there are less then choose a destination by scrolling on the map. five POIs available.
- Page 62 Intersection 3. Pressing/holding and dragging on the map will activate fast scrolling. Press/touch once on The intersection destination entry method allows the area to which you would like to move the you to set two intersecting streets as your current position mark. destination.
- Page 63 Phone Number To use the intersection destination entry method, do the following: The phone number destination entry method 1. Enter the first of two streets in the intersection. allows you to choose a destination by entering a The List option may become available. phone number.
- Page 64 Freeway Entrance/Exit To use the phone number destination entry method, do the following: The freeway entrance/exit destination entry 1. Input the area code and phone number of a method allows you to choose a destination by POI using the numeric keypad. Only business entering a freeway entrance or exit point.
- Page 65 To use the freeway entrance/exit destination entry You can sort the list by distance or name. method, do the following: Touch the Name Sort screen button to sort the list by name. Touch the Dist. Sort screen 1. Touch the Freeway screen button and enter button to have the list sorted by distance.
- Page 66 Emergency To use the emergency destination entry method, when no route has been planned, do the following: The emergency destination entry method allows 1. Select a category. you to enter a destination by choosing from three categories. 2. Select a destination point from the list. Touch the Name Sort screen button to sort the list by name, or Dist Sort to sort the list by distance from the vehicle’s current position.
- Page 67 To use the emergency destination entry method, To use this destination entry method, do the when a route has been planned, do the following: following: 1. Select a category. 1. Select the category/folder in which the memory point has been stored. Select 2.
- Page 68 Previous Destination To use the previous destination entry method, do the following: The previous destination entry method allows you 1. Choose a previous destination from the list. to choose a destination from a list of previous Use the arrow to the right of the destination destination points.
- Page 69 Coordinates To use the coordinates destination entry method, do the following: The coordinates destination entry method allows 1. Touch N or S next to LAT. to enter the you to choose a destination by entering latitude direction of the latitude coordinate. and longitude coordinates.
- Page 70 Preset Destination To use the preset destination entry method, do the following: (Preset Destination): The preset destination 1. Select the desired preset destination from the entry method allows you to set a destination DESTINATION ENTRY screen. The screen by choosing from one of five previously stored buttons are numbered 1 - 5.
- Page 71 Getting Started on Your Route To use this destination entry method, do the following: Once you have entered a destination, you can 1. Select the home screen button from the perform one of the following options: DESTINATION ENTRY screen. A map screen will appear with the destination marked.
- Page 72 Route Preference: Touch this screen button to From this screen you can select Guide to start access the Route Preference screen and your route guidance or select 3routes if available adjust the route preferences. The current setting is to select between Quick, Normal, or Short displayed in the Route Preference section of the route options.
-
Page 73: Keyless Access System
The routes are shown with distance to destination (Straight-Line Distance): This icon shows and estimated travel time. The quickest route the route’s straight-line distance to destination. may not be the shortest, and vice versa. When an (Toll Road): This icon shows the route’s toll optional route is selected it is shown on the road distance information. -
Page 74: Onstar System
® OnStar System (Place/End Call): Touch this screen button to place your phone call. While in a call, this button will be red. Touch this button to end your call. Tone Send: Touch this screen button to send touch tone data. This button will become available during a phone call. -
Page 75: Configure Menu
® Using the OnStar Screen to Make a Configure Menu Phone Call ® To make a phone call using the OnStar screen do the following: 1. Press the AUX hard key. ® 2. Touch the OnStar screen button. 3. Enter the phone number using the numeric keypad. - Page 76 Audio Auto Store: Touch this button to turn the Auto Store on for the current audio source selected. Touch the Audio screen button to access a screen When on, this button will appear on the main audio where several audio features may be turned on screen.
- Page 77 Navigation Set Up Traffic: This button is only available when you are using the FM or CD/DVD audio modes. When on, the Navigation System will search for (Navigation Set Up): Touch this screen stations that broadcast traffic announcements. button to access the NAVIGATION SET UP screen. The following screen buttons are only available for video DVDs: Audio Language: Select this button to view a list...
- Page 78 From this menu, several options are available for adjustment: 2D/3D View: This option allows you to change the view of the map screen and the guidance screen between a 2-dimensional and 3-dimensional view. When changing the map to the 3-dimensional view, use the up/down arrows to change the angle of the map.
- Page 79 2. To change your vehicle’s position, touch the Calibration: This option allows you to map screen. recalibrate the navigation system. Use the zoom in/out function to view the direction of the desired area. Pressing/holding and dragging on the map will activate fast scrolling.
- Page 80 If there are tire pressure differences or a spare tire From this screen, you can adjust the following: is installed, the system will automatically Notify traffic restriction: This option instructs the re-calibrate the system, but it may take longer. To system to notify you when the current route has calibrate the vehicle speed signal, touch the traffic restrictions (e.g.
- Page 81 Text size on map: This option allows you to Average Speed: Select this option to set the adjust the text size on the map between Large, average speed to default. The system monitors the Medium, and Small. This option is located on speed on different roads and updates the the second page of the USER SETTINGS screen.
- Page 82 Vehicle Clock Vehicle: Touch this screen button to access the (Clock Adjust): Touch this screen button or vehicle information menu. From this menu, touch and hold the clock screen button in the upper you can adjust such options as the language, right corner of the screen to access the Clock personal settings, and memory options.
- Page 83 Screen Appearance AM: Touch this screen button when setting the time in AM. (Screen Appearance): Touch this screen PM: Touch this screen button when setting the button to access the appearance screen menu. time in PM. PST, MST, CST, EST: Touch one of these screen buttons to choose between Pacific Standard Time (PST), Mountain Standard Time (MST), Central Standard Time (CST), and Eastern...
- Page 84 Memory Settings Color Mode: This option allows you to adjust your screen mode between Auto, Day, and Night. If your vehicle has the memory feature, memory Day mode will change the navigation system settings for the following features, for up to screen to a lighter background for better viewing two drivers, can be programmed and recalled: in the daytime.
- Page 85 Memory Infotainment Settings and Store Memory Settings Presets These settings and presets are set automatically. They include the following: • Radio presets • Navigation • Address Book • Language • HUD display • Climate control settings For more information, see each item in the Index of your vehicle’s owner manual.
- Page 86 3. Press the CONFIG hard key. 3. Push and release either the Driver 1 or Driver 2 screen buttons to recall the 4. Adjust your settings for the driver’s seat, the driving positions. Push and release the Exit outside mirrors, and the steering column to a screen button to recall the exit position.
-
Page 87: Global Positioning System (Gps)
Magnetic Ride Control When your vehicle is not receiving signals from the satellites, a symbol will appear on the If your vehicle has this feature, select between the map screen. Refer to Symbols on page 21. following screen buttons: This system may not be available or interference Performance: Select this screen button when may occur if the following happens: road conditions or personal preference demand... -
Page 88: Vehicle Positioning
Vehicle Positioning • The vehicle is entering and/or exiting a parking lot, garage or a lot with a roof. At times, the position of the vehicle on the map • The GPS signal is not received. may be inaccurate due to one or more of the •... -
Page 89: Problems With Route Guidance
Problems with Route Guidance • The route prohibits the entry of a vehicle due to a regulation by time or season or any Inappropriate route guidance may occur under one other regulation which may be given. or more of the following conditions: •... -
Page 90: Ordering Map Dvds
Ordering Map DVDs If you have any questions about the operation of the navigation system or the update process, You will receive two free DVD map disc updates call the GM Nav Disc Center or go to the center’s with the purchase of your new vehicle. Updates website. - Page 91 Section 3 Navigation Audio System Navigation Audio System ......92 Auxiliary Devices ........118 Six-Disc CD/DVD Changer ......103 Radio Personalization ........ 119...
- Page 92 Navigation Audio System Your vehicle has a feature called Retained Accessory Power (RAP). With RAP, the audio system can be played even after the ignition Notice: Before adding any sound equipment is turned off. See “Retained Accessory Power to your vehicle, such as an audio system, (RAP)”...
- Page 93 Finding a Station SRCE (Source): Press this key to change the audio source from the radio band to CD, Press the band/source screen button, located in audio DVD, or video DVD, depending on what is the top left corner (AM, FM, CD, etc.), from loaded in the six-disc DVD changer, or from any screen to access the audio source screen.
- Page 94 Preset Stations To scan preset stations, touch and hold Scan for two seconds. The radio will go to the next Storing Preset Stations preset station, play for a few seconds, then go on This feature allows you to store up to 24 preset to the next preset station.
- Page 95 A.B.C Preset Stations 4. Select the audio band. The presets within each list can be mixed: AM, FM, or XM™, A.B.C: This feature allows you to store up to if equipped. 42 presets, six stations in seven different lists. The 5.
- Page 96 Audio Adjust the audio to keep it audible above the noise. This feature works best at lower volume settings (Audio Adjust): Touch this hard key to where background noise may mask the audio. At higher volume settings, where the audio is access the AUDIO ADJUST menu and to adjust much louder than the noise, there may be little or the tone, Digital Signal Processing (DSP),...
- Page 97 Setting the Tone Adjusting the Speakers Left/Right (Balance): To adjust the balance (Treble): Touch the plus (+) or minus (−) sign between the right and the left speakers, touch and next to this symbol to increase or decrease hold the Left or Right screen buttons. To center the treble.
- Page 98 • Normal: For non-surround sound sources only. Display messages from radio stations Select this screen button to adjust the audio to be • Seek to stations with traffic announcements in normal mode. DSP will be in the off mode. This system relies on receiving specific information Driver: For non-surround sound sources only.
- Page 99 Info (Information): Select this screen button to Group Name Category display information broadcasted by the RDS Rock station when in FM. This is not available for AM or Classic Rock WX stations. Adult Hits Top 40 Category: Select this screen button when in FM Oldies Music to view the program types.
- Page 100 XM™ Satellite Radio Service XM™ is a satellite radio service that is based in the 48 contiguous United States and Canada. XM™ offers a large variety of coast-to-coast channels including music, news, sports, talk, traffic/weather (U.S. subscribers), and children’s programming. XM™ provides digital quality audio and text information that includes the channel name and number, song title, and artist name.
- Page 101 To select a category: Category Scanning: This function allows you to scan through the channels in a specific category. 1. Select the XM™ audio source. To activate the category scan function, do the 2. Select the Category screen button. following: The system will display the available 1.
- Page 102 XM Radio Messages Radio Display Message Condition Action Required XM Updating Updating encryption code The encryption code in the receiver is being updated and no action is required. This process should take no longer than 30 seconds. No XM signal Loss of signal The system is functioning correctly, but the vehicle is in a location that is blocking the XM™...
- Page 103 Radio Display Message Condition Action Required XM Theftlocked Theft lock active The XM™ receiver in the vehicle may have previously been in another vehicle. For security purposes, XM™ receivers cannot be swapped between vehicles. If this message is received after having your vehicle serviced, check with your GM dealer.
- Page 104 If there is no apparent damage, try a known good CD. Notice: If a label is added to a CD, or more than one CD is inserted into the slot at a time, or an attempt is made to play scratched or damaged CDs, the CD player could be damaged.
- Page 105 3. When the screen displays “Insert Disc If no CD or DVD is loaded in the CD/DVD (number)”, insert the disc partway into the slot, changer and you press the SRCE hard key a label side up. The system will pull it in and start “No disc loaded”...
- Page 106 Playing an Audio CD (Play): Select this screen button or press one of the available screen buttons, 1 through 6, to begin playing that disc. There will be a 12 to 15 second delay while the CD is read, before it begins to play.
- Page 107 SCAN (Scan All Disc): If this symbol appears (Repeat): Select the repeat screen button to on the display after pressing the Scan screen toggle between the following repeat options: button, the system will play the first 10 seconds of RPT (Repeat Track): If this symbol appears each track on all of the loaded discs of the on the display after pressing the repeat screen same media type.
- Page 108 Using an MP3 • It is recommended that there is a maximum of 192 files on a disc. MP3 Format • The files can be recorded on a CD-R or When creating an MP3 disc, the following is a list CD-RW with a maximum capacity of 700MB.
- Page 109 Notice: If a label is added to a CD, or more than one CD is inserted into the slot at a time, or an attempt is made to play scratched or damaged CDs, the CD player could be damaged. While using the CD player, use only CDs in good condition without any label, load one CD at a time, and keep the CD player and the loading slot free of foreign materials,...
- Page 110 Display: Select this screen button to display the + (Next folder): Select this screen button to MP3 play list. Use the up/down arrows to scroll go to the next folder. through the list. Select the folder or track to play. Scan: Select the Scan screen button to toggle While in this menu, you can use the scan, between the following scan options:...
- Page 111 SCAN (Scan All Disc): If this symbol appears RND (Random All Discs): If this symbol on the display after pressing the Scan screen appears on the display after pressing the random button, the system will play the first 10 seconds of screen button, the system will play the tracks each track on all of the loaded discs of the on all of the loaded discs, in random, rather than...
- Page 112 Playing an Audio or Video DVD OFF: Select this screen button to turn off the scan, random, or repeat functions. When an audio or video DVD has been loaded, Combined Disc: This system will also play a the following screen will appear. Some features do combined disc which contains CD-DA and not function for both audio and video DVDs.
- Page 113 To switch these groups, do the following: Menu: Select this screen button to access the DVD’s menu options. Depending on the type 1. Put the vehicle in PARK (P). of DVD you are using, this screen button may or 2. Access the DVD/CD menu screen. may not be available.
- Page 114 Search: Select this screen button to search (Stop): Select the stop screen button to stop through a DVD by Title/Group, or Chapter/Track. playing the disc. Touch Keypad to access the numeric keypad (Frame Advance): Select this screen button to used to enter data in these searches. play the disc in slow motion.
- Page 115 (Page Up): Select the page up symbol to (Repeat): Select this screen button to repeat scroll up through the pages of an audio DVD. The the current track. Select this screen button function of this screen button depends on the again to repeat the current playing group on the disc inserted.
- Page 116 Cursor Menu Keypad: Select this button and a number keypad will appear. Input the track number, press enter, Cursor: Select this screen button to access the and the system will play the track. left, right, up, and down cursors on the screen. The (Back)/ Return: Select either button to return cursors allow you to navigate through menu to the previous screen.
- Page 117 Six-Disc DVD Changer Errors (Brightness): Select the plus (+) or minus (−) signs next to this symbol to increase or decrease Although the DVD or CD you are playing meets the brightness. regulation requirements, there are circumstances that may cause the disc to not play correctly. Tint: Select the plus (+) or minus (−) signs next to Some of those circumstances may include this symbol to increase or decrease the screen tint.
- Page 118 Auxiliary Devices Connect the auxiliary device to the audio and video connectors, located in the center console. The audio and video adapters allow you to The system requires standard RCA cables, connect audio and video devices, such as a not included, to connect the auxiliary device to the hand-held computer, video camera or a video RCA jacks.
- Page 119 Auxiliary Video Image Screen Radio Personalization To play other audio sources using the auxiliary With this feature, you can recall the latest audio device, do the following: system settings as adjusted the last time your 1. Connect the auxiliary device as explained vehicle was operated.
- Page 120 NOTES...
- Page 121 Section 4 Voice Recognition Voice Recognition ........122...
- Page 122 Voice Recognition Helpful Hints for Stating Commands • When a multiple command is available, choose The navigation system’s voice recognition allows the command that best works for you. for hands-free operation of navigation, phone, • Words that are in brackets are optional. For ®...
- Page 123 • The Command List shows a list of available voice If you experience difficulty with the system recognition commands to use. Touch the recognizing a command, try saying it more Command List screen button and then touch one softly, and wait for a few seconds after of the buttons on the right of the screen to the beep, or you may just try saying it again.
- Page 124 CD: Touch this screen button to display the list of CD commands. DVD: Touch this screen button to display the list of DVD commands. Heater: Touch this screen button to display the list of climate control commands. Disp. (Display): Touch this screen button to display the list of display commands.
- Page 125 Audio: Touch this screen button to display Display [set] night mode: This command instructions on how to use the radio commands. instructs the system to switch the system display to night mode. See “Screen Appearance” Nametag: Touch this screen button to display under Configure Menu on page 75 for more instructions on how to use and store a nametag.
- Page 126 Point of Interest (POI) Commands Navigation repeat [voice] [guidance]: This command instructs the system to repeat the The following is a list of POI commands. State the previous voice guidance prompt. commands exactly as they are written to receive information from the system regarding that specific Cancel: This command instructs the system to command.
- Page 127 • • Navigation Auto Service Navigation Tourist Attraction • • Navigation Other Automotive Navigation Tourist Information • • Navigation GM Navigation Video Rental • Navigation Winery Entertainment Locations • Navigation Amusement Park Financial Locations • • Navigation Casino Navigation ATM •...
- Page 128 • • Navigation Library Navigation Continental Restaurant • • Navigation Parks and Recreation Navigation Continental Food • • Navigation Park and Recreation Navigation Fast Food • • Navigation Police Station Navigation Fast Food Restaurant • • Navigation Post Office Navigation French Restaurant •...
- Page 129 Destination Commands Shopping Locations • Navigation Convenience Store The following are destination commands. Confirm your choice of destination entry by responding • Navigation Department Store to the system with “Enter destination” when • Navigation Grocery Store prompted. You may also state “Add waypoint” or •...
- Page 130 Nametag Commands Guidance Commands You may have up to 10 nametag entries for phone Navigation louder, navigation softer: These book entries and 10 nametag entries for commands instruct the system to increase destinations. and decrease the volume of the voice guidance and voice recognition system prompts.
- Page 131 Navigation delete destination, navigation Radio: These commands instruct the system to cancel destination: These commands instruct turn the audio system on. the system to cancel the current destination. Radio turn off: These commands instruct the The system will request that you confirm. After the system to turn the audio system off.
- Page 132 Radio [select] (channel) XM, radio [select] CD [set] balance center: These commands (channel) satellite: These commands instruct the instruct the system to set the fade and balance to system to go to a specific channel on the XM™ the center position. band (if equipped) —...
- Page 133 DVD Changer Commands The word “middle” can be substituted in place of the word “center”. The following commands are only available when The word “fade” can be substituted in place of the a CD, MP3, or DVD is loaded. word “balance”. DVD: These commands instruct the system to The word “chapter”...
- Page 134 Heater help: This command instructs the system Select driver two: This command selects the to assist with climate control commands. Help memory settings for driver 2. The seat, steering commands will display on the map screen when wheel, and navigation system settings will change the vehicle is stopped.
- Page 135 Phone Commands “Phone Book Screen” under “Dialing and Making ® Calls Using Your Bluetooth Phone” under ® These commands will only function if a Bluetooth ® Bluetooth Phone on page 150 for more phone has been paired with the navigation information on how to store a nametag.
- Page 136 NOTES...
- Page 137 Section 5 Vehicle Customization Vehicle Customization ........ 138 Personalization .......... 138...
- Page 138 Vehicle Customization Language Personalization Your vehicle is equipped with personalization that allows you to program certain features to a preferred setting for up to two people. Features such as driver position, door lock personalization, passenger window personalization, chime personalization, driver information center, remote lock and unlock confirmation, suspension system configuration, and remote start climate control settings can be personalized.
- Page 139 This feature allows you to change the language If the screens appear in a language that you do that the vehicle (instrument panel cluster, not understand, do the following: HUD, Navigation system, DIC, etc.) is in. The 1. Turn off the vehicle. languages available are US English (male 2.
- Page 140 Entering the Personalization Menu 2. Press any button on the appropriate keyless access transmitter to identify yourself as Driver 1 or Driver 2. The driver number is shown on the back of the keyless access transmitter. 3. Press the CONFIG hard key. 4.
- Page 141 Personalization Menu Settings Off Mode If you choose not to use the Personalization Menu, the following defaults will be active on your vehicle: Feature Default Mode All Doors unlock in park All Doors unlock when PULLING front door handle Lock/Unlock Keyless Access All Doors lock eight seconds after last door closed off DELAY locking eight seconds after LOCK is pressed and last door closed on Lights flash at UNLOCK on...
- Page 142 Lock/Unlock Automatic Door Unlock When this feature is off, the doors will not unlock automatically and the doors will have to be unlocked before exiting the vehicle. When this feature or any of the following features are selected on, the button next to the name will appear highlighted.
- Page 143 Keyless Access Unlock FRONT door unlocks when PULLING front door handle: When you approach the vehicle with When this feature is off, the doors will not unlock your keyless access transmitter and pull the automatically when the outside door handle is driver’s or passengers front door handle the door pulled.
- Page 144 Lights/Horn Select this screen button to select the type of feedback desired when you use the keyless entry transmitter and to select the vehicle’s Twilight ® Sentinel delay time. Select any or all of the following options: Lights flash at UNLOCK: The exterior lamps will flash when the keyless access transmitter is used to unlock the vehicle.
- Page 145 Lights flash at LOCK: The exterior lamps will Horn chirps at LOCK: The horn will chirp once flash once when the keyless access transmitter is when the keyless access transmitter is used used to lock the vehicle. All doors must be to lock the vehicle.
- Page 146 Occupant Information Driver Greeting: You can choose between a personal greeting and a standard greeting for Driver 1 or Driver 2. This greeting is shown on the instrument cluster when you turn the vehicle on. If you choose to have a personal greeting, touch the Edit screen button.
- Page 147 Occupant Position Select this screen button to select the memory features you want activated automatically upon entering and exiting the vehicle. Select any or all of the following settings: Recall memory with START button activation: When on, the previously programmed seat, mirror, and steering column positions will be recalled when the START button is pressed.
- Page 148 Remote Start Select this screen button to select the features that remote start will activate. See “Remote Vehicle Start” under “Keyless Access System Operation” in the Index of your vehicle’s owner manual for more information. Select any or all of the following items: The Remote Start screen button must be highlighted in order to select the following options.
- Page 149 Section 6 Phone Phone ............150 ® Bluetooth Phone ........150...
- Page 150 Phone 3. Your phone must be in the discoverable mode ® and the Bluetooth feature powered on, to be found by the Bluetooth system in the ® Bluetooth Phone vehicle. This is normally in the phone settings Bluetooth option. The navigation system is equipped with ®...
- Page 151 PASS-Key allows you to edit the pairing Bluetooth set up screen. passkey used for your vehicle. The system default device name is “Cadillac STS” and the ® PASS-Key is set to “1234”. It is recommended ® that you change the default PASS-Key to a number that you can easily remember.
- Page 152 Receive: Select this screen button to have your (Page Up): Select this screen button to scroll ® Bluetooth system connect to your phone when you up the list one page at a time. are using your phone as the device to initiate (Page Down): Select this screen button to pairing.
- Page 153 ® Bluetooth Phone Screen (Bluetooth): Select this screen button to get to ® the Bluetooth screen. This information on this screen depends on the information received from the phone. Some (Call Status): This area will indicate the call phones may not support this feature. While in this status.
- Page 154 Dialing and Making Calls Using Your Last 10: This screen button will take you to a screen showing your last 10 calls either sent or ® Bluetooth Phone ® received using Bluetooth . You are able to place Once your phone has been set up, you are ready phone calls from this screen.
- Page 155 Phone Book Screen (Scroll Up): This screen button scrolls up the list one entry at a time. ® This screen allows access to your Bluetooth Phone Book where you can store names (Scroll Down): This screen button scrolls and phone numbers. Information in this screen down the list one entry at a time.
- Page 156 To add a new phone book entry, do the following: To add a nametag to a specific name: 1. Select the New screen button. 1. Select the (phone book) screen button. 2. Select a name or phone screen button entry. 2.
- Page 157 Last 10 Calls Screen Edit: This screen button allows you to edit an existing phone book entry. This screen shows either the last 10 calls that have been placed or the last 10 calls received by All (Delete All): This screen button deletes all ®...
- Page 158 Sent: Selecting this screen button will give you (Back): This screen button will return the the list of the last 10 calls sent from the system. screen to the previous page. Received: Selecting this screen button will (Scroll to End/Beginning): These screen give you the list of the last 10 calls received on buttons will allow you to scroll through the entry as the system.
- Page 159 Address ............56 Database Coverage Explanations ....90 Alpha-Numeric Keypad ........17 Destination ............ 55 Audio ............76 Dialing and Making Calls Using Your ® Audio Adjust ..........96 Bluetooth Phone ........154 Audio System ..........92 Dialing from Navigation Screens ....158 Auto Reroute ..........
- Page 160 Getting Started, Navigation ......6 Language ............ 138 Getting Started on Your Route ...... 71 Lights/Horn ..........144 Global Positioning System (GPS) ....87 Lock/Unlock ..........142 Guidance Volume .......... 14 Guidance Windows ........27 Magnetic Ride Control ........87 Map ..............
- Page 161 ® Navigation Phone, Bluetooth ........150 Getting Started ..........6 Phone Number ..........63 Menu ............33 Playing an Audio CD ........106 System Overview ......... 4 Playing an Audio or Video DVD ....112 Using the System ........16 Playing the Radio ..........
- Page 162 Screen Appearance ........83 Using an MP3 ..........108 Scrolling the Map .......... 20 Using Your Home or Preset Destinations ..13 Setting Radio Station Presets ......9 Setting the Region, Entering an Address and Point of Interest, and Storing a Home Destination and Preset Vehicle ............
Need help?
Do you have a question about the STS 2007 and is the answer not in the manual?
Questions and answers