Advertisement
Available languages
Available languages
Quick Links
Funktionen:
DCF77 - funkgesteuerte Uhrzeit
Uhrzeit im 12 oder 24 Stunden Zeitformat
Alarmfunktion
Schlummerfunktion (OFF(aus) oder 1~60 Minuten)
Batterieendanzeige
USB-Anschluss für das Aufladen von mobilen Geräten (5V1A)
Temperatur in °C oder °F
Luftfeuchtigkeit: Innen- und Aussenmessbereich:
20%RH ~ 95%RH
Temperatur:
— Innentemperatur-Messbereich:
-9.9°C (14.2°F) ~ 50°C (122°F)
— Aussentemperatur-Messbereich:
-25°C (-13°F) ~ 50°C (122°F)
— Frostalarm für Aussentemperatur
Speicherung von maximalen /minimalen Werten von Temperatur und Luftfeuchtigkeit
Funk-Aussensender:
— Wandanbringung oder Tischaufstellung
— 3 Kanäle auswählbar
— 433.92MHz RF Übertragungsfrequenz
— 60 Meter Übertragungsreichweite im Freifeld
Wettervorhersage durch Symbole
Stromversorgung:
Wetterstation:
Batterien: 2 x LR06 AA
Netzteil: 5V1.2A
Außensender:
Batterien:2 x LR06 AA
WS 9065 – Bedienungsanleitung
DE1
Advertisement

Related Manuals for Technoline WS 9065


Summary of Contents for Technoline WS 9065
- Page 1 WS 9065 – Bedienungsanleitung Funktionen: DCF77 - funkgesteuerte Uhrzeit Uhrzeit im 12 oder 24 Stunden Zeitformat Alarmfunktion Schlummerfunktion (OFF(aus) oder 1~60 Minuten) Batterieendanzeige USB-Anschluss für das Aufladen von mobilen Geräten (5V1A) Temperatur in °C oder °F ...
- Page 2 Aufbau: Wetterstation...
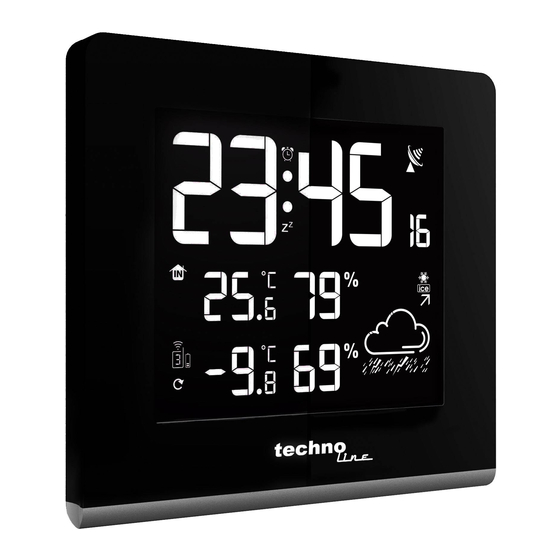
- Page 3 1: “Light/Snooze”-Taste 2: “Mode”-Taste 3: “MEM”-Taste 4: “+”-Taste 5: “-/Wave”-Taste 6: “Alarm ON/OFF”-Schalter 7: Netzteilanschluss 8: USB-Anschluss 9: “CH”-Taste 10:“loop”-Taste 11:“rainbow”-Taste 12:Uhrzeit 13:Batterieendanzeige der Wetterstation 14:Innentemperatur und –luftfeuchtigkeit 15:Batterieendanzeige des Aussensenders 16:Aussentemperatur und -luftfeuchtigkeit 17: Wettervorhersage-Symbol 18: Luftdrucktrend 19: Frostalarm-Symbol 20: DST-Zeitsymbol 21: Funkempfang-Symbol 22: Batteriefachabdeckung...
- Page 4 Inbetriebnahme: Öffnen Sie die Batteriefachabdeckung der Wetterstation Legen Sie 2 x AA Batterien unter Beachtung der Polarität [ “+” und “ –“ Markierungen] in das Batteriefach ein. Diese Batterien sind als Back-Up für das Netzteil gedacht. Verbinden Sie die Wetterstation mit dem enthaltenen Netzteil und stecken Sie das Netzteil in eine Haushaltssteckdose.
- Page 5 Drücken Sie die “Mode”-Taste um die Einstellung zu bestätigen und die Stundenanzeige blinkt. Drücken Sie die “+” und die “-” Taste um die Stunde einzustellen. Drücken Sie die “Mode”-Taste um die Einstellung zu bestätigen und die Minutenanzeige blinkt. Drücken Sie die “+”...
- Page 6 auszuwählen, wenn mehrere Aussensendersignale von der Station empfangen werden. Der Kanalschalter auf der Rückseite des Aussensenders muss passend zum gewünschten Kanal eingestellt werden. “CH“-Taste drücken “CH“-Taste “CH“-Taste “CH“-Taste drücken drücken drücken Automatisch Automatisch Automatisch Maximale/minimale Messwerte Drücken Sie die “MEM”-Taste und die maximalen Werte für Temperatur und Luftfeuchtigkeit werden angezeigt.
- Page 7 Sonnig Leicht bewölkt Bewölkt Regen Starker Regen / Gewitter Schnee Diese Wettersymbole sagen die mögliche Wettersituation für die nächsten 8 Stunden voraus und nicht das derzeitige Wetter. Hintergrundbeleuchtung Drücken Sie die “Light/snooze”-Taste während des Batteriebetriebs und die Hintergrundbeleuchtung leuchtet für 8 Sekunden auf. ...
- Page 8 nahe Baustellen inmitten hoher Gebäude in Betonbauten nahe elektrischer Geräte (Computer, Fernseher, etc) und metallischer Gegenstände in bewegten Fahrzeugen Platzieren Sie die Station an einem Ort mit optimalem Empfang, z.B. in der Nähe von Fenstern und entfernt zu metallischen oder elektrischen Gegenständen.
- Page 9 WS 9065 – Manual Features: DCF radio controlled time function Time in 12 or 24 hour format Alarm function Snooze function (OFF or 1~60min) Low battery indicator USB socket for mobile device charging(5V1A) Temperature in °C or °F format ...
- Page 10 Appearance description: Station...
- Page 11 1: “Light/snooze” touch button 2: ““mode” button 3: “MEM” button 4: “+” button 5: “-/Wave” button 6: Alarm ON/OFF switch 7: Adapter input socket 8: USB socket 9: “CH” button 10:“loop” button 11:“rainbow” button 12:time 13:Weather station low battery indicator 14:Indoor temperature and humidity 15:Remote sensor low battery indicator 16:Outdoor temperature and humidity...
- Page 12 Initial operation: Open the weather station battery compartment cover Insert 2 x AA batteries observing polarity [ “+” and “ –“ marks]. These batteries are intended as back-up for adapter. Insert the provided power adapter and connect to the power socket. ...
- Page 13 Please note: If there is no valid operation within 20 seconds, the clock automatically returns to the normal time mode. Alarm setting Push the “AL” switch to the "on" position, the LCD displays the “ ” icon. At the same time issued BI-BI sound (Except for RC), the alarm function is ON.
- Page 14 Press “CH“ button Press “CH“ Press “CH“ Press “CH“ Automatic Automatic Maximum/minimum values Press the “MEM” button once, the LCD will display maximum value of temperature/ humidity. The LCD will display the minimum value of temperature/humidity if press once “MEM” button again after the maximum value is displayed.
- Page 15 Sunny Slightly cloudy Cloudy Rainy Heavy rain Snowy The weather symbols indicate the probable weather over the next 8 hours and not the current weather. Background lighting In battery powered mode, touch the “Light/snooze” button and the backlight illuminates for 8 seconds.
- Page 16 near construction site among tall buildings inside concrete buildings near electrical appliances (computers, TV’s, etc) and metallic structures inside moving vehicles Place the station at a location with optimal signal, i.e. close to a window and away from metal surfaces or electrical appliances.
- Page 17 Guide d'utilisation - WS 9065 Caractéristiques : Fonction heure radio pilotée DCF Heure au format 24/12 heures Fonction d'alarme Fonction de rappel d’alarme (INACTIF ou de 1 à 60 min) Indicateur de faible niveau des piles ...
- Page 18 Description : Station...
- Page 19 Touche tactile «rétroéclairage/rappel d’alarme» Touche « MODE » Touche «MEM» Touche « + » Touche «-/Wave» Commutateur Activer/Désactiver l’alarme Prise d'entrée secteur Port USB Touche «CH» Touche «boucle» Touche «arc-en-ciel» heure Indicateur piles faibles de la station météo Température et humidité intérieures Indicateur piles faibles du capteur distant Température et humidité...
-
Page 20: Réglage Manuel De L'heure
Mise en marche : Ouvrez le compartiment à piles de la station météo Insérez 2 piles AA en respectant les polarités [marques « + » et « - »]. Ces piles servent de secours pour l’adaptateur. Insérez l’adaptateur secteur fourni et le brancher dans une prise secteur. ... - Page 21 Appuyez sur « mode » pour confirmer votre réglage, les minutes se mettent à clignoter. Utilisez les touches «+»/«-» pour régler les minutes. Appuyez sur la touche «mode» pour confirmer le réglage, les prévisions météo se mettent à clignoter.
- Page 22 Appuyez sur la touche « CH » Appuyez sur Appuyez sur Appuyez sur « CH » « CH » « CH » Automatique Automatique Automatique Valeurs maximales/minimales Appuyez sur la touche «MEM» pour afficher la température/humidité maximale. L’écran LCD affiche la température/humidité...
- Page 23 Ensoleillé Partiellement nuageux Nuageux Pluvieux Fortes pluies Neigeux Les symboles indiquent les prévisions météo pour les 8 prochaines heures. Rétroéclairage En mode fonctionnement sur piles, appuyez sur la touche «Rétroéclairage/Rappel d’alarme» pour allumer l’écran pendant 8 secondes. Appuyez sur la touche «arc-en-ciel» pour choisir différentes couleurs pour le rétroéclairage, la couleur change à...
- Page 24 au milieu de hauts bâtiments à l'intérieur d'un bâtiment en béton à proximité d'un appareil électrique (ordinateur, téléviseur, etc.) et d'une structure métallique à l'intérieur d'un véhicule en déplacement Placez la station à un endroit adapté pour une bonne réception des signaux radio, en l'occurrence près d'une fenêtre et loin de toute surface métallique et de tout appareil électrique.
- Page 25 Hinweis: Bedienungsanleitung in 8 Sprachen Zusätzlich zu dieser gedruckten Bedienungsanleitung können Sie die Bedienungsanleitung in 8 Sprachen auf der offiziellen Internetseite www.technoline.de herunterladen. Note: Instruction manual in 8 languages In addition to this printed user manual, you can download the user manual in 8 languages from the official website www.technoline.de .
Need help?
Do you have a question about the WS 9065 and is the answer not in the manual?
Questions and answers