Table of Contents
Advertisement
WIRELESS 868 MHz WEATHER STATION
Instruction Manual
INTRODUCTION:
Congratulations on purchasing this weather station with wireless 868 MHz transmission of
outdoor temperature and display of indoor temperature, weather forecast icon and weather
tendency indicator. It is further featuring a DCF-77 radio controlled clock and manual time
setting is available. With four easy to use function keys, this innovative product is ideal for
use in the home or office.
31
Advertisement
Table of Contents

Related Manuals for Technoline WS 9215


Summary of Contents for Technoline WS 9215
- Page 1 WIRELESS 868 MHz WEATHER STATION Instruction Manual INTRODUCTION: Congratulations on purchasing this weather station with wireless 868 MHz transmission of outdoor temperature and display of indoor temperature, weather forecast icon and weather tendency indicator. It is further featuring a DCF-77 radio controlled clock and manual time setting is available.
- Page 2 FEATURES: The Weather Station Hanging hole Display Battery compartment cover Function Keys Detachable stand DCF-77 Radio controlled time function with manual time setting options • DCF time reception ON/OFF • 24 hour display •...
- Page 3 Calendar (year, month and day display in setting mode only) • Time zone +/- 12 hours • Temperature display in degree Celsius (°C) • Indoor and outdor temperature with minimum/maximum records • Manual reset of minimum/maximum records • 3 weather forecast icons with weather tendency indicator •...
- Page 4 SETTING UP: Note: This weather station receives only one outdoor transmitter. First, insert the batteries into the temperature transmitter. (see “Install and replace batteries in the temperature transmitter“). Within 30 seconds, insert the batteries into weather station (see “Install and replace batteries in the weather station”).
- Page 5 Note: Daily DCF reception is done at 02:00 and 03:00 am every day. If the reception at 03:00 am is not successful, then at 04:00 and 05:00 and 06:00 am there are other tries, until one is successful. If the reception at 06:00 am is still not successful, then the next try takes place at 02:00 am next day.
-
Page 6: How To Install And Replace Batteries In The Temperature Transmitter
HOW TO INSTALL AND REPLACE BATTERIES IN THE TEMPERATURE TRANSMITTER The Temperature Transmitter uses 2 x AAA, IEC LR3, 1.5V batteries. To install and replace the batteries, please follow the steps below: Remove the battery compartment cover at the back of the transmitter. -
Page 7: Function Keys
FUNCTION KEYS: Weather station: The weather station has four easy to use function keys. SET key OUTDOOR key INDOOR/RESET key SET key Press and hold to enter manual setting modes: Time zone, manual time, calendar and • DCF time reception ON/OFF + key To change any values in manual set modes •... -
Page 8: Lcd Screen
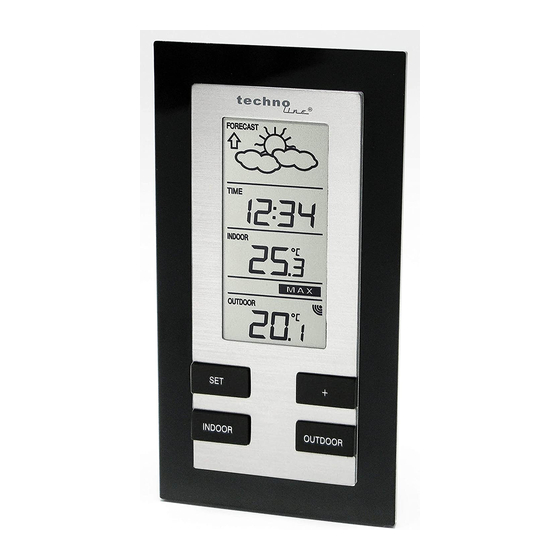
OUTDOOR key To display outdoor minimum/maximum temperature records • LCD SCREEN: Weather tendency indicator Weather forecast icon Radio controlled time reception icon Time Low battery indicator Indoor (weather station) Temperature in °C Maximum icon Minimum icon Low battery indicator Outdoor (transmitter) Temperature in °C Outdoor Reception... -
Page 9: Section 1 - Weather Forecast And Weather Tendency Icons
* When the outdoor signal is successfully received by the Weather Station, this icon will be switched on. (If not successful, the icon will not be shown in LCD) So user can easily see whether the last reception was successful (icon on) or not (icon off). For a better display clarity, the LCD screen is split into 4 sections. -
Page 10: Section 4 - Outdoor Temperature
Section 4 – OUTDOOR TEMPERATURE Display the current outdoor temperature • A signal reception symbol will be shown indicating that receiver is receiving outdoor • temperature Display of low battery indicator (transmitter) • DCF-77 RADIO CONTROLLED TIME The time base for the radio-controlled time is a Cesium Atomic Clock operated by the Physikalisch Technische Bundesanstalt Braunschweig which has a time deviation of less than one second in one million years. -
Page 11: Manual Settings
If the tower icon flashes, but does not set the time or the DCF tower does not appear at all, then please take note of the following: Recommended distance to any interfering sources like computer monitors or TV sets is •... -
Page 12: Time Zone Setting
TIME ZONE SETTING: Time zone (flashing) The time zone default is “0” hour. To set a different time zone: The current time zone value starts flashing. Use the + key to set the time zone. The range runs from 0, -1, -2… -12, 12, 11, 10…... -
Page 13: Calendar Setting
To set the clock: The hour digits start flashing in the time display section. Use the + key to adjust the hours and then press SET key to go to the minute setting. The minute will be flashing. Press the + key to adjust the minutes. Confirm with the SET key and enter the Calendar setting Note: The unit will still try to receive the signal despite a manual setting. - Page 14 To set the Year: Default year “2011” is flashing. Use the + key to change value. The year can be set from 2011 to 2039. Press SET key to confirm and enter Month Setting. Month (flashing) To set the Month: The month digit is flashing.
-
Page 15: Time Reception On/Off Setting
TIME RECEPTION ON/OFF SETTING In area where reception of the radio-controlled time (DCF time) is not possible, the time reception function can be turned OFF. The clock will then work as a normal Quartz clock. (Default setting is ON). Reception icon (flashing) “On”... - Page 16 Sunny Cloudy with sunny Rainy intervals For every sudden or significant change in the air pressure, the weather icons will update accordingly to represent the change in weather. If the icons do not change, then it means either the air pressure has not changed or the change has been too slow for the Weather station to register.
-
Page 17: The Weather Tendency Indicator
Note: After setting up, readings for weather forecasts should be disregarded for the next 12-24 hours. This will allow sufficient time for the Weather Station to collect air pressure data at a constant altitude and therefore result in a more accurate forecast. Common to weather forecasting, absolute accuracy cannot be guaranteed. - Page 18 that the air-pressure is increasing and the weather is expected to improve, but when indicator points downwards, the air-pressure is dropping and the weather is expected to become worse. Taking this into account, you will see how the weather has changed and how it is expected to change.
- Page 19 Minimum Maximum Indoor Indoor Temperature Temperature Record Record MAX icon MIN icon (flashing) (flashing) OUTDOOR MIN/MAX TEMPERATURE RECORDS The current outdoor temperature is displayed on the last section of the LCD. Press and release the “OUTDOOR” key repeatedly, the current outdoor temperature will alternate between the minimum, maximum temperature recordings and the current value.
-
Page 20: Low Battery Indicator
RESETTING INDOOR AND OUTDDOR MIN/MAX TEMPERATURE RECORDS In normal display mode, press and hold the INDOOR/RESET key for 3 seconds to reset in one time ALL indoor and outdoor minimum/maximum records to current values. LOW BATTERY INDICATOR Low battery indicator is displayed on the LCD when the batteries require changing. 868 MHz RECEPTION CHECK The weather station should receive the temperature data within 3 minutes after set-up. -
Page 21: Positioning The Weather Station
Note: When the 868MHz signal is received correctly, do not re-open the battery cover of either the transmitter or weather station, as the batteries may spring free from the contacts and force a false reset. Should this happen accidentally then reset all units (see Setting up above) otherwise transmission problems may occur. - Page 22 that it locks into place before releasing. Free standing With the detachable stand, the weather station can be placed onto any flat surface. POSITIONING THE TEMPERATURE TRANSMITTER: The transmitter is supplied with a holder that may be attached to a wall with the two screws supplied.
-
Page 23: Care And Maintenance
To wall mount: 1. Secure the bracket onto a desired wall using the screws and plastic anchors. 2. Clip the remote temperature sensor onto the bracket. Note: Before permanently fixing the transmitter wall base, place all units in the desired locations to check that the outdoor temperature reading is receivable. -
Page 24: Specifications
When cleaning the display and casings, use a soft damp cloth only. Do not use • solvents or scouring agents as they may mark the LCD and casings. Do not submerge the unit in water. • Special care shall be taken when handling a damaged LCD display. The liquid crystals •... -
Page 25: Liability Disclaimer
Outdoor temperature reception every 4 seconds Power consumption: Weather station 2 x AA, IEC, LR6, 1.5V Battery life cycle (Alkaline batteries recommended) : Approx. 24 months Temperature transmitter 2 x AAA, IEC, LR3, 1.5V Battery life cycle (Alkaline batteries recommended) : Approx. 12 months Dimensions (L x W x H) : Weather station 83 x 25 x 157 mm... - Page 26 As stated on the gift box and labeled on the product, reading the “User manual” is • highly recommended for the benefit of the user. This product must however not be thrown in general rubbish collection points. • The manufacturer and supplier cannot accept any responsibility for any incorrect •...
Need help?
Do you have a question about the WS 9215 and is the answer not in the manual?
Questions and answers