Advertisement
Quick Links
Installation Guide
Omada Gigabit VPN Router
Note: The image may differ from the actual product.
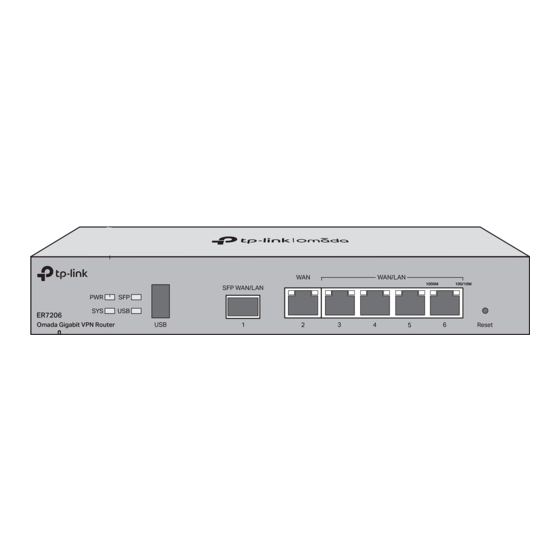
Hardware Overview
Front Panel
LED
Reset: Press and hold the button for 5 seconds, the SYS LED will flash
quickly, indicating the device is being reset to its factory default
settings.
Description
USB 3.0 for USB modem and USB storage device.
Gigabit SFP WAN/LAN port connecting to an SFP module.
By default, it is a WAN port.
You can configure it to a LAN port on the management page.
Gigabit RJ45 WAN port.
Gigabit RJ45 WAN/LAN ports.
By default, they are LAN ports connecting to local PCs or switches.
You can configure each port to a WAN port on the management page.
Secure the lock (not provided) into the security slot to prevent the device
from being stolen.
The router comes with a lightning protection mechanism.
Connect to the power outlet via the provided power adapter.
Hardware Connection
Connect via Ethernet
Modem
Note: To connect to the internet via another RJ45 WAN port (ports 3-6),
configure your desired port to WAN, then connect the port to the internet
via an RJ45 cable. Refer to FAQ-Q1 for more details.
Connect via fiber network
Connect to SFP WAN Slot
Fiber-Optic Cable
Software Configuration
The router supports two configuration options:
Standalone Mode: Configure and manage the router by itself.
Controller Mode: Configure and manage network devices centrally. It is recommended in large-scale networks, which consist of a large number of devices such as
access points, switches, and gateways.
Note: When the router is managed by a controller, configurations of the router will be overridden by the controller.
Connect to Port 2
SFP Module
To ask questions, find answers, and communicate with TP-Link users or
engineers, please visit https://community.tp-link.com to join TP-Link
Community.
For technical support and other information, please visit
https://www.tp-link.com/support, or simply scan the QR code.
© 2023 TP-Link 7106510167 REV2.0.0
Back Panel
Kensington
Grounding Terminal
Security Slot
Indication
On: Power is on.
Off: Power is off.
Slow Flashing: System is running normally.
Quick Flashing: The router is being reset.
On/Off: System is starting up or running abnormally.
On: Running at 1000 Mbps, but no activity.
Off: No device is linked to the corresponding port.
Flashing: Running at 1000 Mbps, and transmitting or receiving data.
For USB Modem:
Flashing: A modem is connected, and it is initializing.
On: The modem is loaded.
Off: No modem is inserted, or it is corrupted or incompatible.
For USB Storage:
On: A USB storage device is inserted and identified.
Off: No USB storage device is inserted, or it is corrupted or incompatible.
Green On: Running at 1000 Mbps, but no activity.
Green Flashing: Running at 1000 Mbps, and transmitting or receiving data.
Green Off: Not running at 1000 Mbps, or no device is connected to the
corresponding port.
Green
Yellow On: Running at 100/10 Mbps, but no activity.
Yellow Flashing: Running at 100/10 Mbps, and transmitting or receiving data.
Yellow
Yellow Off: Not running at 100/10 Mbps, or no device is connected to the
corresponding port.
Power Socket
Use the charger provided in the
package to power on the router
Advertisement

Related Manuals for TP-Link Omada ER7206 V2


Summary of Contents for TP-Link Omada ER7206 V2
- Page 1 Installation Guide Omada Gigabit VPN Router To ask questions, find answers, and communicate with TP-Link users or engineers, please visit https://community.tp-link.com to join TP-Link Note: The image may differ from the actual product. Community. For technical support and other information, please visit https://www.tp-link.com/support, or simply scan the QR code.
- Page 2 Launch a web browser and enter https://omada.tplinkcloud.com in the address c. Enter your TP-Link ID and password to log in. A list of controllers that have been bar. Enter your TP-Link ID and password to log in. Click + Add Controller and bound with your TP-Link ID will appear.
Need help?
Do you have a question about the Omada ER7206 V2 and is the answer not in the manual?
Questions and answers