
Subscribe to Our Youtube Channel
Related Manuals for IOGear GCS1932


Summary of Contents for IOGear GCS1932
- Page 1 User Manual 2/4-Port DisplayPort KVMP Switch with USB 3.1 Gen1 Hub and Audio GCS1932 / GCS1934 PART NO. M1423-b / M1424-b www.iogear.com...
- Page 2 ©2017 IOGEAR. All Rights Reserved. Part No. M1423-b / M1424-b. IOGEAR, the IOGEAR logo is trademarks of IOGEAR. Microsoft and Windows are registered trademarks of Microsoft Corporation. IOGEAR makes no warranty of any kind with regards to the information presented in this document. All information furnished here is for informational purposes only and is subject to...
-
Page 3: Table Of Contents
Table of Contents Introduction Package Contents Features Requirements Operating Systems Overview Hardware Setup Basic Operation Hotkey Operation Troubleshooting Compliance Information Limited Warranty Contact... -
Page 4: Introduction
GCS1932/1934 allows users to access two or four DisplayPort computers from a single USB keyboard, USB mouse, and DisplayPort monitor console. In addition to the front panel pushbuttons and hotkeys, IOGEAR’s GCS1932/1934 offers the latest mouse port-switching... -
Page 5: Features
Features • 2 (GCS1932) or 4 (GCS1934)-Port DisplayPort KVMP Switch with USB 3.1 Gen1 hub and 2.1 surround sound audio • One USB console controls two (GCS1932) or four (GCS1934) computers and two USB 3.0 peripherals • Computer selection via front panel pushbuttons, hotkeys, and mouse •... -
Page 6: Requirements
• Type A USB port • Audio ports (optional) Cables Use only the included IOGEAR DisplayPort KVM cable sets, designed specifically to work with the GCS1932/1934. Note: The quality of the display is affected by the quality and length of the cables. If you need additional cable set, please contact your dealer or IOGEAR to purchase IOGEAR approved cables. -
Page 7: Overview
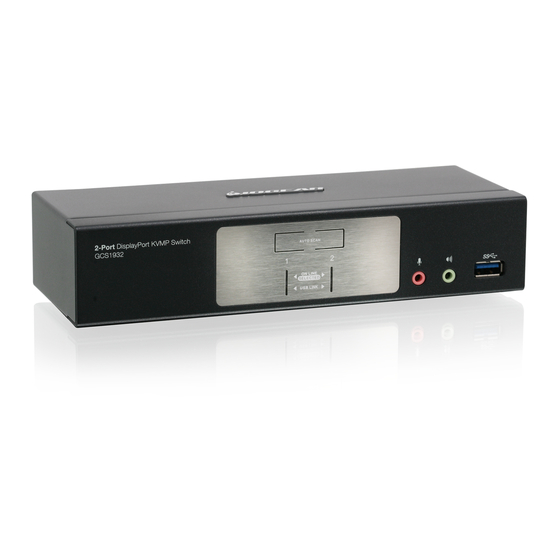
Overview GCS1932 Front View 2-Port DisplayPort KVMP Switch GCS1932 2-Port DisplayPort KVMP Switch GCS1932 GCS1932 Back View 4-Port DisplayPort KVMP Switch GCS1934 4-Port DisplayPort KVMP Switch GCS1934... - Page 8 GCS1934 Front View 4-Port DisplayPort KVMP Switch GCS1934 4-Port DisplayPort KVMP Switch GCS1934 GCS1934 Back View...
- Page 9 Each connector is marked with an appropriate icon to indicate its use. KVM Ports The KVM cables that the computers to the GCS1932/1934 are plugged into these ports. Each KVM port section is comprised of a microphone jack, speaker jack, USB type B socket and a DisplayPort connector.
-
Page 10: Hardware Setup
3. Connect the main microphone and speakers into the GCS1932/1934 microphone and speaker jacks located on the front side panel. The microphone and speakers connected into this front port have priority over those connected on the rear port of GCS1932/1934. 4. Connect the secondary microphone and speakers into the GCS1932/1934 Console microphone and speaker jacks located on the rear panel. - Page 11 GCS1932 Front View 2-Port DisplayPort KVMP Switch GCS1932 2-Port DisplayPort KVMP Switch GCS1932 GCS1932 Back View...
- Page 12 GCS1934 Front View 4-Port DisplayPort KVMP Switch GCS1934 4-Port DisplayPort KVMP Switch GCS1934 GCS1934 Back View...
-
Page 13: Basic Operation
Powering OFF and Restarting If it becomes necessary to Power OFF the GCS1932/1934, before switching it back ON, you must follow below steps: 1. Shut down or Power OFF all computers that are attached to the GCS1932/1934. -
Page 14: Hotkey Operation
Hotkey Operation IOGEAR’s GCS1932/1934 provides an extensive, easy-to-use, hotkey function for convenience in controlling and configuring KVM installation from the keyboard. Hotkeys provide asynchronous (independent) switching of the KVM, USB hub, and audio focus. Therefore, users can give one computer the KVM focus, another the USB hub focus, while a third has the audio focus. - Page 15 Auto Scan Mode GCS1932/1934’s Auto Scan feature allows you to monitor computer activities without switching from port to port manually. This feature automatically cycles the KVM focus through the computer ports at regular intervals. See table below for details.
- Page 16 Note: 1. The [n] stands for the number of seconds that the GCS1932/1934 should dwell on a port before moving on to the next port. Replace [n] with a number between 1 and 99 when entering this hotkey combination. 2. While Auto Scan Mode is in effect, ordinary keyboard and mouse functions are suspended –...
- Page 17 Alternate HSM Invocation Keys In some instances, the default hotkey settings conflict with programs running on your computer and in some instances the default hotkeys either do not exist on your keyboard (Mac keyboards do not have [Scroll Lock]), or are inconvenient to use, Hotkey Setting Mode allows you to select alternate configurations for the KVM’s hotkeys.
- Page 18 2. Press [X] [Enter] Note: This procedure is a toggle. To enable the Port Switching keys, repeat Step 1 and 2 Restore Default Settings To reset the GCS1932/1934 to its default hotkey settings: 1. Invoke HSM 2. Press [R][Enter] Alternative Manual Port Selection...
- Page 19 OFF. This feature is only supported when mouse emulation is also enabled. Power on Detection With Power on Detection, if the focus computer is powered OFF, the GCS1932/1934 will automatically switch to the next powered ON computer. Power on Detection can be enabled or disabled.
- Page 20 Keyboard Emulation Console keyboard port emulation/bypass feature supports most gaming/multimedia keyboards. The default setting is enabled. To disable: 1. Invoke HSM 2. Press [N] This procedure is a toggle. Repeat Step 1 and 2 to enable Keyboard Emulation Note: When keyboard emulation is disabled, the [M], [W], [F2], [F3], [F4], [F5], [F6], and [F10] are also disabled SPC Mode To set the keyboard/mouse to use SPC mode so that it can work under special operating...
- Page 21 Mac Keyboard Emulation The PC compatible (101/104 key) keyboard can emulate the functions of Mac keyboard. The emulation mapping are listed in table below. PC Keyboard Mac Keyboard [Shift] Shift [Ctrl] Ctrl [Ctrl][1] [Ctrl][2] [Ctrl][3] [Ctrl][4] [Alt] [Print Screen] [Scroll Lock] [Enter] Return [Backspace]...
- Page 22 In order to perform a firmware upgrade, need to use a computer that is not connected to the GCS1932/1934. To set GCS1932/1934 to Firmware Upgrade Mode: 1. From a computer that is not part of the KVM installation, go to www.iogear.com/product GCS1932 or www.iogear.com/product/GCS1934 to get a list of available Firmware...
- Page 23 KVM installation. 3. Disconnect the GCS1932/1934 from the KVM installation and power the switch OFF. 4. Connect one of the USB DisplayPort KVM cable set’s Type A USB connectors to a USB Type A port on the computer that is not part of your KVM installation.
- Page 24 3. Read the License Agreement and click “I Agree” button and click “Next” . 4. The Firmware Upgrade Utility main screen appears. The Utility inspects your installation. All the devices capable of being upgraded by the package are listed in the Device List panel. 5.
- Page 25 Click Finish to close the Firmware Upgrade Utility. 10. After a successful completion, the GCS1932/1934 will exit the Firmware Upgrade Mode and resets itself. Firmware Upgrade Fail If the Upgrade Succeeded screen does not appear, this means that the upgrade failed to complete successfully.
- Page 26 Specifications Chart Function GCS1932 GCS1934 Connections Computer Console Port Selection Pushbuttons, Hotkey, Mouse* Connectors Console Keyboard 1 x USB Type A (Black) Ports Video 1 x DisplayPort (White) Mouse 1 x USB Type A (Black) Speakers 1 x 3.5 mm Mini Stereo Jack (Green; Front) 1 x 3.5 mm Mini Stereo Jack (Green;...
-
Page 27: Troubleshooting
In addition, updating the GCS1932/1934’s firmware may solve problems that have been discovered and resolved since the prior version was released. If your product is not running the latest firmware version, we strongly recommend that you upgrade. -
Page 28: Compliance Information
Compliance Information FCC Statement This equipment has been tested and found to comply with the limits for a Class A digital device, pursuant to Part 15 of the FCC Rules. These limits are designed to provide reasonable protection against harmful interference when the equipment is operated in a commercial environment. -
Page 29: Limited Warranty
Limited Warranty Warranty Information This product carries a 3 Year Limited Warranty. For the terms and conditions of this warranty, please go to http://www.iogear.com/support/warranty Register online at https://www.iogear.com/registration Important Product Information Product Model Serial Number... -
Page 30: Contact
Contact WE’RE HERE TO HELP YOU! NEED ASSISTANCE SETTING UP THIS PRODUCT? Make sure you: 1. Visit www.iogear.com for more product information 2. Visit www.iogear.com/support for live help and product support IOGEAR www.iogear.com iogear.custhelp.com support@iogear.com... - Page 31 This page intentionally left blank...
- Page 32 ©2017 IOGEAR ®...
Need help?
Do you have a question about the GCS1932 and is the answer not in the manual?
Questions and answers