
Related Manuals for NI 1358


Summary of Contents for NI 1358
- Page 1 National Instruments USB-1358 Manual Get Pricing & Availability at ApexWaves.com Call Today: 1-800-915-6216 Email: sales@apexwaves.com https://www.apexwaves.com/modular-systems/national-instruments/accessories/USB-1358...
- Page 2 Both SCXI and USB kits connect to an SCXI switch with a 10-pin rear connector. Note Refer to the NI Switches Getting Started Guide to determine the switches and switch controllers that your kit supports. The NI 1359 kit (2 slots) consists of the following components: •...
-
Page 3: Installing The Kit
(4 Screws) Figure 1. Components of the NI 1357/1358/1359 Controller/Adapter Kit Installing the Kit Install NI-DAQ 7.4 or later before you install the NI 1357/1358/1359 kit. Note Complete the following steps to install the NI 1357/1358/1359 kit: Power off and unplug the SCXI chassis. Follow proper electrostatic discharge (ESD) precautions and ensure high voltage analog backplane is not connected before installing the hardware. - Page 4 Insert the switch module into the SCXI slot. Screw the switch front panel to the chassis front panel mounting rail. Attach the NI 1359, included with the kit, to the rear of the SCXI switch module. Ensure that the 10-pin rear connector of the switch module connects to the lower, right 10-pin rear connector of the NI 1359 cabled to the computer or the switch controller.
- Page 5 To auto-detect the NI USB-1359 and auto-create the SCXI chassis in Measurement & Automation Explorer (MAX), power on the SCXI chassis before you cable the NI USB-1359 to the computer. If you are using an NI PXI-1010 chassis, MAX auto-detects this chassis as an NI SCXI-1000 chassis.
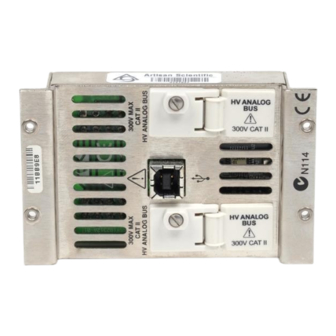
- Page 6 • USB kits—Connect one end of the USB cable to the NI USB-1359 switch controller and the other end to a USB hub or port on the computer as shown in Figure 5. 300V MAX 300V MAX CAT II CAT II...
- Page 7 • USB kits—For every NI USB-1359 in the configuration, connect one end of a USB cable to the NI USB-1359 and the other end to a USB hub or port on the computer. NI 1357/1358/1359 Kit Installation Guide...
- Page 8 If you are using NI-DAQmx to configure an SCXI switch module cabled to an NI USB-1357/1358/1359 kit and the kit was cabled before the chassis was powered on, the chassis is not auto-detected and does not appear in MAX. Complete all of the following steps to create your switch module and the chassis, and, subsequently, configure the switch module.
- Page 9 Figure 7. Configuring the Create New SCXI Dialog Box Create a new SCXI chassis: If you are using an NI PXI-1010 chassis and the switch controller is not in the Note rightmost PXI slot, create the chassis as an NI SCXI-1000 in MAX.
- Page 10 Configure the Details dialog box for an SCXI switch module: Note During scanning, the NI SCXI-1127/1128 can connect to the HVAB. To configure the switch module to automatically connect to the HVAB during scanning, enable the optional checkbox in the Details dialog box.
-
Page 11: Specifications
Terminal to terminal .......300 V or VDC Maximum Current Maximum current (per channel) .....2 ADC, 2 AAC Bus Interface USB specification ........USB 2.0 full-speed USB bus speed........12 Mb/s USB Power Requirements 5 VDC.............25 mA typical, 100 mA max NI 1357/1358/1359 Kit Installation Guide ni.com... - Page 12 NI SCXI-1129 (150 V, CAT I) in Slot 2 The NI SCXI-1127 does not share the HVAB with the NI SCXI-1129. Therefore, the NI SCXI-1127 can operate at the full rating (300 V, CAT II). Example 3 NI SCXI-1000 chassis...
- Page 13 Certification column. National Instruments, NI, ni.com, and LabVIEW are trademarks of National Instruments Corporation. Refer to the Terms of Use section on ni.com/legal for more information about National Instruments trademarks. Other product and company names mentioned herein are trademarks or trade names of their respective companies.
Need help?
Do you have a question about the 1358 and is the answer not in the manual?
Questions and answers