Table of Contents
Advertisement
Quick Links
Advertisement
Table of Contents

Related Manuals for NI PXIe-8880


Summary of Contents for NI PXIe-8880
- Page 1 Artisan Technology Group is your source for quality new and certified-used/pre-owned equipment SERVICE CENTER REPAIRS WE BUY USED EQUIPMENT • FAST SHIPPING AND DELIVERY Experienced engineers and technicians on staff Sell your excess, underutilized, and idle used equipment at our full-service, in-house repair center We also offer credit for buy-backs and trade-ins •...
-
Page 2: Table Of Contents
GETTING STARTED GUIDE NI PXIe-8880 This document includes instructions for installing and configuring your NI PXIe-8880 embedded controller. Contents Getting Started.......................... 2 Unpacking......................... 2 Electrical........................... 2 Preparing the Environment....................2 Shock and Vibration......................3 Installing an OS.........................3 Installing the NI PXIe-8880 into a PXI Express Chassis..........3 LabVIEW RT........................ -
Page 3: Getting Started
If you experience CPU frequency variation, turn your chassis fans on High, using the fan speed selector switch on the rear of the chassis. 0 to 45 °C when used with the NI PXIe-1071, NI PXIe-1078 (with kit part number 158034A-01), or NI PXIe-1086 chassis. -
Page 4: Shock And Vibration
MIL- PRF-28800F, Class 3.) Installing an OS NI PXIe-8880 controllers include a preinstalled OS. In some cases, you may want to install a different OS. When doing so, consider the following guidelines. Installing from a USB CD/DVD-ROM The NI PXIe-8880 supports the installation of Windows 7 from a USB CD/DVD-ROM. - Page 5 1. Protective Screw Cap (4X) Make sure the injector/ejector handle is in its downward position. Align the NI PXIe-8880 with the card guides on the top and bottom of the system controller slot. Caution Do not raise the injector/ejector handle as you insert the NI PXIe-8880.
-
Page 6: Labview Rt
Raise the injector/ejector handle until the module firmly seats into the backplane receptacle connectors. The front panel of the NI PXIe-8880 should be even with the front panel of the chassis. Tighten the four bracket-retaining screws on the top and bottom of the front panel to secure the NI PXIe-8880 to the chassis. - Page 7 Open Measurement & Automation Explorer (MAX) on another computer in the same subnet and expand the Remote Systems branch. MAX lists the PXI Express controller as the model name of the controller followed by the MAC address (for example, NI- PXIe-8880 00802f108562).
- Page 8 If you are not using LabVIEW RT, these switches should remain in the OFF position. The controller reads these switches only after a system reset. The NI PXIe-8880 controller includes the following LabVIEW RT configuration switches: • Switch 1—Boot LabVIEW RT: Set this switch to ON to boot LabVIEW RT.
-
Page 9: Drivers And Software
NIDRIVERS Services drivers preinstalled on the controller. Data Storage The NI PXIe-8880 has the following data storage features: 8 | ni.com | NI PXIe-8880 Getting Started Guide Artisan Technology Group - Quality Instrumentation ... Guaranteed | (888) 88-SOURCE | www.artisantg.com... -
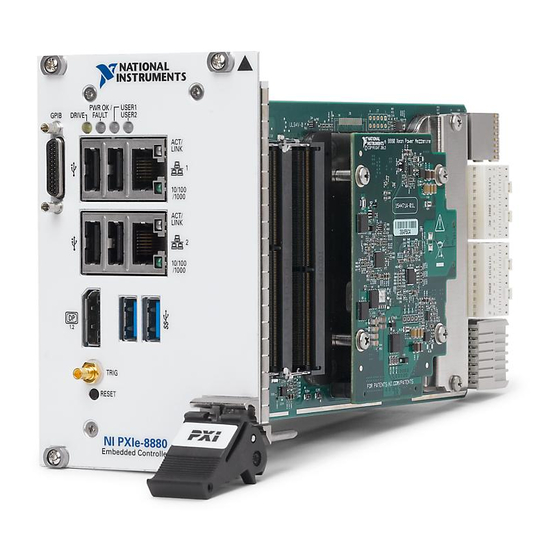
Page 10: Ni Pxie-8880 Front Panel
USB storage support – USB CD/DVD-ROM, mass storage device, or floppy drive NI PXIe-8880 Front Panel The following figure shows the front panel layout of the NI PXIe-8880. Figure 4. NI PXIe-8880 Front Panel Connectors 1. Reset Button 5. GPIB Connector 2. - Page 11 488.2 PXI Express Trigger Connectivity The SMB connector on the NI PXIe-8880 front panel can connect to or from any PXI Express backplane trigger line. A trigger allocation process is needed to prevent two resources from connecting to the same trigger line, resulting in the trigger being double-driven and possibly damaging the hardware.
-
Page 12: Pxi Express Chassis Configuration
For NI PXI Express chassis and controllers, these .ini files are provided as part of the NI PXI Platform Services software included with your controller. System integrators, configuration utilities, and device drivers can use these .ini files. -
Page 13: Removing The Ni Pxie-8880 From A Pxi Express Chassis
Slide the unit out of the chassis. Cleaning Use a dry, low-velocity stream of air to clean the NI PXIe-8880 controller. If needed, use a soft, nonmetallic brush for cleaning around components. Make sure that the device is completely dry and free from contaminants before returning it to service. -
Page 14: Boot Options
Can I use the internal Serial ATA drive and an external hard drive at the same time? Yes. Refer to the BIOS Setup Utility section of the NI PXIe-8880 User Manual for more information. Boot Options What devices can I boot from? The NI PXIe-8880 can boot from the following devices: •... -
Page 15: Cables And Connections
How do I plug both a PS/2 mouse and PS/2 keyboard into the controller? The NI PXIe-8880 has no PS/2 connector, and you need to use a USB Y-splitter cable as shown below, or a similar device, to connect both a PS/2 mouse and PS/2 keyboard. National Instruments part number 778713-01 is such a cable and is available through the online catalog at ni.com/products. -
Page 16: Upgrade Information
Upgrade Information How do I upgrade system memory? You can change the amount of installed RAM on the NI PXIe-8880 by upgrading the DDR4 SO-DIMMs. Complete the following steps to upgrade the RAM. Remove the NI PXIe-8880 from the PXI Express chassis. - Page 17 My NI PXIe-8880 does not have an internal floppy drive. Is there a way to use an external drive? Yes. The NI PXIe-8880 controller supports and can boot from USB floppy drives. Refer to the Boot Options section for more information. A USB floppy drive is available from National Instruments, part number 778492-02.
-
Page 18: Pxi Express Configuration
• Recover the hard drive on the controller. • Make sure the RAM is properly seated. NI PXIe-8880 Getting Started Guide | © National Instruments | 17 Artisan Technology Group - Quality Instrumentation ... Guaranteed | (888) 88-SOURCE | www.artisantg.com... -
Page 19: What If I Can't See The Video
If you are using MAX to configure your PXI system, you must install the PXI Platform Services software on your controller to identify NI PXI and PXI Express chassis and modules in MAX. You can install PXI Platform Services from the software CD included with your controller or from ni.com/downloads. -
Page 20: Worldwide Support And Services
National Instruments product. Product registration facilitates technical support and ensures that you receive important information updates from NI PXIe-8880 Getting Started Guide | © National Instruments | 19 Artisan Technology Group - Quality Instrumentation ... Guaranteed | (888) 88-SOURCE | www.artisantg.com... - Page 21 . You can find information about patents.txt ni.com/patents end-user license agreements (EULAs) and third-party legal notices in the readme file for your NI product. Refer to the Export Compliance Information at for the National Instruments global trade compliance policy and ni.com/legal/export-compliance...
- Page 22 Artisan Technology Group is your source for quality new and certified-used/pre-owned equipment SERVICE CENTER REPAIRS WE BUY USED EQUIPMENT • FAST SHIPPING AND DELIVERY Experienced engineers and technicians on staff Sell your excess, underutilized, and idle used equipment at our full-service, in-house repair center We also offer credit for buy-backs and trade-ins •...
Need help?
Do you have a question about the PXIe-8880 and is the answer not in the manual?
Questions and answers