
Related Manuals for Honda UM536


Summary of Contents for Honda UM536
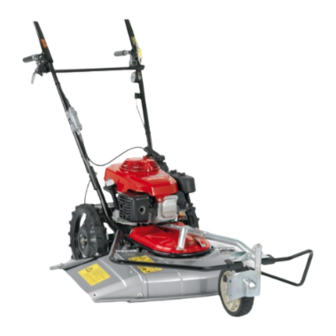
- Page 1 HSS2103 (V03A) WEED MOWER · UM536 UM616 OWNER'S MANUAL MANUEL DE L'UTILISATEUR BEDIENUNGSANLEITUNG MANUAL DEL PROPIETARIO MANUALE DELL'UTENTE...
- Page 2 This manual covers the operation and maintenance of the Honda LAWNMOWER UM536/UM616. Honda Motor Co., Ltd. reserves the right to make changes at any time without notice and without incurring any obligation. No part of this publication may be reproduced without written permission.
-
Page 3: Table Of Contents
8. MOWING..........................37 9. STOPPING THE ENGINE ....................40 10. MAINTENANCE........................41 11. TRANSPORTING/STORAGE.....................57 12. TROUBLESHOOTING......................60 13. SPECIFICATIONS ........................61 MAJOR Honda DISTRIBUTOR ADDRESSES .........Inside back cover ‘‘UK Declaration of Conformity’’ CONTENT OUTLINE.........Inside back cover ‘‘EC Declaration of Conformity’’ CONTENT OUTLINE .........Inside back cover... -
Page 4: Safety Instructions
1. SAFETY INSTRUCTIONS To ensure safe operation For your safety and safety of others, pay special attention to these precautions: • Honda lawnmower is designed to give safe and dependable service if operated according to instructions. Read and understand the Owner’s Manual before operating the mower. - Page 5 • Keep all persons and pets away from the mower area. • Disconnect the spark plug cap to prevent any possibility of accidental starting. Wear heavy gloves to protect your hands from the cutting means when cleaning the cutting means or when inspecting or replacing the cutting means.
- Page 6 To ensure safe operation Operator Responsibility • Never attempt to modify the mower. It can cause an accident as well as damage to the mower and appliances. Tampering with the engine voids the EU type-approval of this engine. – Do not connect an extension to the muffler. –...
- Page 7 • Avoid operating the equipment in wet grass, where feasible. • While mowing, always keep the safety distance to the cutting means, which is provided by the handle length. • Walk, never run. Do not let yourself be pulled by the mower. •...
- Page 8 • Do not use the machine with worn or damaged parts. Parts must be replaced, not repaired. Replace worn or damaged parts with Honda Genuine parts. Cutting means must always bear the mark Honda and the reference number. Non equivalent quality parts may damage the machine and be prejudicial to your safety.
- Page 9 To ensure safe operation Thrown Object Hazard Objects hit by the rotating cutting means can be thrown from the mower with great force, and may cause serious injury. • Thoroughly inspect the area where the equipment is to be used and remove all objects which may be thrown by the machine (stones, branches, wires, bones, etc...).
- Page 10 To ensure safe operation • Never store the equipment with gasoline in the tank inside a building where fumes may reach an open flame, spark or high temperature source. • Allow the engine to cool before storing in any enclosure. •...
-
Page 11: Safety Label Locations
2. SAFETY LABEL LOCATIONS Your mower must be used with care. Therefore, decals have been placed on the machine, to remind you pictorially of main precautions to take during use. Their meaning is explained below (see page 3). These decals are considered as a part of the mower. Should one become detached or unreadable, contact your servicing dealer for its replacement. - Page 12 [UM616] DRIVE CLUTCH LEVER CUTTING-MEANS CONTROL LEVER LOCK LEVER (EE2 type) THROTTLE LEVER SHIFT LEVER BRAKE LEVER (EBE2 type) PARKING BRAKE LEVER (EBE2 type) AIR CLEANER ENGINE OIL FILLER CAP/ DIPSTICK SPARK PLUG CAP ENGINE OIL DRAIN BOLT MUFFLER SIDE RUBBER DISCHARGE CHUTE CUTTING HEIGHT ADJUSTING FRONT WHEEL...
-
Page 13: Controls
The throttle lever controls engine speed from LOW (idle) to HIGH (max. speed). Use when starting the engine, while operating the mower, or when stopping the engine. CHOKE position is for starting a cold engine. [UM536] HIGH CHOKE THROTTLE LEVER... - Page 14 2. Cutting-means control lever The cutting-means control lever is operated in two ways: • The cutting means will start to rotate when the cutting-means control lever is squeezed while squeezing the lock lever (yellow mark). • Releasing the cutting-means control lever will cause the cutting means to stop rotating, allowing the lock lever to return to the LOCK position automatically.
- Page 15 3. Drive clutch lever The mower will start to move when the drive clutch lever is squeezed and will stop when the lever is released. MOVE STOP DRIVE CLUTCH LEVER STOP MOVE 4. Fuel valve lever The fuel valve lever is used to open or close the fuel passage from the fuel tank to the carburetor.
- Page 16 5. Cutting height adjusting levers Cutting height can be adjusted in 4 stages by changing the height of the front and rear wheels. Adjust the cutting height by operating these levers before mowing (see page 31). CUTTING HEIGHT CUTTING HEIGHT ADJUSTING LEVER ADJUSTING LEVER FREE...
- Page 17 7. Gear shift lever (UM536) This lever is used to change mower speed in forward. It has two positions. 1st: 0.5 m/sec GEAR SHIFT LEVER 2nd: 0.8 m/sec 8. Shift lever (UM616) The shift lever controls the mower’s maximum drive speed. Move the shift lever to select the pace at which you normally mow in open areas.
- Page 18 9. Brake lever (EBE2 type) The brake is provided to aid in changing direction or adjusting speed when mowing up and down the face of the grade or driving down a slope. BRAKE LEVER...
- Page 19 10. Parking brake lever (EBE2 type) You can use the lever to lock the lawnmower when parking on a level surface or transporting it. Squeeze the brake lever until it is locked in place, and then lock the parking brake lever. PARKING LOCK BRAKE LEVER...
-
Page 20: Pre-Operation Checks
Lubrication oil specifications necessary to maintain the performance of the emissions control system: Honda genuine oil. CAUTION: Using nondetergent oil or 2-stroke engine oil could shorten the engine’s service life. - Page 21 2. Check the fuel level Remove the fuel tank cap and check that the fuel tank is filled to the upper limit of fuel level. If the level is low, fill up the fuel tank to the upper level. Use automotive unleaded gasoline with a Research Octane Number of 91 or higher (a Pump Octane Number of 86 or higher).
- Page 22 Gasolines containing alcohol If you decide to use a gasoline containing alcohol (gasohol), be sure its octane rating is at least as high as that recommended by Honda. There are two types of ‘‘gasohol’’: one containing ethanol, and the other containing methanol.
- Page 23 3. Check the air cleaner elements CAUTION: Never run the engine without the air cleaner; rapid engine wear will result. 1. Remove the wing nuts to remove the air cleaner cover. 2. Remove the air cleaner elements. If the elements are dirty, follow the cleaning procedure described on page 46. CAUTION: After servicing the air cleaner elements, reinstall the air cleaner cover securely.
- Page 24 4. Check the cutting means Before each use, check the cutting means for damage or excessive wear. To avoid severe personal injury, disconnect the spark plug cap to prevent accidental starting, and wear heavy gloves to protect your hands from the cutting means.
- Page 25 • Never operate the mower with a cutting means that is cracked or notched at the base of its upturned rear edge. CAUTION: • Use Honda Genuine replacement cutting means, or equivalent. • To reduce the possibility of weakening the cutting means, or causing imbalance or poor cutting performance, sharpening should be performed by your servicing dealer.
- Page 26 5. Check all protectors and guards 1. Inspect the protectors and guards to be sure that they are correctly installed and are not damaged. If a protector or guard is damaged, replace it before using the mower. Never use the mower without its protector. Stones or other foreign objects thrown outward by the cutting means could cause personal injury or property damage.
-
Page 27: Starting The Engine
2. Turn the fuel valve lever ON. FUEL VALVE LEVER 3. Move the throttle lever to the CHOKE position. NOTE: When the engine is warm or the air temperature is high, move the throttle lever to the LOW position. [UM536] [UM616] CHOKE CHOKE CHOKE CHOKE... - Page 28 Otherwise, the starting mechanism might be damaged. While the engine is in operation, don’t pull the starter grip or damage may result. 5. As the engine warms up, move the throttle lever to the LOW position. [UM536] [UM616] THROTTLE LEVER...
-
Page 29: Operation
Cutting height can be adjusted in 4 stages by operating the front and rear cutting height adjusting levers. (Cutting height is subject to change according to the condition of the ground surface.) UM536: 25 mm, 40 mm, 60 mm, 85 mm UM616: 20 mm, 35 mm, 55 mm, 80 mm NOTE: Adjust the front and rear cutting height adjusting levers to the same position. - Page 30 –2. Step on the cutting height adjusting lever to release the lock. –3. Move the handle up or down to adjust the cutting height. –4. Remove your foot from the cutting height adjusting lever to lock it. [UM536] [UM616] 85 mm 80 mm...
- Page 31 2. Move the shift lever to the desired shift lever position. GEAR SHIFT LEVER (UM536) ······ ······ FAST ······ FAST SLOW SHIFT LEVER ······ SLOW (UM616) 3. Move the throttle lever to the HIGH position. [UM536] [UM616] HIGH HIGH HIGH...
- Page 32 4. Unlock the lock lever then squeeze the cutting-means control lever. · · · · · · · · · · ROTATE LOCK LEVER CUTTING-MEANS CONTROL LEVER 5. Squeeze the drive clutch lever. · · · · · · · ·...
- Page 33 7. To stop the mower on a down slope, release the drive clutch lever and squeeze the brake lever (EBE2 type only). BRAKE LEVER DRIVE CLUTCH LEVER NOTE: • Be sure to disengage the drive clutch before applying the brake. Damage to the transmission mechanism could result if the brake and drive clutch levers are operated simultaneously.
- Page 34 8. When parking, use the parking brake lever to lock the brake lever (EBE2 type only). To lock the brake lever, while squeezing the brake lever pull the parking brake lever up. PARKING LOCK BRAKE LEVER Squeeze the brake lever. Pull the parking brake lever up.
-
Page 35: Mowing
8. MOWING On slopes When mowing on a slope, be sure to lock the front wheel securely with the wheel lock pin so that it cannot move from side to side. To lock the wheel: Position the front wheel so that it is right beneath the wheel stays. Remove the clip and press the lock pin into place. - Page 36 <Cutting pattern> In order to discharge the cuttings as efficiently as possible, use one of the following recommended patterns. (1) (CLOCKWISE) * When using this pattern, the mower will begin to discharge the cuttings more efficiently after it has cleared the central area. (COUNTERCLOCKWISE) Discharge direction...
- Page 37 NOTE: When mowing, it is important to keep the cutting means turning rapidly. Be sure to take the type of grass and the nature of the terrain into account when selecting engine speed and transmission settings. If the engine slows down while mowing, use one of the following procedures. •...
-
Page 38: Stopping The Engine
9. STOPPING THE ENGINE 1. Release both levers. 2. Move the throttle lever to the STOP position. [UM536] STOP [UM616] STOP 3. Move the fuel valve lever to the OFF position. FUEL VALVE LEVER... -
Page 39: Maintenance
Replacement parts which are not of equivalent quality may damage the mower. Periodic inspection and adjustment of the Honda UM536/UM616 are essential if high level performance is to be maintained. Regular maintenance will also help to extend service life. The required service intervals and the kind of maintenance to be performed are described in the chart on the following page. - Page 40 Rear protector rubber Check Outer surface under housing Clean Cutting-means belt Check-adjust o (2) Cutting-means control cable Check-adjust Drive clutch cable (UM536) Check-adjust Shift cable (UM616) Check-adjust Throttle cable Check-adjust o (2) Brake cable (EBE2 type only) Check Adjust...
-
Page 41: Transporting/Storage
11. TRANSPORTING/STORAGE Transporting To prevent fire hazard, turn the fuel valve lever to OFF and drain fuel from the fuel tank before loading the mower on a trailer for transportation. Cleaning of parts behind belt cover. When the mower is to be stored or left standing for an extended period of time, remove the belt cover and clean the parts behind the cover as follows: –1. -
Page 42: Troubleshooting
12. TROUBLESHOOTING Engine fails to start: 1. No fuel. Add fuel. 2. Spark plug faulty or Regap plug or replace improperly gapped. (see page 50). 3. Spark plug cap loose or Check spark plug cap. disconnected. 4. Fuel not reaching Check the position of the fuel valve lever carburetor. -
Page 43: Specifications
Carbon dioxide (CO2) Please refer to "CO2 Information List" on emissions** www.honda-engines-eu.com/co2 * The power rating of the engine indicated in this document is the net power output tested on a production engine for the engine model and measured in... - Page 44 Frame MODEL UM536K3 UM616K3 Type EBE2 EBE2 Dimensions 1,780 mm (70.1 in) 1,790 mm (70.5 in) Length Width 860 mm (33.9 in) 970 mm (38.2 in) Height 1,080 mm (42.5 in) 1,080 mm (42.5 in) Dry mass 63 kg 68 kg 72 kg 76 kg [Dry weight]...
Need help?
Do you have a question about the UM536 and is the answer not in the manual?
Questions and answers