Table of Contents
Advertisement
Advertisement
Table of Contents

Related Manuals for Honda HR21


Summary of Contents for Honda HR21
- Page 3 This HR21K2 meets C.P.S.C. blade safety requirement for walk behind rotary power mowers. This manual covers operation and maintenance of the HONDA ROTARY MOWER HR2 1. All information in this publication is based on the latest product information printing. Honda Motor Co., Ltd. reserves the right to make changes at any time without notice and without incur- ring any obligation.
- Page 4 Thank you for purchasing a Honda Lawn Mower. If any problems occur, or if there are any questions concerning the mower, consult an authorized HONDA dealer. No part of this publication may be reproduced The Honda rotary mower is designed to give safe and dependable service intended use: mowing (cutting) grass, and bagging cut grass when equipped with the grass bag.
-
Page 5: Table Of Contents
CONTENTS ... GENERAL SAFETY COMPONENT IDENTIFICATION THECONTROLS OPERATION TRANSPORTING/STORAGE MAINTENANCE TROUBLESHOOTING SPECIFICATIONS HR21... -
Page 6: General Safety
GENERAL SAFETY * Know how to stop the engine quickly and under- stand operation of all the controls. anyone to operate the mower without struction. * The safety shield and side guard are for your pro- tection; keep them in place at all times. * The blade is sharp and dangerous. -
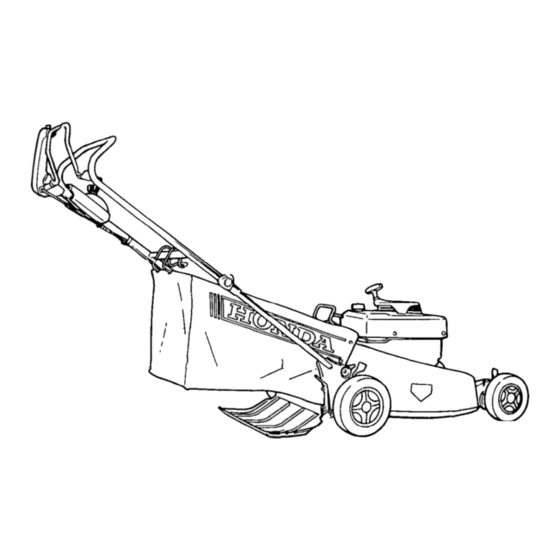
Page 7: Component Identification
COMPONENT IDENTIFICATION GRASS BAG HANDLE LOCK LEVER FUEL TANK CAP RECOIL STARTER CUTTING HEIGHT ADJUSTING LEVER MUFFLER ’ S-XAM type ROTO-STOP LEVER THROTTLE LEVER BELT COVER HR21... - Page 8 DRIVE CLUTCH LEVER- GRASS BAG DISCHARGE SAFETY SHIELD HR21 c-” -HANDLE ANDLE HANDLE JOINT ___-_------ OIL FILLER SIDE GUARD LOCK LEVER S-XAM type...
-
Page 9: Thecontrols
T’o put the cutting blade into operation, press the button on top of the ROTO-STOP lever and push the lever forward, holding it against the handlebar. The blade will stop when the ROTO-STOP lever is released. THROTTLE CONTROL LEVER HR21... - Page 10 3. Drive Clutch (S-XAM TYPE only) For self-propelled operation, clutch lever forward and hold it against the handlebar. The drive clutch lever holds the ROTO-STOP lever forward during self-propelled The button on top of the ROTO-STOP lever must be pressed before either of these levers can be moved forward - the cutting blade must be put into operation whenever the mower is’to be self-propelled.
-
Page 11: Operation
OPERATION The HR21 may be used either with the grass bag, or without the bag as a mulching mower. The following suggestions and rules are intended to help you operate your Honda HR21 under the safest conditions possible. Be alert and exercise the same care using the mower as you would using any other power tool. - Page 12 BEFOREYOUSTARTTHEMOWER 1.. Check the engine oil level. p?ciEq * Engine oil is a major jktor formance and service life. Non-detergent or veget- able oils are not recommended. * Running the engine with insufficient serious engine damage. Use Honda-4-stroke, or an equivalent gent, premium quality motor oil certified to meet or exceed U.S.
- Page 13 2. Check the fuel level. Use automotive gasoline. Never use an oil/gasoline mixture or dirty gasoline. Avoid getting dirt, dust or water in the fuel tank. * Gasoline is extremely flammable and explosive un- der certain conditions. Refuel in a well ventilated area with the engine stopped.
- Page 14 3. Check the grass bag for fraying, tears and clogged mesh. Wash the bag with water if necessary, and let it dry thoroughly. Grass will not chute proper- ly without adequate ventilation Make sure the lock lever is latched securely. 4.
- Page 15 1. Move the throttle lever to “CHOKE”. NOTE: Do not use “CHOKE” when the engine is warm or the air temperature is high. Move the throttle “LO” instead. 2. Turn the fuel valve “ON”. CHOKE- FUEL VALVE HR21 13...
- Page 16 NOTE: The throttle lever may be moved anywhere between “HI” and “LO” to adjust engine speed during opera- tion. However the engine may stall if the lever is at “IDLE” when the ROTO-STOP is engaged. HR21 Engage mower THROTTLE LEVER,...
- Page 17 * Operation of the mower at an altitude lower than the carburetor is jetted for may result in reduced performance, overheating, damage caused by an excessively lean airffuel mix- ture. air-fuel 3.5% for each and serious engine HR21...
- Page 18 Cutting Height Adjustment Five settings are available: l”, l-i/2”, To change blade height: 1. Stop the engine. 2. Push the adjusting lever toward move it up or down to raise or lower the blade height. 3. Release the lever in the appropriate notch. 4.
- Page 19 2. Lift the lock lever, grasp the handle and remove the bag toward the rear of the mower. Installation Notes * Reverse the removal procedure. * Be sure the lock lever is securely engaged or the discharge guard will not open completely and grass will not chute properly. HR21...
-
Page 20: Transporting/Storage
TRANSPORTING/STORAGE Transporting Turn fuel valve when mower. * To avoid fuel and oil spillage do not tilt the unit; spilled fuel may ignite. The handle may be folded for convenience: 1. Remove the grass bag (p. 17). 2. Push the handle lock levers down and move the handle forward until it stops. - Page 21 Preparation Storage The following steps should be taken to protect the mower whenever it will be stored for longer than 30 days. NOTE: If the mower will be stored for longer than a year, first remove the spark plug and pour three table- spoonsful of clean motor oil into the cylinder.
- Page 22 3. Pull the starter rope until it becomes hard to pull. This closes the valves and breaker points (non-CD1 models), and protects them from dust and corro- sion. 4. Coat areas that may rust with a light film of oil. Cover the mower and store it on a level surface in a dry, dust free area.
-
Page 23: Maintenance
Periodic inspection and adjustment HR21 is essential if high level performance is to be maintained. Regular maintenance will also ensure a long service life. The required service intervals and the kind of maintenance to be performed are des- cribed in the following chart. - Page 24 MAINTENANCESCHEDULE ‘q\ Perform at every mdrcated month Engine oil Check level Engine oil Change &cleaner element Check Clean Air cleaner element Fuel strainer Check Spark plug Clean-Adjust Blade bolts (Tightness) Check Gass bae Check Throttle cable Adjust V-belt Insoection Drive clutch cable Adjust ROTO-STOP cable...
- Page 25 Please dispose of used motor oil in a manner that is compatible with the environment. take it in a sealed container to your local service station for reclamation. Do not throw it in the trash or pour it on the ground. unless you We suggest you BOLT OIL DRAIN HR21...
- Page 26 AIR CLEANER SERVICE A dirty air cleaner will restrict.air retor. prevent carburetor malfunction, air cleaner frequently. 1. Remove the wing nuts and the air cleaner cover. Remove the elements and separate them. fully check both elements for holes or tears and replace if damaged.
- Page 27 SPARKPLUG Standard Plugs : W20MR-U(ND) P-DAM: BMR-GA(NGK)_ or S-XAM: BPM6A-lO(NGK) or W2OMP-UlO(ND) 1. Disconnect the cap and remove the spark plug. 2. Visually inspect the plug. Discard the plug if it is heavily deposited or if the insulator is cracked or chipped.
- Page 28 Use only a genuine HONDA replacement blade or equivalent . 3. Clean away any dirt and grass from around the blade shaft. 4. Install the blade. Tighten the bolts securely. Torque: 4.5 - 5.5 gk m (32.5 - 39.8 ft lb), HR21...
- Page 29 THROTTLE CONTROL CABLE ADJUSTMENT 1. Move the throttle lever to “CHOKE”. 2. Push the control lever at the carburetor with your finger to check if it is positioned at the extreme right. 3. If adjustment is necessary, loosen the cable lock nut.
- Page 30 ROTO-STOP LEVER FREE PLAY 1. Measure free play at the tip of the lever as shown; it should be between 5 - 10 2. If adjustment is necessary, loosen the lock nut at the lever cable and turn the adjusting bolt to in- crease or decrease free play.
- Page 31 3. Tighten the lock nuts securely. 4. After adjusting, make sure the drive clutch oper- ates properly; moving torward when gripping and stopping to propel1 when releasing. 15.20mm (19/32-2502 in). HR21...
- Page 32 NOTE: The following adjustments should be performed by an authorized Honda dealer unless the owner has the proper tools and is mechanically proficient. 1. Move the throttle lever to “IDLE” and start the engine. 2. Turn the throttle stop screw either in or out as required until the engine runs at 1,400 rpm.
- Page 33 SHIFT CONTROL CABLE ADJUSTMENT (S-XAM TYPE only) 1. Move the shift lever to “3”. 2. Remove the grass bag. Loosen the three 6 mm bolts and remove the bag opening panel. 3. Loosen the three 6 mm bolts and remove the belt cover.
- Page 34 Install the bag grip on the rod through the slits in the bag end. HR21 UPPER FRAME 2. Install four float nuts onto the plastic sheet in the bottom of the bag.
- Page 35 6. Install the spring on the lever with the long hook down. Slide the retaining bracket under the short hook and finger-tighten the bracket on the bag. LOCK LEVER 7. Hook the long end of the spring on the lever and tighten the bracket securely. HR21...
-
Page 36: Troubleshooting
Engine will not start Hard starting or loss of power Erratic operation Engine overheats Excessive vibration HR21 1. No fuel. 2. Throttle lever in “STOP” position. 3. Spark plug wire loose or disconnected. 4. Spark plug faulty or improperly gapped (p. 25). -
Page 37: Specifications
1 .O 1 (0.26 US gal) TYPE P-DAM: BMR-6A (NGK), W20MRU(ND) TYPE S-XAM: BPM6A-10 (NGK), W20MPUlO (ND) 1610X580x960 mm (63.4x22.8x37.8 TYPE P-DAM: 42.0 kg (92.6 lb), S-XAM: 45.5 kg (100.3 lb) 67 1 (2.0 bu) 540 mm (21 in) forced air-cooled HR21... - Page 38 WARRANTY SERVICE Owner Satisfaction Your satisfaction and goodwill are important Limited Warranty. Normally, any problems concerning the product will be handled by your dealer’s service department. a warranty problem that has not been handled to your satisfaction, we suggest you take the following Discuss your problem with a member of dealership management.
Need help?
Do you have a question about the HR21 and is the answer not in the manual?
Questions and answers