Table of Contents
Advertisement
Available languages
Available languages
Quick Links
Advertisement
Table of Contents

Subscribe to Our Youtube Channel
Related Manuals for Teka FS 903 5VE SS


Summary of Contents for Teka FS 903 5VE SS
- Page 1 User Manual FS 903 5VE SS EN AR www.teka.com...
- Page 2 Dear User, Our objective is to make this product provide you with the best output which is manufactured in our modern facilities in a careful working environment, in compliance with total quality concept. Therefore, we suggest you to read the user manual carefully before using the product and, keep it permanently at your disposal.
-
Page 3: Table Of Contents
Contents Important warnings Methods for protecting ceramic glass cooking surface Electrical connection Introduction of the appliance Accessories Technical features of your oven Installation of your oven Installation of the oven feet Control panel Using oven section Using the grill Using the chicken roasting Using cooker section Description of oven Cooking time table... -
Page 4: Important Warnings
IMPORTANT WARNINGS 1. Installation and repair should always be performed by “AUTHORIZED SERVICE”. Manufacturer shall not be held responsible for operations performed by unauthorized persons. 2. Please read this operating instructions carefully. Only by this way you can use the appliance safely and in a correct manner. - Page 5 12. Ensure that the oven door is completely closed after putting food inside the oven. 13. NEVER try to put out the fire with water. Only shut down the device circuit and then cover the flame with a cover or a fire blanket. 14.
- Page 6 22. Keep the ventilation channels open. 23. The appliance is not suitable for use with an external timer or a separate remote control system. 24. Do not heat closed cans and glass jars. The pressure may lead jars to explode. 25.
- Page 7 34. Do not put objects that children may reach on the appliance. 35. It is important to place the wire grill and tray properly on the wire racks and/or correctly place the tray on the rack. Place the grill or tray between two rails and make sure it is balanced before putting food on it.
- Page 8 42. User should not handle the oven by himself. 43. Food can spill when foot of oven is dismantled or gets broken, be careful. It may cause personal injuries. 44. During usage, the internal and external surfaces of the oven get hot. As you open the oven door, step back to avoid the hot vapour coming out from the interior.
- Page 9 52To prevent overheating, the appliance should not be installed behind of a decorative cover. 53. Turn off the appliance before removing the safeguards. After cleaning, install the safeguards according to instructions. 54. Cable fixing point shall be protected. 55. Please don’t cook the food directly on the tray / grid.
- Page 10 Electrical Safety 1. Have an authorized electrician set grounding equipment. Our company shall not be responsible for the damages that shall be incurred due to using the product without grounding according to local regulations. 2. The circuit breaker switches of the oven shall be placed so that end user can reach them when the oven is installed.
- Page 11 10. The rear surface of the oven also heats up when the oven is operated. Electrical connections shall not touch the rear surface, otherwise the connections may be damaged. 11. Do not tighten the connecting cables to the oven door and do not run them over hot surfaces. If the cord melts, this may cause the oven to short circuit and even a fire.
- Page 12 Intended Use 1. This product has been designed for domestic use. Commercial use is not permitted. 2. This appliance may only be used for cooking purposes. It shall not be used for other purposes like heating a room. 3. This appliance shall not be used to heat plates under the grill, drying clothes or towels by hanging them on the handle or for heating purposes.
-
Page 13: Methods For Protecting Ceramic Glass Cooking Surface
Methods for Protecting Ceramic Glass Cooking Surface Ceramic glass surface is unbreakable and scratch resistant to a certain degree. However, to avoid any damage, please do the following: 1. Never pour cold water on hot cookers. 2. Do not stand on a ceramic glass plate. 3. -
Page 14: Electrical Connection
Electrical Connection 1. Your oven requires 40 Amp fuse for mono phase or 3x16 Amp fuse for 3 phase supply according to electrical power for cooker section has 4 ceramic heater and oven section has electric models. Installation by a qualified electrician is mandatory. -
Page 15: Introduction Of The Appliance
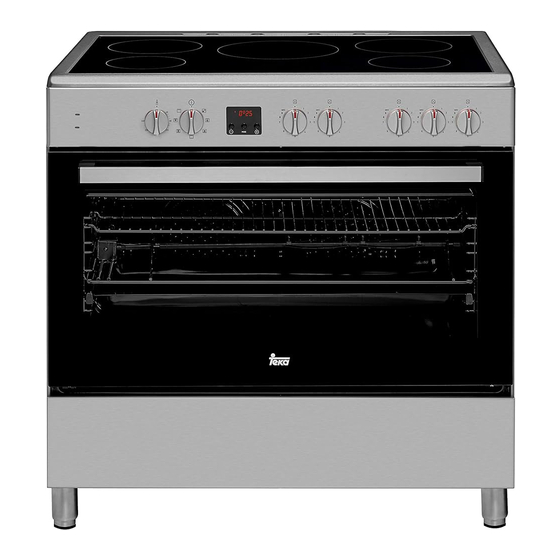
INTRODUCTION OF THE APPLIANCE 1. Vitro ceramik glass 2. 180/120 mm dual hilight 3. Restvarmeindikator 4. 140 mm hilight 5. 140X250 mm (ovaldual) hilight 6. 180 mm hilight 7. 140 mm hilight 8. Control panel 9. Oven section led lamp 10. -
Page 16: Accessories
Accesories Deep tray Used for pastries, deep fried foods and stew recipes. In case of frying directly on the grill for cakes, frozen foods and meat dishes, it can be used of oil pick-up tray. Wire grill Used for frying and/or placing the foods to be baked, fried and frozen foods on the desired rack. -
Page 17: Technical Features Of Your Oven
Technical Features Of Your Oven Specifications 90x60 Outer width 900 mm Outer depth 610 mm Outer height 925 mm Lamp power 15-25 W Bottom heating element 2000 W Top heating element 1500 W Turbo heating element 2200 W x 1 / 1250 W x 2 Grill heating element 3250 W Supply voltage... -
Page 18: Installation Of Your Oven
INSTALLATION OF YOUR OVEN Check if the electrical installation is proper to bring the appliance in operating condition. If electricity installation is not suitable, call an electrician and plumber to arrange the utilities as necessary. Manufacturer shall not be held responsible for damages caused by operations performed by unauthorized persons. - Page 19 6,5 mm min. 6,5 mm min. WARNING: The kitchen furniture near the appliance must be heat resistant. WARNING: Do not install the appliance beside refrigerators or coolers. Heat radiated by the appliance increases the energy consumption of cooling devices. WARNING: Do not use the door and/or handle to carry or move the appliance.
-
Page 20: Installation Of The Oven Feet
Installation Of The Oven Feet In order to install the oven feet; 1. Foot attachment lath is installed on the oven from the bottom of the oven as shown in (figure 1).Nuts are centered on these lathes in order to screw feet. -
Page 21: Using Oven Section
Mechanical timer*: Used for determining the period for cooking in the oven. When adjusted time is expired, power to heaters is turned off and an audible warnig signal is emitted. Mechanical timer can be adjusted to desired period between 0-90 minutes. For cooking periods, see cooking tables. -
Page 22: Using The Grill
Using The Grill 1. When you place the grill on the top rack, the food on the grill shall not touch the grill. 2. You can preheat for 5 minutes while grilling. If necessary, you may turn the food upside down. 3. -
Page 23: Using Cooker Section
USING COOKER SECTION Using And Description Of Hob Section For Vitroceramic Level Level Level Level Level Level Level Level Level Max. 140 mm 1200 Commutator 180 mm 1230 1700 Commutator 180 mm 1800 1800 1800 1800 1800 1800 1800 1800 1800 Regulator 1000... -
Page 24: Description Of Oven
DESCRIPTION OF THE OVEN Function Button: Used for determining the heaters to be used for cooking the dish to be cooked in the oven. Heater program types in this button and their functions are described below. All heater types and program types consisting of these heaters may not be available at all models. -
Page 25: Cooking Time Table
COOKING TIME TABLE WARNING: Oven must be preheated for 7-10 minutes before placing the food in it. Cooking Cooking Cooking Cooking Food function temperature (°C) rack time (min.) Cake Static Small cake Static Static Pastry Static+Fan 180-200 20-25 Cookie Static Apple pie Static 180-190... -
Page 26: Maintenance And Cleaning
MAINTENANCE AND CLEANING 1. While oven is operating or shortly after it starts operating, it is extremely hot. You must avoid touching from heating elements. 2. Never clean the interior part, panel, lid, trays and all other parts of the oven by the tools like hard brush, cleaning mesh or knife. Do not use abrasive, scratching agents and detergents. -
Page 27: Installation Of The Oven Door
Installation Of The Oven Door Figure 6 Figure 5 Figure 5.1 Figure 5.2 Figure 6.1 Figure 6.2 Completely open the Bring the hinge Afterwards, close To remove the oven door by pulling lock to the widest the oven door as to oven door, pull it it to yourself. -
Page 28: Cleaning And Maintenance Of The Oven's Front Door Glass
Cleaning And Maintenance Of The Oven’s Front Door Glass Remove the profile by pressing the plastic latches on both left and right sides as shown in figure 7 and pulling the profile towards yourself as shown in figure 8. Then remove the inner-glass as shown in figure 9. If required, middle glass can be removed in the same way. -
Page 29: Rack Positions
Rack Positions * It is important to place the wire grill into the oven properly. Do not allow wire rack to Rack 4 touch rear wall of the oven. Rack positions Rack 3 are shown in the next figure. You may place Rack 2 a deep tray or a standard tray in the lower Rack 1... -
Page 30: Using The Grill Deflector Sheet
Using The Grill Deflector Sheet * 1. A safety panel is designed to protect control panel and the buttons when the oven is in grill mode. (figure 12) 2. Please use this safety panel in order to avoid the heat to damage control panel and the buttons when the oven is grill mode. -
Page 31: Troubleshooting
TROUBLESHOOTING You may solve the problems you may encounter with your product by checking the following points before calling the technical service. Check Points In case you experience a problem about the oven, first check the table below and try out the suggestions. Problem Possible Cause What to Do... - Page 32 Problem Possible Cause What to Do Plastic or other not heat resistant When operating the oven burnt or At high temperatures, use suitable accessories are being used inside plastic odour coming out. glassware accessories. the oven. Oven door is open. Close the door and restart.
-
Page 33: Handling Rules
HANDLING RULES 1. Do not use the door and/or handle to carry or move the appliance. 2. Carry out the movement and transportation in the original packaging. 3. Pay maximum attention to the appliance while loading/unloading and handling. 4. Make sure that the packaging is securely closed during handling and transportation. -
Page 34: Environmentally-Friendly Disposal
ENVIRONMENTALLY-FRIENDLY DISPOSAL Dispose of packaging in an environmentally-friendly manner. This appliance is labelled in accordance with European Directive 2012/19/EU concerning used electrical and electronic appliances (waste electrical and electronic equipment - WEEE). The guideline determines the frame work for the return and recycling of used appliances as applicable throughout to the EU. - Page 35 التخلص من الجهاز بطريقة صديقة للبيئة .التخلص من العلبة بطريقة صديقة للبيئة يسمى هذا الجهاز وفقا التوجيه األوروبي 91/2102 / االتحاد األوروبي بشأن نزاع استخدام األجهزة الكهربائية واإللكترونية (نفايات المعدات الكهربائية ). يحدد اإلطار التوجيهي للعودة وإعادة تدوير األجهزةWEEE - واإللكترونية .المستخدمة...
- Page 36 قواعد النقل .1. ال تستخدم الباب و/ أو المقبض لتحريك الجهاز أو نقله .2. يجب نقل الجهاز في غالفة األصلي .3. انتبه تما م ً ا للجهاز أثناء تحميله/ تنزيله ونقله .4. تأكد من إغالق الغالف بإحكام أثناء الحمل والنقل .5.
- Page 37 اإلجراء السبب المحتمل المشكلة يخرج دخان من وحدات التسخين. هذا ليس عند تشغيل الفرن ألول مرة عطال. وبعد االستخدام 2-3 مرات, سيتوقف .هذه الدخان هناك دخان يخرج أثناء التشغيل دع الفرن يبرد, ومن ثم نظف بقايا الطعام من .يوجد طعام على وحدة التخسين .وحدات...
- Page 38 استكشاف األخطاء وإصالحها يمكنك حل المشكالت التي قد تواجهها مع المنتج من خالل التحقق من النقاط التالية قبل االتصال .بالخدمة التقنية نقاط الفحص .في حال واجهت مشكلة في الفرن ، تحقق أو ال ً من الجدول أدناه وحاول العمل بهذه االقتراحات اإلجراء...
- Page 39 * استخدام صفيحة الشواء العاكسة .1. تم تصميم لوحة األمان لحماية لوحة التحكم واألزرار عندما يكون الفرن في وضع الشواء )12 (شكل 2. يرجى استخدام لوحة األمان حتى تتجنب أن تتلف الحرارة لوحة التحكم واألزرار عندما يكون .الفرن في وضع الشواء .تحذير: ربما...
- Page 40 تغيير لمبة الفرن تحذير: من ع ً ا لوقوع احتمالية التعرض لصدمة كهربية فتأكد من أن دائرة الجهاز مفتوحة قبل استبدال )المصباح(عندما تكون الدائرة مفتوحة فهذا يعني أن الطاقة مفصولة .قم أوال بفصل مصدر الطاقة عن الجهاز و تحقق من أن الجهاز بارد اخلع...
- Page 41 تنظيف الموقد وصيانة باب الفرن الزجاجي قم بإزالة التشكيل الجانبي عن طريق الضغط على المزالج البالستيكي على كال الجانبين اليمين واليسار كما هو مبين في الشكل (صورة 7) و قم بعدها بسحب التشكيل الجانبي نحوك كما هو مبين في الشكل (صورة...
- Page 42 تركيب باب الفرن 6 صورة 5 صورة 2.6 صورة 1.6 صورة 2.5 صورة 1.5 صورة إلخراج باب الفرن، قوموا بعد ذلك قوموا بغلق باب قوموا بفتح قفل المفصل قوموا بفتح باب الفرن تمام ا ً وذلك بسحب باب بسحب باب الفرن الى الفرن...
- Page 43 الصيانة والتنظيف 1. ان الجهاز ساخن اثناء التشغيل او ما بعد التشغيل بوقت يسير. احذروا مالمسة عناصر التسخين .فى مثل هذه االوقات 2. ال تقوموا بتاتا بتنظيف االجزاء الداخلية للجهاز و اللوحة و الغطاء و الصينية و القطع االخرى .باستعمال الفرشاة الصلبة او منظف االوانى الحديدى او اآلالت الحادة مثل السكين 3.
- Page 44 جدول الطهي .تحذير: يجب تسخين الفرن لمدة7-10 دقائق قبل وضعه الطعام في ذلك الطهي الطهي الطهي رف الطهي الطعام )الوقت (دقيقة )درجة الحرارة (°م الوظيفة ثابت كيك ثابت كعكة صغيرة ثابت فطيرة 25-20 200-180 ثابت مروحة معجنات ثابت كيك محلى 190-180 ثابت...
- Page 45 وظائف البرامج أزرار الوظائف: يستخدم لتحديد مشعالت الطبخ للطعام المراد طهيه في الفرن. يتم وصف أنواع برنامج التسخين في هذا الزر ووظائفها أدناه. قد ال تتوفر جميع أنواع المشعالت والبرامج التي تتألف من أجهزة . المشعالت في جميع الموديالت الدجاج والمشواة مروحة...
- Page 46 استخدام قسم الطباخ استخدام ووصف قسم الموقد للفتروسيراميك المستوى المستوى المستوى المستوى المستوى المستوى المستوى المستوى المستوى الحد األقصى 1200 041 مم واط واط واط واط واط واط الموصل 1700 1230 081 مم واط واط واط واط واط واط الموصل 1800 1800 1800...
- Page 47 استخدام الشواية .1. عند وضع الشواية على الرف العلوي, فيجب أال يتالمس الطعام مع الشواية .2. يمكنك عمل تسخين أولي لمدة 5 دقائق أثناء الشوي. وإذا لزم األمر, يمكنك تقليب الطعام .3. يجب أن يكون الطعام في وسط الشواية لتوفير أقصى تدفق للهواء عبر الفرن ;لتشغيل...
- Page 48 المؤقت اآللي*: يستخدم لتحديد فترة الطهي في الفرن. عند انتهاء وقت الطهي, يتم إيقاف تشغيل الشعالت, وتصدر إشارة تحذير مسموعة. يمكن ضبط المؤقت اآللي للفترة المطلوبة بين 0-09 دقيقة. لمعرفة فترات .الطهي, انظر جدول الطهي الثيرموستات: يستخدم لتحديد درجة حرارة الطبخ للطعام المراد طهيه في...
- Page 49 :تجهيز األرجل لغرض تركيبها 1. توضح الصورة 1 وجود قضيب خاص أسفل الفرن لتركيب أرجل المتحركة. حيث هناك .2 صوامل خاصة لشد أرجل الصورة .3 2. ويتم شد الصوامل إلحكام أرجل كما هو موضح في الصورة 3. يمكن تحقيق توازن الفرن عبر تغيير مستوى أرجل المتحركة بواسطة اللوالب المخصصة لهذا .الغرض...
- Page 50 .6,5 مم-كحد أدنى .6,5 مم-كحد أدنى .تحذير: يجب أن يكون أثاث المطبخ القريب من الجهاز مقاو م ً ا للحرارة تحذير: ال تقم بتثبيت الجهاز بجانب الثالجات والمبردات. حيث تؤدي الحرارة المشعة بواسطة .الجهاز على زيادة استهالك الطاقة ألجهزة التبريد .تحذير: ال...
- Page 51 تركيب الفرن ،تحقق من أن التركيبات الكهربائية مناسبة لوضع الجهاز في حالة التشغيل. إن لم يكن األمر كذلك استدع فني كهرباء وسباك لتجهيز المنافع حسب الضرورة. التتحمل الشركة المنتجة أي مسؤولية عن .عمليات الصيانة التي يقوم بها أشخاص غير مرخص لهم .تحذير: من...
- Page 52 المواصفات الفنية 60 x 90 المواصفات 009 ميلي متر العرض الخارجي 016 ميلي متر العمق الخارجي 529 ميلي متر االرتفاع الخارجي 51- 52 وات طاقة المصباح 0002 وات عنصر التسخين السفلي 0051 وات عنصر التسخين العلوي 0523 وات عنصر تسخين الشواية ...
- Page 53 االكسسوارات * صينية عميقة تستعمل للمعجنات،الشواء و األطعمة التي تحتوي على الماء. كما يمكن استعمالها كوعاء لتجميع الزيت إذا قمت بالشواء أو التحميص ألطعمة مثل الكعك،األغذية .المجمدة، و األطباق التي تحتوي على لحوم الشواية السلك تستعمل للتحميص أو وضع الطعام المعدة للخبز، أو األغدية المجمدة إلى الرف .المرغوب...
- Page 54 التعريف بالجهاز 1. الزجاج األعلى باليت 2. لوح التسخين 021/081 مم 3. مصباح الصمام 4. لوح التسخين 041 مم 5. لوح التسخين 041/052 مم 6. لوح التسخين 081 مم 7. لوح التسخين 041 مم 8. لوحة التحكم 9. فرن مصباح الصمام 01.
- Page 55 التوصيل الكهربائي 1. يتطلب فرنك صمام 40 أمبير حسب طاقة الجهاز. يوصى بالتركيب وباسطة فني كهرباء مؤهل .إن لزم األمر ،2. يتم ضبط الفرن ليعمل بإمداد تيار كهربي 022-042 فولت / 083-514 فولت تيار متردد .05/ 06 هرتز. إذا كانت الكهرباء الرئيسية مختلفة عن القيمة المحددة، اتصل بالخدمة المعتمدة .3.
- Page 56 طرق حماية السطح السيراميكي لزجاج الطهي .سطح الزجاج السيراميكي غير قابلة للكسر ومقاومة للخدش لدرجة معينة :ومع ذلك ، لتجنب أي ضرر ، يرجى القيام بما يلي .1. ال تصب الماء البارد على المواقد الساخنة .2. ال تقف على لوح الزجاج السراميكي 3.
- Page 57 االستخدام المخصص 1. هذا المنتج مصمم لالستخدام المنزلي. ال يسمح باستخدام الجهاز لألغراض .التجارية 2. ال يجوز استخدام هذا الجهاز إال ألغراض الطهي. ال يجب استخدامه .ألغراض أخرى مثل تدفئة الغرفة 3. ال يجوز استخدام هذا الجهاز لتسخين األطباق تحت الشواية أو تجفيف .المالبس...
- Page 58 11. يجب أال تتدلي كابالت التوصيل على باب الفرن, كما يجب أال تمرر ,من فوق األسطح الساخنة. ففي حالة انصهار الكابل, ستعرض الجهاز للتلف .وربما يحدث حريق 21. إذا تعرض الكابل للتلف، يجب استبداله بواسطة المنتج أو وكيله أو فني .مختص...
- Page 59 65. تنبيه! في حالة كسر زجاج الموقد ، قم بإيقاف تشغيل أي عنصر تسخين على الفور وفصل الجهاز عن مصدر الطاقة ، وال تلمس سطح .الجهاز وال تستخدم الجهاز 75. للمواسط المدمجة مصابيح الهالوجين المستخدم ال التحديق في مصباح .الهالوجين السالمة...
- Page 60 .24. يجب على المستخدم عدم محاولة صيانة أو إصالح الفرن بنفسه 34. يجب توخي الحذر عند تنظيف الشعالت الغازية. فقد تؤدي إلى حدوث .إصابات 44. يمكن أن ينسكب الطعام في حالة تفكك أقدام الفرن أو تحطمها, ولذلك .كن حذرا. فقد تؤدي إلى حدوث إصابات 54.
- Page 61 92. احذر عند استخدم المشروبات الكحولية في أطباقك. يتبخر الكحول في درجات الحرارة العالية وقد تتسبب الحريق ألنها تحترق عندما تالمس .األسطح الساخنة .03. يجب التحقق من إغالق الوحدة بعد االستخدام 13. ال تحاول استخدام الجهاز في حالة احتوائه على تلف أو خلل ما يمكن .رؤيته...
- Page 62 ،71. يمكن استخدام هذا الجهاز من قبل األطفال فوق 8 سنوات من العمر واألفراد الذين يعانون من التحديات البدنية والسمعية أو العقلية أو األشخاص الذين يعانون من نقص الخبرة أو المعرفة؛ ما دام يتم ضمان السيطرة أو يتم .توفير معلومات بشأن المخاطر .81.
- Page 63 تحذيرات هامة 1. يجب أن يتم التثبيت واإلصالح دائ م ً ا بواسطة «الخدمة المتعمدة». التتحمل الشركة المنتجو أي مسؤولية عن عمليات الصيانة التي يقوم بها أشخاص غير .مرخص لهم 2. يرجى قراءة معلومات المستخدم هذه بعناية وبهذه الطريقة فقط يمكنك .استخدام...
- Page 64 ،عزيزي المستخدم هدفنا هو جعل هذا المنتج يوفر لك أفضل استخدام, حيث تم تصنيعه في منشآتنا الحديثة في بيئة عمل .متأنية, بشكل يتوافق مع مفهوم الجودة الشاملة .ولذلك، ننصح بقراءة دليل المستخدم بعناية قبل استخدام المنتج واالحتفاظ به للرجوع إليه في المستقبل مالحظة: تم...
- Page 65 محتويات تحذيرات هامة طرق حماية السطح السيراميكي لزجاج الطهي التوصيل الكهربائي التعريف بالجهاز االكسسوارات المواصفات الفنية تركيب الفرن التوضيح بالرسوم المتسلسلة لوحة التحكم استخدام قسم الفرن استخدام الشواية استخدام مقالة الدجاج استخدام قسم الطباخ وظائف البرامج جدول الطهي الصيانة والتنظيف تركيب...
- Page 66 Teka Chile S.A. China No.1506, Shengyuan Henghua Bldg. No.200 Wending Rd. Xuhui, Dist. 200030 Shanghai +86 2 153 076 996 Teka International Trading (Shanghai) Co. Ltd. Czech Republic V Holesovickách, 593 182 00 Praha 8 - Liben +420 284 691 940 Teka CZ S.R.O.
- Page 68 teka.com...
Need help?
Do you have a question about the FS 903 5VE SS and is the answer not in the manual?
Questions and answers