Advertisement
Quick Links
Item # 1007 791 258
Model # GGHL00019
USE AND CARE GUIDE
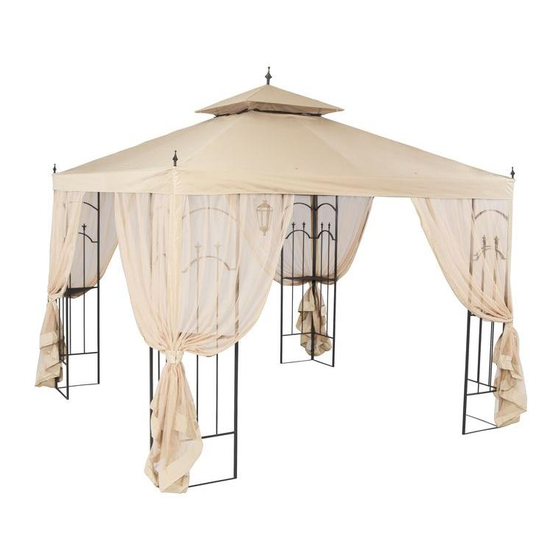
ARROW GAZEBO
Questions, problems, missing parts? Before returning to the store,
call Hampton Bay Customer Service.
8 a.m. - 7 p.m., EST, Monday - Friday, 9 a.m. - 6 p.m., EST, Saturday
1-855-HD-HAMPTON
HAMPTONBAY.COM
THANK YOU
We appreciate the trust and confidence you have placed in Hampton Bay through the purchase of this gazebo. We strive to continually create
quality products designed to enhance your home. Visit us online to see our full line of products available for your home improvement needs.
Thank you for choosing Hampton Bay!
Advertisement

Related Manuals for HAMPTON BAY 1007 791 258


Summary of Contents for HAMPTON BAY 1007 791 258
- Page 1 THANK YOU We appreciate the trust and confidence you have placed in Hampton Bay through the purchase of this gazebo. We strive to continually create quality products designed to enhance your home. Visit us online to see our full line of products available for your home improvement needs.
- Page 2 2 YEAR FRAME AND FABRIC WARRANTY WHAT IS COVERED We warrant the frame and fabric to be free of manufacturing defects to the original purchaser for two year. WARNING: gazebo fabric. WARNING: This application of any foreign substance to the ineffective.
- Page 3 Part Description Quantity M6x15 combination bolt M6x10 combination bolt and nut M6x20 combination bolt and nut M6x30 combination bolt and nut 16+1 12+1 M6x35 combination bolt and nut Ground spike Hex wrench Corkscrew ground spike...
- Page 5 Assembly Assembling the corner panels Connect the panels (A and B) by lining up the labels near the top, middle, and bottom of the panels and connecting them with M6x35 combination bolts and nuts (EE). Repeat for the remaining sets of panels (A and B). Secure the four corner connectors (I) onto the top corners of the assembled panels (A and B) with M6x20 combination bolts and nuts (CC).
- Page 6 Assembly (continued) Connecting the corner panels Line up the two holes on the two ends of the beam (C) with the corresponding bolt holes on the side tubes of panels (A and B). Attach the panels to the beam (C) using M6x30 combination bolts and nuts (DD). Repeat for the remaining three beams (C).
- Page 7 Assembly (continued) Assembling the canopy Insert the four canopy spokes (D) into the four long tubes of the lower canopy hub (H). Insert the four canopy frames (E) into the four short tubes of the lower canopy hub (H). Make sure all push pins are in place. HAMPTONBAY.COM Please contact 1-855-HD-HAMPTON for further assistance.
- Page 8 Assembly (continued) Placing the large fabric cover Place the large fabric cover (L) loosely on top of the assembled frame. NOTE: Do not fully extend the fabric cover.
- Page 9 Assembly (continued) Assembling the small canopy Insert the three short canopy spokes (G) into the upper canopy hub (J). See figure 1. Install the small fabric cover (K) on the three short canopy spokes (G), and pull the three corresponding pouches of the small fabric cover (K) onto the ends of the three short canopy spokes (G).
- Page 10 Assembly (continued) Attaching the small canopy Attach the four short canopy spokes (G) to each of the regular canopy spokes (D) by inserting the connecting peices of (G) into (D). Ensure all push pins are secure.
- Page 11 Assembly (continued) Attaching the canopy to the top of the panel structure Place the structure assembled in step 6 on top of the assembled panel structure from step 2. Insert the four canopy spokes (D) into the four corner connectors (I). Ensure all push pins are in place. Secure the metal pieces on the ends of each canopy frames (E) onto the four beams (C) using M6x15 combination bolts (AA).
- Page 12 Assembly (continued) Attaching the track tubes Connect the end of a track tube (F) to a corner connector (I). Insert the other end of the track tube (F) into the bracket on the end of the canopy frame (E), and secure them together by using M6x10 combination bolts and nuts (BB).
- Page 13 Assembly (continued) Hanging the netting Put up the nettings (M) onto the track tubes (F) using the plastic rings (N). Hang the fabric buckles in the middle of the nettings (M) onto the bolts of the corner connectors (I). HAMPTONBAY.COM Please contact 1-855-HD-HAMPTON for further assistance.
- Page 14 Assembly (continued) Attaching the large fabric cover Pull the large fabric cover (L) onto the corner connectors (I). Attach all the velcro of the large fabric cover (L) on the top frames and the top bars of the panels (A and B). Screw the four corner arrows (Q) onto the four corner connectors (I).
-
Page 15: Care And Cleaning
Assembly (continued) Grounding the gazebo Slightly lift up the corners of the panels (A and B), and put the corkscrew ground spikes (HH) through the hole on the flat bars on the bottom of the panels (A and B). Twist the corkscrew ground spikes (HH) down while the panels are lifted up. Next, twist the corkscrew ground spike (HH) into the ground until the panels (A and B) are secure. - Page 16 Questions, problems, missing parts? Before returning to the store, call Hampton Bay Customer Service. 8 a.m. - 7 p.m., EST, Monday - Friday, 9 a.m. - 6 p.m., EST, Saturday 1-855-HD-HAMPTON HAMPTONBAY.COM Retain this manual for future use.
Need help?
Do you have a question about the 1007 791 258 and is the answer not in the manual?
Questions and answers