Table of Contents
Advertisement
Quick Links
Advertisement
Table of Contents

Related Manuals for WhisperKool SC Series


Summary of Contents for WhisperKool SC Series
- Page 1 SC SERIES OWNER’S MANUAL SC PRO 2000 SC PRO 3000 SC PRO 4000 SC PRO 8000...
- Page 2 WhisperKOOL. Every effort has been made to ensure that the information in this manual is accurate. WhisperKOOL is not responsible for printing or clerical errors.
-
Page 3: Table Of Contents
TABLE OF CONTENTS Introduction ............. 2 Before You Start . -
Page 4: Introduction
INTRODUCTION Customer Service Thank you for purchasing a WhisperKOOL cooling system. We strive to provide the highest-quality products and the best possible customer service. If you have any questions about your system, please call us at upport@WhisperKOOL.com or visit whisperkool. -
Page 5: Before You Start
4. For your convenience, the WhisperKOOL unit has two power inlets: one on the side of the unit, and the other on the back. Use the selector switch, located on the right side of the unit, to select the inlet you would like to use. -
Page 6: Receiving And Inspecting The Unit
NOTE: WhisperKOOL units are manufactured in the USA and tested prior to shipment. Please leave the WhisperKOOL unit in its original box until you are ready for installation. If the unit is to be stored for any length of time prior to installation, ensure that the unit is stored on a flat level surface in the upright position. This will allow you to move the product safely without damaging it. - Page 7 SC PRO Series QUICK REFERENCE GUIDE 2000, 3000, 4000 Front / Side View Rear / Side View www.whisperkool.com | Page 5...
-
Page 8: Quick Reference Guide
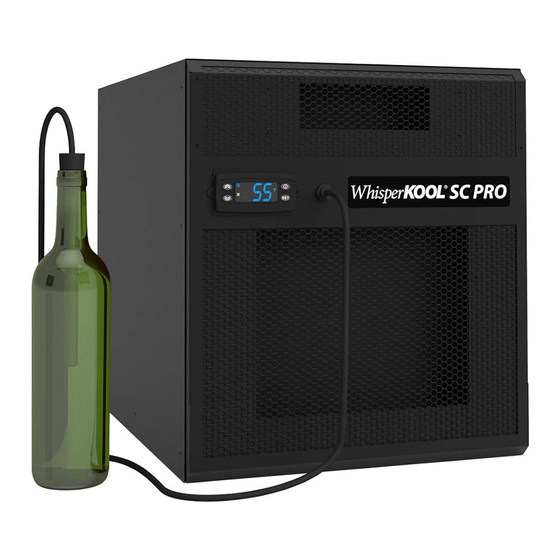
QUICK REFERENCE GUIDE 8000 Front / Side View Controller Probe input Control panel Bottle probe (see page 10 for details) Rear / Side View Rear power inlet Drain port Page 6 120122 SC PRO... -
Page 9: Controller Layout
Can maintain a 55°F cellar temperature with up to 85°F condenser air intake temperature Temp. Delta Not recommended Outside Venting Warranty Two-year limited warranty (parts and labor) / Five-year limited warranty (compressor) Contact our sales team if your cellar incorporates stone, concrete, or glass in its construction. www.whisperkool.com | Page 7... -
Page 10: Preparing The Wine Cellar
Insulation Insulation is REQUIRED in order to properly use WhisperKOOL products. It is vital that all walls and ceilings be insulated to keep the cellar temperature as consistent as possible during the summer and winter months. Standard fiberglass or rigid foam insulation is normally used in cellar construction;... - Page 11 NOTE: Do not attempt to mount the unit in a wall recess or attempt to camouflage or cover the unit with any sort of aftermarket grille, accessory, etc. This can restrict airflow, prevent the unit from working properly, and void the warranty. Please feel free to call WhisperKOOL Customer Service with any questions or concerns regarding installation requirements. Door and Door Seal An exterior-grade (1¾”) door must be installed as a cellar door.
- Page 12 In some cases, it may be advisable to install a vent fan to dissipate heat from within the exhaust area. However, you must have a fresh air inlet as well. If your unit requires ducting, please contact WhisperKOOL to obtain a specially designed ducting plenum for the unit.
- Page 13 PREPARING THE UNIT FOR INSTALLATION The WhisperKOOL 2000, 3000, and 4000 unit requires a dedicated 115-volt, 15-amp circuit. The 8000 unit requires a dedicated 115-volt, 20-amp circuit The unit draws a large amount of amps during its initial startup. By designating a dedicated circuit breaker, you will guarantee the unit has enough power to run effectively.
-
Page 14: Preparing The Installation Location
Make sure that the internal height remains at 16 inches (2000/3000/4000) or 22.75 inches (8000) so that the WhisperKOOL unit will fit snugly through the framed cut-out. Page 12... - Page 15 SC PRO Series PREPARING THE UNIT FOR INSTALLATION Single-Piece Mounting Bracket The SC Series utilizes a single-piece mounting bracket. This sturdy bracket frames the installation location and secures the unit to the wall. Applying Insulation Tape Locate the six-foot piece of black foam tape included with the unit.
-
Page 16: Preparing The Unit For Installation
PREPARING THE UNIT FOR INSTALLATION 5” inch thick wall Mounting Bracket (wall thickness may vary) Wine Cellar Exhaust Area #1 8000 9.5–10.5 inches In Cellar #2 8000 14–15 inches In Cellar Page 14 120122 SC PRO... -
Page 17: Installing The Unit Through The Wall
The screws should penetrate the studs as well as the upper and lower supports to provide adequate support for the WhisperKOOL unit (see illustration). Seal all cracks and gaps around the WhisperKOOL unit with an air- tight sealant or caulking to prevent air leakage. -
Page 18: Condensation Drain Line
DRAIN LINE Condensation Drain Line Tube All units come equipped with a drain line for additional removal of excess condensate. This is a backup system to the condensate evaporator. It is mandatory to install the drain line attachment. The condensate evaporator will heat and dissipate the excess moisture through the rear of the unit. -
Page 19: Liquid Measuring Thermostat System
SC PRO Series LIQUID-MEASURING THERMOSTAT SYSTEM (BOTTLE PROBE) WhisperKOOL cooling units come with a liquid-temperature-measuring thermostat. The self-calibrating bottle probe contains a sensor chip, which communicates back and forth with the thermostat. This results in a consistent tempera- ture setting and accuracy. Wine should be kept at a very precise, controlled temperature and humidity. By measuring the liquid temperature rather than air, the unit will operate 75–80% of the time. -
Page 20: System Operation
40°F, the display will blink three times and continue normal operation. Setpoint The setpoint is preset at the factory (WhisperKOOL) to 55°F. It Bottle Probe Failure Protection can be adjusted by the customer between 50°F and 70°F (in In the event that a bottle probe should fail, the APST (Advance 1°F increments). -
Page 21: Functions
The alarm symbol is shown and an audible buzzer will sound when the unit encounters an issue ALARM that needs attention. The displayed alarm codes are explained on the next page. To silence the buzzer, press any button. The alarm code will remain displayed until corrected. www.whisperkool.com | Page 19... -
Page 22: Alarm Codes
Enhancement back into the cellar. (The WhisperKOOL unit, however, cannot increase the humidity of the cellar.) This parameter should not be adjusted below 1. Adjustments should be made in increments of 5, with a maximum of 15 and a minimum of 1. - Page 23 SC PRO Series WIRING SCHEMATIC 2000, 3000, 4000 GREEN GREEN BLUE BLACK BROWN WHITE WHITE BLACK BLUE YELLOW BROWN BLACK WHITE GREEN Evap. Probe Bottle. Probe Cond. Probe YELLOW BLUE WHITE BLACK GREEN WHITE BLUE www.whisperkool.com | Page 21...
-
Page 24: Wiring Schematic
WIRING SCHEMATIC 8000 GREEN GREEN BLUE BLACK BROWN WHITE WHITE BLACK BLUE YELLOW BROWN WHITE BLACK GREEN Evap. Probe Bottle. Probe Cond. Probe YELLOW BLUE WHITE BLACK GREEN WHITE Page 22 120122 SC PRO... - Page 25 SC PRO Series NOTES www.whisperkool.com | Page 23...
-
Page 26: Troubleshooting Guide
Lower the setpoint Evaporator coil is frosted or iced up Observe ice formation pattern. If only part way up the coil face, unit could be low on refrigerant. If so, contact us at support@whisperkool.com. System runs constantly Possible cause Solution... - Page 27 If compressor runs, check for and clean condenser coil as a possible cause of compressor overheating. If problem repeats, contact us at support@whisperkool.com. Evaporator fan runs but compressor does not Possible cause...
-
Page 28: Maintenance Schedule
MAINTENANCE SCHEDULE 1. Check coils Monthly 2. Check for unusual noise or vibration 3. Check drain line to see if it is above the waterline (if draining into a vessel) Every Six Using the supplied drain line brush, clean the interior drain line leading from the drip tray (see illustration below for more details) Weeks Quarterly... - Page 29 SC PRO Series UV IN-FIELD INSTALLATION *AVOID DIRECT SKIN EXPOSURE TO UV. NEVER LOOK DIRECTLY INTO THE UV LIGHT SOURCE. Remove the (4) screws and cover panel. using the (4) previously removed screws. receptacle www.whisperkool.com | Page 27...
- Page 30 UV IN-FIELD INSTALLATION *AVOID DIRECT SKIN EXPOSURE TO UV. NEVER LOOK DIRECTLY INTO THE UV LIGHT SOURCE. Unplug the UV assembly power cord from the UV power receptacle Remove the bulb by pulling away from UV base. Remove the (4) screws and UV assembly. Page 28 120122 SC PRO...
- Page 31 Use cotton gloves or rag to avoid Install the (4) screws and UV assembly. skin oils that will harm the UV lamp. Plug the UV assembly power cord into the UV power receptacle. Bulb replacement is now complete. www.whisperkool.com | Page 29...
- Page 32 TECHNICAL ASSISTANCE WhisperKOOL Customer Service is available Monday through Friday from 6:00 a.m. to 4:00 p.m. Pacific Standard Time. The appointed customer service representative will be able to assist you with your questions and warranty information more effectively if you provide them with the following: •...
- Page 33 A. Two (2) Year Limited Warranty: For the period of TWO (2) YEARS (the “Limited Warranty Period”) from the date of original sale of a Product by WhisperKOOL, if a WhisperKOOL Product is found to be defective in material or workmanship after undergoing WhisperKOOL’s Customer Service troubleshooting, then, subject to the WhisperKOOL Product Limited...
- Page 34 16. No one has any authority to add to or vary the limited warranty on this Product. 3. Product Installation Requirements: A. Prior to installing a WhisperKOOL Product, the End User must read the WhisperKOOL Owner’s Manual and thereafter the End User must follow the required installation, use and maintenance procedures set forth by WhisperKOOL in WhisperKOOL’s Owner’s Manual.
- Page 35 Product Limited Warranty And Product Installation Requirements), and further these Terms and Conditions of Sale shall be interpreted as though drafted jointly by WhisperKOOL and Purchaser. Any dispute will be resolved by the courts in and for the County of San Joaquin, State of California, and all parties, WhisperKOOL, Purchaser and End User, hereby irrevocably submit to the personal jurisdiction of such courts for that purpose.
- Page 36 E-mail: support@whisperkool.com Web: www.whisperkool.com B. Technical Assistance: WhisperKOOL Customer Service is available Monday through Friday from 6:00 a.m. to 4:00 p.m. (PST). The Customer Service representative will be able to assist you with your questions and warranty information more effectively if you provide them with the following: 1.
- Page 37 WhisperKOOL 1738 E. Alpine Ave Stockton, CA 95205 www.whisperkool.com...
Need help?
Do you have a question about the SC Series and is the answer not in the manual?
Questions and answers