Table of Contents
Advertisement
Quick Links
Advertisement
Table of Contents

Related Manuals for KVM-TEC Matrixline MX2000


Summary of Contents for KVM-TEC Matrixline MX2000
- Page 1 Check out our Installation Channel: kvm-tec User Manual Matrixline MX 6711 SET 6711L CPU/LOCAL 6711R CON/REMOTE Matrixline fiber MX2000 - F 6811 SET 6811L CPU/LOCAL 6811R CON/REMOTE kvm-tec = C www.kvm-tec.com connect collaborate communicate control...
-
Page 2: Table Of Contents
3.9.12 Hiding system status menu 3.1 Using the on screen menu 3.9.13 Lock menu 3.2 System status 3.9.14 USB share any key 3.3 Viewing the current firmware version 4. Network settings 4.1 Network settings and management Switching Systems 2 | kvm-tec kvm-tec | 3... - Page 3 4.2 Connecting, disconnecting or selecting a current workplace connected devices kvm-tec = C 4.3 Searchbox-function 5. troubleshooting & first aid 6. Maintance & care connect collaborate communicate control 6.1 Extender care 6.2. Disposal 7. Warranty 7.1. Standard warranty 7.2 Extended warranty...
-
Page 4: Introduction
• Prior to connecting to the mains, make sure your local mains voltage matches the rating indicated on the product. • The product must be connected to a permanent and earthed AC wall socket. 6 | kvm-tec kvm-tec | 7... -
Page 5: Technical Specifications
KVM Extender (local unit and remote unit) socket. Make sure the product can be disconnected from the power socket at all times. Model: Matrixline MX2000 und Matrixline 2000 Fiber MX-F KVM • Unplug the product during electrical storms or when not in use. -
Page 6: About Your Matrixline Extender
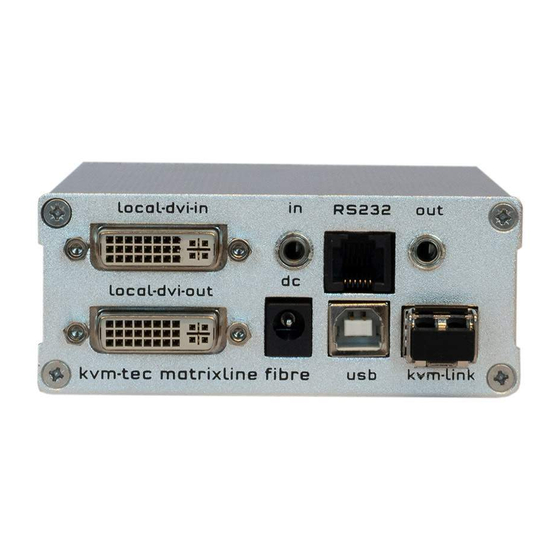
CAT5/6/7 cable or fiber cable dvi-out DVI-D connection to monitor connection for 12 V power supply Power/Status LED displays the status of the extender dvi-out DVI connection to monitor Power/Status LED displays the status of the extender 10 | kvm-tec kvm-tec | 11... -
Page 7: About The Status Led
MX 2000 fiber sfP Module pro unit Green 1 x SFP Modul-Multimode module up to 500m/1640 ft (alternativ with Single-Mode up to 20km/12 mi ItemNr 6855) Green V. fast * MX only ** Rem. Only Meaning of LED indicators 12 | kvm-tec kvm-tec | 13... -
Page 8: Mounting Options
Rack Mounting Kit RMK-F - Part No. 6130 The rack mounting kit RMK-F is for mounting kvm-tec Marixline extenders. It consists of a19“ rack shelf and an alu-faceplate. Rack Mounting Kit RMK-FN - Part No. 6131 The rack mounting kit RMK-FN is for assembling kvm-tec Matrixline extenders. - Page 9 1 Gbit / sec. For Video Sharing the network Switch has to support IGMP snooping 7 Connect the monitor with the DVI cable to CON HAVE FUN - your kvm-tec Extender is now in use for many years (MTBF approx 10 years) 6.
- Page 10 6. Almost done! Connect the audio cable Local audio/out to the PC audio/in and Remote audio/out with the audio cable to the microphone HAVE FUN - your kvm-tec Extender is now in use for many years (MTBF approx 10 years) 6. Audio to PC 2.
-
Page 11: Start Up
2. Pull the metal latch of the SFP module forwards until it is at a right angle. 3. Replace the SFP module with the other module. Put the metal latch back in position. Only 2.7 REMoVING a fIbER cablE use SFP modules from kvm-tec, or recommended by kvm-tec. To remove a fiber cable: •... -
Page 12: Extender Settings
The currently installed firmware version of the remote (CON) and local (CPU) extender is W Network Settings Network Settings displayed in the main menu (e.g. ‚4267‘). G ExtenderSettings Settings Extender Switching List List of all extenders in the switching system Exit Exit 22 | kvm-tec kvm-tec | 22 kvm-tec | 23... -
Page 13: Updating A Firmware With Switching Manager
It takes about 2 minutes until the firmware is loaded into the extender. The bar on the right in the column the main window fills blue 2. is the update. attENtIoN Only if the bar is grey, the update is finished. 24 | kvm-tec kvm-tec | 25... -
Page 14: Viewing Available Devices
The devices you can connect to, are listed on the device list screen. In the main screen menu press the L key A total of 8 favorites can be defined. Connecting these 8 favorites is possible with shortcuts from 1-8. 26 | kvm-tec kvm-tec | 27... -
Page 15: Share List
Extender settings menu: 1. Make sure the main menu is open. 2. Press the G key. The Extender settings menu appears. 3. The extender settings are distributed across two sub-menus: Remote settings and local settings. 28 | kvm-tec kvm-tec | 29... -
Page 16: Managing Local Settings
• Press s to save the settings and exit the menu. • Press Q to exit without saving. • Drücken Sie die R Taste um das Remote Setting Menü anzuzeigen. • Press R button to display the Remote Setting menu 30 | kvm-tec kvm-tec | 31... -
Page 17: Setting The Audio Volume
In the extender settings menu, press the R button. The Remote Settings Menu is displayed. Press the R button. 2. The Baud Rate menu is displayed. To select a baud rate, press the corresponding key. The Enter Parity menu opens. Press the appropriate button to select a parity 32 | kvm-tec kvm-tec | 33... -
Page 18: Alternative Use Of The Rs232 Interface
Switching Manager depends on the programming. It can be used for switching scenarios, for example. A corresponding programming can be requested from us and will be charged according to time and effort. 34 | kvm-tec kvm-tec | 35... -
Page 19: Show The Last Received Image
5 To return from power save mode, press any key. Enable and disable power save mode on the remote screen. In the main menu, press G > R. 36 | kvm-tec kvm-tec | 37... -
Page 20: Selecting A Keyboard Layout
1. Press R in the Extender settings menu- The Remote settings menu appears. 2. Press the K key. The Keyboard locale menu opens: • Press E to select English (QWERTY) • Press d to select German (QWERTZ) • Press f to select French (AZERTY) 38 | kvm-tec kvm-tec | 39... -
Page 21: Editing Keyboard Shortcuts
3. Use the arrows to select a command. 4. Press E to edit the shortcut. To edit: Press a single key. Edit the frequency with left and right arrows. OR - Press a key combination 40 | kvm-tec kvm-tec | 41... -
Page 22: Lock Menu
Set the password You have to create your own password and the menu is always locked with your password If you forgot your password the menu is locked Please contact your Reseller to unlock the menu 42 | kvm-tec kvm-tec | 43... -
Page 23: Network Settings
In the main menu, press L. Switching Manager software and all functions are described in the Switching Manager 2000 manual. You can download the manual from our website. www. kvm-tec.com 4.2 coNNEctING, dIscoNNEctING oR sElEctING a cURRENt WoRKPlacE coNNEctEd dEVIcEs Logging in to the local PC in the main menu, press A. -
Page 24: Troubleshooting & First Aid
Check if other units have ther Unit display the same behaviour lEd is blinking Different firmware Please contact the kvm-tec support team via e-mail: green or USB is not support@kvm-tec.com or by phone: +43 2253 81912 30 compatible Contact kvm-tec Contact kvm-tec... -
Page 25: Maintance & Care
By disposing of the packaging and packaging waste in the proper manner, you help to avoid possible hazards for the environment and public health. Art Nr 9003 warranty extension to 5 years per Set Art Nr 9002 warranty extension to 5 years per Unit 48 | kvm-tec... -
Page 26: Cable Requirements
Requires dedicated fibre connection: cable type Singlemode with LC connector color Wavelength ( ) of 850 nm in multi-mode or 1310 nm TX -1550 nm RX in single-mode orange/White orange Green/White blue blue/White Green brown/White brown 50 | kvm-tec kvm-tec | 51... -
Page 27: Requirements Network-Switch
The network switch must fulfil the following specifications: 1 Gigabit switch, with true port to port transfer rates of 1 Gigabit/second A list of kvm-tec tested and recommended switches can be found on our website at www.kvm-tec.com Products - Switching System - Datasheet -recommended Switche... -
Page 28: Address & Phone / Emails
11. NotEs 10. addREss & PhoNE / EMaIls 10. addREss & PhoNE/EMaIl If you have any questions about our products, please contact kvm-tec or your dealer. kvm-tec electronic gmbh Gewerbepark Mitterfeld 1A 2523 Tattendorf Austria Phone: 0043 (0) 2253 81 912 Fax: 0043 (0) 2253 81 912 99 Email: support@kvm-tec.com...
Need help?
Do you have a question about the Matrixline MX2000 and is the answer not in the manual?
Questions and answers