Advertisement
Quick Links
YD3004
INSTALLATION INSTRUCTION
26"~55"
Max:
45KG
(99LBS)
If you have any questions, please contact us.
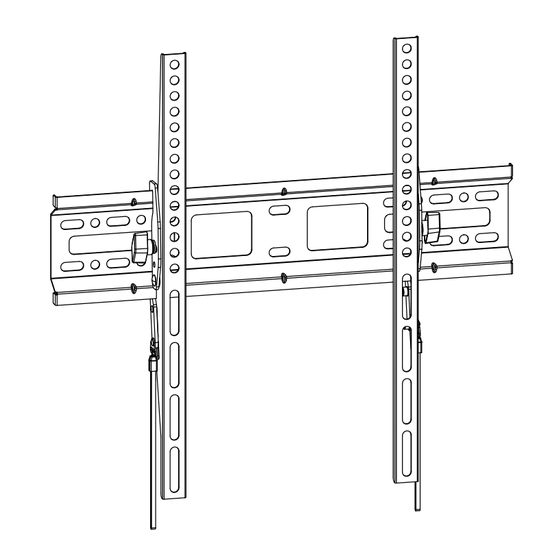
STEP 1 Attach the TV Brackets
1-1 Select TV Screws
M8
M6
M4
Too Large
Too Short
1-2 Need Spacer?
Yes, choose the appropriate screws, washers,and spacers for your TV.
Long Screw
Washer
Spacer
Bracket
01
02
03
For more spacing
For raised back TV
For Counterbore of TV
between bracket and TV
No, just choose the screws, washers.
Bracket
Short Screw
Washer
Please read this instruction carefully before installation.
If you do not understand these instructions or have doubts about the safety of the installation, assembly or
use of this product, please contact us.
● This product is designed for use in wood stud and solid concrete wall.
- DO NOT install into drywall alone.
● The wall must be capable of supporting five times the weight of the TV and mount combined.
● Do not apply this product to any purpose not indicated by ELIVED.
● Incorrect installation may result in product damage or body injury. ELIVED shall bear no responsibility
for any damage or injury resulted from incorrect installation, incorrect assembly or misuse.
WARNING:
Before starting assembly, verify all parts are included and undamaged. For parts shortage or damage,
please contact us.
Must Check Before Getting Started
MAX:400mm/16"
MAX:
400mm/16"
Velcro Cable Ties ×3
Installation Tools (Not Included)
Bubble Level ×1
Wood Stud Installation
Max: 400x400mm/16x16"
Min: 75x75mm/3x3"
(V5)
Stud
Awl
Wood
Finder
Drill Bit
STEP 1 (Continued)
1-3 Attach the TV Brackets
Too Small
Correct Diameter
Too Long
Correct Length
MA MB
Not for M8 Screws
MD MF
May be needed
TV back
04
To avoid the
blocked input
TV back
3
Safety Caution
This product contains small items that could be a choking hazard if swallowed.
<16mm(5/8")
Max.
16"(406mm)
Max:
45KG
(99LBS)
Drywall with wood studs
CAUTION: DO NOT install into drywall alone.
Concrete Installation
2M
5/32"
3/8"
(4mm)
(10mm)
Band
Pencil
Electrodrill
Masonry
Hammer
Tape
Drill Bit
No!
MC
ME
B
A
Supplied Parts and Hardware
TV Brackets
A
x1
B
x1
Min. 8"
(203mm)
Solid concrete wall
TV Screws / Spacers / Washers
Philips Screws
Philips Screws
M4 x 12mm
M6 x 15mm
M4 x 30mm
M6 x 30mm
x4
x4
x4
x4
10mm
MA
MB
Socket
Screwdriver
Wrench
NOTE: Not all hardware included will be used.
1
STEP 2 Attach Wall Plate to Wall
OPTION A: Wood Stud Installation
2A-1
Center line
Phillips
Screwdriver
2A-2
4
Wall Plate
C
x1
Lag Bolt ST6x50mm
Ⅰ
x4
Philips Screws
Spacers
Washers
Spacers
M8 x 25mm
M8 x 10mm
M6
M8 x 5mm
M8 x 45mm
x4
x4
x8
x4
x8
MC
MD
ME
MF
Min. Wood Stud Size:
Max.
nominal 2"(51mm)
16"(406mm)
actual 1 1/2"(38mm)
Min. Wood Stud Size:
nominal 4"(102mm)
actual 3 1/2"(89mm)
Wall before Wood Stud
<16mm(5/8")
Bubble
Level
2
5
Advertisement

Subscribe to Our Youtube Channel
Related Manuals for Elived YD3004


Summary of Contents for Elived YD3004
- Page 1 ● Do not apply this product to any purpose not indicated by ELIVED. ● Incorrect installation may result in product damage or body injury. ELIVED shall bear no responsibility for any damage or injury resulted from incorrect installation, incorrect assembly or misuse.
- Page 2 STEP 2 (Continued) STEP 2 (Continued) STEP 2 (Continued) OPTION B: Solid Concrete Wall Installation 2A-3 2B-3 2.16"(55mm) 2B-1 Min. 8"(203mm) 5/32" (4mm) Bubble Level Concrete wall anchor (NOT INCLUED) Be sure to drill into the center of the stud. Contact us to have these additional pieces shipped directly to you.
Need help?
Do you have a question about the YD3004 and is the answer not in the manual?
Questions and answers