
Related Manuals for Emerson Rosemount 628


Summary of Contents for Emerson Rosemount 628
- Page 1 Quick Start Guide 00825-0100-4628, Rev AD May 2023 Rosemount 628 Universal Gas ™ Sensor Integrated Wireless Gas Monitoring...
- Page 2 May 2023 Safety information NOTICE This guide provides configuration and basic installation information for the Rosemount 628 Wireless Gas Monitor. It does not provide diagnostic, maintenance, service, troubleshooting, Intrinsically Safe (IS) installation, or ordering information. For more information, refer to the Rosemount 928 Wireless Gas Monitor Reference Manual.
-
Page 3: Table Of Contents
The products described in this document are not designed for nuclear qualified applications. Using non-nuclear qualified products in applications that require nuclear-qualified hardware or products may cause inaccurate readings. For information on Rosemount nuclear-qualified products, contact an Emerson sales representative. Contents Overview............................ - Page 4 Quick Start Guide May 2023 Emerson.com/Rosemount...
-
Page 5: Overview
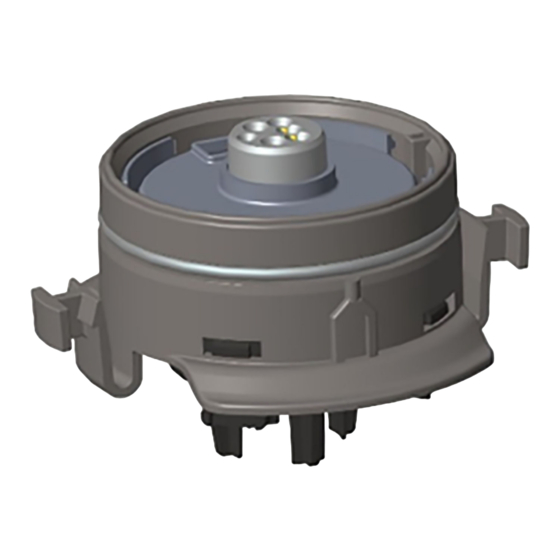
The sensor fits integrally into the transmitter without the use of tools. Make electrical connections when the sensor module is fully seated in the transmitter sensor housing. Note Use Rosemount 628 Universal Gas Sensor only with the Rosemount 928 Transmitter. CAUTION The Ingress Protection (IP) filter must be installed. - Page 6 Quick Start Guide May 2023 Figure 1-1: Ingress Protection Filter A. IP filter housing B. IP filter gasket C. Filter media Emerson.com/Rosemount...
-
Page 7: Install The Sensor
May 2023 Quick Start Guide 2 Install the sensor The sensor is held in place using a tight-fitting seal and snap connections. The sensor is connected to the transmitter by two latching tabs that fit into the bottom portion of the housing as shown in Figure 2.1. - Page 8 May 2023 Figure 2-1: Inserting the Sensor into the Transmitter A. Rosemount 928 Transmitter housing B. Rosemount 628 Universal Gas Sensor C. Latching tabs 5. To ensure a firm latch and seal, push the module upward until the two latching tabs are fully engaged. After they are seated, push up on th bottom of each of the latching tabs.
- Page 9 May 2023 Quick Start Guide Postrequisites To remove the sensor, compress the latching tabs and pull downward until it is released from the transmitter housing. Quick Start Guide...
-
Page 10: Bench Configuration
To connect to the transmitter using a handheld communication device, refer to Guided setup. To obtain the latest DD, go to EmersonProcess.com/DeviceFiles and then visit the Emerson web page for your handheld device. Procedure 1. On the Home screen, select Configure. 2. Do one of the following: •... - Page 11 May 2023 Quick Start Guide 2. In the device pane, double-click the device icon. 3. Select Configure. 4. In the Configure pane, do one of the following: • Select Guided Setup to verify or change initial configuration settings. Refer to Guided setup.
-
Page 12: Guided Setup
Guided setup Guided setup contains basic configurations settings. The Guided Setup menus are useful during initial configuration. Note Emerson developed the Field Communicator Guided Setup configuration procedures using Emerson AMS Trex Device ™ Communicator. The menus are identical to those found in other Field Communicators, but are navigated using touch screens rather than fast keys. - Page 13 May 2023 Quick Start Guide Figure 4-1: Transmitter terminal block A. +COMM terminal B. -COMM terminal 3. Start your handheld communicator device. If necessary, open the HART Field Communicator application on your handheld device to establish HART communication. Refer to the manual for your handheld communicator device for more information.
- Page 14 Quick Start Guide May 2023 4. On the Overview screen, select Configure. 5. On the Configure screen, select Guided Setup. Postrequisites Refer to Basic setup through Configuring process alerts. Emerson.com/Rosemount...
- Page 15 May 2023 Quick Start Guide 4.1 Basic setup 4.1.1 Basic setup using Field Communicator Procedure 1. On the Guided Setup screen, select Basic Setup. 2. On the Device Information screen, select any of the following and configure as needed. Otherwise, continue with Step 3. Quick Start Guide...
- Page 16 The Tag field is blank by default and does not display if left blank. • Descriptor: Enter a description of the device up to 16 alphabetic, numeric, and special characters long. The Descriptor field is blank by default and does not display if left blank. Emerson.com/Rosemount...
- Page 17 May 2023 Quick Start Guide • Message: Enter a message up to 32 alphabetic, numeric, and special characters long. The Message field is blank by default, does not display if left blank, and may be used for any purpose. Quick Start Guide...
- Page 18 Quick Start Guide May 2023 3. On the Device Information screen, select Next. Emerson.com/Rosemount...
- Page 19 May 2023 Quick Start Guide 4. On the Basic Setup screen, select OK to confirm successful completion of basic setup. 4.1.2 Basic setup using AMS Wireless Configurator Procedure 1. In the Initial Setup field of the Guided Setup, select Basic Setup. Quick Start Guide...
- Page 20 Descriptor field is blank by default and does not display if left blank. • Message: Enter a message up to 32 alphabetic, numeric, and special characters long. The Message field is left blank by default, does not display if left blank, and may be used for any purpose. Emerson.com/Rosemount...
- Page 21 May 2023 Quick Start Guide 3. On the Basic Setup screen, select Next. 4. Select Finish. Quick Start Guide...
-
Page 22: Calibrating The Sensor
Calibrating the sensor ensures that the analog, digital, and discrete outputs accurately transmit the target gas concentrations registered by the module. Although Emerson calibrated the device at the factory, you must calibrate it at the following times to ensure accuracy and correct operation: •... - Page 23 May 2023 Quick Start Guide Procedure 1. Connect the HART communication leads from the Field ® Communicator HART terminals to the COMM terminals on the terminal block of the transmitter. Figure 5-1: Transmitter terminals A. +COMM terminal B. -COMM terminal 2. Establish communication between the transmitter and the Field Communicator.
- Page 24 Quick Start Guide May 2023 4. On the Configure screen, select Guided Setup. 5. On the Guided Setup screen, select Calibrate Sensor. Emerson.com/Rosemount...
- Page 25 May 2023 Quick Start Guide 6. Select OK to accept the current date as the calibration date and continue. 7. Acknowledge the warning. If necessary, remove the loop from automatic control. 8. When calibrating for H S and CO, expose the sensor to clean air, to zero the reading.
- Page 26 IP filter assembly (part number 00628-9000-0001). d) Release the clean air/known percent oxygen specified calibration gas to the sensor. Note If you need a long length of calibration tubing to reach the device, then make allowances for a delay Emerson.com/Rosemount...
- Page 27 May 2023 Quick Start Guide in response time from the sensor while the clean air travels the length of the calibration tubing. e) Complete Step 9 through Step 12. f) Turn off the clean air (or percent oxygen specified calibration gas) when the sensor is correctly zeroed. 9.
- Page 28 The value must be between 5 ppm and 100 ppm. For oxygen, use 20.9 percent oxygen from clean air. This step may be performed with surrounding air if no contaminants are present. 14. Select OK. Emerson.com/Rosemount...
- Page 29 May 2023 Quick Start Guide 15. Install a regulator on the target gas source. WARNING Toxic gas Before performing the next step, verify that the regulator is closed to avoid releasing target gas into the air during calibration. 16. Attach a length of calibration tubing (PVC tubing, 3/16-in. ID, 5/16-in.
- Page 30 Quick Start Guide May 2023 17. Release the target gas from the target gas source. Emerson recommends a flow rate of 1.0 liters per minute to ensure a consistent sensor reading. Note If you need a long length of tubing to reach the device,...
- Page 31 May 2023 Quick Start Guide 18. Wait while the gas concentration measurement stabilizes. Refer to Figure 5-2. Figure 5-2: Typical Calibration Profile A. Gas concentration ppm B. Time (in seconds) C. Gas concentration measurement has stabilized 19. Select OK when the gas concentration measurement stabilizes at or near the target gas concentration level.
- Page 32 IP filter is not clogged or obstructed. A sensor that cannot accept a new calibration may have reached the end of its service life. Replace the sensor and repeat this procedure. Refer to the Replace the gas sensor section in the Rosemount 928 Wireless Gas Monitor Reference Manual. Emerson.com/Rosemount...
- Page 33 May 2023 Quick Start Guide 22. Select Accept calibration and then select OK. The Field Communicator displays the Service Reminder screen if a service reminder is configured and enabled. 23. Select OK to accept the service reminder date or enter another date.
- Page 34 25. Detach the calibration tubing from the regulator on the target gas source and from the IP filter inlet on the bottom of the sensor. 5.2 Calibrate using AMS Wireless Configurator Procedure 1. On the Guided Setup tab, in the Initial Setup field, select Calibrate Sensor. Emerson.com/Rosemount...
- Page 35 May 2023 Quick Start Guide 2. On the Calibrate Sensor screen, select Next to accept the current date as the calibration date and continue. 3. On the Warning screen, select Next. 4. When calibrating for H S, and CO, expose the sensor to clean air, to zero the reading.
- Page 36 Install a regulator on the clean air/known percent oxygen content gas cylinder. c) Attach a length of calibration tubing (PVC tubing, 3/16- in. OD, 5/16-in. OD) from the regulator on the cylinder to the IP filter on the bottom of the sensor. Emerson.com/Rosemount...
- Page 37 May 2023 Quick Start Guide d) Release the clean air/known percent oxygen specified calibration gas to the sensor. Note If you need a long length of calibration tubing to reach the device, then make allowances for a delay in response time from the sensor while the clean air travels the length of the calibration tubing.
- Page 38 Quick Start Guide May 2023 7. Select Accept New Zero. 8. Select Next. 9. Select Next. Emerson.com/Rosemount...
- Page 39 May 2023 Quick Start Guide WARNING Toxic gas The regulator may release gas into the air during calibration. Before starting the next step, verify that the regulator is closed. 10. Install a regulator on the target gas source. 11. Attach a length of calibration tubing (PVC tubing, 3/16-in. ID, 5/16-in.
- Page 40 Quick Start Guide May 2023 12. Release the target gas from the target gas source. Emerson recommends a flow rate of 1.0 liters per minute to ensure a consistent sensor reading. Note If you need a long length of calibration tubing to reach the...
- Page 41 May 2023 Quick Start Guide 13. Wait while the gas concentration measurement stabilizes. Refer to Figure 5-3. Figure 5-3: Typical Calibration Profile A. Gas concentration ppm B. Time (in seconds) C. Gas concentration measurement has stabilized 14. Select Next when the gas concentration measurement stabilizes at or near the target gas concentration level.
- Page 42 Quick Start Guide May 2023 15. Wait while the AMS Wireless Configurator calibrates. When the calibration process finishes, the new adjusted reading is displayed. 16. Select Next. 17. Select Accept calibration. Emerson.com/Rosemount...
- Page 43 May 2023 Quick Start Guide 18. Select Next. The Service Reminder screen is displayed if a service reminder is configured and enabled. 19. Select Next to accept the service reminder date or enter another date. Refer to the Service reminders section of the Rosemount 928 Wireless Gas Monitor Reference Manual for more information.
-
Page 44: Verify Operating Atmosphere
(85 °C) (7 °C) Note The electrochemical cells in the sensor have a limited shelf life. Store sensor modules in a cool location that is not excessively humid or dry. Storing sensors for long periods may shorten their useful service life. Emerson.com/Rosemount... - Page 45 May 2023 Quick Start Guide Quick Start Guide...
- Page 46 2023 Emerson. All rights reserved. Emerson Terms and Conditions of Sale are available upon request. The Emerson logo is a trademark and service mark of Emerson Electric Co. Rosemount is a mark of one of the Emerson family of companies. All other marks are the property of their respective owners.
Need help?
Do you have a question about the Rosemount 628 and is the answer not in the manual?
Questions and answers