Advertisement
Quick Links
Advertisement

Subscribe to Our Youtube Channel
Related Manuals for Modena BK 1725 C


Summary of Contents for Modena BK 1725 C
- Page 1 User Manual Book Built-In Electric Hob Manual BK 1725 C BI 0721 C...
- Page 2 TABLE OF CONTENT Part 1: Safety & Warnings Part 2: Installation Part 3: Operation Instructions Part 4: Cleaning & Maintenance...
- Page 3 PART 1 : SAFETY & WARNING Safety Warnings Your safety is important to us. Please read below information carefully before installing or using your Hob. Installation Electrical Shock Hazard • Disconnect the appliance from the mains electricity supply before carrying out any work or maintenance on it. •...
- Page 4 • In order to avoid a hazard, this appliance must be installed according to these instructions for installation. • This appliance is to be properly installed and earthed only by a suitably qualified person. • This appliance should be connected to a circuit which incorporates an isolating switch providing full disconnection from the power supply.
- Page 5 • Do not let your body, clothing or any item other than suitable cookware contact the ceramic glass until the surface is cool. BEWARE! Metallic objects such as knives, forks, spoons and lids should not be placed on the hob surface since they can get hot. •...
- Page 6 • After use, always turn off the cooking zones and the hob as described in this manual. Do not rely on the pan detection feature to turn off the cooking zones when you remove the pans. • Do not allow children to play with the appliance or sit, stand, or climb on it.
- Page 7 working environments; -farm houses; -by clients in hotels, motels and other residential type environments; -bed and breakfast type environments. • This appliance can be used by children aged from 8 years and above and persons with reduced physical, sensory or mental capabilities or lack of experience and knowledge if they have been given supervision or instruction concerning use of the appliance in a safe way and understand the hazards involved.
- Page 8 BI 0721 C 705+5 405+5 50 mini BK 1725 C Under any circumstances, make sure the electric hob is well ventilated and the air inlet and outlet are not blocked. Ensure the electric hob is in good work state. As shown below: Note: The safety distance between the hotplate and the cupboard above the hotplate should be at least 760mm.
- Page 9 A(mm) B(mm) C(mm) 760mm 50mm minimal 20mm minimal Air intake Air exit 5mm Installing the foam gasket Before inserting the hob into the opening in the kitchen worktop, the supplied foam gasket (in a plastic bag) must be attached to the lower side of the ceramic glass. Do not install the hob without the foam gasket! The gasket should be attached to the hob in the following method:...
- Page 10 Before locating the fixing brackets The unit should be placed on a stable, smooth surface (use the packaging). Do not apply force onto the controls protruding from the hob. Easy Fit kits There is one easy fit kits package for each hob, include 2pcs fixing clip and 2pcs screw.
- Page 11 Connecting the hob to the mains power supply The power supply should be connected in compliance with the relevant standard, or a single-pole circuit breaker. The appliance has a large power rating and must be connected to electricity by a Qualified Electrician .
- Page 12 Cautions 1. The hob must be installed by qualified personnel or technicians. Please never conduct the operation by yourself. 2. The electric hob shall not be mounted to cooling equipment, dishwashers and rotary dryers. 3. The electric hob shall be installed such that better heat radiation can be ensured to enhance its reliability.
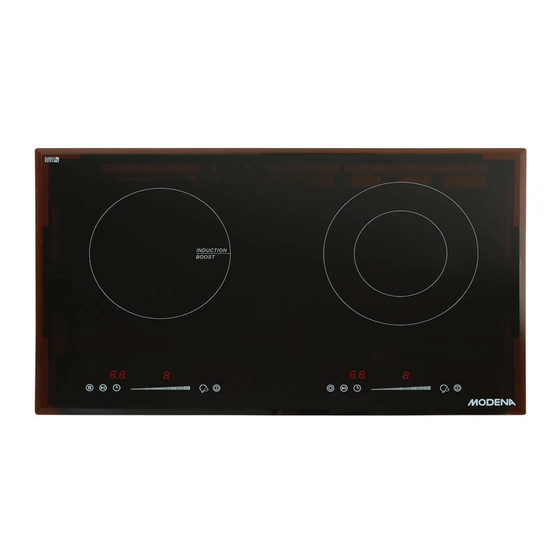
- Page 13 PART 3 : OPERATION INSTRUCTIONS OPERATION INSTRUCTIONS Product Overview Model: BI 0721 C 1. 2000W booster 2200W induction Zone 2. 2000W booster 2200W induction Zone 3. Ceramic Glass 4. Control panel of cooking zone#1 5. Control panel of cooking zone#2 Control Panel 1.
- Page 14 Model: BK 1725C 1. 2000W booster 2200W induction Zone 2. 2200/1000W Ceramic Dual Zone 3. Ceramic Glass 4. Control panel of cooking zone#1 5. Control panel of cooking zone#2 1. Booster / Extend zone control button 4. Heating level/Timer adjusting slider 2.
- Page 15 Before using your New Hob • Read this guide, taking special note of the ‘Safety Warnings’ section. • Remove any protective film that may still be on your new electric hob. Using the Touch Controls • The controls respond to touch, so you don’t need to apply any pressure.
- Page 16 • You can check whether your cookware is suitable by carrying out a magnet test. Move a magnet towards the base of the pan. If it is attracted, the pan is suitable for induction hob. • If you do not have a magnet: 1.
- Page 17 Always lift pans off the electric hob – do not slide, or they may scratch the glass. NOTES! You can use any kind of pot or pan for Ceramic Hob. Using your Hob To start cooking 1. After the hob be connected to electricity and power on. Press and hold the ON/OFF control button for about 3 seconds till you hear a “beep”...
- Page 18 • Make sure the bottom of the pan and the surface of the cooking zone are clean and dry. 3. Set heating level of cooking zone • You can adjust heat setting by touching the slider control. NOTES! 1. After connect to electricity, when power on, the buzzer of hob beeps once, all indicators light up for 1 second then go out.
- Page 19 1. Select and active the cooking zone which you would like to use extended zones, for those cooking zone with this feature. 1) For model BK 1725 C: Touch the slider control button of corresponding heating zone to active it for adjustment.
- Page 20 NOTES! 1. By continuous touch the control button, the extended zones work at below consequence: Dual zone: “Central-Dual-Central-Dual-Central-Zone” 2. When Dual Zone active, the heat level LED indicator of it will show heat setting and “ “ alternately. Using Booster Function-Induction Hob Some of induction hob models might have one or several cooking zones which has Booster function.
- Page 21 NOTES! The Booster function will last for 5 minutes. After booster finish, the cooking zone will return to original setting. Cancel the Booster function -Follow above practice of active Booster function one more time when Booster is working, could cancel the Booster function. -You can also cancel Booster function by adjust power level setting.
- Page 22 You can always turn the hob off with the ON/OFF control in an emergency, but you shall unlock the hob first in the next operation NOTES! Under Child Lock function, if turn the hob off without inactive the Child Lock function. When turn on the hob later, the Child Lock function will still valid.
- Page 23 Using The Timer When the hob is turned on, you can use the timer to turn either or more than one cooking zones off. • You can set timer for up to 99 minutes, the default setting is 30 minutes. Minute display shows the number Timer overview...
- Page 24 After adjusting, the setting in timer indicator flashing for 5 seconds, then be confirmed with setting stop flashing. When the timer is set, it will begin to count down immediately, the display will show the remaining time. NOTE: The red dot next to power level indicator will illuminate for those zones be set with timer.
- Page 25 Notes: 1. No heating takes place unless there is a suitable pan on the cooking zone. 2. The display will auto turn off after 2 minutes if no suitable pan is placed on it. 3. When an unsuitable size or non-magnetic pan (e.g. aluminum), or some other small item (e.g.
- Page 26 Over-heat Protection A temperature sensor equipped can monitor the temperature inside the hob. When an excessive temperature is monitored, the hob will auto stop operation. Cooking Guidelines Take care when frying as the oil and fat heat up quickly, particularly if you are using Booster function.
- Page 27 Searing steak To cook juicy flavorsome steaks: 1. Stand the meat at room temperature for about 20 minutes before cooking. 2. Heat up a heavy-based frying pan. 3. Brush both sides of the steak with oil. Drizzle a small amount of oil into the hot pan and then lower the meat onto the hot pan.
- Page 28 Heat Settings The settings below are guidelines only. The exact setting will depend on factors including your cookware and the amount you are cooking. Experiment with the hob to find the settings that best suit you. Heat setting Suitability 1 - 2 •...
- Page 29 PART 4 : CLEANING AND MAINTENANCE Cleaning and Maintenance IMPORTANT! Before any maintenance or cleaning work is carried out, DISCONNECT the appliance from ELECTRICITY supply and ensure the appliances is completely cool. Cleaning the Hob Surface Clean spillages from the hob surface as soon as possible after use. Always ensure the surface is cool enough before cleaning.
- Page 30 What? How? Important! Everyday 1. Switch off the power • When turn off the power soiling on supply of hob, there will supply. glass be no ‘hot surface’ 2. Apply a vitro-ceramic (fingerprints, indication but the cooking glass cleaner while marks, stains zone may still be hot! the glass is still...
- Page 31 Spillovers on 1. Switch off the power • The hob may beep and the touch supply. turn controls 2. Soak up the spill itself off, and the touch controls may not 3. Wipe the touch function while there is control area with a liquid on them.
- Page 32 - Whether liquid/wet cloth over touch control panel active overflow protection; 3. After cooking there is “H” shows on display: - This is normal. The hob is with Residual Heat Warning safety features. It will remain on until the surface is cool enough for touch. 4.
- Page 33 High temperature of the Check whether no liquid in pan sensor pan, fill with liquid then restart. High temperature of the Please restart after the IGBT temperature sensor induction hob cools down. For all other error codes, switch off and call your service provider.
Need help?
Do you have a question about the BK 1725 C and is the answer not in the manual?
Questions and answers