Table of Contents
Advertisement
Rating:
Amperes:
Sanding belt speed:
Sanding belt size:
Weight:
Need Assistance?
Call us on our toll free customer support line:
1-866-349-8665 (Monday through Friday 9am – 5pm
Eastern Time)
Technical questions
Replacement parts
Parts missing from package
PRODUCT SPECIFICATIONS
120V, 60Hz, AC
7.0 A
557–820 ft/min (no load)
3 x 21"
6 lb 7 oz (2.92kg)
1
3 x 21" BELT SANDER
241-0996
Owner's Manual
Advertisement
Table of Contents

Related Manuals for Performax 241-0996


Summary of Contents for Performax 241-0996
-
Page 1: Product Specifications
3 x 21" BELT SANDER 241-0996 Owner’s Manual PRODUCT SPECIFICATIONS Rating: 120V, 60Hz, AC Amperes: 7.0 A Sanding belt speed: 557–820 ft/min (no load) Sanding belt size: 3 x 21" Weight: 6 lb 7 oz (2.92kg) Need Assistance? Call us on our toll free customer support line: 1-866-349-8665 (Monday through Friday 9am –... -
Page 2: Table Of Contents
TABLE OF CONTENTS Product specifications ………….………………………………………………………………... Table of contents ……………………………………………………………………....General safety warnings ………………………………………………………………………… 3–4 Eye, ear & lung protection ………………………………………………………………………. 3–4 Electrical safety …………………………………………………………………………………... Power tool safety ……………………………………………………………………....5–6 General safety rules ……………………………………………………………………………... Work area ………………………………………………………………….……………………... Electrical safety …………………………………………………………………………………... Personal safety …………………………………………………………………………………... -
Page 3: General Safety Warnings
GENERAL SAFETY WARNINGS WARNING: Before using this tool or any of its accessories, read this manual and follow all Safety Rules and Operating Instructions. The important precautions, safeguards and instructions appearing in this manual are not meant to cover all possible situations. It must be understood that common sense and caution are factors which cannot be built into the product. -
Page 4: Electrical Safety
GENERAL SAFETY WARNINGS WEAR A DUST MASK THAT IS DESIGNED TO BE USED WHEN OPERATING A POWER TOOL IN A DUSTY ENVIRONMENT. WARNING: Dust that is created by power sanding, sawing, grinding, drilling, and other construction activities may contain chemicals that are known to cause cancer, birth defects, or other genetic abnormalities. -
Page 5: Power Tool Safety
POWER TOOL SAFETY WARNING: If operating a power tool in a damp location Read all safety warnings and is unavoidable, use a residual current device instructions. Failure to follow the warnings and (RCD) protected supply. Use of a ground fault instructions may result in electric shock, fire circuit interrupter (GFCI) reduces the risk of and/or serious injury. -
Page 6: Power Tool Use And Care
POWER TOOL SAFETY POWER TOOL SAFETY Power tool use and care Hold power tools by insulated gripping surfaces when performing an operation Do not force the power tool. Use the correct where the cutting tool may contact hidden wiring or its own cord. Contact with a “live“ power tool for your application. -
Page 7: Specific Safety Rules
SPECIFIC SAFETY RULES WARNING: Always turn the switch OFF and wait for the Know your belt sander. Read the Owner’s Manual carefully. Learn the sanding belt to come to a complete stop before tool’s applications and limitations, as well as putting the sander down. -
Page 8: Guidelines For Extension Cords
GUIDELINES FOR EXTENSION CORDS Make sure your extension cord is the proper When operating a power tool outdoors, use an outdoor extension cord marked “W-A” or size. When using an extension cord, be sure to “W”. These cords are rated for outdoor use and use one heavy enough to carry the current the tool will draw. -
Page 9: Symbols
SYMBOLS WARNING: Some of the following symbols may appear on the belt sander. Study these symbols and learn their meaning. Proper interpretation of these symbols will allow for more efficient and safer operation of this tool. Volts No load speed Alternating or direct Amperes current... -
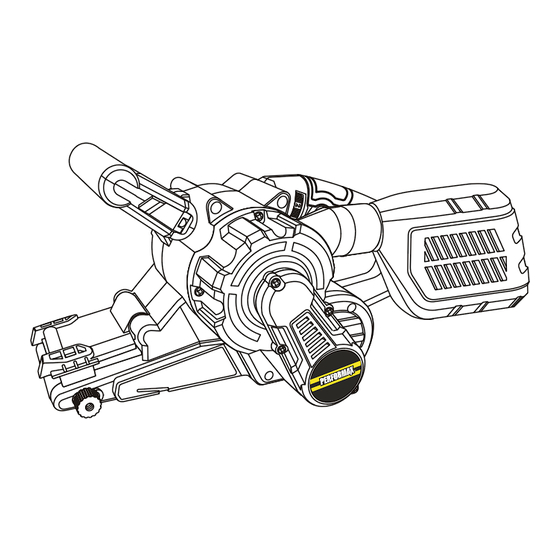
Page 10: Know Your Belt Sander
KNOW YOUR BELT SANDER Trigger switch lock-on button Adjustable front handle Rear Speed control Clamping handle wheel Dust box holes Vacuum port Adjustable handle latch Hinged sanding belt cover Motor vents Belt tension release lever Belt tracking on opposite knob side of base Clamps 3 x 21"... -
Page 11: Assembly And Operating
ASSEMBLY AND OPERATING INSTALLING THE DUST BOX OR ON/OFF TRIGGER SWITCH AND LOCK-ON ATTACHING A VACUUM HOSE BUTTON To install the dust box, insert the front of the 1. To turn the sander ON, squeeze the trigger dust box (1) into the dust port (2) (Fig. 1). switch (1) (Fig. -
Page 12: Changing A Sanding Belt
ASSEMBLY AND OPERATING CHANGING A SANDING BELT 4. Push the tension release lever back into the side of the sanding belt carrier. The sanding belt must be changed for the following reasons: 5. Squeeze the ON/OFF trigger switch • The belt is badly worn or torn momentarily and check to make sure the •... -
Page 13: Selecting The Correct Sanding Belt
ASSEMBLY AND OPERATING SELECTING THE CORRECT SANDING BELT WARNING The belt sander is designed to quickly remove For safety reasons, the operator must large amounts of materials. read the sections of this Owner’s Manual entitled "GENERAL SAFETY Selecting the correct sanding belt will allow the WARNINGS", "POWER TOOL SAFETY", belt sander to work more efficiently and produce "SPECIFIC SAFETY RULES",... -
Page 14: General Purpose Sanding
ASSEMBLY AND OPERATING ADJUSTING THE FRONT HANDLE – cont’d NOTES: a) It is important to keep the sander moving at all times while the sanding belt is in contact with the workpiece. Allowing the tool to become stationary will create a groove or detent in the workpiece. -
Page 15: Sanding Concave Surfaces
ASSEMBLY AND OPERATING USING THE SANDER AS A STATIONARY SANDING ROUGH WOOD SURFACES OR BELT SANDER REMOVING PAINT – cont’d For sanding smaller workpieces this sander can be clamped up-side down onto a work bench. 1. Turn the sander upside down at the edge of the work bench (1) (Fig. -
Page 16: Maintenance
MAINTENANCE GENERAL WARNING: Always wear safety goggles or safety glasses with side shields during all WARNING: When servicing this tool, cutting operations. It is critical that you wear use only identical replacement parts. The safety goggles or safety glasses with side use of any other part may create a hazard or shields and a dust mask while blowing dust cause product damage. -
Page 17: Exploded View
EXPLODED VIEW... -
Page 18: Parts Listing
PARTS LIST WARNING: When servicing, use only original equipment replacement parts. The use of any other parts may create a safety hazard or cause damage to the belt sander. Any attempt to repair or replace electrical parts on this belt sander may create a safety hazard unless repairs are performed by a qualified technician. - Page 19 PARTS LIST Key # Part # Part Name Quantity 4010010031 Bearing 626-2Z 2040080056 Big gear Washer Φ10.5xΦ20x1.5 2030020123 2040290104 Drive wheel shaft 1061040007 Switch 1250010003 Terminal block 4030010099 Screw ST3.9x14 2030050002 Cord clamp 3140010004 Cord sleeve 1190290013 UL cord 1230030025 Brush holder 4030010020 Screw ST2.9x6...
-
Page 20: Warranty
® back to your nearest MENARDS® retail store. At its discretion, PERFORMAX agrees to have the tool or any defective part(s) repaired or replaced with the ®...
Need help?
Do you have a question about the 241-0996 and is the answer not in the manual?
Questions and answers