Tandem t:slim X2 User Manual
Insulin pump with control-iq technology
Hide thumbs
Also See for t:slim X2:
- User manual (364 pages) ,
- Training manual (142 pages) ,
- Manual (11 pages)
Table of Contents
Advertisement
Quick Links
Advertisement
Table of Contents
Troubleshooting

Related Manuals for Tandem t:slim X2


Summary of Contents for Tandem t:slim X2
- Page 1 User Guide MMOL/L...
- Page 3 It also provides step-by-step instructions on how Control-IQ technology to operate safely. to properly program, manage and care for your t:slim X2 insulin pump with Control-IQ technology. Changes in equipment, software, or procedures occur periodically;...
-
Page 4: Table Of Contents
Radiology and Medical Procedures and Your t:slim X2 Pump ....... . - Page 5 What your t:slim X2 Pump Package Includes ........
- Page 6 4.13 Sound Volume ................67 4.14 Turn Security PIN On or Off .
- Page 7 Disconnecting When Using Control-IQ Technology ..........105 Chapter 9 • t:slim X2 Insulin Pump Information and History t:slim X2 Pump Info .
- Page 8 12.14 Data Error Alert ................137 Chapter 13 • t:slim X2 Insulin Pump Alarms 13.1...
- Page 9 Potential Benefits From Using the t:slim X2 Insulin Pump with CGM ......
- Page 10 Reasons You May Need to Calibrate ............204 Chapter 24 • Viewing CGM Data on Your t:slim X2 Insulin Pump 24.1...
- Page 11 Chapter 25 • CGM Alerts and Errors 25.1 Startup Calibration Alert ..............215 25.2 Second Startup Calibration Alert .
- Page 12 26.6 Sensor Inaccuracies ............... 240 Section 4: Control-IQ Technology Features Chapter 27 •...
- Page 13 X2 Pump Performance Characteristics ........
- Page 14 33.14 t:slim X2 Insulin Pump Event Data (Black Box) ....... .
-
Page 15: Section 1: Before You Begin
Before You Begin CHAPTER 1 Introduction... -
Page 16: Conventions Of This Guide
CHAPTER 1 • Introduction 1.1 Conventions of This Guide The following are conventions used in this user guide (such as terms, icons, text formatting, and other conventions) along with their explanations. Formatting Conventions Convention Explanation Bolded Text Text that is in bold in a sentence or step indicates an on-screen icon or physical button name. Italic Text Text that is in italics indicates the name of a screen or menu on the pump display. - Page 17 CHAPTER 1 • Introduction Symbol Definitions Symbol Definition ⚑ Calls out an important note regarding the use or operation of the system. ⚠ Calls out safety precautions which, if ignored, could result in minor or moderate injury. ⚠ Calls out critical safety information which, if ignored, could result in serious injury or death. Indicates how the pump responds to the previous instruction.
-
Page 18: Explanation Of Symbols
The following are symbols (and their descriptions), which you may find on your pump, pump supplies and/or their packaging. These symbols tell you about the proper and safe use of the pump. Some of these symbols may not be relevant in your region, and are listed for informational purposes only. Explanation of t:slim X2 Insulin Pump Symbols Symbol Definition... - Page 19 CHAPTER 1 • Introduction Explanation of t:slim X2 Insulin Pump Symbols (Continued) Symbol Definition Symbol Definition Authorized Representative in the European Community Indicates the authorized representative in Switzerland Manufacturer CE marking of conformity Date of manufacture IEC Class II Equipment...
-
Page 20: System Description
Control-IQ™ technology, referred to as direction and rate of change arrows. embedded in the t:slim X2 pump the “pump” or the “t:slim X2 pump,” software. This feature enables the t:slim The sensor measures glucose in the consists of the t:slim X2 insulin pump, X2 pump to automatically adjust the interstitial fluid under the skin—not in... -
Page 21: Indications For Use
(either the communicate with compatible, digitally mellitus in persons six years of age and t:slim X2 pump or the Dexcom receiver), but you connected devices. greater. can still use the Dexcom G6 CGM app and your... -
Page 22: Important User Information
Younger children may inadvertently guide and other applicable user guides, The t:slim X2 insulin pump with Control-IQ press or tap the pump, leading to you may be putting your health and technology should not be used in children under unintentional delivery of insulin. -
Page 23: Emergency Kit
CHAPTER 1 • Introduction • Extra snack for longer coverage component pieces may cause internal injury or delivery. If the Security PIN is turned on, the infection. Quick Bolus feature is automatically disabled. than fast-acting carbohydrate Inadvertent screen taps, button presses, or •... - Page 24 CHAPTER 1 • Introduction This Page is Intentionally Left Blank...
-
Page 25: Section 2: T:slim X2 Insulin Pump Features
X2 Insulin Pump Features CHAPTER 2 Important Safety Information... -
Page 26: T:slim X2 Insulin Pump Warnings
The following includes important safety Consult with your healthcare provider for your over deliver insulin, which can lead to severe information related to your t:slim X2™ individual training needs for the pump. Failure to hypoglycemia (low BG) events. pump and its components. The... - Page 27 Care. Use of cartridges not manufactured by result in an inaccurate display of the insulin level may cause hypoglycemia (low BG) or Tandem Diabetes Care or reuse of cartridges on the Home screen and you could run out of hyperglycemia (high BG) events.
-
Page 28: Magnetic Resonance Imaging Safety
12 inches to any part of the t:slim X2 button presses that may lead to insulin delivery pump, including cables specified by the or changes in the pump settings. -
Page 29: Radiology And Medical Procedures And Your T:slim X2 Pump
Cardioverter Defibrillator (AICD) pump. The pump is a sealed device that should placement or reprogramming » X-ray be opened and repaired only by Tandem » Cardiac Catheterization » Computed Tomography (CT) scan Diabetes Care. Modification could result in a » Nuclear Stress Test »... - Page 30 CHAPTER 2 • Important Safety Information the insertion site on your body to avoid infection. ⚠ PRECAUTION ⚠ PRECAUTION Contact your healthcare provider if you have CHECK the tubing connection between your ALWAYS make sure that the correct time and symptoms of infection at your insulin infusion cartridge tubing and infusion set tubing daily to date are set on your insulin pump.
- Page 31 CHAPTER 2 • Important Safety Information cannula to be pulled out of the infusion site. For ⚠ PRECAUTION ⚠ PRECAUTION this reason it is recommended not to charge the DO NOT use the vibrate feature for alerts and AVOID exposure of your pump to temperatures pump while sleeping.
-
Page 32: Potential Benefits From Using Your Pump
If you choose to use a pump case or other units of insulin or grams of levels as recommended by your healthcare accessories not provided by Tandem, DO NOT carbohydrate. provider. cover the six vent holes on the back of the •... -
Page 33: Possible Risks From Using Your Pump
CHAPTER 2 • Important Safety Information and correction boluses (IOB). When Other risks associated with infusion 2.6 Possible Risks From Using programming additional food or sets include occlusions and air bubbles Your Pump correction boluses, the pump will in the tubing or dislodged cannula, subtract the amount of IOB from which can affect insulin delivery. -
Page 34: Working With Your Healthcare Provider
CHAPTER 2 • Important Safety Information ⚠ PRECAUTION 2.7 Working with your Healthcare 2.8 Verification of Proper CONFIRM that the screen display turns on, you Provider Functionality can hear audible beeps, feel the pump vibrate, and see the green LED light blinking around the Any clinical language presented in this A power supply (AC adapter with edge of the Screen On/Quick Bolus button... - Page 35 X2 Insulin Pump Features CHAPTER 3 Getting to Know Your t:slim X2 Insulin Pump...
-
Page 36: What Your T:slim X2 Pump Package Includes
CHAPTER 3 • Getting to Know Your t:slim X2 Insulin Pump Your pump comes with a protective Supply Reordering 3.1 What your t:slim X2 Pump cover in the place where the cartridge is To order cartridges, infusion sets, Package Includes normally inserted. - Page 37 CHAPTER 3 • Getting to Know Your t:slim X2 Insulin Pump Bolus insulin. Also known as the Insulin Load A bolus is a quick dose of insulin that is Sensitivity Factor (ISF). Load refers to the process of removing, usually delivered to cover food eaten or...
- Page 38 CHAPTER 3 • Getting to Know Your t:slim X2 Insulin Pump Units Units are the measurement for insulin. USB Cable USB is the abbreviation for Universal Serial Bus. The USB cable connects into the pump’s micro USB port. ⚠ WARNING...
-
Page 39: Explanation Of T:slim X2 Insulin Pump Icons
CHAPTER 3 • Getting to Know Your t:slim X2 Insulin Pump 3.3 Explanation of t:slim X2 Insulin Pump Icons The following icons may appear on your pump screen: Pump Icon Definitions Symbol Definition Symbol Definition The amount of charge left in the pump battery. - Page 40 CHAPTER 3 • Getting to Know Your t:slim X2 Insulin Pump Pump Icon Definitions (Continued) Symbol Definition Symbol Definition Security PIN has been enabled. See Section 4.14 Turn Space. Tap to enter a space on the character keypad. Security PIN On or Off.
-
Page 41: Explanation Of Pump Colors
CHAPTER 3 • Getting to Know Your t:slim X2 Insulin Pump 3.4 Explanation of Pump Colors Red LED 1 red blink every 30 seconds indicates a malfunction or alarm condition. Yellow LED 1 yellow blink every 30 seconds indicates an alert or reminder condition. -
Page 42: Pump Back Side
CHAPTER 3 • Getting to Know Your t:slim X2 Insulin Pump 3.5 Pump Back Side 1. t:slim X2 Cartridge: A single-use disposable cartridge can hold up to 300 units (3.0 mL) of insulin. 2. Vent Holes: Vent holes help the pump function correctly. - Page 43 CHAPTER 3 • Getting to Know Your t:slim X2 Insulin Pump...
-
Page 44: Lock Screen
CHAPTER 3 • Getting to Know Your t:slim X2 Insulin Pump 8. Insulin Level: Displays the current 3.6 Lock Screen amount of insulin in the cartridge. The Lock screen appears anytime you 9. Tandem Logo: Returns to the turn on the screen. You must tap 1–2–3 Home screen. - Page 45 CHAPTER 3 • Getting to Know Your t:slim X2 Insulin Pump...
-
Page 46: Home Screen
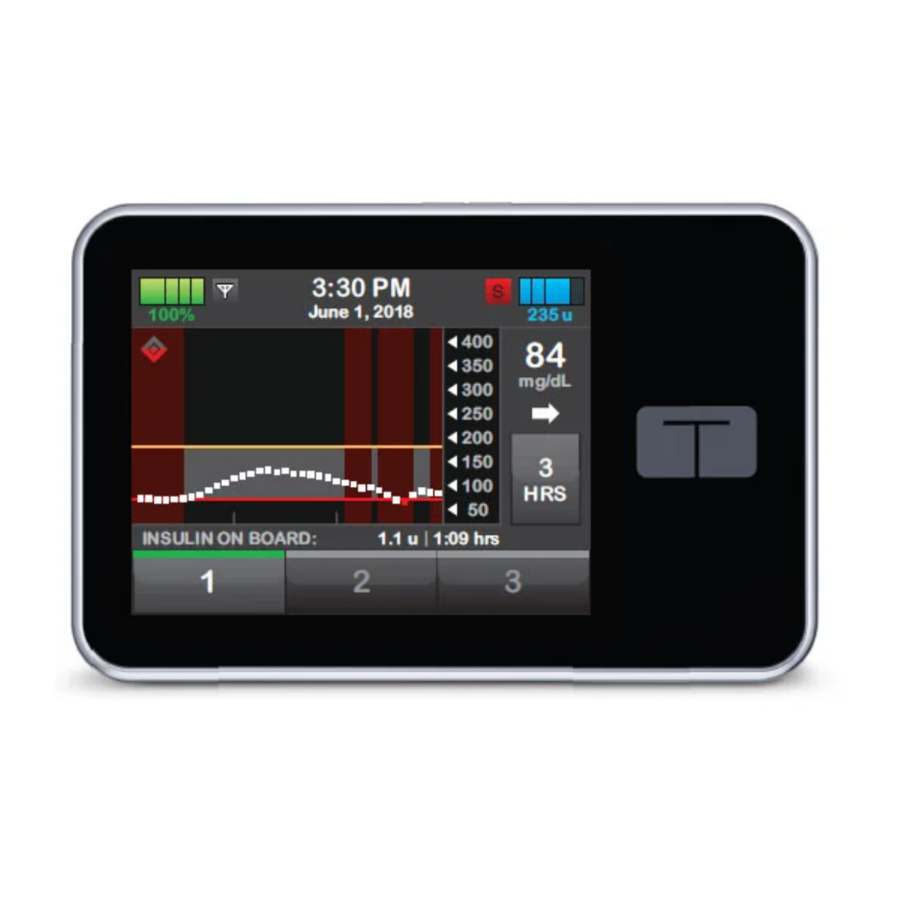
CHAPTER 3 • Getting to Know Your t:slim X2 Insulin Pump 8. Insulin Level: Displays the current 3.7 Home Screen amount of insulin in the cartridge. 1. Battery Level: Displays the level of 9. Tandem Logo: Returns to the battery power remaining. When Home screen. - Page 47 CHAPTER 3 • Getting to Know Your t:slim X2 Insulin Pump...
-
Page 48: Current Status Screen
CHAPTER 3 • Getting to Know Your t:slim X2 Insulin Pump 7. Correction Factor: Displays current The mobile connection may not yet 3.8 Current Status Screen correction factor used to calculate a be available in your region. bolus. The Current Status screen can be accessed from the Lock screen and the 8. - Page 49 CHAPTER 3 • Getting to Know Your t:slim X2 Insulin Pump...
-
Page 50: Bolus Screen
CHAPTER 3 • Getting to Know Your t:slim X2 Insulin Pump Control-IQ technology is turned 3.9 Bolus Screen on and available The Bolus screen will default to use A CGM session is active units of insulin in calculating a bolus. - Page 51 CHAPTER 3 • Getting to Know Your t:slim X2 Insulin Pump Using Units Using Grams...
-
Page 52: Options Screen
CHAPTER 3 • Getting to Know Your t:slim X2 Insulin Pump 8. Device Settings: Display settings, 3.10 Options Screen Bluetooth settings, Time and Date, Sound Volume, and Security PIN. : Returns to the Home screen. 9. History: Displays historical log of 2. - Page 53 CHAPTER 3 • Getting to Know Your t:slim X2 Insulin Pump...
-
Page 54: My Pump Screen
CHAPTER 3 • Getting to Know Your t:slim X2 Insulin Pump 3.11 My Pump Screen : Returns to the Options screen. 2. Personal Profiles: A group of settings that define basal and bolus delivery. 3. Control-IQ: Turn on/off Control-IQ technology and enter required values. - Page 55 CHAPTER 3 • Getting to Know Your t:slim X2 Insulin Pump...
-
Page 56: Device Settings Screen
CHAPTER 3 • Getting to Know Your t:slim X2 Insulin Pump 3.12 Device Settings Screen : Returns to the Options screen. 2. Display Settings: Customize the Screen Timeout settings. 3. Bluetooth Settings: Turn on/off mobile connection. The mobile connection may not yet be available in your region. - Page 57 CHAPTER 3 • Getting to Know Your t:slim X2 Insulin Pump...
-
Page 58: Number Keypad Screen
CHAPTER 3 • Getting to Know Your t:slim X2 Insulin Pump 3.13 Number Keypad Screen 1. Value Entered. : Returns to previous screen. 3. Keypad Numbers. : Allows numbers to be added on the gram screen. If in units, this displays as a decimal point. - Page 59 CHAPTER 3 • Getting to Know Your t:slim X2 Insulin Pump...
-
Page 60: Letter Keypad Screen
CHAPTER 3 • Getting to Know Your t:slim X2 Insulin Pump 3.14 Letter Keypad Screen 1. Name of Profile. : Returns to previous screen. : Enters a space. 4. 123: Changes keypad mode from letters (ABC) to numbers (123). : Saves entered information. - Page 61 CHAPTER 3 • Getting to Know Your t:slim X2 Insulin Pump...
- Page 62 CHAPTER 3 • Getting to Know Your t:slim X2 Insulin Pump This Page is Intentionally Left Blank...
- Page 63 X2 Insulin Pump Features CHAPTER 4 Getting Started...
-
Page 64: Charging The T:slim X2 Pump
USB cable may cause the the charger must be connected to an isolated, t:slim X2 insulin pump to minimize the risk of cannula to be pulled out of the infusion site. For battery powered 12 Volt system, such as an fire or burns. -
Page 65: Turning The Pump On
If these features are not working, press the Screen On/Quick Bolus 2. Plug the other end of the cable into discontinue use of the t:slim X2™ pump and button, then use the pad of your finger the micro USB port on the pump. -
Page 66: Turning The T:slim X2 Pump Screen On
Off). The pump continues to function normally when the screen is not on. ⚑ NOTE When using the pump, tap the Tandem logo to 4.7 Turning the Pump Off return to the Home screen or tap to return to the previous screen. -
Page 67: Unlocking The T:slim X2 Pump Screen
CHAPTER 4 • Getting Started 6. Tap Time. 4.8 Unlocking the t:slim X2 Pump 4.9 Edit Time Screen 7. Using the on-screen keypad, enter After powering up your pump for the the hour and minutes. Verify and The Lock screen appears anytime you first time, set the current time and date. -
Page 68: Basal Limit
Basal Limit setting, the Basal Limit will be set to a value two times the highest basal rate setting in your pump. 9. Tap the Tandem logo to return to 6. Using the on-screen keypad, enter 1. From the Home screen, tap the Home screen. -
Page 69: Display Settings
CHAPTER 4 • Getting Started 7. Tap the Tandem logo to return to 6. Select preferred volume. 4.12 Display Settings the Home screen. 7. Continue to make changes for all The display settings for your t:slim X2 Sound Volume options by repeating 4.13 Sound Volume... - Page 70 CHAPTER 4 • Getting Started 6. Tap Security PIN to toggle the 1. From the Home screen, tap 11. Use the keypad to enter a new feature on. OPTIONS. Security PIN. 7. Tap to create your Security 2. Tap the Down Arrow. 12.
- Page 71 X2 Insulin Pump Features CHAPTER 5 Insulin Delivery Settings...
-
Page 72: Personal Profiles Overview
Bolus Settings. for you. Only your healthcare provider can determine and help you adjust your basal The t:slim X2 pump uses the settings in rate(s), carb ratio(s), correction factor(s), target Creating Personal Profiles your active profile to calculate the BG, and duration of insulin action. - Page 73 CHAPTER 5 • Insulin Delivery Settings Although you do not need to define • Insulin Duration (how long a bolus session ends. If you enter a value for your every setting, some pump features basal rate that is higher than 3 units/hour, lowers your BG) require certain settings to be defined you will receive less insulin than expected...
-
Page 74: Programming A New Personal Profile
CHAPTER 5 • Insulin Delivery Settings Insulin Duration and Insulin on Board delivered above and below the 6. Tap Press to Set Up to begin (IOB) programmed basal rate, in addition to setting insulin delivery settings. all bolus insulin delivered. The insulin Your pump remembers how much duration time is not displayed on the insulin you have taken from previous... - Page 75 CHAPTER 5 • Insulin Delivery Settings • Be sure to tap after entering or ⚑ NOTE Control-IQ technology works, see Chapter changing a value. 29 Introduction to Control-IQ Technology. If you have previously set a Basal Limit in the Pump Settings, then the Basal rate ⚠...
- Page 76 12:00 PM, the default will change to correct. Tap to make changes. 4. Tap 6. Tap the Tandem logo to return to 5. Repeat steps from Section the Home screen. 5.2 Creating a New Profile...
-
Page 77: Editing Or Reviewing An Existing Profile
Control-IQ technology is enabled. Tap and make changes. changes as needed and use the on-screen keypad to enter 15. Tap the Tandem logo to return to changes. Tap 5.4 Editing or Reviewing an the Home screen. Existing Profile 9. -
Page 78: Duplicating An Existing Profile
CHAPTER 5 • Insulin Delivery Settings A new Personal Profile will be activate it (that profile is ⚑ NOTE created with the same settings as automatically activated). To delete a time segment, tap on the X to the the profile copied. left of the time segment and tap 5. -
Page 79: Deleting An Existing Profile
CHAPTER 5 • Insulin Delivery Settings 6. Using the on-screen keypad, 7. Tap the Tandem logo to return to If you program a Temp Rate more than rename the profile name (up to 16 the Home screen. the maximum allowable basal rate of 15... -
Page 80: Stopping A Temp Rate
CHAPTER 5 • Insulin Delivery Settings 7. Tap Duration. Using the on-screen 5.10 Stopping a Temp Rate keypad enter desired length of time for Temp Rate. Tap To stop an active temp rate: You can always tap View Units to 1. - Page 81 X2 Insulin Pump Features CHAPTER 6 Infusion Site Care and Loading Cartridge...
-
Page 82: Infusion Site Selection And Care
CHAPTER 6 • Infusion Site Care and Loading Cartridge • The abdomen is the most popular set if you notice leaks around the site, or if you 6.1 Infusion Site Selection and suspect your infusion set cannula may have site because of access to fatty Care become dislodged. - Page 83 CHAPTER 6 • Infusion Site Care and Loading Cartridge • The infusion set must be replaced and rotated every 48–72 hours, or more often if needed. Areas of Body for Infusion Set Insertion • With experience, you will find areas that not only provide better absorption, but are more comfortable.
-
Page 84: Cartridge Instructions For Use
FOLLOWING: cartridge with insulin and load the pump. Control-IQ technology will then cartridge into your t:slim X2 pump. The immediately begin to operate normally. • 1 unopened cartridge single-use disposable cartridge can hold up to 300 units (3.0 mL) of insulin. - Page 85 CHAPTER 6 • Infusion Site Care and Loading Cartridge The illustration identifies the Instructions for Drawing Insulin from 1. Inspect the needle and syringe connector and insulin fill port used in Vial into Syringe package for any signs of damage. the cartridge filling process.
- Page 86 CHAPTER 6 • Infusion Site Care and Loading Cartridge syringe into vial. Maintain pressure 8. Slowly pull back the plunger to the 10. Check the syringe for air bubbles on syringe plunger. desired amount of insulin. and do one of the following: ...
- Page 87 CHAPTER 6 • Infusion Site Care and Loading Cartridge 5. Make sure the needle is still in the fill port and release the plunger. Pressure will pull the plunger to its neutral position but it will NOT push any air back inside the cartridge. 4.
- Page 88 Make sure cartridge is lined up to both guide During the load sequence, the tracks. Tandem logo is disabled. Tapping it 10. Maintain pressure on the plunger will not return to the Home screen. while you remove the needle from the cartridge.
-
Page 89: Filling Tubing
CHAPTER 6 • Infusion Site Care and Loading Cartridge cartridge onto the pump. Tap the To fill the tubing without changing the cartridge. This can cause very high BG, or UNLOCK icon when completed. Diabetic Ketoacidosis (DKA). cartridge, from the Home screen tap OPTIONS, tap Load, tap Fill Tubing and then follow the instructions. - Page 90 CHAPTER 6 • Infusion Site Care and Loading Cartridge 3. Be careful to keep the tubing 5. Hold the pump vertically to ensure 20–25 units for 110 cm (43 inch) connector away from unclean any air in the cartridge will be tubing areas.
-
Page 91: Filling Cannula
CHAPTER 6 • Infusion Site Care and Loading Cartridge b. If you want to fill the tubing with To Fill the Cannula: The amount of insulin remaining displayed more than 30 units, tap FILL to on the Home screen will decrease 5 units at 1. -
Page 92: Setting Site Reminder
CHAPTER 6 • Infusion Site Care and Loading Cartridge After fill is complete, STOPPING 1. Tap if correct. Tap Edit ⚑ NOTE FILL screen is displayed. Reminder if settings need to be If this is the first time using your pump and changed. - Page 93 X2 Insulin Pump Features CHAPTER 7 Manual Bolus...
-
Page 94: Manual Bolus Overview
(low BG) events. Pay attention to IOB and the bolus calculator recommended dose before Your t:slim X2 pump offers you the 7.2 Correction Bolus Calculation delivering large or multiple boluses. ability to deliver different boluses to... - Page 95 CHAPTER 7 • Manual Bolus present, it is subtracted only from deliver a correction bolus. Individual CGM values values were auto-populated. See Section 32.9 the correction portion of the bolus. may not be as accurate as BG meter values. Additional Analysis of Glucose Value Auto-Population with CGM for more information.
- Page 96 CHAPTER 7 • Manual Bolus Correction Bolus confirmation screen is can tap on the glucose value on the value is changed, if the manually displayed if appropriate after you Bolus screen. inputted value is above or below your manually enter your BG value on the Target BG, your pump will again Bolus screen.
- Page 97 CHAPTER 7 • Manual Bolus • To decline the correction bolus, be subtracted from any food bolus ⚑ NOTE press . No correction bolus will you request on the Bolus screen. For more information about CGM trend be added to any food bolus you arrows and how to use them for treatment Within Target request on the Bolus screen.
-
Page 98: Bolus Override
CHAPTER 7 • Manual Bolus saved in your pump history whether Tap if entered data is 7.4 Food Bolus Using Units or not a bolus is delivered. correct. If you are using Control-IQ technology, 4. Follow the steps in the appropriate ... -
Page 99: Extended Bolus
CHAPTER 7 • Manual Bolus 4. Check that the grams of carb are After the bolus delivery is complete, When extending a bolus, any correction entered in the correct location on an icon displays below the CGM bolus amount will always be given in the the screen. - Page 100 CHAPTER 7 • Manual Bolus Tap if entered data is The DELIVER LATER portion of the Tap to go back to make correct. extended bolus also has minimum changes or view calculations. and maximum rates. If you program ...
-
Page 101: Max Bolus
CHAPTER 7 • Manual Bolus 5. Tap Max Bolus. 7.7 Max Bolus 7.8 Quick Bolus The Max Bolus setting allows you to set The Quick Bolus function enables you a limit to the maximum insulin delivery to deliver a bolus by simply pressing a amount for a single bolus. - Page 102 2. Tap My Pump. changes. desired amount is reached. The pump will beep/vibrate for each 3. Tap Personal Profiles. 12. Tap the Tandem logo to return to button press. the Home screen. 4. Tap Pump Settings. 3. Wait for the pump to beep/vibrate...
-
Page 103: Canceling Or Stopping A Bolus
CHAPTER 7 • Manual Bolus You cannot exceed the Max Bolus use the touchscreen to enter bolus 2. Tap to cancel the bolus. setting defined in your Pump information. Settings when using the Quick Bolus feature. Once you reach the ... - Page 104 CHAPTER 7 • Manual Bolus The BOLUS STOPPED screen is displayed and the units delivered are calculated. Units requested and delivered are shown. 4. Tap...
- Page 105 X2 Insulin Pump Features CHAPTER 8 Starting, Stopping, or Resuming Insulin...
-
Page 106: Starting, Insulin Delivery
2. Tap STOP INSULIN. corresponds with the time you If pump screen is not on, press Screen would like the Resume Pump Alarm A confirmation screen displays. On/Quick Bolus button once to turn on to display. your t:slim X2 pump screen. -
Page 107: Disconnecting When Using Control-Iq Technology
CHAPTER 8 • Starting, Stopping, or Resuming Insulin 1. Tap 1–2–3. 2. Tap The RESUMING INSULIN screen is temporarily displayed. – OR – 1. From the Home screen, tap OPTIONS. 2. Tap RESUME INSULIN. 3. Tap The RESUMING INSULIN screen is temporarily displayed. - Page 108 CHAPTER 8 • Starting, Stopping, or Resuming Insulin This Page is Intentionally Left Blank...
- Page 109 X2 Insulin Pump Features CHAPTER 9 t:slim X2 Insulin Pump Information and History...
-
Page 110: T:slim X2 Pump Information
CHAPTER 9 • t:slim X2 Insulin Pump Information and History the oldest events are removed from the declared. The letter “C” (C: Alert) 9.1 t:slim X2 Pump Info history log and replaced with the most indicates the time it was cleared. - Page 111 X2 Insulin Pump Features CHAPTER 10 t:slim X2 Insulin Pump Reminders...
-
Page 112: Low Bg Reminders
CHAPTER 10 • t:slim X2 Insulin Pump Reminders Your pump lets you know important until acknowledged. Reminders do not 6. Low BG is set to on; to turn off, tap information about the System with escalate. Low BG. Reminders, Alerts, and Alarms. -
Page 113: After Bolus Bg Reminder
CHAPTER 10 • t:slim X2 Insulin Pump Reminders value is read. When you turn this to 16.7 mmol/L) that you want 1. From the Home screen, tap reminder on, you need to set a high to trigger the reminder, then tap OPTIONS. -
Page 114: Missed Meal Bolus Reminder
CHAPTER 10 • t:slim X2 Insulin Pump Reminders c. Tap Selected Days and tap the To Respond to the Missed Meal Bolus 10.4 Missed Meal Bolus Reminder day(s) you want the reminder to Reminder be on, then tap To clear the reminder tap The Missed Meal Bolus Reminder lets deliver a bolus if necessary. - Page 115 X2 Insulin Pump Features CHAPTER 11 User Settable Alerts and Alarms...
-
Page 116: Low Insulin Alerts
11.1 Low Insulin Alert specified number of hours and the pump will shut down after 60 seconds. Your t:slim X2™ pump keeps track of 7. Tap when all changes are When the number of hours since you how much insulin remains in the complete. -
Page 117: Max Basal Alert
4.11 Basal Limit), you will receive an alert if the following scenarios occur. 10. Tap the Tandem logo to return to the Home screen. 1. A Temp Rate was requested that exceeds the Basal Limit. To Respond to Auto-Off Warning 2. - Page 118 CHAPTER 11 • User Settable Alerts and Alarms the same Basal Limit value that was set up in Personal Profiles.
- Page 119 X2 Insulin Pump Features CHAPTER 12 t:slim X2 Insulin Pump Alerts...
- Page 120 CHAPTER 12 • t:slim X2 Insulin Pump Alerts Your pump lets you know important until acknowledged. Alerts do not information about its performance with escalate. Reminders, Alerts, and Alarms. ⚑ NOTE Reminders are displayed to notify you There is an additional list of alerts and errors...
-
Page 121: Low Insulin Alerts
CHAPTER 12 • t:slim X2 Insulin Pump Alerts 12.1 Low Insulin Alert Screen Explanation What will I see on the screen? What does it mean? 5 units or less of insulin remain in the cartridge. 2 sequences of 3 notes or 2 vibrations depending on the How will the pump notify me? volume/vibrate setting selected in Sound Volume. -
Page 122: Low Power Alerts
CHAPTER 12 • t:slim X2 Insulin Pump Alerts 12.2 Low Power Alerts Low Power Alert 1 Screen Explanation What will I see on the screen? What does it mean? Less than 25% of battery power remains. 2 sequences of 3 notes or 2 vibrations depending on the How will the pump notify me? volume/vibrate setting selected in Sound Volume. - Page 123 CHAPTER 12 • t:slim X2 Insulin Pump Alerts Low Power Alert 2 Screen Explanation What will I see on the screen? Less than 5% of battery power remains. Insulin delivery will What does it mean? continue for 30 minutes and then the pump will power off and insulin delivery will stop.
-
Page 124: Incomplete Bolus Alert
CHAPTER 12 • t:slim X2 Insulin Pump Alerts 12.3 Incomplete Bolus Alert Screen Explanation What will I see on the screen? You started a bolus request but did not complete the request within What does it mean? 90 seconds. 2 sequences of 3 notes or 2 vibrations depending on the How will the pump notify me? volume/vibrate setting selected in Sound Volume. -
Page 125: Incomplete Temp Rate Alert
CHAPTER 12 • t:slim X2 Insulin Pump Alerts 12.4 Incomplete Temp Rate Alert Screen Explanation What will I see on the screen? You started to set up a temp rate but did not complete the request What does it mean? within 90 seconds. -
Page 126: Incomplete Load Sequence Alerts
CHAPTER 12 • t:slim X2 Insulin Pump Alerts 12.5 Incomplete Load Sequence Alerts Incomplete Cartridge Change Alert Screen Explanation What will I see on the screen? You selected Change Cartridge from the Load menu but did not What does it mean? complete the process within 3 minutes. - Page 127 CHAPTER 12 • t:slim X2 Insulin Pump Alerts Incomplete Fill Tubing Alert Screen Explanation What will I see on the Screen? You selected Fill Tubing from the Load menu but did not complete What does it mean? the process within 3 minutes.
- Page 128 CHAPTER 12 • t:slim X2 Insulin Pump Alerts Incomplete Fill Cannula Alert Screen Explanation What will I see on the Screen? You selected Fill Cannula from the Load menu but did not complete What does it mean? the process within 3 minutes.
-
Page 129: Incomplete Setting Alert
CHAPTER 12 • t:slim X2 Insulin Pump Alerts 12.6 Incomplete Setting Alert Screen Explanation What will I see on the screen? You started to set up a new Personal Profile or Control-IQ What does it mean? technology setting but did not save or complete the programming within 5 minutes. -
Page 130: Basal Rate Required Alert
CHAPTER 12 • t:slim X2 Insulin Pump Alerts 12.7 Basal Rate Required Alert Screen Explanation What will I see on the screen? You did not enter a basal rate in a time segment in Personal Profiles. What does it mean? A basal rate must be entered in each time segment (rate can be 0 u/hr). -
Page 131: Max Hourly Bolus Alert
CHAPTER 12 • t:slim X2 Insulin Pump Alerts 12.8 Max Hourly Bolus Alert Screen Explanation What will I see on the screen? In the previous 60 minutes, you requested total bolus delivery that is What does it mean? more than 1.5 times your Max Bolus setting. -
Page 132: Max Bolus Alerts
CHAPTER 12 • t:slim X2 Insulin Pump Alerts 12.9 Max Bolus Alerts Max Bolus Alert 1 Screen Explanation What will I see on the screen? You requested a bolus larger than the Max Bolus setting in your What does it mean? active Personal Profile. - Page 133 CHAPTER 12 • t:slim X2 Insulin Pump Alerts Max Bolus Alert 2 The following applies only if you have Carbs turned on in your active Personal Profile and your Max Bolus amount is set to 25 units. Screen Explanation What will I see on the screen?
-
Page 134: Max Basal Alert
CHAPTER 12 • t:slim X2 Insulin Pump Alerts 12.10 Max Basal Alert Screen Explanation What will I see on the screen? An active Temp Rate exceeds your Basal Limit setting due to a new What does it mean? timed segment activation within Personal Profiles. This alert will only display once your timed segment changes. -
Page 135: Min Basal Alerts
CHAPTER 12 • t:slim X2 Insulin Pump Alerts 12.11 Min Basal Alerts Min Basal Alert 1 Screen Explanation What will I see on the screen? When entering a basal rate or requesting a temp rate, you requested What does it mean? a basal rate less than half of the lowest basal rate defined in your Personal Profile. - Page 136 CHAPTER 12 • t:slim X2 Insulin Pump Alerts Min Basal Alert 2 Screen Explanation What will I see on the screen? An active temp rate dropped below half of your lowest basal setting What does it mean? defined in your Personal Profile.
-
Page 137: Connection Error Alert
CHAPTER 12 • t:slim X2 Insulin Pump Alerts 12.12 Connection Error Alert Screen Explanation What will I see on the screen? You connected pump to a computer with the USB cable to charge it What does it mean? and a connection could not be made. -
Page 138: Power Source Alert
CHAPTER 12 • t:slim X2 Insulin Pump Alerts 12.13 Power Source Alert Screen Explanation What will I see on the screen? You connected your pump to a power source that does not have What does it mean? enough power to charge the pump. -
Page 139: Data Error Alert
CHAPTER 12 • t:slim X2 Insulin Pump Alerts 12.14 Data Error Alert Screen Explanation What will I see on the screen? Your pump encountered a condition that could potentially result in a What does it mean? loss of data. 2 sequences of 3 notes or 2 vibrations depending on the How will the pump notify me? volume/vibrate setting selected in Sound Volume. - Page 140 CHAPTER 12 • t:slim X2 Insulin Pump Alerts This Page is Intentionally Left Blank...
- Page 141 X2 Insulin Pump Features CHAPTER 13 t:slim X2 Insulin Pump Alarms...
- Page 142 CHAPTER 13 • t:slim X2 Insulin Pump Alarms Information in this section will help you ⚠ PRECAUTION learn how to respond to Alarms. CHECK your pump regularly for potential alarm conditions that may display. It is important to be Alarms notify you with 3 sequences of 3...
-
Page 143: Resume Pump Alarms
CHAPTER 13 • t:slim X2 Insulin Pump Alarms 13.1 Resume Pump Alarm Screen Explanation What will I see on the screen? You selected STOP INSULIN in the Options menu and insulin What does it mean? delivery has been stopped for more than 15 minutes. -
Page 144: Low Power Alarm
CHAPTER 13 • t:slim X2 Insulin Pump Alarms 13.2 Low Power Alarm Screen Explanation What will I see on the screen? Your pump detected a power level of 1% or less remaining and all What does it mean? deliveries have stopped. -
Page 145: Empty Cartridge Alarm
CHAPTER 13 • t:slim X2 Insulin Pump Alarms 13.3 Empty Cartridge Alarm Screen Explanation What will I see on the screen? Your pump detected that the cartridge is empty and all deliveries What does it mean? have stopped. 3 sequences of 3 notes or 3 vibrations depending on the How will the pump notify me? volume/vibrate setting selected in Sound Volume. -
Page 146: Cartridge Error Alarm
CHAPTER 13 • t:slim X2 Insulin Pump Alarms 13.4 Cartridge Error Alarm Screen Explanation What will I see on the screen? Your pump detected that the cartridge could not be used and all deliveries have stopped. This can be caused by cartridge defect, not... -
Page 147: Cartridge Removal Alarm
CHAPTER 13 • t:slim X2 Insulin Pump Alarms 13.5 Cartridge Removal Alarm Screen Explanation What will I see on the screen? Your pump detected that the cartridge has been removed and all What does it mean? deliveries have stopped. 3 sequences of 3 notes or 3 vibrations depending on the How will the pump notify me? volume/vibrate setting selected in Sound Volume. -
Page 148: Temperature Alarm
CHAPTER 13 • t:slim X2 Insulin Pump Alarms 13.6 Temperature Alarm Screen Explanation What will I see on the screen? Your pump detected an internal temperature below 2ºC (35ºF) or What does it mean? above 45ºC (113ºF) or a battery temperature below 2ºC (35ºF) or above 52ºC (125ºF) and all deliveries have stopped. -
Page 149: Occlusion Alarms
CHAPTER 13 • t:slim X2 Insulin Pump Alarms 13.7 Occlusion Alarms Occlusion Alarm 1 Screen Explanation What will I see on the screen? Your pump detected that insulin delivery is blocked and all deliveries have stopped. See Section 33.4 t:slim X2 Pump Performance... - Page 150 CHAPTER 13 • t:slim X2 Insulin Pump Alarms Occlusion Alarm 2 Screen Explanation What will I see on the screen? Your pump detected a second occlusion alarm shortly after the first What does it mean? occlusion alarm and all deliveries have stopped.
-
Page 151: Screen On/Quick Bolus Button Alarm
CHAPTER 13 • t:slim X2 Insulin Pump Alarms 13.8 Screen On/Quick Bolus Button Alarm Screen Explanation What will I see on the screen? The Screen On/Quick Bolus button on the top of your pump is stuck What does it mean? or not functioning properly and all deliveries have stopped. -
Page 152: Altitude Alarm
CHAPTER 13 • t:slim X2 Insulin Pump Alarms 13.9 Altitude Alarm Screen Explanation What will I see on the screen? Your pump detected a pressure difference between inside the cartridge and the surrounding air within the validated operating What does it mean? range of -396 meters to 3,048 meters (-1,300 feet to 10,000 feet) and all deliveries have stopped. -
Page 153: Reset Alarm
CHAPTER 13 • t:slim X2 Insulin Pump Alarms 13.10 Reset Alarm Screen Explanation What will I see on the screen? Your pump experienced a reset and all deliveries have been What does it mean? stopped. 3 sequences of 3 notes or 3 vibrations depending on the How will the pump notify me? volume/vibrate setting selected in Sound Volume. - Page 154 CHAPTER 13 • t:slim X2 Insulin Pump Alarms This Page is Intentionally Left Blank...
-
Page 155: Chapter 14 • T:slim X2 Insulin Pump Malfunction
X2 Insulin Pump Features CHAPTER 14 t:slim X2 Insulin Pump Malfunction... -
Page 156: Malfunction
CHAPTER 14 • t:slim X2 Insulin Pump Malfunction 14.1 Malfunction If your pump detects a pump error, the MALFUNCTION screen appears and all deliveries are stopped. Contact Customer Technical Support. Malfunctions notify you with 3 sequences of 3 notes at highest volume and 3 vibrations. - Page 157 CHAPTER 14 • t:slim X2 Insulin Pump Malfunction Screen Explanation What will I see on the screen? Your pump detected a pump error and all deliveries have been What does it mean? stopped. How will the pump notify me? 3 sequences of 3 notes at highest volume and 3 vibrations.
- Page 158 CHAPTER 14 • t:slim X2 Insulin Pump Malfunction This Page is Intentionally Left Blank...
- Page 159 X2 Insulin Pump Features CHAPTER 15 Taking Care of Your Pump...
-
Page 160: Overview
CHAPTER 15 • Taking Care of Your Pump going into storage mode. Disconnect a hard surface. Check that the pump is working 15.1 Overview properly by plugging a power source into the the pump from the power source. USB port and confirming that the display turns Keep the pump protected when not in This section provides information on on, you hear audible beeps, feel the pump... - Page 161 X2 Insulin Pump Features CHAPTER 16 Lifestyles Issues and Travel...
-
Page 162: Overview
If you choose to use a pump case or other Customer Technical Support. accessories not provided by Tandem, DO NOT While the convenience and flexibility of cover the six vent holes on the back of the... - Page 163 CHAPTER 16 • Lifestyles Issues and Travel Other Activities Which Require enough supplies with you while you’re Your pump has been designed to Removing Your Pump away from home. In addition to pump withstand common electromagnetic supplies, you should also always bring interference including airport metal ⚠...
- Page 164 CHAPTER 16 • Lifestyles Issues and Travel This Page is Intentionally Left Blank...
-
Page 165: Section 3: Cgm Features
CGM Features CHAPTER 17 Important CGM Safety Information... -
Page 166: Warnings
Using Dexcom G6 CGM with Your body that you wear your CGM. Types of t:slim X2 Insulin Pump obstruction differ and have not been tested. If Using Dexcom G6 with Your t:slim your transmitter and pump are farther than 6 X2™... -
Page 167: Potential Benefits From Using The T:slim X2 Insulin Pump With Cgm
Use your BG meter and consult 17.4 Possible Risks From Using the the interstitial fluid slower than it is t:slim X2 Insulin Pump with with your healthcare provider about alternative absorbed into the blood, which can glucose monitoring approaches. - Page 168 CHAPTER 17 • Important CGM Safety Information This Page is Intentionally Left Blank...
- Page 169 CGM Features CHAPTER 18 Getting to Know Your CGM System...
-
Page 170: Cgm Terminology
CHAPTER 18 • Getting to Know Your CGM System Glucose Trends Rise and Fall (Rate of Change) Alerts 18.1 CGM Terminology Glucose trends let you see the pattern Rise and fall alerts occur based on how of your glucose levels. The trend graph much and how fast your glucose levels Alternate Site BG Testing shows where your glucose levels have... - Page 171 CHAPTER 18 • Getting to Know Your CGM System Transmitter ID The transmitter ID is a series of numbers and/or letters that you enter into your pump to let it connect and communicate with the transmitter. Trend (Rate of Change) Arrows Trend arrows show how fast your glucose levels are changing.
-
Page 172: Explanation Of Cgm Pump Icons
CHAPTER 18 • Getting to Know Your CGM System 18.2 Explanation of CGM Pump Icons The following CGM icons may appear on your pump screen: CGM Icon Definitions Symbol Meaning Symbol Meaning Unknown sensor reading. Transmitter error. mmol/L CGM sensor session is active, but the transmitter and pump CGM sensor session is active, and the transmitter is are out of range. - Page 173 CHAPTER 18 • Getting to Know Your CGM System This Page is Intentionally Left Blank...
-
Page 174: Cgm Lock Screen
CHAPTER 18 • Getting to Know Your CGM System 9. Active Bolus Icon: Indicates a 18.3 CGM Lock Screen bolus is being delivered. The CGM Lock screen appears anytime 10. Status: Displays current system you turn on the screen and you are settings and insulin delivery status. - Page 175 CHAPTER 18 • Getting to Know Your CGM System...
-
Page 176: Cgm Home Screen
CHAPTER 18 • Getting to Know Your CGM System 10. Status: Displays current system To view CGM information on the full 18.4 CGM Home Screen settings and insulin delivery status. screen: From the CGM Home screen tap 1. Time and Date Display: Displays 11. - Page 177 CHAPTER 18 • Getting to Know Your CGM System...
-
Page 178: My Cgm Screen
CHAPTER 18 • Getting to Know Your CGM System 18.5 My CGM Screen 1. Start Sensor: Starts a CGM session. If sensor is active, STOP SENSOR will be displayed. 2. Calibrate CGM: Enter a calibration BG value. Only active when sensor session is active. - Page 179 CHAPTER 18 • Getting to Know Your CGM System...
- Page 180 CHAPTER 18 • Getting to Know Your CGM System This Page is Intentionally Left Blank...
- Page 181 CGM Features CHAPTER 19 CGM Overview...
-
Page 182: Cgm System Overview
CGM with your readings to the pump display every 5 sooner than you would using a only a t:slim X2™ pump. Use of a CGM is minutes. The pump display shows BG meter. optional, but in order to use sensor glucose readings, a trend graph, Control-IQ™... -
Page 183: Sensor Overview
CHAPTER 19 • CGM Overview metal) between them. Otherwise, they may not 19.4 Sensor Overview be able to communicate. If water is between your transmitter and the pump (for example, if For information about the Dexcom G6 you’re showering or swimming) keep them sensor, visit the manufacturer’s website closer to each other. - Page 184 CHAPTER 19 • CGM Overview This Page is Intentionally Left Blank...
- Page 185 CGM Features CHAPTER 20 CGM Settings...
-
Page 186: About Bluetooth Technology
This sets all alerts and cell phones and many other devices. alarms to lower volume beeps. Your t:slim X2™ pump uses Bluetooth You may still use a smartphone with the wireless technology communication to Dexcom G6 CGM app and your pump... - Page 187 CHAPTER 20 • CGM Settings The Soft, Normal, and HypoRepeat options have the following sequence: • The first alert is vibrate only. • If the alert is not confirmed in 5 minutes, the pump vibrates and beeps. • If the alert is not confirmed in 5 more minutes, the pump vibrates and beeps louder.
- Page 188 CHAPTER 20 • CGM Settings Sound Option Descriptions CGM Volume Vibrate Soft Normal HypoRepeat 2 long vibrates + 2 long vibrates + 2 long vibrates + High Alert 2 long vibrates 2 low beeps 2 medium beeps 2 medium beeps 3 short vibrates + 3 short vibrates + 3 short vibrates +...
-
Page 189: Cgm Info
CHAPTER 20 • CGM Settings • Hardware Revision To Select Your CGM Volume: 1. From the Home screen, tap • BLE Hardware ID OPTIONS. • Software Number 2. Tap the Down Arrow. You can view this information at any time. 3. - Page 190 CHAPTER 20 • CGM Settings This Page is Intentionally Left Blank...
- Page 191 CGM Features CHAPTER 21 Setting CGM Alerts...
-
Page 192: Setting Your High Glucose Alerts And Repeat Feature
CHAPTER 21 • Setting CGM Alerts Setting Your CGM Alerts When the transmitter and the pump are 5. Tap High and Low. too far apart, you will not get sensor You can create personal settings for glucose readings or alerts. 6. -
Page 193: Setting Your Low Glucose Alert And Repeat Feature
CHAPTER 21 • Setting CGM Alerts hour, 2 hours, 3 hours, 4 hours, or 2. Tap the Down Arrow. remains below the Low Alert value. 5 hours when your sensor glucose The default value is: Never (the alert reading remains above the High 3. -
Page 194: Rate Alerts
CHAPTER 21 • Setting CGM Alerts beeps according to your CGM volume 21.3 Rate Alerts 21.4 Setting Your Rise Alert selection. Rate alerts tell you when your glucose 1. From the Home screen, tap levels are rising (Rise Alert) or falling (Fall OPTIONS. -
Page 195: Setting Your Fall Alert
CHAPTER 21 • Setting CGM Alerts alerts. The default value is on and will 21.5 Setting Your Fall Alert 21.6 Setting Your Out of Range alert after 20 minutes. Alert The Out Of Range symbol appears on 1. From the Home screen, tap the pump Home screen and on the Out The range from the transmitter to the OPTIONS. - Page 196 CHAPTER 21 • Setting CGM Alerts 5. Tap Out of Range. The default is set to on and the time is set to 20 minutes. 6. To change the time, tap Alert After. 7. Using the on-screen keypad, enter the time after which you want to be alerted (between 20 minutes and 3 hours and 20 minutes) then tap 8.
- Page 197 CGM Features CHAPTER 22 Starting or Stopping a CGM Sensor Session...
-
Page 198: Enter Your Transmitter Id
CHAPTER 22 • Starting or Stopping a CGM Sensor Session 3. Tap the Down Arrow. Once matching values have been 22.1 Enter Your Transmitter ID entered, you will be returned to the 4. Tap My CGM. My CGM screen and the transmitter To activate the Bluetooth wireless ID you entered will be highlighted in technology communication, you need... - Page 199 If you don't enter a code into either the t:slim X2 pump you will need to a. Make sure your pump and calibrate your sensor every 24 transmitter are within 6 meters hours.
-
Page 200: Sensor Startup Period
CHAPTER 22 • Starting or Stopping a CGM Sensor Session Sensor Startup Period Timeline ⚠ WARNING 22.3 Sensor Startup Period Continue to use a BG meter and test strips in order to make treatment decisions during the As an example, the Dexcom G6 sensor 2-hour startup period. -
Page 201: Automatic Sensor Shut-Off
However, if you end a Your t:slim X2™ pump tells you how with the current CGM reading. sensor session early, you cannot much time you have left until your re-start the session with that same sensor session is complete. -
Page 202: Ending A Sensor Session Before Automatic Shut-Off
CHAPTER 22 • Starting or Stopping a CGM Sensor Session 1. Tap to return to the previous shutoff. To end your sensor session 22.6 Removing the Sensor and screen. early: Transmitter 1. From the Home screen, tap The SENSOR EXPIRING SOON OPTIONS. - Page 203 CGM Features CHAPTER 23 Calibrating Your CGM System...
-
Page 204: Calibration Overview
CHAPTER 23 • Calibrating Your CGM System When calibrating, you must enter your and is active (white, not greyed out) 23.1 Calibration Overview BG values into the pump by hand. You before calibrating. can use any commercially available BG • Always use the same BG meter to If you did not enter a CGM sensor code meter. - Page 205 CHAPTER 23 • Calibrating Your CGM System Two hours after you start the sensor 10. Tap to confirm the calibration. ⚠ PRECAUTION session, the CALIBRATE CGM screen DO use fingertips to calibrate from your BG will appear, letting you know that two if the BG value does not meter.
-
Page 206: Calibration Bg Value And Correction Bolus
23.3 Calibration BG Value and 23.4 Reasons You May Need to Correction Bolus Calibrate Your t:slim X2™ pump uses the BG You may need to calibrate if your value entered for calibration to symptoms do not match the glucose determine if a correction bolus is values provided by your CGM. - Page 207 CGM Features CHAPTER 24 Viewing CGM Data on Your t:slim X2 Insulin Pump...
-
Page 208: Overview
CHAPTER 24 • Viewing CGM Data on Your t:slim X2 Insulin Pump Your BG meter measures glucose in • The current time and date are 24.1 Overview your blood. Your sensor measures shown at the top of the screen in glucose from interstitial fluid (the fluid the middle. -
Page 209: Cgm Trend Graphs
CHAPTER 24 • Viewing CGM Data on Your t:slim X2 Insulin Pump • If the Low Alert is not set and your To view different Trend Graph times, 6 Hour Trend Graph shows you your glucose reading is 3.1 mmol/L or... -
Page 210: Rate Of Change Arrows
CHAPTER 24 • Viewing CGM Data on Your t:slim X2 Insulin Pump 24 Hour Trend Graph shows you your LOW shows when your most recent 24.3 Rate of Change Arrows current glucose reading along with the sensor glucose reading is less than 2.2 last 24 hours of sensor glucose mmol/L. - Page 211 CHAPTER 24 • Viewing CGM Data on Your t:slim X2 Insulin Pump condition, an arrow may not display. If the trend arrow is missing, and you are concerned that your BG level may be rising or falling, take a BG measurement...
- Page 212 CHAPTER 24 • Viewing CGM Data on Your t:slim X2 Insulin Pump The table below shows the different trend arrows your receiver or pump displays: Trend Arrow Definitions Constant: Your glucose is steady (not increasing/decreasing Slowly falling: Your glucose is falling 0.06–0.11 mmol/L more than 0.06 mmol/L each minute).
-
Page 213: Cgm History
CHAPTER 24 • Viewing CGM Data on Your t:slim X2 Insulin Pump the time it was declared. The letter “C” screen and on the CGM Lock screen. 24.4 CGM History (C: Alert) indicates the time it was The pump will automatically attempt to cleared. - Page 214 CHAPTER 24 • Viewing CGM Data on Your t:slim X2 Insulin Pump This Page is Intentionally Left Blank...
- Page 215 CGM Features CHAPTER 25 CGM Alerts and Errors...
- Page 216 Control-IQ technology to be enabled, a sensor session must be started and transmitting sensor values to the pump based on a sensor code or sensor calibration. ⚠ PRECAUTION You must customize the CGM alert settings on your t:slim X2 pump and the Dexcom G6 CGM...
-
Page 217: Startup Calibration Alerts
CHAPTER 25 • CGM Alerts and Errors 25.1 Startup Calibration Alert Screen Explanation What will I see on the screen? 2-hour CGM startup period is complete. This will only appear if you What does it mean? did not enter a sensor code. How will the pump notify me? 1 vibration, then vibration/beep every 5 minutes until confirmed. -
Page 218: Second Startup Calibration Alert
CHAPTER 25 • CGM Alerts and Errors 25.2 Second Startup Calibration Alert Screen Explanation What will I see on the screen? The CGM needs an additional BG value to complete startup What does it mean? calibration. This will only appear if you did not enter a sensor code. How will the pump notify me? 1 vibration, then vibration/beep every 5 minutes until confirmed. -
Page 219: Hour Calibration Alert
CHAPTER 25 • CGM Alerts and Errors 25.3 12 Hour Calibration Alert Screen Explanation What will I see on the screen? The CGM needs a BG value to calibrate. This will only appear if you What does it mean? did not enter a sensor code. How will the pump notify me? On screen only with no vibration or beep. -
Page 220: Incomplete Calibration
CHAPTER 25 • CGM Alerts and Errors 25.4 Incomplete Calibration Screen Explanation What will I see on the screen? If you start to enter a calibration value using the keypad and do not What does it mean? complete the entry within 90 seconds, this screen appears. How will the pump notify me? 2 beeps or vibrations depending on Sound Volume selected. -
Page 221: Calibration Timeout
CHAPTER 25 • CGM Alerts and Errors 25.5 Calibration Timeout Screen Explanation What will I see on the screen? If you start to enter a calibration value using the keypad and do not What does it mean? complete the entry within 5 minutes, this screen appears. How will the pump notify me? 2 beeps or vibrations depending on Sound Volume selected. -
Page 222: Wait 15 Minute Calibration Error Alert
CHAPTER 25 • CGM Alerts and Errors 25.6 Wait 15 Minute Calibration Error Alert Screen Explanation What will I see on the screen? What does it mean? The sensor cannot calibrate. How will the pump notify me? 1 vibration, then vibration/beep every 5 minutes until confirmed. Will the pump re-notify me? to confirm. -
Page 223: Calibration Required Alert
CHAPTER 25 • CGM Alerts and Errors 25.7 Calibration Required Alert Screen Explanation What will I see on the screen? The CGM needs a BG value to calibrate. Sensor glucose readings What does it mean? will not be displayed at this time. How will the pump notify me? 1 vibration, then vibration/beep every 5 minutes until confirmed. -
Page 224: Cgm High Alert
CHAPTER 25 • CGM Alerts and Errors 25.8 CGM High Alert Screen Explanation What will I see on the screen? Your most recent sensor glucose reading is at or above the High What does it mean? Alert setting. 2 vibrations, then 2 vibrations/beeps every 5 minutes until How will the pump notify me? confirmed or your glucose value drops below the Alert level. -
Page 225: Cgm Low Alert
CHAPTER 25 • CGM Alerts and Errors 25.9 CGM Low Alert Screen Explanation What will I see on the screen? Your most recent sensor glucose reading is at or below the Low What does it mean? Alert setting. 3 vibrations, then 3 vibrations/beeps every 5 minutes until How will the pump notify me? confirmed or your glucose value goes above the Alert level. -
Page 226: Cgm Fixed Low Alert
CHAPTER 25 • CGM Alerts and Errors 25.10 CGM Fixed Low Alert Screen Explanation What will I see on the screen? What does it mean? Your most recent sensor glucose reading is at or below 3.1 mmol/L. 4 Vibrations, then 4 vibrations/beeps every 5 minutes until How will the pump notify me? confirmed or your glucose value goes above 3.1 mmol/L. -
Page 227: Cgm Rise Alert
CHAPTER 25 • CGM Alerts and Errors 25.11 CGM Rise Alert Screen Explanation What will I see on the screen? Your glucose levels are rising at 0.11 mmol/L per minute or faster What does it mean? (at least 1.7 mmol/L in 15 minutes). 2 vibrations, then 2 vibrations/beeps every 5 minutes or until How will the pump notify me? confirmed. -
Page 228: Cgm Rapid Rise Alert
CHAPTER 25 • CGM Alerts and Errors 25.12 CGM Rapid Rise Alert Screen Explanation What will I see on the screen? Your glucose levels are rising at 0.17 mmol/L per minute or faster What does it mean? (at least 2.5 mmol/L in 15 minutes). 2 vibrations, then 2 vibrations/beeps every 5 minutes or until How will the pump notify me? confirmed. -
Page 229: Cgm Fall Alert
CHAPTER 25 • CGM Alerts and Errors 25.13 CGM Fall Alert Screen Explanation What will I see on the screen? Your glucose levels are falling at 0.11 mmol/L per minute or faster What does it mean? (at least 1.7 mmol/L in 15 minutes). 3 vibrations, then 3 vibrations/beeps every 5 minutes or until How will the pump notify me? confirmed. -
Page 230: Cgm Rapid Fall Alert
CHAPTER 25 • CGM Alerts and Errors 25.14 CGM Rapid Fall Alert Screen Explanation What will I see on the screen? Your glucose levels are falling at 0.17 mmol/L per minute or faster What does it mean? (at least 2.5 mmol/L in 15 minutes). 3 vibrations, then 3 vibrations/beeps every 5 minutes or until How will the pump notify me? confirmed. -
Page 231: Unknown Sensor Glucose Reading
CHAPTER 25 • CGM Alerts and Errors 25.15 Unknown Sensor Glucose Reading Screen Explanation What will I see on the screen? The sensor is sending sensor glucose readings that the pump does What does it mean? not understand. You will not receive sensor glucose readings. How will the pump notify me? On screen only with no vibration or beep. -
Page 232: Out Of Range Alert
CHAPTER 25 • CGM Alerts and Errors 25.16 Out of Range Alert Screen Explanation What will I see on the screen? The transmitter and pump are not communicating. The pump will What does it mean? not receive sensor glucose readings, and Control-IQ technology is not able to predict glucose levels or adjust insulin delivery. -
Page 233: Low Transmitter Battery Alert
CHAPTER 25 • CGM Alerts and Errors 25.17 Low Transmitter Battery Alert Screen Explanation What will I see on the screen? What does it mean? Transmitter battery is low. How will the pump notify me? 1 vibration, then vibration/beep every 5 minutes until confirmed. Yes, the alarm will notify you when there are 21, 14, and 7 days of Will the pump re-notify me? transmitter battery life remaining. -
Page 234: Transmitter Error
CHAPTER 25 • CGM Alerts and Errors 25.18 Transmitter Error Screen Explanation What will I see on the screen? What does it mean? The transmitter has failed and the CGM session has stopped. How will the pump notify me? 1 vibration, then vibration/beep every 5 minutes. Will the pump re-notify me? Tap MORE INFO. -
Page 235: Failed Sensor Error
CHAPTER 25 • CGM Alerts and Errors 25.19 Failed Sensor Error Screen Explanation What will I see on the screen? The sensor is not working properly and the CGM session has What does it mean? stopped. How will the pump notify me? 1 vibration, then vibration/beep every 5 minutes. -
Page 236: Cgm Unavailable
CHAPTER 25 • CGM Alerts and Errors 25.20 CGM Unavailable Screen Explanation What will I see on the screen? Your CGM session has been stopped for more than 20 minutes and What does it mean? the CGM can no longer be used. 2 vibrations, then 2 vibrations/beeps every 5 minutes or until How will the pump notify me? confirmed. -
Page 237: Cgm System Error
CHAPTER 25 • CGM Alerts and Errors 25.21 CGM System Error Screen Explanation What will I see on the screen? Your CGM System is not working properly; the CGM session has What does it mean? stopped and the CGM can no longer be used. How will the pump notify me? 1 vibration, then vibration/beep every 5 minutes. - Page 238 CHAPTER 25 • CGM Alerts and Errors This Page is Intentionally Left Blank...
- Page 239 CGM Features CHAPTER 26 CGM Troubleshooting...
-
Page 240: Cgm Pairing Troubleshooting
CHAPTER 26 • CGM Troubleshooting This chapter provides helpful tips and G6 CGM app and your t:slim X2 insulin Do not calibrate if your BG value is instructions to help you fix issues you pump simultaneously with the same below 2.2 mmol/L or above 22.2 may have while using the CGM portion transmitter ID. -
Page 241: Out Of Range/No Antenna Troubleshooting
10 settings in your active Personal Profile, limited to minutes for your t:slim X2 pump to start • Make sure your sensor pod is not communicating with your transmitter. -
Page 242: Failed Sensor Troubleshooting
FAILED SENSOR screen are meant to be used for trending mmol/L, recalibrate your sensor using shows on your t:slim X2 pump. If you purposes only. The sensor measures the second BG value. The sensor see this screen, it means your CGM glucose in the fluid under the skin—not... - Page 243 CHAPTER 26 • CGM Troubleshooting • Use only BG values between 2.2– 22.2 mmol/L for calibration. If one or more of your values is outside of this range, the receiver will not calibrate. • Use the same BG meter you routinely use to measure your BG to calibrate.
- Page 244 CHAPTER 26 • CGM Troubleshooting This Page is Intentionally Left Blank...
-
Page 245: Section 4: Control-Iq Technology Features
Control-IQ Technology Features CHAPTER 27 Important Control-IQ Technology Safety Information... -
Page 246: Control-Iq Warnings
⚠ WARNING Using insulin not provided by the pump while ⚠ WARNING The t:slim X2 insulin pump with Control-IQ using closed loop therapy can cause the system Control-IQ technology has not been evaluated in technology should not be used in children under to over deliver insulin, which can lead to severe pregnant women or persons on dialysis. -
Page 247: Control-Iq Precautions
CHAPTER 27 • Important Control-IQ Technology Safety Information sensor readings that are higher than actual glucose levels, it could result in missed hypoglycemia alerts and errors in diabetes management, such as delivery of excess basal insulin and correction boluses, including automatic correction boluses. - Page 248 CHAPTER 27 • Important Control-IQ Technology Safety Information This Page is Intentionally Left Blank...
- Page 249 Control-IQ Technology Features CHAPTER 28 Getting to Know Control-IQ Technology...
-
Page 250: Responsible Use Of Control-Iq Technology
CHAPTER 28 • Getting to Know Control-IQ Technology 28.1 Responsible Use of Control-IQ Technology Systems like the t:slim X2™ insulin pump with Control-IQ™ technology are not substitutes for the active management of diabetes, including manually bolusing for meals. There are... -
Page 251: Explanation Of Control-Iq Technology Icons
CHAPTER 28 • Getting to Know Control-IQ Technology 28.2 Explanation of Control-IQ Technology Icons If you have a CGM session active and are using Control-IQ technology, you may see the following additional icons on your pump screen: Control-IQ Technology Icon Definitions Symbol Meaning Symbol... -
Page 252: Control-Iq Lock Screen
CHAPTER 28 • Getting to Know Control-IQ Technology 28.3 Control-IQ Lock Screen The Control-IQ Lock screen appears any time you turn on the screen and you are using your pump with a CGM and Control-IQ technology enabled. The Control-IQ Lock screen is the same as the CGM Lock screen, with the following additions. - Page 253 CHAPTER 28 • Getting to Know Control-IQ Technology...
-
Page 254: Control-Iq Home Screen
CHAPTER 28 • Getting to Know Control-IQ Technology 28.4 Control-IQ Home Screen The Home screen with Control-IQ technology enabled is identical to the CGM Home screen, with the following additions. See Section 18.4 CGM Home Screen. 1. Control-IQ Technology Status: Indicates the status of Control-IQ technology. - Page 255 CHAPTER 28 • Getting to Know Control-IQ Technology...
-
Page 256: Control-Iq Screen
CHAPTER 28 • Getting to Know Control-IQ Technology 28.5 Control-IQ Screen 1. Control-IQ Technology on/off: Turns on, or off, Control-IQ technology. 2. Weight: Displays your current weight. This value is manually entered in on the numerical keypad. ⚑ NOTE Your weight should be representative of what you weigh when you start Control-IQ technology. - Page 257 CHAPTER 28 • Getting to Know Control-IQ Technology...
- Page 258 CHAPTER 28 • Getting to Know Control-IQ Technology This Page is Intentionally Left Blank...
- Page 259 Control-IQ Technology Features CHAPTER 29 Introduction to Control-IQ Technology...
-
Page 260: Control-Iq Technology Overview
Control-IQ™ technology is a feature of active in the body, is not displayed when Do not use Control-IQ technology unless the t:slim X2™ pump that automatically Control-IQ technology is enabled due to the recommended by your healthcare provider. adjusts insulin dosing in response to variability of insulin delivery when automatically readings from a CGM. - Page 261 CHAPTER 29 • Introduction to Control-IQ Technology predicts CGM values 30 minutes in the are described below. Each of the insulin mmol/L) 30 minutes in the future, the future. Insulin delivery is automatically delivery adjustments occurs in different rate of insulin delivery will start adjusted based on the predicted CGM ways depending on whether you are decreasing to attempt to keep the...
- Page 262 CHAPTER 29 • Introduction to Control-IQ Technology Current 30-minute Reading Prediction 6.25 6.25 CGM SENSOR READINGS CGM SENSOR READINGS INSULIN DELIVERY INSULIN DELIVERY 5-minute Interval CGM Prediction Personal Profile Basal Rate Control-IQ Decreased Basal Rate ⚑ NOTE Diagrams are for illustrative purposes only and are not intended to reflect actual results.
- Page 263 CHAPTER 29 • Introduction to Control-IQ Technology Insulin Decreased or Delivering 0 Units per Hour Control-IQ technology can reduce the basal delivery to a percent of the basal rate in addition to completely suspending. When Control-IQ technology predicts that your glucose value will be lower than a preset treatment value (3.9 mmol/L) 30 minutes in the future, insulin delivery will...
- Page 264 CHAPTER 29 • Introduction to Control-IQ Technology Current 30-minute Delivery Delivery 30-minute Reading Prediction at 0 u/hr Resumed Prediction CGM SENSOR READINGS CGM SENSOR READINGS INSULIN DELIVERY INSULIN DELIVERY 5-minute Interval CGM Prediction Control-IQ Decreased Basal Rate ⚑ NOTE Diagrams are for illustrative purposes only and are not intended to reflect actual results.
- Page 265 CHAPTER 29 • Introduction to Control-IQ Technology Increasing Insulin Delivery When Control-IQ technology predicts that your glucose value will be at or above a preset treatment value (8.9 mmol/L) 30 minutes in the future, the rate of insulin delivery will start increasing to attempt to keep the actual CGM values within the target CGM range.
- Page 266 CHAPTER 29 • Introduction to Control-IQ Technology Current 30-minute Current 30-minute Reading Prediction Reading Prediction CGM SENSOR READINGS CGM SENSOR READINGS INSULIN DELIVERY INSULIN DELIVERY 5-minute Interval CGM Prediction Personal Profile Basal Rate Control-IQ Increased Basal Rate Control-IQ Max Basal Rate ⚑...
- Page 267 CHAPTER 29 • Introduction to Control-IQ Technology Automatic Correction Bolus Delivery ⚑ NOTE bolus is being delivered and that an automatic correction bolus was delivered, respectively. Each automatic correction bolus delivery can be When Control-IQ technology predicts manually canceled or stopped during the that your CGM value will be at or above delivery in the same way that a manual bolus 10 mmol/L 30 minutes in the future,...
- Page 268 CHAPTER 29 • Introduction to Control-IQ Technology Current 30-minute Reading Prediction 10.0 10.0 5-minute Interval CGM Prediction Personal Profile Basal Rate CGM SENSOR READINGS Control-IQ Increased Basal Rate Control-IQ Max Basal Rate Automatic Correction Bolus INSULIN DELIVERY ⚑ NOTE Diagrams are for illustrative purposes only and are not intended to reflect actual results.
-
Page 269: Control-Iq Technology And Activity
CHAPTER 29 • Introduction to Control-IQ Technology Suspended Insulin With No Activity Manually Start Sleep section for starting 29.3 Control-IQ Technology and Enabled Sleep manually in that chapter. Activity Insulin is set to 0 units/hour when The CGM range targeted by Control-IQ Control-IQ technology predicts a CGM technology during Sleep is 6.25 When Control-IQ technology is turned... - Page 270 CHAPTER 29 • Introduction to Control-IQ Technology Automatic Correction Bolus During must manually start Sleep once you Activity, see the diagram on the next Sleep turn Exercise off. page. Automatic correction boluses will not Decreasing Insulin During Exercise be delivered while Sleep is enabled. Insulin is decreased when Control-IQ When Control-IQ technology switches technology predicts a CGM reading of...
- Page 271 CHAPTER 29 • Introduction to Control-IQ Technology Control-IQ Sleep Activity Exercise Activity Delivers an automatic correction bolus if sensor Delivers 10.0 –– 10.0 glucose is predicted to be above mmol/L Increases basal insulin delivery if sensor Increases glucose is predicted to be above mmol/L Maintains 6.25 - 8.9...
- Page 272 CHAPTER 29 • Introduction to Control-IQ Technology This Page is Intentionally Left Blank...
- Page 273 Control-IQ Technology Features CHAPTER 30 Configuring and Using Control-IQ Technology...
-
Page 274: Required Settings
CHAPTER 30 • Configuring and Using Control-IQ Technology Recommended Control-IQ 30.1 Required Settings Technology Pump Settings Although Sleep can be started and Required Personal Profile Settings stopped manually, it is recommended In order to use Control-IQ™ that you schedule sleep. This chapter technology, the following Personal explains how to do both. -
Page 275: Set Total Daily Insulin
8. When you are done setting up • Tap to leave Control-IQ on. (basal and bolus) delivered in a 24-hour Control-IQ, tap the Tandem logo to period. Consult your healthcare return to the CGM Home screen. provider if you need assistance... -
Page 276: Schedule Sleep
CHAPTER 30 • Configuring and Using Control-IQ Technology ⚑ NOTE 30.5 Schedule Sleep Exercise and Sleep may not be enabled at the same time. If Exercise is active at the time a Control-IQ technology operates Sleep Schedule begins, the Sleep Schedule will differently during Sleep than with no not enable. -
Page 277: Enable Or Disable A Sleep Schedule
. You are returned to the sleep, press to return to the Start Time screen. Activity screen or tap the Tandem logo to return to the Home screen. 12. Tap AM or PM to set the Time of Day, if applicable. -
Page 278: Manually Start Or Stop Sleep
CHAPTER 30 • Configuring and Using Control-IQ Technology schedules are configured, see 4. Tap the toggle. Section 30.5 Schedule Sleep.) 5. Tap 5. Tap the toggle next to the schedule name. 30.7 Manually Start or Stop Sleep 6. Tap In addition to scheduling sleep, Sleep can be manually started and/or Disable a Sleep Schedule stopped. -
Page 279: Manually Start Or Stop Exercise
CHAPTER 30 • Configuring and Using Control-IQ Technology 3. Tap the STOP text next to Sleep. An EXERCISE STARTED message color and its meaning can be found in is temporarily displayed. The Section 28.2 Explanation of Control-IQ Exercise icon is displayed on the Technology Icons. - Page 280 Control-IQ screen; see the Section 3.3 Explanation operating. Each different color and its technology was delivering 0 units/hour. of t:slim X2 Insulin Pump Icons for the meaning can be found in Section 28.2 manual bolus icon image.) The following...
- Page 281 Control-IQ Technology Features CHAPTER 31 Control-IQ Technology Alerts...
- Page 282 Sound Volume selection. For information on insulin delivery reminders, alerts, and alarms see Chapters 12 t:slim X2 Insulin Pump Alerts, 13 t:slim X2 Insulin Pump Alarms, and 14 t:slim X2 Insulin Pump Malfunction.
-
Page 283: Out Of Range Alerts - Control-Iq Technology Disabled
CHAPTER 31 • Control-IQ Technology Alerts 31.1 Out of Range Alert – Control-IQ Technology Disabled Screen Explanation What will I see on the screen? The transmitter and pump are not communicating. The pump will What does it mean? not receive sensor glucose readings, and Control-IQ technology is not able to predict glucose levels or adjust insulin delivery. -
Page 284: Out Of Range Alert - Control-Iq Technology Enabled
CHAPTER 31 • Control-IQ Technology Alerts 31.2 Out of Range Alert – Control-IQ Technology Enabled Screen Explanation What will I see on the screen? Control-IQ technology is turned on, but the transmitter and pump are not communicating. The pump will not receive sensor glucose readings. -
Page 285: Control-Iq Technology Low Alert
CHAPTER 31 • Control-IQ Technology Alerts 31.3 Control-IQ Technology Low Alert Screen Explanation What will I see on the screen? Control-IQ Low Alert has predicted that your glucose reading will What does it mean? drop below 3.9 mmol/L, or below 4.4 mmol/L if Exercise is enabled, in the next 15 minutes. -
Page 286: Control-Iq High Alert
CHAPTER 31 • Control-IQ Technology Alerts 31.4 Control-IQ High Alert Screen Explanation What will I see on the screen? Control-IQ technology has three hours of CGM data and has increased insulin delivery, but detects a glucose reading above 11.1 What does it mean? mmol/L and does not predict that the glucose reading will decrease in the next 30 minutes. -
Page 287: Max Insulin Alert
CHAPTER 31 • Control-IQ Technology Alerts 31.5 Max Insulin Alert Screen Explanation What will I see on the screen? The pump has delivered the maximum allowable 2 hour insulin amount based on your Total Daily Insulin setting. You see this alert when Control-IQ technology has delivered 50% of your Total Daily Insulin (through basal and/or bolus deliveries) over the previous What does it mean? - Page 288 CHAPTER 31 • Control-IQ Technology Alerts This Page is Intentionally Left Blank...
- Page 289 Control-IQ Technology Features CHAPTER 32 Overview of Control-IQ Technology Clinical Studies...
-
Page 290: Introduction
≥6 years to 13 years old. In diabetes, 14 to 71 years of age, treated diabetes and managing both studies, the t:slim X2 insulin pump with insulin via an insulin pump or diabetes-related emergencies and with Control-IQ technology was injections for at least one year. - Page 291 CHAPTER 32 • Overview of Control-IQ Technology Clinical Studies There was one episode of Diabetic Ketoacidosis (DKA), caused by infusion site failure, in the DCLP3 Control-IQ group. There were no episodes of DKA in the DCLP5. There were no severe hypoglycemic events in either study.
-
Page 292: Demographics
CHAPTER 32 • Overview of Control-IQ Technology Clinical Studies 32.3 Demographics Baseline characteristics including demographics of the study participants are provided in the table below. DCLP3: Baseline Characteristics Including Demographics at Enrollment (N=168) Average Age Average HbA Median Diabetes Duration Gender MDI Users CGM Users... -
Page 293: Intervention Compliance
32.4 Intervention Compliance The following tables provide an overview of the how often the t:slim X2 insulin pump with Control-IQ technology, Dexcom G6 CGM, and BG meters were used during the studies, respectively. The analysis for Control-IQ technology use is specific to the Control-IQ group, while the analysis for CGM and BG meter use represents both the Control-IQ group and the SAP group. - Page 294 CHAPTER 32 • Overview of Control-IQ Technology Clinical Studies DCLP5: Percentage of t:slim X2 Insulin Pump with Control-IQ Technology Use Over the 4-Month Period (n=78) Average Time Control-IQ Available* Weeks 1–4 93.4% Weeks 5–8 93.8% Weeks 9–12 94.1% Weeks 13–End 94.4%...
- Page 295 CHAPTER 32 • Overview of Control-IQ Technology Clinical Studies DCLP5: Percentage of CGM Use Over the 4-Month Period (N=101) Control-IQ* SAP* Weeks 1–4 Weeks 5–8 Weeks 9–12 Weeks 13–End Overall *The denominator is the total possible time within the 4-month study period. CGM use includes warm-up time. DCLP3: Daily BG Meter Use Over the 6-Month Period (N=168) Control-IQ BG Meter Use Per Day...
-
Page 296: Primary Analysis
CHAPTER 32 • Overview of Control-IQ Technology Clinical Studies 32.5 Primary Analysis The primary outcome of both the DCLP3 and DCLP5 studies was to compare the CGM sensor values in range between 3.9–10 mmol/L between the Control-IQ groups and the SAP groups. The data represent the overall system performance 24-hours per day. DCLP3: Comparison of CGM Values Between Control-IQ and SAP Users (N=168) Difference Between Study Arm Characteristic... - Page 297 CHAPTER 32 • Overview of Control-IQ Technology Clinical Studies DCLP5: Comparison of CGM Values Between Control-IQ and SAP Users (N=101) Difference Between Study Arm Characteristic Control-IQ and Control Arm Average Glucose 9.0 mmol/L 9.9 mmol/L -0.9 mmol/L (std dev) (1.0 mmol/L) (1.4 mmol/L) Average % 3.9–10mmol/L +11%...
- Page 298 CHAPTER 32 • Overview of Control-IQ Technology Clinical Studies The tables below describes the average time participants in both studies spent with glucose levels between 3.9–10 mmol/L by month at baseline and during the study period. DCLP3: Percentage of Time in Range per Study Arm by Month (N=168) Month Control-IQ Baseline...
-
Page 299: Secondary Analysis
CHAPTER 32 • Overview of Control-IQ Technology Clinical Studies 32.6 Secondary Analysis The following tables compares the percent of time that participants spent at the indicated glucose levels during the daytime and nighttime. The definitions of daytime and nighttime differ slightly between the two studies and are defined in the tables. DCLP3: Secondary Analysis by Time of Day (N=168) Daytime Nighttime... - Page 300 CHAPTER 32 • Overview of Control-IQ Technology Clinical Studies The following table compares the percent of time spent between 3.9–10 mmol/L across the different baseline HbA1c values observed in the DCLP3 study in both treatment groups. Percentage of Time in Range per Study Arm by Baseline HbA1c (N=168) Time in Range Baseline HbA1c Control-IQ...
-
Page 301: Insulin Delivery Differences
CHAPTER 32 • Overview of Control-IQ Technology Clinical Studies 32.7 Insulin Delivery Differences The following table compares the insulin delivery statistics between the Control-IQ group and the SAP group in the DCLP3 study. DCLP3: Insulin Delivery Comparison (N=168) Characteristic Timepoint Control-IQ After 2-weeks Average (std dev) - Page 302 CHAPTER 32 • Overview of Control-IQ Technology Clinical Studies The following table compares the insulin delivery statistics between the Control-IQ group and the SAP group in the DCLP5 study. Total daily insulin is reported as Units of insulin per body weight of participant, in kilograms (kg), per day. DCLP5: Insulin Delivery Comparison (N=101) Characteristic Timepoint...
-
Page 303: Control-Iq Technology High And Low Alert Accuracy
CHAPTER 32 • Overview of Control-IQ Technology Clinical Studies 32.8 Control-IQ Technology High and Low Alert Accuracy The following data table characterizes the accuracy of the Control-IQ technology high and low alerts, respectively. This analysis depicts the percent of alerts that were triggered relative to the resulting glucose value achieving the level the alert predicted. The Control-IQ technology Low Alert notifies the user when Control-IQ technology predicts that the glucose value will be below 3.9 mmol/L 15 minutes in the future, or 4.4 mmol/L when the exercise activity is enabled. - Page 304 CHAPTER 32 • Overview of Control-IQ Technology Clinical Studies The table below depicts the performance of the Control-IQ technology high and low alerts when evaluating the resulting glucose value after 15-minutes and 30-minutes. DCLP3: Percentage of Accurate Control-IQ Technology Alerts (n=112) Performance Predictive Alert 15-minutes...
-
Page 305: Additional Analysis Of Glucose Value Auto-Population With Cgm
CHAPTER 32 • Overview of Control-IQ Technology Clinical Studies 32.9 Additional Analysis of Glucose Value Auto-Population with CGM Upon completion of the Pivotal Study, an evaluation of the auto-population of CGM readings into the bolus calculator was performed. The results of the analysis indicate, when a glucose value was >13.9 mmol/L, there was an increased incidence of CGM values <3.9 mmol/L five hours after a bolus was delivered using auto-populated CGM readings compared to the five hours after the bolus was delivered using manually entered glucose values. - Page 306 CHAPTER 32 • Overview of Control-IQ Technology Clinical Studies DCLP3: Post-Correction Bolus CGM Readings (5 hours): Based on Starting Glucose Readings One or More CGM Three Consecutive CGM Five or More CGM CGM Reading Entry Type Reading <3.0 mmol/L Readings <3.9 mmol/L Readings <3.9 mmol/L (95% CI) (95% CI)
- Page 307 CHAPTER 32 • Overview of Control-IQ Technology Clinical Studies DCLP5: Post-Correction Bolus CGM Readings (5 hours): Based on Starting Glucose Readings One or More CGM Three Consecutive CGM Five or More CGM CGM Reading Entry Type Reading <3.0 mmol/L Readings <3.9 mmol/L Readings <3.9 mmol/L (95% CI) (95% CI)
- Page 308 CHAPTER 32 • Overview of Control-IQ Technology Clinical Studies This Page is Intentionally Left Blank...
-
Page 309: Section 5: Technical Specifications And Warranty
Technical Specifications and Warranty CHAPTER 33 Technical Specifications... -
Page 310: Overview
This section provides tables of technical specifications, performance characteristics, options, settings, and electromagnetic compliance information for the t:slim X2™ pump. The specifications in this section meet the international standards set forth in IEC 60601-1, IEC 60601-6, IEC 60601-1-11, and IEC 60601-2-24. - Page 311 CHAPTER 33 • Technical Specifications t:slim X2 Pump Specifications (Continued) Specification Type Specification Details Insulin Concentration U-100 The service life of the pump is four years. Contact Customer Technical Support for instructions on safe disposal Service Life Conditions of the pump.
- Page 312 Minimum Audible Alarm Volume 45 dBA at 1 meter ⚑ NOTE Accuracies stated in this table are valid for all Tandem Diabetes Care, Inc. branded infusion sets including: AutoSoft™ 90, AutoSoft™ XC, AutoSoft™ 30, VariSoft™, and TruSteel™ branded infusion sets.
- Page 313 CHAPTER 33 • Technical Specifications USB Charging/Download Cable Specifications Specification Type Specification Detail Tandem P/N 004113 Length 2 meters (6 feet) Type USB A to USB Micro B Power Supply/Charger, AC, Wall Mount, USB Specifications Specification Type Specification Detail Tandem P/N...
- Page 314 Requirements for Charging from a ⚠ WARNING Computer ALWAYS use the USB cable provided with your t:slim X2 insulin pump to minimize the risk of The t:slim X2 pump is designed to be fire or burns. connected to a host computer for battery charging and data transfer.
-
Page 315: T:slim X2 Pump Options And Settings
CHAPTER 33 • Technical Specifications 33.3 t:slim X2 Pump Options and Settings t:slim X2 Pump Options and Settings Option/Setting Type Option/Setting Detail Time May be set to 12-hour or 24-hour clock (default is 12-hour clock) Basal Rate Setting Range 0.1 – 15 units/hr... - Page 316 CHAPTER 33 • Technical Specifications t:slim X2 Pump Options and Settings (Continued) Option/Setting Type Option/Setting Detail Maximum Extended Bolus Time 8 hours (2 hours when Control-IQ™ technology is enabled) Maximum Bolus Size 25 units Maximum Automatic Bolus Size 6 units Status indicator visible on Home screen;...
-
Page 317: T:slim X2 Pump Performance Characteristics
Basal Delivery To assess basal delivery accuracy, 32 t:slim X2 pumps were tested by delivering at low, medium, and high basal rates (0.1, 2.0, and 15 U/hr). Sixteen of the pumps were new, and 16 had been aged to simulate four years of regular use. For both aged and unaged pumps, eight pumps were tested with a new cartridge, and eight with a cartridge which underwent two years of real time aging. - Page 318 Bolus Delivery To assess bolus delivery accuracy, 32 t:slim X2 pumps were tested by delivering consecutive low, medium, and high bolus volumes (0.05, 2.5, and 25 units). Sixteen of the pumps were new, and 16 had been aged to simulate four years of regular use. For both aged and unaged pumps, eight pumps were tested with a new cartridge, and eight with a cartridge which underwent two years of real time aging.
- Page 319 CHAPTER 33 • Technical Specifications Summary of Bolus Delivery Performance (n=32 pumps) Target Bolus Size Mean Bolus Size Min Bolus Size Max Bolus Size Individual Bolus Accuracy Performance [Units] [Units] [Units] [Units] Min Bolus Delivery Performance 0.050 0.050 0.000 0.114 (n=800 boluses) Intermediate Bolus Delivery Performance 2.50...
- Page 320 CHAPTER 33 • Technical Specifications Intermediate Bolus Delivery Performance (2.5U) (n=800 boluses) Units of Insulin Delivered After a 2.5 U Bolus Request 0.625– 1.875– 2.25– 2.375– 2.625– 2.75– 3.125– 4.375– <0.625 >6.25 1.875 2.25 2.375 2.625 2.75 3.125 4.375 6.25 (<25%) (>250%) (25–75%)
- Page 321 CHAPTER 33 • Technical Specifications Rate of Delivery Characteristic Value 25 Unit Bolus Delivery Speed 2.97 Units/min Typical 2.5 Unit Bolus Delivery Speed 1.43 Units/min Typical 20 Unit Prime 9.88 Units/min Typical Bolus Duration Characteristic Value 25 Unit Bolus Duration 8 minutes 26 seconds Typical 2.5 Unit Bolus Duration 1 minute 45 seconds Typical...
-
Page 322: Electromagnetic Compatibility
• The pump will not deliver a clinically to the EMC information provided here. than 12 inches to any part of the t:slim X2 significant amount of insulin after pump, including cables specified by the occlusion release. - Page 323 CHAPTER 33 • Technical Specifications The pump and CGM and their components are designed to ensure data security and patient confidentiality using a series of cybersecurity measures, including device authentication, message encryption, and message validation.
-
Page 324: Electromagnetic Emissions
CHAPTER 33 • Technical Specifications 33.7 Electromagnetic Emissions The pump and CGM are intended for use in the electromagnetic environment specified below. Always make sure that the pump and CGM are used in such an environment. Guidance and Manufacturer’s Declaration – Electromagnetic Emissions Emissions Test Compliance Electromagnetic Environment –... -
Page 325: Electromagnetic Immunity
CHAPTER 33 • Technical Specifications 33.8 Electromagnetic Immunity The pump and CGM are intended for use in home healthcare electromagnetic environments. Guidance and Manufacturer’s Declaration – Electromagnetic Immunity Immunity Test IEC 60601 Test Level Compliance Level ± 8 kV contact ±... - Page 326 CHAPTER 33 • Technical Specifications Guidance and Manufacturer’s Declaration – Electromagnetic Immunity (Continued) Immunity Test IEC 60601 Test Level Compliance Level 385 MHz: 27 V/m @ 18 Hz Pulse modulation 385 MHz: 27 V/m @ 18 Hz Pulse modulation 450 MHz: 28 V/m @ FM modulation 710 MHz, 450 MHz: 28 V/m @ FM modulation 710 MHz, 745 745 MHz, 780 MHz: MHz, 780 MHz:...
-
Page 327: Quality Of Wireless Service
To improve quality of service when essential performance requirements other devices operating in the 2.4 GHz states that the pump will not band are around, the t:slim X2 insulin discontinue reporting data and/or pump uses the built-in coexistence information from the CGM transmitter features provided by Bluetooth wireless to the user without notification. -
Page 328: Wireless Technology
CHAPTER 33 • Technical Specifications 33.10 Wireless Technology The pump and CGM utilize wireless technology with the following characteristics: Wireless Technology Specifications Specification Type Specification Detail Wireless Technology Bluetooth Low Energy (BLE) version 5.0 Tx/Rx Frequency Range 2.360 to 2.500 GHz Bandwidth (per channel) 2 MHz Radiated Output Power (maximum) -
Page 329: Fcc Notice Concerning Interference
Interference exclusions stated herein. Repair or • damage results from service or replacement of a t:slim X2 pump will not repairs performed to any part of the For information about the Dexcom G6 extend the original four-year warranty, transmitter interference testing, visit the t:slim X2 pump by any person or which will continue to apply. - Page 330 Cochrane Drive, East Tower, 6th Floor, intended to add new features to your CONSUMERS) Markham, ON, L3R 0B8 t:slim X2 pump. Tandem reserves the No employee of Tandem or any other (“Tandem”) warrants its cartridge right to offer those updates, if any, in its...
- Page 331 CONSUMERS) workmanship for one use during the • damage results from service or No employee of Tandem or any other period of three days after the individual repairs performed to any part of the party, including without limitation any infusion set sterile packaging has been...
-
Page 332: Returned Goods Policy
(1) during the applicable Warranty Period, if the • damage results from service or No employee of Tandem or any other customer experiences an issue with the repairs performed to any part of the party, including without limitation any... -
Page 333: T:slim X2 Insulin Pump Event Data (Black Box)
(RMA) number from • t:slim X2 cartridge (t:lock™ use of the t:slim X2 pump, or if the Tandem’s Customer Service connector) pump is returned. Others who may Department. Tandem will provide a •... - Page 334 CHAPTER 33 • Technical Specifications • AutoSoft 30 infusion set • VariSoft infusion set • TruSteel infusion set Optional Accessories/Replacement Parts • t:case pump cover (black, blue, pink, purple, turquoise, olive) • t:holster • t:slim USB charging cable • t:slim USB charger •...
- Page 335 CHAPTER 33 • Technical Specifications This Page is Intentionally Left Blank...
-
Page 336: Index
INDEX Alert Icon, Where to Find ..... 42 Alerts & Reminders ......52 Basal Rate Required Alert . - Page 337 Control-IQ Technology, Max Insulin Alert ..285 Auto-Off Alarm .......114 Data Error Alert .
- Page 338 Bluetooth ........184 Cannula ........35 Bolus .
- Page 339 Automatic Sensor Shut-Off ....199 High Glucose Alert, Set ..... .190 Calibrate Blood Glucose Value .
- Page 340 Transmitter ID ......196 Control-IQ Technology Troubleshooting ......237 Automatic Correction Bolus Delivery .
- Page 341 Weight ........254 Low BG Reminder ......110 Control-IQ Technology Safety Information .
- Page 342 Default ........97 Control-IQ Technology ..... . 284 High BG Reminder .
- Page 343 Infusion Site Care, Pediatric ..... 20 Load Cartridge ......82, 86 Insulin Low BG Reminder .
- Page 344 Pump History ....... . 108 Pump History, Delivery Summary ....108 Pump Info .
- Page 345 Reset Alarm ....... . . 151 Letter Keypad Screen ......58 Lock Screen .
- Page 346 Troubleshooting CGM ......237 Tandem Logo ......44, 64 Tubing Target BG .
- Page 347 Fill Tubing ....... . . 87 Pump Warranty ......327 Tubing Connector .
- Page 348 Dexcom, Inc. in the U.S. and/or other countries. The Bluetooth word mark and logos are registered trademarks owned by Bluetooth SIG, Inc. and any use of such marks by Tandem Diabetes Care, Inc. is under license. All other third party marks are the property of their respective owners.
- Page 350 CANADA: (833) 509-3598 tandemdiabetes.ca UNITED STATES: (877) 801-6901 tandemdiabetes.com CONTACT INFORMATION: tandemdiabetes.com/contact 1009955_A AW-1009956_A 2022-MAR-08 © 2022 Tandem Diabetes Care, Inc. All rights reserved.