Advertisement
Quick Links
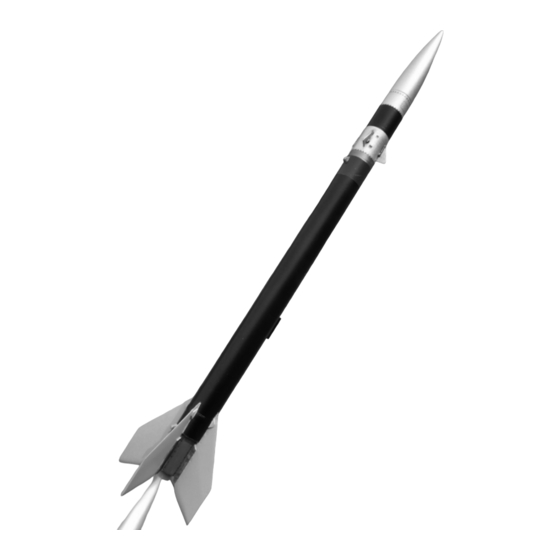
Skill Level 4
Moderately Challenging
Included in the Black Brant series of sounding rockets orig-
inally developed by the Canadian Government in combination
with Bristol Aerospace, the Black Brant VC is a 4-fin variant
of the fifth rocket in the series which first flew April 4th, 1970.
More than 100 flights of the single-stage VC have been com-
pleted since then, and modified versions have flown as upper
stages on a number of other Black Brant rockets. All together,
more than a thousand Black Brant rockets have been flown
with a success rate of over 98%. The combination of longevi-
ty, flexibility, and reliability have made the Black Brant family of
rockets some of the most popular sounding rockets in history.
As iconic as the Black Brant VC is however, it is also a
nearly ideal target for the entry-level scale modeler. As a solid
propellant, aerodynamically stabilized, sounding rocket, there
is no need for large nose weights or clear plastic ("cheater")
fins to make a model stable. Moreover, the surface details are
all fairly simple (in fact, many Black Brant flights used exclu-
sively internal antennas). Taken together, it is a perfect model
for those with an interest in scale modeling, but only minimal
experience.
This kit has been designed to allow for the creation of a
reasonably detailed sport-scale model straight out of the pack-
age. Nevertheless, the kit is an excellent canvas for additional
details, should the builder desire to add them. With balsa
wood fins and cardstock details, the rocket is built entirely of
materials that any rocket builder will have experience with and
the assembly techniques – while requiring care and patience
– are techniques that are used in lower skill level models. The
Black Brant VC is a perfect start to any exploration of scale
modeling. And with its reasonably small scale of 1:15 (or,
more precisely, 1:14.66), it flies exceptionally well on a wide
variety of readily available 18mm motors, so it is an economi-
cal rocket as well.
Kit #05061
Skill Level 4
Black Brant
Black Brant VC Parts List
Item # Item Name
10068 AT-18/2.75"
10091 AT-24/3.75"
10110 AT-29/13"
10254 AT-29/3.75"
13008 AC-29
13029 CR-13/18
13031 CR-18/24
13035 CR-24/29
13051 1/8" Launch Lug 1"
15726 Black Brant VC Jig and Detail Parts Cardstock
15727 Black Brant VC 3/32"x3" Balsa Fin Sheet
19114 PNC-29A
24043 Regular "D" Crimped Engine Hook
29124 12" Parachute Packs for Kits
29519 100# Kevlar* x 6 feet
31258 Black Brant VC Instruction Sheet A
31259 Black Brant VC Instruction Sheet B
31260 Black Brant VC Instruction Sheet C
31261 Black Brant VC Instruction Sheet D
39055 Black Brant VC Face Card
41111 Black Brant VC Waterslide Decals Sheet
Needed Tools and Materials
… Pencil
… Ruler
… Hobby Knife with Sharp Blades
… Scissors
… Thin CyA Adhesive
… Medium CyA Adhesive
… Wood Glue
… Aluminum Angle Extrusion
… Masking Tape or Cellophane Tape
… Wood Filler or Modeling Filler
… Sandpaper - 180 or 220 grit, 320 or 400 grit
… Sanding Block (e.g. Sanding Tee - Item # 02100)
… Pin or Needle
Optional Tools / Finishing Supplies
… Paper Towels
… Painter's Tape or Masking Tape
… Sandpaper: 400 grit
… Paint Supplies: Spray Paint, Brushes, etc.
… Bowl of Water with a little Dishwashing Soap
… Tweezers
… Cotton Swabs
… Sweing Needle or Short Section of Fine Music Wire
Manufactured in the USA by:
Apogee Components Inc.
Colorado Springs, Colorado, USA
www.ApogeeRockets.com
Made In USA
VC
Qty
1
1
1
1
1
1
3
2
1
1
1
1
1
1
1
1
1
1
1
1
1
Page 1
Advertisement

Related Manuals for Apogee Black Brant VC


Summary of Contents for Apogee Black Brant VC
- Page 1 … Pencil … Ruler As iconic as the Black Brant VC is however, it is also a … Hobby Knife with Sharp Blades nearly ideal target for the entry-level scale modeler. As a solid …...
- Page 2 18mm tube, in front of the ring just installed. Inner Motor Band Strip Outer Motor Band Strip Sand Wedge to THIS SECTION Forward Edge NOT SHAPED Sand Wedge to Aft Edge Page 2 Black Brant VC Marking Guide...
- Page 3 … 5. Pass the shock cord through the second Step 5 notched ring. Using wood glue, place a ring of glue around the outer forward edge of the tube and slide the second ring over the tube, flush with the end of the motor mount tube.
- Page 4 … 10. Slide one of the larger green CR-24/29 rings Step 10 onto the front of the 24mm tube, then apply wood glue forward of the marked line at the 1-9/16” (40mm) location. Slide the ring into place so that it is just forward of the 1-9/16”...
- Page 5 Steps 18 through 25 are optional. They are provided to achieve a more scale look, but not required for the Black Brant VC to fly. These optional steps use more advanced finishing techniques. Proceed to step 26 if you wish to continue the build without completing the optional steps.
- Page 6 … 20. Carefully sand from the edge of the tape for- Step 20 ward to the centerline at the front of the fin using Sand Here progressively finer sandpaper either against a flat surface or with a sanding block. Begin with 180 - 220 grit paper to approach the appropriate wedge shape, then finish sharpening the wedge with a 320 - 400 grit sandpaper.
- Page 7 … 25. Apply wood filler to the fins and once it has Step 25 dried, sand the fins smooth with a fine grit sandpa- per to reduce visible wood grain. … 26. Cut out eight of each of the main fin detail Step 26 pieces - parts marked “A”...
- Page 8 … 30. Apply thin CyA adhesive to the upper edges of Step 30 the cardstock details. Allow the CyA adhesive to harden. Then gently sand down the surface of the details using a fine grit sandpaper to smooth all the edges. Step 31 Canards: …...
- Page 9 … 35. Cut out four of the “E” parts (six are provided) Step 35 and two of the “F” parts (three are provided) from the cardstock detail sheet. Carefully sand any tabs off of the parts with fine grit sandpaper. …...
-
Page 10: Final Assembly
… 40. Holding the rail guide by impaling it on the end Step 40 of a pin, saturate the entire rail guides with thin CyA adhesive to harden the surface. Set the rail guides aside to allow the adhesive to set com- pletely prior to attempting to remove them from the needle. - Page 11 … 45. Using a sharp hobby knife or a pair of scissors, Step 45 Start Wrapping cut the motor band pieces out of the instructions. at Fin Line Spread a small amount of wood glue on the back (the side opposite the dotted lines) of the wider piece and align one end with a fin line, placing the 3/4”...
- Page 12 … 50. Slide the canard alignment guide onto the front Step 50 of the body tube to a position approximately 1/2” (13mm) in front of the front canard position marks, and align the slots with the lines. Apply wood glue to the bottom of each canard and slide into place from the back, aligning the aft edge of the canard with the position mark.
-
Page 13: Recovery System
The process described here is for a rough approximation of the standard Black Brant VC paint scheme with black, silver, and gray over the majority of the rocket; it does not represent a particular prototype. While the overall process would remain similar for specific prototypes, additional steps may be required depending upon the complexity of masking required. - Page 14 Silver strip on edge of step masking. Included here is a schematic for a rather general Black Brant VC paint scheme which may not represent a specific prototype. … 61. Using a fine-point paint brush, apply any paint...
- Page 15 Rows of Bolts at Base of Flange … 67. Congratulations! Your Black Brant VC is now complete and ready for flight! Suggested Motors Est. Altitude Motor...
- Page 16 Countdown and Launch Procedure The Black Brant VC flies well on a variety of 18mm motors to a wide variety of altitudes. Choose a motor that is appropriate for the available field and winds. The area around the launch pad should be free from dry grass and other fire hazards, and the pad should be as far from trees, powerlines and low-flying planes as possible.
Need help?
Do you have a question about the Black Brant VC and is the answer not in the manual?
Questions and answers