Advertisement
Quick Links
Skill Level 4
Slightly Challenging
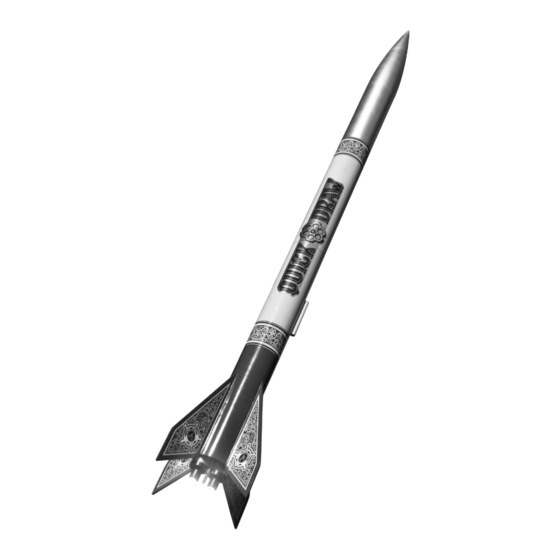
If you've been looking for the ultimate mid-power
cluster rocket, look no further. Using our BT-80 Quick-
Change Motor Mount System, the Quick Draw allows
you to switch between multiple motor mount options
for flights on one, two, three, or four 24mm motors and
one or two 29mm motors (some mount options sold
separately). For a majestic flight, load up the 4x24mm
mount (sold separately) and fly on four long-burn
motors (such as the Apogee E6, which will take the
rocket over 3300') or just install the 1x29mm mount
(included) and punch a hole in the sky with a snappy
flight to 2000' altitude on an Aerotech G40. The Quick
Draw brings rapid flexibility of motor options to you
with a rocket that is an impressive flier, a quick build,
and easy to work on.
Instructions P/N 31248
Visit us online at:
www.ApogeeRockets.com
Kit #05058
Skill Level 4
Quick Draw Parts List
Item # Item Name
10091 AT-24/3.75"
10197 AT-66/18" (BT-80)
10254 AT-29/3.75" LC
12381 CBD-66 1/8" Plywood (single) LC
12704 BT-80 Quick-Change Fixed Mount Sheet
12705 BT-80 Quick-Change Fixed Mount
Installation Jig Sheet (cardstock)
12710 BT-80 Quick-Change 1x29mm MMT Sheet
12712
BT-80 Quick-Change 3x24mm MMT Sheet
13044
Coupler AC-66 (BT-80) single
13056 1/4" Launch Lug 3" Long (single)
13080 #8-32 Nut ZP
13085
#8-32 x 4" Full Thread Stud LCS ZP All Thread
14000
#8 Flat Washer ZP
15723
Quick Draw Fin Sheet
19480
PNC-66mm (BT-80)
24044
Crimped "E-size" Engine Hook - single
29101 Apogee 32"/24" Plastic Parachute Pack
29520
300# Kevlar x 8 Feet
29524
300# Kevlar x 4.5 Feet
31248 Quick Draw Instruction - Sheet A
31249
Quick Draw Instruction - Sheet B
31250 Quick Draw Instruction - Sheet C
39051
Quick Draw Face Card
41105
Quick Draw Decal White
41106
Quick Draw Decal Silver
Required Tools
… Pencil
… Ruler
… Hobby Knife with Sharp Blades
… Flat Needle File
… Scissors
… Wood Glue
… Aluminum Angle Extrusion
… Sandpaper: 220 grit, 320 grit and Sanding Block
(e.g. Sanding Tee - Item # 02100)
… Dowel at least 12" long
… Q-tips (cotton swabs)
Optional Tools / Materials / Finishing Supplies
… Fin Alignment Guide
(e.g. 66mm 4-Fin Alignment Guide Apogee Item # 35701)
… Thin CyA Adhesive (Super Glue)
… Paper Towels
… Painter's Tape or Masking Tape
… Fine Sandpaper
… Paint Supplies: Spray Paint, Brushes, etc
… Bowl of water with a little dishwashing soap
Apogee Components Inc.
Colorado Springs, Colorado, USA
Made In USA
Manufactured in the USA by:
Qty
3
2
1
1
1
1
1
1
1
1
1
1
1
1
1
3
1
1
1
1
1
1
1
2
1
Page 1
Advertisement

Related Manuals for Apogee QUICK DRAW


Summary of Contents for Apogee QUICK DRAW
- Page 1 For a majestic flight, load up the 4x24mm mount (sold separately) and fly on four long-burn Optional Tools / Materials / Finishing Supplies motors (such as the Apogee E6, which will take the … Fin Alignment Guide (e.g. 66mm 4-Fin Alignment Guide Apogee Item # 35701) rocket over 3300’) or just install the 1x29mm mount...
-
Page 2: Assembly Steps
18" BT-80 tubes, taping into place. Mark the lo- cations of the fins and launch lug. Using an aluminum angle for alignment, extend the launch lug line the Quick Draw Quick Draw entire length of the tube and the four fin lines at least... - Page 3 … 8. Remove the parts of the fixed mount installation jig from the cardstock sheet (P/N 12705) with a sharp hobby knife. Step 8 … 9. Assemble the three frame pieces by inserting the tabs into the slots. Do not glue yet. Step 9 …...
- Page 4 Fin Can Assembly Step 16 … 16. Remove the fins from the fin sheet (P/N 15723) with a sharp hobby knife. … 17. Using a sanding block such as the Sanding Tee (P/N 02100), sand the surface and edges of the fins to remove any roughness and to prepare for final finishing.
- Page 5 … 23. Mark the midpoint of the coupler (2” or 50 mm from 2" Step 23 50mm either end). Glue the bulkhead into the coupler with the loop facing out 1/8” (3 mm) inside the coupler tube to leave space for fillets. 1/8"...
- Page 6 Step 32 rough sections of the surface. Spray a coat of primer over the entire rocket. When painting the Quick Draw, take care to avoid getting paint in the rear of the rocket to avoid fit problems with removable mounts. Sand the primer entirely before applying color coats.
- Page 7 … 1-2. Using a section of aluminum angle or a door frame 5/8" Step 1-2 16mm to ensure alignment, draw a line along the length of the motor mount tube and mark 5/8” (16mm) from the aft (hardened) end of the tube. Once marked, sand the inner edge of the tube (if hardened in step 1) to ensure easy motor installation.
- Page 8 … 1-9. Tie a loop in one end of one of the 23" (580 mm) Step 1-9 shock cords, securing the tail with masking tape. Tie the opposite end of the shock cord using a sliding knot, slide over the front (not hardened) end of the motor mount tube and tighten.
- Page 9 … 2-3. If the tubes were hardened, check the fit of a motor Step 2-3 into the end of the motor tubes. Sand lightly if there is Tape resistance to inserting the motor. Using a sharp hobby knife, cut a slot at the 1/8" (3mm) mark made in the previ- ous step.
- Page 10 Motor Type turer Loaded Estes 2 x E16-4 Single Use 1186 *Quick Draw Suggested Motor Charts *Quick Draw Suggested Motor Charts Cesaroni 2 x F36SS-8 Reloadable 1601 1x29mm Motor Mount: 1x29mm Motor Mount:...
- Page 11 Insert motor Rotate clockwise mount into rocket the Quick Draw and rotate the mount until it drops into the to latch in place slots in the fixed mount. Holding the rocket vertical here can be helpful to allow the shock cord to pass through the fixed mount.
- Page 12 Countdown and Launch Procedure The Quick Draw is a large rocket and needs to be flown on a fairly large field. The first flights should be done in light winds so that the flight characteristics can be learned. Additionally, it is ideal to simulate a Quick Draw flight if unusual motor combinations are used to check both stability and ejection charge timing.
Need help?
Do you have a question about the QUICK DRAW and is the answer not in the manual?
Questions and answers