
Related Manuals for Elko EKO09765


Summary of Contents for Elko EKO09765
- Page 1 ELKO – Smart Radiator Thermostat Device User Guide Commissioning instructions for the ELKO Smart system, devices and app. 03/2023 www.elko.no...
- Page 2 Legal Information The ELKO brand and any trademarks of ELKO AS and its subsidiaries referred to in this guide are the property of ELKO AS or its subsidiaries. All other brands may be trademarks of their respective owners. This guide and its content are protected under applicable copyright laws and furnished for informational use only.
-
Page 3: Table Of Contents
Table of Contents Safety information ..................4 Smart Radiator Thermostat ...............5 For your safety ..................5 About the device..................6 Installing the device ..................6 Pairing the device ..................7 Pairing device manually.................7 Pairing device with auto scan..............9 Configuring the device ................10 Changing the device icon ..............10 Renaming the device ................ -
Page 4: Safety Information
Safety information Safety information Important information Read these instructions carefully and look at the equipment to become familiar with the device before trying to install, operate, service, or maintain it. The following special messages may appear throughout this manual or on the equipment to warn of potential hazards or to call attention to information that clarifies or simplifies a procedure. -
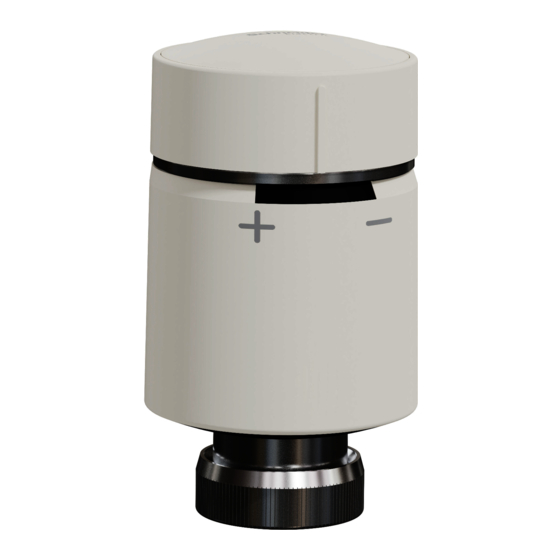
Page 5: Smart Radiator Thermostat
Smart Radiator Thermostat Smart Radiator Thermostat EKO09765 For your safety NOTICE RISK OF DAMAGE TO DEVICE • Make sure that the O-ring is seated firmly on the thread. • The ring nut should be tightened by hand, do not use any tools. Do not tighten too hard. -
Page 6: About The Device
The target temperature and the switching times are set in the ELKO Smart app. Personalize your home heating by adding a Thermostat to your ELKO Smart system. This provides an effortless control to set different schedules and temperatures in different rooms, and upgrading to room-to-room heating control could save energy usage. -
Page 7: Pairing The Device
Smart Radiator Thermostat Pairing the device Using the ELKO Smart app, pair your device with the ELKO SmartHub to access and control the device. You can either add the device manually or do an auto-scan to pair it. Pairing device manually To pair the device manually: NOTE: Remember to insert the batteries to power On the device. - Page 8 How to pair device 1. Power on the device. 8. After a few seconds, a solid green LED indicates that the device is successfully paired to the ELKO SmartHUB. 9. After the device is added in the app, tap Done. NOTE: •...
-
Page 9: Pairing Device With Auto Scan
3. If you have multiple hubs, do Step 4 or proceed to Step 5. 4. Tap Select hub and select the ELKO SmartHub from the slide-up menu. 5. Turn and hold the cap in the “+” direction for a few seconds. -
Page 10: Configuring The Device
Configuring the device Changing the device icon You can change the device icon using the ELKO Smart app. 1. On the Home page, select the device for which you wish to change the icon. 2. At the top-right corner of the screen, tap 3. -
Page 11: Renaming The Device
Name Save Changing the device location You can change the device location using the ELKO Smart app. 1. On the Home page, select the device for which you wish to change the location. 2. At the top-right corner of the screen, tap 3. -
Page 12: Removing The Device
Smart Radiator Thermostat Removing the device Using the ELKO Smart app, you can remove a device from the device list. To remove a device: NOTE: You can only remove the device by accessing each Thermostat control page. 1. On the Home page, tap All devices > iTRV. -
Page 13: Using The Device
Smart Radiator Thermostat Using the device When a Thermostat is commissioned and assigned to a room, a group is automatically created with all the Thermostats from the same room. This group is called as Radiator Thermostats in the home page. This grouping is to save heating costs and to avoid Thermostats working against each other in a room. -
Page 14: Individual Thermostat Visibility In Home Page
Smart Radiator Thermostat iTRV Please ensure that the iTRV is assigned to a room before using it Individual thermostat visibility in home page The individual Thermostats will not appear on the home page by default. Using the app, you can change the default settings to adjust the visibility according to your preferences. -
Page 15: Setting The Room Temperature Using App
Smart Radiator Thermostat Setting the room temperature using app By using the ELKO Smart app, the room temperature can be increased/ decreased. NOTE: You can only adjust the room temperature through the control panel of the group Thermostat. 1. On the Home page, tap All devices > Radiator Thermostat. - Page 16 Smart Radiator Thermostat DUG_ITRV_ELKO-00...
-
Page 17: Using The Boost Mode
Smart Radiator Thermostat When the current temperature is higher than setpoint When the current temperature value is equal to or higher than the setpoint, the flame icon on the control panel page will be displayed in grey state (A). Radiator Thermostats When the setpoint is higher than current temperature When the setpoint (max 30 °C) is higher than the current temperature value, the flame icon on the control panel page will be displayed in highlighted state (A). - Page 18 Smart Radiator Thermostat 4. To turn off the boost mode manually, go back to the control panel page and 5. In the slide-up menu, tap Off (B) and tap Confirm. NOTE: The Boost mode will be cancelled and turned off if you change the setpoint below the current temperature using the app's sliding bar or manually adjust the setpoint on the device.
-
Page 19: Checking The Device History
Smart Radiator Thermostat Checking the device history Using the ELKO Smart app, you can monitor the temperature changes by accessing the device history. To see the device history of the group Thermostats: 1. On the Home page, tap All devices > Radiator Thermostats. -
Page 20: Creating A Schedule
Smart Radiator Thermostat Creating a Schedule The heating system is fully controlled and triggered by your schedule. Once the schedule is set, your system will follow the active schedule. You can create or modify the schedules at any time. To create a schedule: 1. -
Page 21: Creating A Moment
3. Tap the toggle switch (A) to turn on the Child Lock settings. Creating a moment Moment allows you to group multiple actions that are usually done together. Using the ELKO Smart app, you can create moments based on your needs. To create a moment: 1. On the Home page, tap 2. - Page 22 Smart Radiator Thermostat 5. In the Add task menu, you can do either or all of the following actions (C): – Run the device - Select the devices that you want in a moment. – Select Automation - Select the automation that you want to enable or disable.
-
Page 23: Creating An Automation
Creating an automation Automation allows you to group multiple actions that are usually done together, triggered automatically or at scheduled times. Using the ELKO Smart app, you can create automations based on your needs. To create an automation: 1. On the Home page, tap the 2. - Page 24 Smart Radiator Thermostat 5. Tap Add Condition to open the slide-up menu. 6. In the Add Condition menu, you can do either or all of the following options (C): – When weather changes - Select the various weather settings. – Schedule - Set the time and day. –...
- Page 25 Smart Radiator Thermostat 9. In the Add task menu, you can do either or all of the following options (F): – Run the device - Select the devices that you want to be triggered. – Moment or Automation - Select the moment which you want to trigger or select the automation that you want to enable or disable.
- Page 26 Smart Radiator Thermostat 3. Tap Add Condition > When weather changes > Outdoor Temperature. 4. Select the outdoor temperature value (A), the condition (B) and tap Next. TIP: You can set the outdoor temperature value as 0 °C and the condition as <...
-
Page 27: Replacing The Batteries
Smart Radiator Thermostat 1. On the Automation tab, locate the automation that you want to delete and then tap 2. Tap Delete and tap Ok. NOTE: After deleting an automation, the device action can no longer be triggered. Replacing the batteries Replace the batteries when the battery is low or critically low. -
Page 28: Troubleshooting
Fast flash for 5 seconds (Repeated) direction to start a boost Solid with fade-out after 2 seconds. NOTE: In this event, the thermostat has not joined the ELKO Smart system and must either join the SmartHUB or be re-installed. Troubleshooting... -
Page 29: Technical Data
Smart Radiator Thermostat Technical data Power supply 2x 1.5 V IEC LR6 (AA) alkaline batteries Without power supply Connection data are retained Temperature setting range 5 °C to 30 °C Temperature resolution 0.5 °C Control accuracy < 0.8 °C at 4 °C/h Surface temperature at place of installation max. - Page 30 Trademarks This guide makes reference to system and brand names that are trademarks of their relevant owners. • Zigbee ® is a registered trademark of the Connectivity Standards Alliance. • Apple ® and App Store ® are brand names or registered trademarks of Apple Inc. •...
- Page 32 ELKO AS Sandstuveien 68, 0680 Oslo Pb 6598 Etterstad, 0607 Oslo Norge + 47 67 79 39 00 support@elko.no www.elko.no As standards, specifications, and design change from time to time, please ask for confirmation of the information given in this publication.
Need help?
Do you have a question about the EKO09765 and is the answer not in the manual?
Questions and answers