Table of Contents
Advertisement
Quick Links
GARMENT STEAMER
5000 SERIES
USER MANUAL
MY-GD20D2W
Warning notices: Before using this product, please read this manual carefully and keep it for future reference.
The design and specifications are subject to change without prior notice for product improvement.
Consult with your dealer or manufacturer for details.
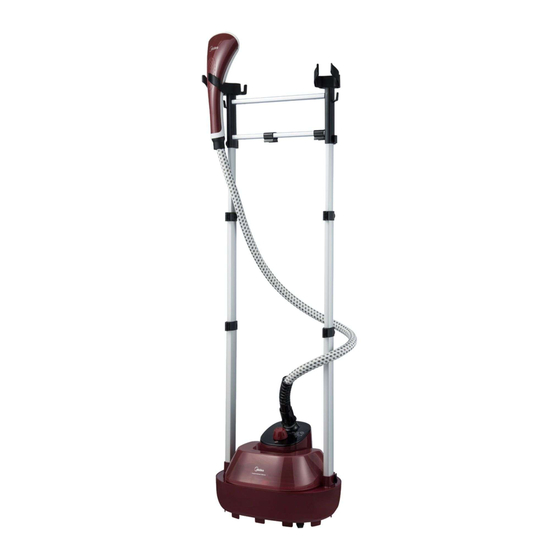
The diagram above is just for reference. Please take the appearance of the actual product as the standard.
Advertisement
Table of Contents

Related Manuals for Midea 5000 Series


Summary of Contents for Midea 5000 Series
- Page 1 GARMENT STEAMER 5000 SERIES USER MANUAL MY-GD20D2W Warning notices: Before using this product, please read this manual carefully and keep it for future reference. The design and specifications are subject to change without prior notice for product improvement. Consult with your dealer or manufacturer for details.
-
Page 2: Table Of Contents
THANK YOU LETTER Thank you for choosing Midea! Before using your new Midea product, please read this manual thoroughly to ensure that you know how to operate the features and functions that your new appliance offers in a safe way. -
Page 3: Safety Instructions
SAFETY INSTRUCTIONS Intended Use The following safety guidelines are intended to prevent unforeseen risks or damage from unsafe or incorrect operation of the appliance. Please check the packaging and appliance on arrival to make sure everything is intact to ensure safe operation. If you find any damage, please contact the retailer or dealer. - Page 4 Before use, please read the Safety Cautions completely, and use the appliance in accordance with the requirements to avoid any damage to persons or properties. Caution To prevent the hose from forming a U-shape,always ● place the steamer on the floor to ensure that the hose is straight.
- Page 5 Warning Never use this appliance for any purpose other than ● ironing clothes. Never use other high-power electric applia nce on the ● same socket to avoid overload of circuits. Never dismantle this appliance on your own. Any person ● other than qualified personnel shall not dismantle and repair the appliance, and otherwise it may cause fire, electric shock or personal injury.
- Page 6 When the garment steamer is operating, prevent the ● danger arising from steam splashing, do not have its spray nozzle towards people to avoid scald. When the garment steamer is operating, its spray nozzle, ● air duct and air duct joint will become very hot. Therefore, never touch them to avoid scald.
- Page 7 if they have been given supervision or instruction concerning use of the appliance in a safe way and understand the hazards involved. Children shall not play with the appliance. Cleaning and user maintenance shall not be made by children without supervision. The appliance must not be disposed of with regular ●...
-
Page 8: Specifications
SPECIFICATIONS Product Model MY-GD20D2W Voltage 220-240V~ Frequency 50/60Hz Power 2000W Water tank capacity 2.0L Weight 7.0kg Dimensions 358X293X1600mm Circuit Diagram Display panel Input power Wiring 220-240V~ 50/60Hz Power board Thermal fuse Heating body Temperature controller... -
Page 9: Product Overview
PRODUCT OVERVIEW Part Name Ironing head Shelf Cothes hook Clothes rail Clamping piece assembly Windpipe Hanging ironing board Locking spanner Support rod Windpipe fastener Control panel Water tank Part List Discharge plug Seam clamp Brush Ironing board Glove (The schematic above is for reference only, and the actual product shall be based.) Warm Tips It is recommended to use purified water or filtered water, which makes the Garment Steamer more durable. -
Page 10: Product Installation
PRODUCT INSTALLATION Installation Of Support Rod 1 Install each part in sequence according to the figure. Release the lock button, insert the support rod into the mainframe, and lock each spanner. 2 Collapsible adjusting height. Insert Insert Installation Of Windpipe 1 Align the boss of windpipe fastener with the “... - Page 11 Installation Of Hanging Ironing Board 1 Schematic diagram of front installation. Align the fa stener with the first and second support rods and set at positions. 2 Schematic diagram of top installation. Shorten the supporting rod to suitable height. Revolve the hok of hanging ironing board to the side position. Put the hanging ironing board flat on the top of Clothes rail assembly,put the fixed column in the middle of hanging ironing board into the right hole,and fixed.
-
Page 12: Operation Instructions
OPERATION INSTRUCTIONS Preparations 1 Hang up the clothes. 2 Fill the water tank. 3 Put the tank back, and start the machine. - Page 13 Key Control 1 Start Press the “Power” key to start the machine. 2 Functions Press in the “Function” key to select the appropriate gear. Power Functions Power Functions General Application Wear gloves or glove Hanging ironing board boards to prevent from can be used as an bein scalded.
- Page 14 NOTE Do not iron one place for a long time, so as not to damage the clothes. Clothing can be ironing horizontally Ironing Of Trousers In case of requirements from clients for trousers axis, use the seam clamp foraid. Fix the trousers axis by setting the seam clamp, pres s the spanner, and iron from the top downwards.
- Page 15 Installation Of Brush Snap the brush top end on the upper edge of iron head, and fasten the brush when the iron head is aligned with the boss of brush lower edge. Dismantle in reverse after use. Installed dismantled Installation Of Seam Clamp Snap the clamp top end on the upper edge of iron head, with lower boss snapped below.
-
Page 16: Cleaning And Maintenance
CLEANING AND MAINTENANCE 1. Press the "On/Off" buttom to close the garment steamer. 2. Disconnect the power plug. 3. After cooling the product for 30 minutes, open the water tank cover, lift and tilt the product, and pour out the water inside the product from the water tank cover. 4. -
Page 17: Troubleshooting 1
TROUBLESHOOTING Operation of your appliance can lead to errors and malfunctions. The following tables contain possible causes and notes for resolving an error message or malfunction. It is recommended to read the table below carefully in order to save your time and money that may cost for calling to the service center. -
Page 18: Trademarks, Copyrights And Legal Statement
Midea may constitute trademark infringement or unfair competition in violation of relevant laws. This manual is created by Midea and Midea reserves all copyrights thereof. No entity or individual may use, duplicate, modify, distribute in whole or in part this manual, or bundle or sell with other products without the prior written consent of Midea. -
Page 19: Data Protection Notice
European Economic Area. Further information are provided on request. You can contact our Data Protection Officer via MideaDPO@midea.com. To exercise your rights such as right to object your personal date being processed for direct marketing purposes, please contact us via...
Need help?
Do you have a question about the 5000 Series and is the answer not in the manual?
Questions and answers