
Subscribe to Our Youtube Channel
Related Manuals for Stanley FATMAX FMXGN4200021


Summary of Contents for Stanley FATMAX FMXGN4200021
- Page 1 2000W INVERTER GENERATOR OWNERS OPERATING MANUAL For service, spare parts or product information, please contact Smart Marketing Group Pty. Ltd. AUST. 1300 660 457 N.Z. 0800 474 876 www.stanleyproducts.com.au FMXGN4200021 04395 05/22...
- Page 2 CONTENTS TECHNICAL INFORMATION Section Page Specifications Inverter Generator FMXGN4200021 Specification Engine type Single cylinder, 4 stroke 79.8cc Suggested Applications Rated engine speed 4800r/min Introduction Oil tank capacity 400ml Warranty Statement 4 Stroke fully synthetic motor oil, Oil type SAE 15W-40 (API SN Category) General Safety Instructions 5 - 6 Fuel tank capacity...
- Page 3 INTRODUCTION WHAT IS COVERED • Manufacturing fault or defect. Dear Customer, HOW TO CLAIM UNDER THIS WARRANTY Thank you for purchasing this generator which has passed through our extensive quality assurance processes. Every • Call customer service, phone number to the left. care has been taken to ensure that it reaches you in perfect •...
- Page 4 Products presented for repair may be replaced by refurbished This STANLEY Fatmax product is eligible for a products of the same type rather than being repaired. 3 Year Limited Trade Warranty* Refurbished parts may be used to repair the products.
- Page 5 LUBRICATION OF ENGINE PROTECT POWER LEADS FROM DAMAGE Your engine comes with NO oil in the sump. You will need to Always disconnect power cords from a power supply socket by add engine oil, refer to pages 8 and 10 for complete details and pulling the plug.
- Page 6 EXTENSION CORDS & REELS EAR PROTECTION The use of ear protection is highly recommended when using Inspect extension cords periodically and replace if damaged. generators. The continual noise may damage your ears. Never use damaged extension cord as these may cause injury. Always unwind any extension cords fully before plugging RESPIRATORY PROTECTION into mains power supply.
- Page 7 SPECIFIC SAFETY INSTRUCTIONS • Your generator is factory set, NEVER attempt to speed it up WARNING! Do not use the generator in areas where as this could endanger the user and damage the generator there is a risk of explosion or fire from combustible and/or attached appliances.
- Page 8 IMPORTANT ELECTRICAL DATA This generator is fitted with a sealed electrical connection socket that is compatible with the generator. If the electrical connection socket becomes damaged it must be replaced with a complete assembly that is identical to the original, and this must be replaced by an authorised service agent.
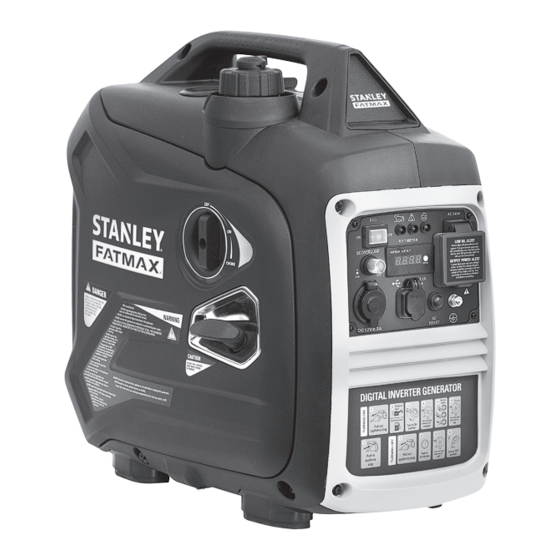
- Page 9 PIC. 1 1, 3 & 2 COMPONENTS & CONTROLS (PIC.1) Earth bolt point for earth lead 1. Low oil level indicator (yellow): this light is off when the Single 5V DC USB socket engine is off or when in normal operation with adequate oil. Single 240V AC socket A.
- Page 10 OPERATING INSTRUCTIONS PIC. 2 UNPACKING Carefully unpack your generator. This generator is heavy (21kg) and may require two (2) people to lift. Dispose of all packing material in an environmentally responsible manner. Open carton, gently lift the generator clear of the carton and packaging, this may require 2 people.
- Page 11 FILLING THE FUEL TANK PIC. 5 UNLEADED 91 PETROL - NO ETHANOL Always use clean fresh fuel as specified on page 8. Stale fuel can cause the generator to run rough and damage the motor; this will not be covered by warranty. DO NOT FILL ABOVE THIS LINE Ensure the engine is OFF.
- Page 12 STARTING YOUR GENERATOR PIC. 9 WARNING! Never start your generator without “earth” stake attached or with electrical appliances or power leads attached. 1. Ensure the ”Earth” stake and wire are attached, Pic. 6. 2. Turn the fuel cap breather lever clockwise to ON. NOTE: If fuel cap breather is not on generator will not operate correctly.
- Page 13 STOPPING YOUR GENERATOR PIC. 12 WARNING! Never stop your generator with electrical appliances or power leads attached. Always remove power leads and appliances before stopping your generator. WARNING! In case of emergency, the easiest way to stop the generator is to directly rotate START switch to OFF position.
- Page 14 USING YOUR GENERATOR PIC. 14 AC OUTLET Your generator is equipped with a 240V AC power socket. This will run a range of devices providing they are within the limits of the generators output. NOTE: The peak (surge) power requirements of some devices e.g.
- Page 15 SAFETY DEVICES PIC. 15 AC OUTLET Your generator is equipped with a green output indicator (RUN) light, Pic. 15. When this light goes out and the red light glows, then the generator will produce NO POWER. To restart the power supply; 1.
- Page 16 STORAGE PIC. 18 If the generator is not to be used or is to be stored for more than one month the following storage procedure should be carried out. Drain all the fuel from the fuel tank (refer to page 19) and the carburettor (see below), ensure that all the fuel has been drained.
- Page 17 MAINTENANCE CHART Item Remark Pre-operation Initial 1 month or Every 3 month or Every 6 month or Every 12 month or check (daily) 6 hours 12 hours 24 hours 48 hours Check condition Spark plug Adjust gap and clean Replace if required Check oil level Engine oil Replace...
- Page 18 MAINTENANCE PIC. 19 CHECKING/CLEANING THE AIR FILTER For proper performance and long life, keep air filters clean. 1. Remove access panel, refer page 10. 2. Un-clip the air filter cover, Pic. 19. 3. Remove the foam air filter (Pic. 20). 4.
- Page 19 CLEANING THE EXHAUST PORT & MUFFLER Depending on the type of fuel used, the type and amount of oil used, and/or your operating conditions, the exhaust port and muffler may become blocked with carbon deposits. If you notice a power loss with your petrol-powered tool, you may need to remove these deposits to restore performance.
- Page 20 FAULT CHART ACTION No oil/ Low oil level Fill sump with correct oil, See page 8 Loose spark plug Tighten plug Insufficient Loose cylinder Tighten bolt compression head bolt Damaged gasket Replace gasket FUEL SYSTEM PROBLEMS Insufficient pulling Pull recoil quickly speed for starting Foreign matter in Clean tank...
- Page 21 FAULT CHART CONTINUED ACTION Tripped circuit breaker Reset, refer page 15 Poor connection or faulty lead Check and replace Indicator light ON. No AC output Broken recepticle Faulty circuit breaker Consult Service Agent Indicator light OFF. Generator problem No AC output Output power too Engine RPM set too Consult Service Agent...
- Page 22 SERVICE LOG Purchase Date Place of Purchase This Service is to be complete within 5 hours or 1 months of purchase as This Service is to be complete within 24 hours or well as again within 12 hours or 3 months, which ever comes first. 6 months of purchase, which ever comes first.
- Page 23 NOTES...
- Page 24 For any queries or assistance call Customer Service AUST. 1300 660 457 NZ 0800 474 876 www.stanleyproducts.com.au Hours of operation: Monday to Friday 8.00am - 5.00pm AEST Do not return to place of purchase. Keep your purchase receipt, this will be required to make any claims under the 1 year warranty.
Need help?
Do you have a question about the FATMAX FMXGN4200021 and is the answer not in the manual?
Questions and answers